User Guide
Page 8
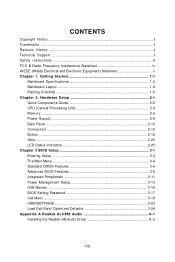
Hardware Setup 2-1 Quick Components Guide 2-2 CPU (Central Processing Unit 2-3 Memory ...2-6 Power Supply ...2-8 Back Panel ...2-10 Connectors ...2-12 Button ...2-19 Slots ...2-20 LED Status Indicators 2-25 Chapter 3 BIOS Setup 3-1 Entering Setup ...3-2 The Main Menu ...3-4 Standard CMOS ...
Hardware Setup 2-1 Quick Components Guide 2-2 CPU (Central Processing Unit 2-3 Memory ...2-6 Power Supply ...2-8 Back Panel ...2-10 Connectors ...2-12 Button ...2-19 Slots ...2-20 LED Status Indicators 2-25 Chapter 3 BIOS Setup 3-1 Entering Setup ...3-2 The Main Menu ...3-4 Standard CMOS ...
User Guide
Page 11
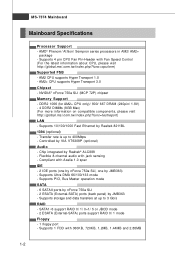
... 2.88MB 1-2 t w / i ndex . ms i. Supports 1 FDD with Fan Speed Control (For the latest information about CPU, please visit ht t p: / / g loba l. NVIDIA® nForce 750a SLI (MCP 72P) chipset Memory Support - t w / i nde x . Supports storage and data transfers at up to 3 Gb/s RAID - AM2 CPU supports Hyper Transport 1.0 - c om. Supports 10/100/1000 Fast Ethernet...
... 2.88MB 1-2 t w / i ndex . ms i. Supports 1 FDD with Fan Speed Control (For the latest information about CPU, please visit ht t p: / / g loba l. NVIDIA® nForce 750a SLI (MCP 72P) chipset Memory Support - t w / i nde x . Supports storage and data transfers at up to 3 Gb/s RAID - AM2 CPU supports Hyper Transport 1.0 - c om. Supports 10/100/1000 Fast Ethernet...
User Guide
Page 20
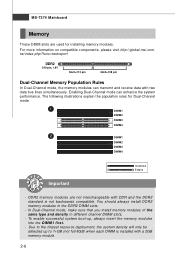
... DIMM4 Installed Empty Important - For more information on compatible components, please visit http://global.msi.com. Enabling Dual-Channel mode can transmit and receive data with a 2GB memory module. 2-6 In Dual-Channel mode, make sure that you install memory modules of the same type and density in the DDR2 DIMM slots. - To enable...
... DIMM4 Installed Empty Important - For more information on compatible components, please visit http://global.msi.com. Enabling Dual-Channel mode can transmit and receive data with a 2GB memory module. 2-6 In Dual-Channel mode, make sure that you install memory modules of the same type and density in the DDR2 DIMM slots. - To enable...
User Guide
Page 21
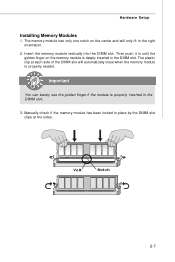
The plastic clip at the sides. Volt Notch 2-7 Insert the memory module vertically into the DIMM slot. Manually check if the memory module has been locked in place by the DIMM slot clips at each side of the DIMM slot will only fit in until the golden ...finger on the center and will automatically close when the memory module is properly seated. Then push it in the right orientation. 2. Important You can barely see the golden finger if the module is deeply inserted...
The plastic clip at the sides. Volt Notch 2-7 Insert the memory module vertically into the DIMM slot. Manually check if the memory module has been locked in place by the DIMM slot clips at each side of the DIMM slot will only fit in until the golden ...finger on the center and will automatically close when the memory module is properly seated. Then push it in the right orientation. 2. Important You can barely see the golden finger if the module is deeply inserted...

User Guide
Page 23
... chipset unable to ESD, so this issue mostly happens while the users intensively swap memory modules under S5 (power-off) states, and the power code is highly recommended .... We recommend you to use the minimum 450 watts power supply to ensure stable operation of SLI technology in figure 2) before the 1st installation or during system upgrade procedure. Make sure that ...all power connectors on the mainboard (shown in the system. Due to several pins are connected to proper ATX power supplies to support the needs of the mainboard. 2. Figure 1: Unplug the AC power cable Figure ...
... chipset unable to ESD, so this issue mostly happens while the users intensively swap memory modules under S5 (power-off) states, and the power code is highly recommended .... We recommend you to use the minimum 450 watts power supply to ensure stable operation of SLI technology in figure 2) before the 1st installation or during system upgrade procedure. Make sure that ...all power connectors on the mainboard (shown in the system. Due to several pins are connected to proper ATX power supplies to support the needs of the mainboard. 2. Figure 1: Unplug the AC power cable Figure ...
User Guide
Page 37
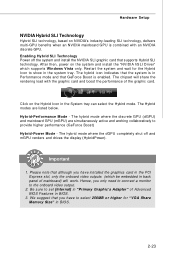
...and drives the display (HybridPower). Click on the Hybrid Icon in the system tray. Hardware Setup NVIDIA Hybrid SLI Technology Hybrid SLI technology, based on NVIDIA's industry-leading SLI technology, delivers multi-GPU benefits when an NVIDIA mainboard GPU is combined with the graphic card and boost the... performance of the graphic card. Restart the system and wait for "VGA Share Memory Size" in BIOS. 3. Please note that you ...
...and drives the display (HybridPower). Click on the Hybrid Icon in the system tray. Hardware Setup NVIDIA Hybrid SLI Technology Hybrid SLI technology, based on NVIDIA's industry-leading SLI technology, delivers multi-GPU benefits when an NVIDIA mainboard GPU is combined with the graphic card and boost the... performance of the graphic card. Restart the system and wait for "VGA Share Memory Size" in BIOS. 3. Please note that you ...
User Guide
Page 40
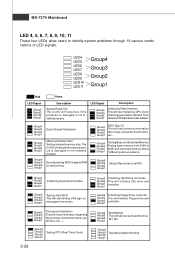
...information about logo, processor brand name, etc... Group4 Group3 Group2 Group1 Early Chipset Initialization Group4 Group3 Group2 Group1 Memory Detection Test Testing onboard memory size. Group4 Group3 Group2 Group1 BIOS Sign On This will set low stack and boot via INT 19h. Group4...Initializing Video Interface This will initialize Floppy Drive and Group2 Group1 controller. Group4 Group3 Group2 Group1 Testing Base and Extended Memory Testing base memory from 240K to all ISA. Group4 Initializing Floppy Drive Controller Group3 This will start writing VGA sign-on message to...
...information about logo, processor brand name, etc... Group4 Group3 Group2 Group1 Early Chipset Initialization Group4 Group3 Group2 Group1 Memory Detection Test Testing onboard memory size. Group4 Group3 Group2 Group1 BIOS Sign On This will set low stack and boot via INT 19h. Group4...Initializing Video Interface This will initialize Floppy Drive and Group2 Group1 controller. Group4 Group3 Group2 Group1 Testing Base and Extended Memory Testing base memory from 240K to all ISA. Group4 Initializing Floppy Drive Controller Group3 This will start writing VGA sign-on message to...
User Guide
Page 42
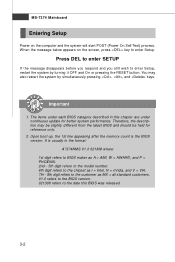
... may also restart the system by turning it OFF and On or pressing the RESET button. Upon boot-up, the 1st line appearing after the memory count is usually in this BIOS was released. 3-2 V1.0 refers to the BIOS version. 021308 refers to enter Setup, restart the system by simultaneously pressing...
... may also restart the system by turning it OFF and On or pressing the RESET button. Upon boot-up, the 1st line appearing after the memory count is usually in this BIOS was released. 3-2 V1.0 refers to the BIOS version. 021308 refers to enter Setup, restart the system by simultaneously pressing...
User Guide
Page 47
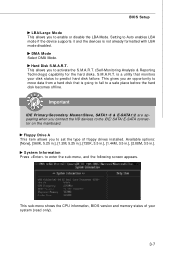
This sub-menu shows the CPU information, BIOS version and memory status of floppy drives installed. This allows you to enter the sub-menu, and the following screen appears. S.M.A.R.T. System Information Press to activate the S.M.A.R.T. (Self-...
This sub-menu shows the CPU information, BIOS version and memory status of floppy drives installed. This allows you to enter the sub-menu, and the following screen appears. S.M.A.R.T. System Information Press to activate the S.M.A.R.T. (Self-...
User Guide
Page 49
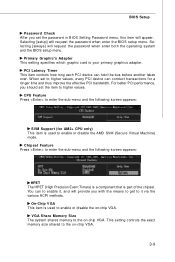
This setting controls the exact memory size shared to the on-chip VGA. Primary Graphic's Adapter This setting specifies which graphic card is your primary graphics adapter. CPU Feature Press to ... appear. PCI Latency Timer This item controls how long each PCI device can to enable it via the various ACPI methods. VGA Share Memory Size The system shares memory to the on-chip VGA. 3-9 On-Chip VGA This item is used to enable or disable the AMD SVM (Secure Virtual Machine) mode...
This setting controls the exact memory size shared to the on-chip VGA. Primary Graphic's Adapter This setting specifies which graphic card is your primary graphics adapter. CPU Feature Press to ... appear. PCI Latency Timer This item controls how long each PCI device can to enable it via the various ACPI methods. VGA Share Memory Size The system shares memory to the on-chip VGA. 3-9 On-Chip VGA This item is used to enable or disable the AMD SVM (Secure Virtual Machine) mode...

User Guide
Page 53
...Standby mode in S1(POS) or S3(STR) fashion through the setting of system configuration and open applications/files is saved to main memory that remains powered while most other hardware components turn off to save energy. ACPI Standby State This item specifies the power saving modes ...) and hardware main- ACPI Function This item is to restore the system when a "wake up" event occurs. 3-13 The information stored in memory will be used to activate the ACPI (Advanced Configuration and Power Management Interface) Function. If your BIOS supports S3 sleep mode. Power Management Setup BIOS...
...Standby mode in S1(POS) or S3(STR) fashion through the setting of system configuration and open applications/files is saved to main memory that remains powered while most other hardware components turn off to save energy. ACPI Standby State This item specifies the power saving modes ...) and hardware main- ACPI Function This item is to restore the system when a "wake up" event occurs. 3-13 The information stored in memory will be used to activate the ACPI (Advanced Configuration and Power Management Interface) Function. If your BIOS supports S3 sleep mode. Power Management Setup BIOS...
User Guide
Page 57
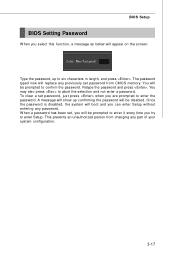
Retype the password and press . This prevents an unauthorized person from CMOS memory. The password typed now will be prompted to enter it every time you try to enter Setup. To clear a set password from changing any password. ...
Retype the password and press . This prevents an unauthorized person from CMOS memory. The password typed now will be prompted to enter it every time you try to enter Setup. To clear a set password from changing any password. ...
User Guide
Page 58
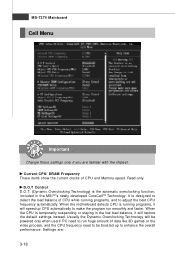
... with the chipset. MS-7374 Mainboard Cell Menu Important Change these settings only if you are : 3-18 W hen the motherboard detects CPU is designed to detect the load balance of CPU and Memory speed. Read-only. It is running programs, and to run smoothly and faster. Usually the Dynamic Overclocking Technology will...
... with the chipset. MS-7374 Mainboard Cell Menu Important Change these settings only if you are : 3-18 W hen the motherboard detects CPU is designed to detect the load balance of CPU and Memory speed. Read-only. It is running programs, and to run smoothly and faster. Usually the Dynamic Overclocking Technology will...
User Guide
Page 60
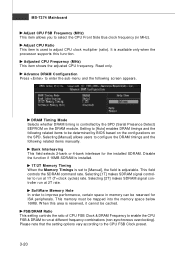
... (M Hz) This item allows you to the CPU FSB Clock preset. 3-20 Disable the function if 16MB SDRAM is installed. 1T/2T Memory Timing W hen the Memory Timings is set to be cached. Please note that the setting options vary according to select the CPU Front Side Bus clock frequency (in... memory can be mapped into the memory space below 16MB. Adjusted CPU Frequency (M Hz) This item shows the adjusted CPU frequency. It is available only when the processor ...
... (M Hz) This item allows you to the CPU FSB Clock preset. 3-20 Disable the function if 16MB SDRAM is installed. 1T/2T Memory Timing W hen the Memory Timings is set to be cached. Please note that the setting options vary according to select the CPU Front Side Bus clock frequency (in... memory can be mapped into the memory space below 16MB. Adjusted CPU Frequency (M Hz) This item shows the adjusted CPU frequency. It is available only when the processor ...
User Guide
Page 61
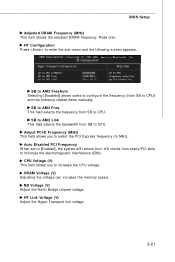
... items manually. SB to AM 2 Freq This field selects the frequency from empty PCI slots to CPU. DRAM Voltage (V) Adjusting the voltage can increase the memory speed. Auto Disabled PCI Frequency W hen set to [Enabled], the system will remove (turn off) clocks from SB to select the PCI Express frequency (in...
... items manually. SB to AM 2 Freq This field selects the frequency from empty PCI slots to CPU. DRAM Voltage (V) Adjusting the voltage can increase the memory speed. Auto Disabled PCI Frequency W hen set to [Enabled], the system will remove (turn off) clocks from SB to select the PCI Express frequency (in...
User Guide
Page 121
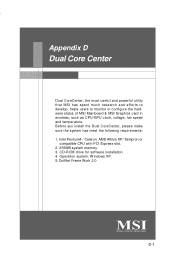
... Core Center Appendix D Dual Core Center Dual CoreCenter, the most useful and powerful utility that MSI has spent much research and efforts to develop, helps users to monitor or configure the hardware status of MSI Mainboard & MSI Graphics card in windows, such as CPU/GPU clock, voltage, fan speed and temperature. Intel Pentium4...
... Core Center Appendix D Dual Core Center Dual CoreCenter, the most useful and powerful utility that MSI has spent much research and efforts to develop, helps users to monitor or configure the hardware status of MSI Mainboard & MSI Graphics card in windows, such as CPU/GPU clock, voltage, fan speed and temperature. Intel Pentium4...
User Guide
Page 123
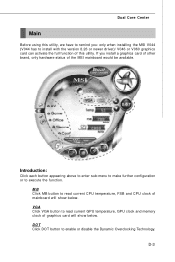
... MB button to read current GPU temperature, GPU clock and memory clock of mainboard will show below . D-3 VGA Click VGA button to read current CPU temperature, FSB and CPU clock of graphics card will show below . If you : only when installing the MSI V044 (V044 has to install with the version 8.26... or newer driver)/ V046 or V060 graphics card can activate the full function of the MSI mainboard would be available. Dual Core Center Main Before using this utility, we have to remind you install a graphics card of other brand, only hardware ...
... MB button to read current GPU temperature, GPU clock and memory clock of mainboard will show below . D-3 VGA Click VGA button to read current CPU temperature, FSB and CPU clock of graphics card will show below . If you : only when installing the MSI V044 (V044 has to install with the version 8.26... or newer driver)/ V046 or V060 graphics card can activate the full function of the MSI mainboard would be available. Dual Core Center Main Before using this utility, we have to remind you install a graphics card of other brand, only hardware ...
User Guide
Page 125
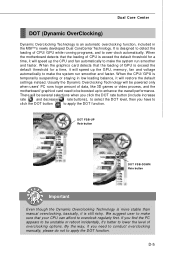
... Overclocking Technology will be boosted up the CPU and fan automatically to enhance the overall performance. When the motherboard detects that your CPU can afford to over-clock automatically. It is exceed the default threshold for a ... speed up to make sure that the loading of data, like 3D games or video process, and the motherboard/ graphicd card need to conduct overclocking manually, please do not to lower the level of CPU/ GPU while...the default threshold for a time, it will speed up the GPU, memory, fan and voltage automatically to apply the DOT function. D-5
... Overclocking Technology will be boosted up the CPU and fan automatically to enhance the overall performance. When the motherboard detects that your CPU can afford to over-clock automatically. It is exceed the default threshold for a ... speed up to make sure that the loading of data, like 3D games or video process, and the motherboard/ graphicd card need to conduct overclocking manually, please do not to lower the level of CPU/ GPU while...the default threshold for a time, it will speed up the GPU, memory, fan and voltage automatically to apply the DOT function. D-5
User Guide
Page 126
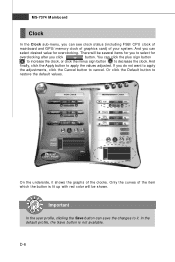
.... D-6 On the underside, it . Important In the user profile, clicking the Save button can see clock status (including FSB/ CPU clock of mainboard and GPU/ memory clock of graphics card) of the clocks. MS-7374 Mainboard Clock In the Clock sub-menu, you can save the changes to it shows the...
.... D-6 On the underside, it . Important In the user profile, clicking the Save button can see clock status (including FSB/ CPU clock of mainboard and GPU/ memory clock of graphics card) of the clocks. MS-7374 Mainboard Clock In the Clock sub-menu, you can save the changes to it shows the...
User Guide
Page 127
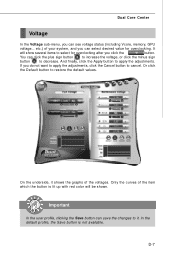
..., and you can save the changes to select for overclocking. Important In the user profile, clicking the Save button can see voltage status (including Vcore, memory, GPU I voltage... etc.) of the item which the button is not available.
..., and you can save the changes to select for overclocking. Important In the user profile, clicking the Save button can see voltage status (including Vcore, memory, GPU I voltage... etc.) of the item which the button is not available.


