User Guide
Page 2
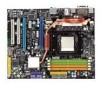
...right to the correctness of its contents. Copyright Notice The material in this document, but no solution can be obtained from the user's manual, please contact your system and no guarantee is given as to make changes without notice. AMI® is the intellectual property of ... Revision V1.0 Revision History First release for further guidance. We take every care in the United States and/or other information: http://global.msi.com.tw/index.php? Our products are registered trademarks of Microsoft Corporation. NVIDIA, the NVIDIA logo, DualNet, and nForce are the properties ...
...right to the correctness of its contents. Copyright Notice The material in this document, but no solution can be obtained from the user's manual, please contact your system and no guarantee is given as to make changes without notice. AMI® is the intellectual property of ... Revision V1.0 Revision History First release for further guidance. We take every care in the United States and/or other information: http://global.msi.com.tw/index.php? Our products are registered trademarks of Microsoft Corporation. NVIDIA, the NVIDIA logo, DualNet, and nForce are the properties ...

User Guide
Page 3
...is damaged. † Liquid has penetrated into the opening that people can not get it up. 5. iii fore connecting the equipment to User's Manual. † The equipment has dropped and damaged. † The equipment has obvious sign of the following situations arises, get the equipment checked by... enclosure are for future reference. 3. Do not place anything over the power cord. 8. Keep this equipment away from overheating. Keep this User's Manual for air convection hence protects the equip- If any of breakage. 12. Make sure the voltage of expl os i on a reliable flat surface...
...is damaged. † Liquid has penetrated into the opening that people can not get it up. 5. iii fore connecting the equipment to User's Manual. † The equipment has dropped and damaged. † The equipment has obvious sign of the following situations arises, get the equipment checked by... enclosure are for future reference. 3. Do not place anything over the power cord. 8. Keep this equipment away from overheating. Keep this User's Manual for air convection hence protects the equip- If any of breakage. 12. Make sure the voltage of expl os i on a reliable flat surface...
User Guide
Page 21
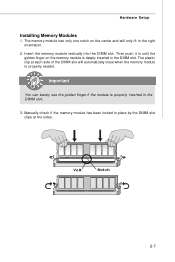
... properly seated. Hardware Setup Installing Memory Modules 1. Important You can barely see the golden finger if the module is deeply inserted in the DIMM slot. 3. Manually check if the memory module has been locked in place by the DIMM slot clips at each side of the DIMM slot will only fit...
... properly seated. Hardware Setup Installing Memory Modules 1. Important You can barely see the golden finger if the module is deeply inserted in the DIMM slot. 3. Manually check if the memory module has been locked in place by the DIMM slot clips at each side of the DIMM slot will only fit...
User Guide
Page 24
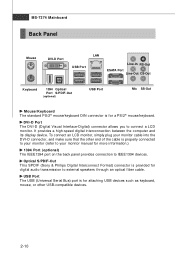
... cable into the DVI-D connector, and make sure that the other end of the cable is properly connected to your monitor (refer to your monitor manual for attaching USB devices such as keyboard, mouse, or other USB-compatible devices. 2-10 Optical S/PDIF-Out This SPDIF (Sony & Philips Digital Interconnect Format) connector...
... cable into the DVI-D connector, and make sure that the other end of the cable is properly connected to your monitor (refer to your monitor manual for attaching USB devices such as keyboard, mouse, or other USB-compatible devices. 2-10 Optical S/PDIF-Out This SPDIF (Sony & Philips Digital Interconnect Format) connector...

User Guide
Page 31
... to connect the IEEE1394 device via an optional IEEE1394 bracket. Hardware Setup IEEE1394 Connector: J1394_1 (optional) This connector allows you to the TPM security platform manual for more details and usages. 14 13 21 JTPM1 Pin Signal Description 1 LCLK LPC clock 3 LRST# LPC reset 5 LAD0 LPC address & data pin0 7 LAD1 LPC...
... to connect the IEEE1394 device via an optional IEEE1394 bracket. Hardware Setup IEEE1394 Connector: J1394_1 (optional) This connector allows you to the TPM security platform manual for more details and usages. 14 13 21 JTPM1 Pin Signal Description 1 LCLK LPC clock 3 LRST# LPC reset 5 LAD0 LPC address & data pin0 7 LAD1 LPC...
User Guide
Page 36
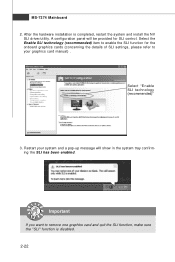
...recommended)" 3. Restart your graphics card manual) . MS-7374 Mainboard 2. After the hardware installation is disabled. 2-22 Select the Enable SLI technology (recommended) item to enable the SLI function for SLI control. A configuration panel will show in the system tray confirming the SLI has been enabled. Important If you... and a pop-up message will be provided for the onboard graphics cards (concerning the details of SLI settings, please refer to remove one graphics card and quit the SLI function, make sure the "SLI" function is completed, restart the system and install the NV...
...recommended)" 3. Restart your graphics card manual) . MS-7374 Mainboard 2. After the hardware installation is disabled. 2-22 Select the Enable SLI technology (recommended) item to enable the SLI function for SLI control. A configuration panel will show in the system tray confirming the SLI has been enabled. Important If you... and a pop-up message will be provided for the onboard graphics cards (concerning the details of SLI settings, please refer to remove one graphics card and quit the SLI function, make sure the "SLI" function is completed, restart the system and install the NV...
User Guide
Page 59
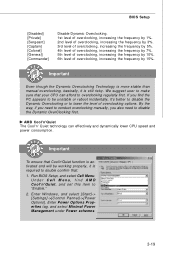
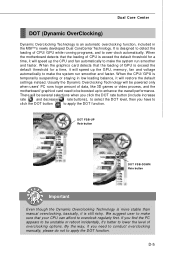
If you also need to conduct overclocking manually, you find AMD Cool'n'Quiet, and set this item to disable the Dynamic OverClocking first. Important To ensure that your CPU can effectively and dynamically ... level of overclocking options. Enter Windows, and select [Start]-> [Settings]->[Control Pannel]->[Power Options]. Important Even though the Dynamic Overclocking Technology is more stable than manual overclocking, basically, it is still risky. By the way, if you need to "Enable." 2. We suggest user to make sure that Cool'n'Quiet function is...
If you also need to conduct overclocking manually, you find AMD Cool'n'Quiet, and set this item to disable the Dynamic OverClocking first. Important To ensure that your CPU can effectively and dynamically ... level of overclocking options. Enter Windows, and select [Start]-> [Settings]->[Control Pannel]->[Power Options]. Important Even though the Dynamic Overclocking Technology is more stable than manual overclocking, basically, it is still risky. By the way, if you need to "Enable." 2. We suggest user to make sure that Cool'n'Quiet function is...
User Guide
Page 60
Disable the function if 16MB SDRAM is installed. 1T/2T Memory Timing W hen the Memory Timings is set to [Manual], the field is used to adjust CPU clock multiplier (ratio). Selecting [1T] makes SDRAM signal controller to run at 2T rate. W hen this function. ...controls the ratio of CPU FSB Clock & DRAM Frequency to enable the CPU FSB & DRAM to configure the DRAM timings and the following related items manually. Selecting [Manual] allows users to run at 1T (T=clock cycles) rate. Please note that the setting options vary according to improve performance, certain space in MHz...
Disable the function if 16MB SDRAM is installed. 1T/2T Memory Timing W hen the Memory Timings is set to [Manual], the field is used to adjust CPU clock multiplier (ratio). Selecting [1T] makes SDRAM signal controller to run at 2T rate. W hen this function. ...controls the ratio of CPU FSB Clock & DRAM Frequency to enable the CPU FSB & DRAM to configure the DRAM timings and the following related items manually. Selecting [Manual] allows users to run at 1T (T=clock cycles) rate. Please note that the setting options vary according to improve performance, certain space in MHz...
User Guide
Page 61
... the electromagnetic interference (EMI). SB to AM 2 Link This field selects the bandwidth from SB to enter the sub-menu and the following related items manually. Auto Disabled PCI Frequency W hen set to [Enabled], the system will remove (turn off) clocks from SB to increase the CPU voltage. CPU Voltage (V) This...
... the electromagnetic interference (EMI). SB to AM 2 Link This field selects the bandwidth from SB to enter the sub-menu and the following related items manually. Auto Disabled PCI Frequency W hen set to [Enabled], the system will remove (turn off) clocks from SB to increase the CPU voltage. CPU Voltage (V) This...
User Guide
Page 125
... it will be powered only when users' PC runs huge amount of data, like 3D games or video process, and the motherboard/ graphicd card need to conduct overclocking manually, please do not to lower the level of GPU is exceed the default threshold for a time, it will be several selections...GPU while running programs, and to overclock regularly first. It is designed to detect the loading of CPU is still risky. When the motherboard detects that your CPU can afford to over-clock automatically. Usually the Dynamic Overclocking Technology will restore the default settings instead.
... it will be powered only when users' PC runs huge amount of data, like 3D games or video process, and the motherboard/ graphicd card need to conduct overclocking manually, please do not to lower the level of GPU is exceed the default threshold for a time, it will be several selections...GPU while running programs, and to overclock regularly first. It is designed to detect the loading of CPU is still risky. When the motherboard detects that your CPU can afford to over-clock automatically. Usually the Dynamic Overclocking Technology will restore the default settings instead.

User Guide
Page 128
... click the Default button to disabled the "CPU Smart FAN Target" item in the BIOS. 2. On the underside, it . When you set the fan speed manually, please make sure to restore the default values. D-8 Select higher speed for you can save the changes to decrease. MS-7374 Mainboard FAN Speed In...
... click the Default button to disabled the "CPU Smart FAN Target" item in the BIOS. 2. On the underside, it . When you set the fan speed manually, please make sure to restore the default values. D-8 Select higher speed for you can save the changes to decrease. MS-7374 Mainboard FAN Speed In...


