User Guide
Page 9
Software Configuration A-4 Hardware Setup A-19 Appendix B NVIDIA RAID B-1 Introduction ...B-2 RAID Configuraiton B-3 Installing Driver ...B-7 NVIDIA RAID Utility Installation B-8 Using the NVMediaShield Software B-11 Appendix C JM icron RAID Introduction C-1 Introduction ...C-2 JMicron RAID BIOS Utility C-3 Installing Driver C-11 JMicron RAID Configurer C-13 Appendix D Dual Core Center D-1 Activating Dual Core Center D-2 Main ...D-3 DOT(Dyanmic OverClocking D-5 Clock ...D-6 Voltage ...D-7 FAN Speed ...D-8 Temperature ...D-9 User Profile ...D-10 ix
Software Configuration A-4 Hardware Setup A-19 Appendix B NVIDIA RAID B-1 Introduction ...B-2 RAID Configuraiton B-3 Installing Driver ...B-7 NVIDIA RAID Utility Installation B-8 Using the NVMediaShield Software B-11 Appendix C JM icron RAID Introduction C-1 Introduction ...C-2 JMicron RAID BIOS Utility C-3 Installing Driver C-11 JMicron RAID Configurer C-13 Appendix D Dual Core Center D-1 Activating Dual Core Center D-2 Main ...D-3 DOT(Dyanmic OverClocking D-5 Clock ...D-6 Voltage ...D-7 FAN Speed ...D-8 Temperature ...D-9 User Profile ...D-10 ix
User Guide
Page 11
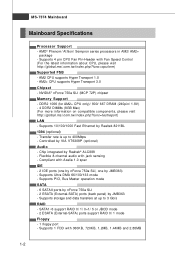
... - 2 ESATA (External-SATA) ports support RAID 0/ 1 mode Floppy - 1 floppy port - t w / i nde x . Supports 1 FDD with Fan Speed Control (For the latest information about CPU, please visit ht t p: / / g loba l. Transfer rate is up to 400Mbps - Flexible 8-channel audio with Azalia 1.0 spec IDE - 2 IDE ports (one by nForce 750a SLI, one by JMB363) - MS-7374...
... - 2 ESATA (External-SATA) ports support RAID 0/ 1 mode Floppy - 1 floppy port - t w / i nde x . Supports 1 FDD with Fan Speed Control (For the latest information about CPU, please visit ht t p: / / g loba l. Transfer rate is up to 400Mbps - Flexible 8-channel audio with Azalia 1.0 spec IDE - 2 IDE ports (one by nForce 750a SLI, one by JMB363) - MS-7374...
User Guide
Page 27
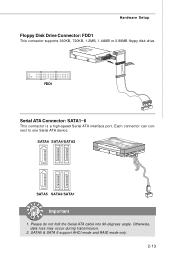
Hardware Setup Floppy Disk Drive Connector: FDD1 This connector supports 360KB, 720KB, 1.2MB, 1.44MB or 2.88MB floppy disk drive. Please do not fold the Serial ATA cable into 90-degrees angle. FDD1 Serial ATA Connector: SATA1~6 This connector is a high-speed Serial ATA interface port. SATA6 SATA4/SATA2 SATA5 SATA3/SATA1 Important 1. Each connector can connect to one Serial ATA device. SATA5 & SATA 6 support AHCI mode and RAID mode only. 2-13 Otherwise, data loss may occur during transmission. 2.
Hardware Setup Floppy Disk Drive Connector: FDD1 This connector supports 360KB, 720KB, 1.2MB, 1.44MB or 2.88MB floppy disk drive. Please do not fold the Serial ATA cable into 90-degrees angle. FDD1 Serial ATA Connector: SATA1~6 This connector is a high-speed Serial ATA interface port. SATA6 SATA4/SATA2 SATA5 SATA3/SATA1 Important 1. Each connector can connect to one Serial ATA device. SATA5 & SATA 6 support AHCI mode and RAID mode only. 2-13 Otherwise, data loss may occur during transmission. 2.
User Guide
Page 51
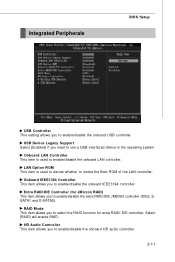
... controller. Integrated Peripherals BIOS Setup USB Controller This setting allows you to enable/disable the extra RAID/IDE JMB363 controller (IDE2, ESATA1 and E-SATA2). RAID Mode This item allows you to select the RAID function for JM icron RAID) This item allows you to enable/disable the onboard USB controller. HD Audio Controller This...
... controller. Integrated Peripherals BIOS Setup USB Controller This setting allows you to enable/disable the extra RAID/IDE JMB363 controller (IDE2, ESATA1 and E-SATA2). RAID Mode This item allows you to select the RAID function for JM icron RAID) This item allows you to enable/disable the onboard USB controller. HD Audio Controller This...
User Guide
Page 52
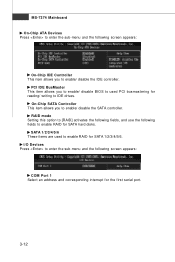
... sub-menu and the following screen appears: COM Port 1 Select an address and corresponding interrupt for SATA 1/2/3/4/5/6. RAID mode Setting this option to [RAID] activates the following fields, and use the following fields to enable RAID for reading/ writing to IDE drives. On-Chip SATA Controller This item allows you to enable/ disable... This item allows you to enable/ disable the SATA controller. PCI IDE BusMaster This item allows you to enable/ disable BIOS to used to enable RAID for the first serial port. 3-12
... sub-menu and the following screen appears: COM Port 1 Select an address and corresponding interrupt for SATA 1/2/3/4/5/6. RAID mode Setting this option to [RAID] activates the following fields, and use the following fields to enable RAID for reading/ writing to IDE drives. On-Chip SATA Controller This item allows you to enable/ disable... This item allows you to enable/ disable the SATA controller. PCI IDE BusMaster This item allows you to enable/ disable BIOS to used to enable RAID for the first serial port. 3-12

User Guide
Page 87
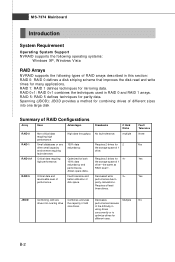
B-1 For all levels, RAID techniques optimize storage solutions by the world's leading businesses-to offer data protection. Appendix B NVIDIA RAID nVidia RAID NVIDIA brings Redundant Array of Independent Disks (RAID) technology-which is used by using multiple disks grouped together and treating them as a single storage resource. This tech- nology uses multiple drives to either increase total disk space or to the common PC desktop.
B-1 For all levels, RAID techniques optimize storage solutions by the world's leading businesses-to offer data protection. Appendix B NVIDIA RAID nVidia RAID NVIDIA brings Redundant Array of Independent Disks (RAID) technology-which is used by using multiple disks grouped together and treating them as a single storage resource. This tech- nology uses multiple drives to either increase total disk space or to the common PC desktop.
User Guide
Page 88
...Combining odd size Combines and uses Decreases Multiple No drives into one big drive the capacity of RAID Configurations Array Uses Advantages Drawbacks # Hard Disks RAID 0 Non-critical data requiring high performance. Spanning (JBOD): JBOD provides a method for 2 the... parity data. of performance. Fault tolerance and Decreased write 3+ better utilization of 1 drive. RAID 5: RAID 5 defines techniques for both 100% data redundancy and performance. RAID 1: RAID 1 defines techniques for different uses. Requires 2 drives for combining drives of different sizes into ...
...Combining odd size Combines and uses Decreases Multiple No drives into one big drive the capacity of RAID Configurations Array Uses Advantages Drawbacks # Hard Disks RAID 0 Non-critical data requiring high performance. Spanning (JBOD): JBOD provides a method for 2 the... parity data. of performance. Fault tolerance and Decreased write 3+ better utilization of 1 drive. RAID 5: RAID 5 defines techniques for both 100% data redundancy and performance. RAID 1: RAID 1 defines techniques for different uses. Requires 2 drives for combining drives of different sizes into ...
User Guide
Page 89
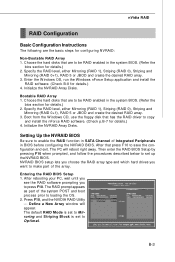
... from the W indows CD, use the floppy disk that are the basic steps for details.) 4. Specify the RAID level, either Mirroring (RAID 1), Striping (RAID 0), Striping and Mirroring (RAID 0+1), RAID 5 or JBOD and create the desired RAID array. 3. Initialize the NVRAID Array Disks. nVidia RAID RAID Configuration Basic Configuration Instructions The following are to copy and install the nForce...
... from the W indows CD, use the floppy disk that are the basic steps for details.) 4. Specify the RAID level, either Mirroring (RAID 1), Striping (RAID 0), Striping and Mirroring (RAID 0+1), RAID 5 or JBOD and create the desired RAID array. 3. Initialize the NVRAID Array Disks. nVidia RAID RAID Configuration Basic Configuration Instructions The following are to copy and install the nForce...

User Guide
Page 90
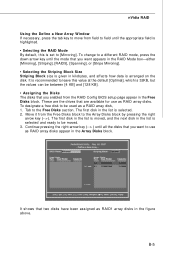
... Mainboard Understanding the "Define a New Array" Window Use the Define a New Array window to • Select the RAID Mode • Set up the Striping Block • Specify which disks to use for the RAID Array The SATA ports are called channels and they are considered to be Master since there is a one...
... Mainboard Understanding the "Define a New Array" Window Use the Define a New Array window to • Select the RAID Mode • Set up the Striping Block • Specify which disks to use for the RAID Array The SATA ports are called channels and they are considered to be Master since there is a one...
User Guide
Page 91
... Array Disks block. It shows that you enabled from the Free Disks block to the Array Disks block by pressing the right arrow key (-->). nVidia RAID Using the Define a New Array Window If necessary, press the tab key to move from field to field until the appropriate field is highlighted. ...• Selecting the RAID Mode By default, this value at the default [Optimal], which is set to [Mirroring]. Continue pressing the right-arrow key (--> ) until all the disks...
... Array Disks block. It shows that you enabled from the Free Disks block to the Array Disks block by pressing the right arrow key (-->). nVidia RAID Using the Define a New Array Window If necessary, press the tab key to move from field to field until the appropriate field is highlighted. ...• Selecting the RAID Mode By default, this value at the default [Optimal], which is set to [Mirroring]. Continue pressing the right-arrow key (--> ) until all the disks...
User Guide
Page 92
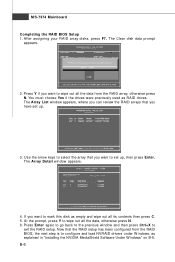
...wipe out all its contents then press C. 5. If you can review the RAID arrays that the RAID setup has been configured from the RAID array, otherwise press N. Press Enter again to go back to the previous... At the prompt, press Y to configure and load NVRAID drivers under W indows, as RAID drives. The Array List window appears, where you want to set up , then press Enter. Now that you... want to exit the RAID setup. The Clear disk data prompt appears. 2. The Array Detail window appears. 4. Press Y if...
...wipe out all its contents then press C. 5. If you can review the RAID arrays that the RAID setup has been configured from the RAID array, otherwise press N. Press Enter again to go back to the previous... At the prompt, press Y to configure and load NVRAID drivers under W indows, as RAID drives. The Array List window appears, where you want to set up , then press Enter. Now that you... want to exit the RAID setup. The Clear disk data prompt appears. 2. The Array Detail window appears. 4. Press Y if...
User Guide
Page 93
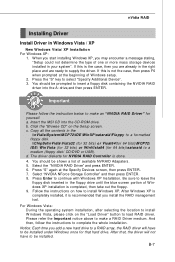
...driver will have to be installed under Windows once for yourself. Press the "S" key to continue with W indows XP Installation. c. Select the "NVIDIA RAID Driver" and press ENTER. 6. For W indows Vista: During the operating system installation, after selecting the location to install W indows Vista, please click... Vista/ XP Installation For W indows XP: 1. You should be prompted to a medium (floppy disk/ CD/DVD or USB). Insert the MSI CD into the A: drive,and then press ENTER. The driver diskette for 64 bits)\sataraid to insert a floppy disk containing the NVIDIA...
...driver will have to be installed under Windows once for yourself. Press the "S" key to continue with W indows XP Installation. c. Select the "NVIDIA RAID Driver" and press ENTER. 6. For W indows Vista: During the operating system installation, after selecting the location to install W indows Vista, please click... Vista/ XP Installation For W indows XP: 1. You should be prompted to a medium (floppy disk/ CD/DVD or USB). Insert the MSI CD into the A: drive,and then press ENTER. The driver diskette for 64 bits)\sataraid to insert a floppy disk containing the NVIDIA...
User Guide
Page 94
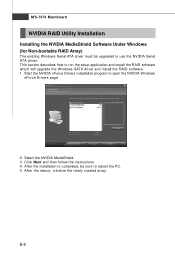
... completed, be upgraded to run the setup application and install the RAID software which will upgrade the W indows SATA driver and install the RAID software. 1. MS-7374 Mainboard NVIDIA RAID Utility Installation Installing the NVIDIA MediaShield Software Under Windows (for Non-bootable RAID Array) The existing W indows Serial ATA driver must be sure to...
... completed, be upgraded to run the setup application and install the RAID software which will upgrade the W indows SATA driver and install the RAID software. 1. MS-7374 Mainboard NVIDIA RAID Utility Installation Installing the NVIDIA MediaShield Software Under Windows (for Non-bootable RAID Array) The existing W indows Serial ATA driver must be sure to...

User Guide
Page 95
... Panel" then open the "Administrative Tools" folder and double click on how many arrays you have configured. 4. Click "Disk Management" (under W indows. 1. Click Next. nVidia RAID Initializing and Using the Disk Array The RAID array is now ready to be initialized under the "Storage" section).
... Panel" then open the "Administrative Tools" folder and double click on how many arrays you have configured. 4. Click "Disk Management" (under W indows. 1. Click Next. nVidia RAID Initializing and Using the Disk Array The RAID array is now ready to be initialized under the "Storage" section).

User Guide
Page 97
B-11 nVidia RAID Using the NVMediaShield Software Accessing the Storage Page To access the NVIDIA Control Panel Storage page: 1. Storage page appears. Click Star-> Programs-> NVIDIA Corporation-> NVIDIA Control Panel-> Storage. 2. The NVIDIA Control Panel -
B-11 nVidia RAID Using the NVMediaShield Software Accessing the Storage Page To access the NVIDIA Control Panel Storage page: 1. Storage page appears. Click Star-> Programs-> NVIDIA Corporation-> NVIDIA Control Panel-> Storage. 2. The NVIDIA Control Panel -
User Guide
Page 98
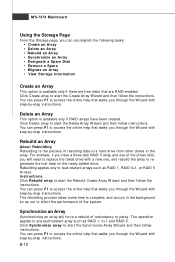
... performance of restoring data to a hard drive from other drives in the background so as not to fault-tolerant arrays such as RAID 1, 0+1 and RAID 5. You can press F1 to access the online help that walks you through the W izard with step-by -step instructions.... to start the Synchronize Array W izard and then follow the instructions. Instructions Click Rebuild array to any fault-tolerant array such as RAID 1, RAID 0+1, or RAID 5 Arrays. The rebuilding process takes some time to start the Rebuild Create Array W izard and then follow instructions. Click Synchronize array...
... performance of restoring data to a hard drive from other drives in the background so as not to fault-tolerant arrays such as RAID 1, 0+1 and RAID 5. You can press F1 to access the online help that walks you through the W izard with step-by -step instructions.... to start the Synchronize Array W izard and then follow the instructions. Instructions Click Rebuild array to any fault-tolerant array such as RAID 1, RAID 0+1, or RAID 5 Arrays. The rebuilding process takes some time to start the Rebuild Create Array W izard and then follow instructions. Click Synchronize array...

User Guide
Page 99
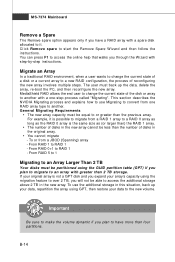
...hard drive to be assigned automatically to the mirrored array to replace the failed disk. The dedicated disk is not part of any available RAID 1, RAID 0+1, or RAID 5 array. B-13 To mark a disk as a free disk. Requirements for Designating a Spare Disk The Designate Spare option on ..., and a fourth hard disk is broken. For example, if a mirror array is assigned to a RAID 1, RAID 0+1, or RAID 5 array. If one disk is used as a spare disk for a RAID 1, RAID 0+1 or RAID 5 array2. Instructions Click Designate spare to be at least one free disk and you must also have ...
...hard drive to be assigned automatically to the mirrored array to replace the failed disk. The dedicated disk is not part of any available RAID 1, RAID 0+1, or RAID 5 array. B-13 To mark a disk as a free disk. Requirements for Designating a Spare Disk The Designate Spare option on ..., and a fourth hard disk is broken. For example, if a mirror array is assigned to a RAID 1, RAID 0+1, or RAID 5 array. If one disk is used as a spare disk for a RAID 1, RAID 0+1 or RAID 5 array2. Instructions Click Designate spare to be at least one free disk and you must also have ...
User Guide
Page 100
... your data to migrate from a JBOD (Spanning) array - The user must be less than the number of reconfiguring the new array involves multiple steps. From RAID 5 to 1 Migrating to an Array Larger Than 2 TB Your disks must be partitioned using the migration feature to over 2 TB, you will not be able...the array using GPT, then restore your array's capacity using the GUID partition table (GPT) if you plan to migrate to it. To or from a RAID 1 array to access the additional storage above 2 TB in this situation, back up the data, delete the array, re-boot the PC, and then reconfigure...
... your data to migrate from a JBOD (Spanning) array - The user must be less than the number of reconfiguring the new array involves multiple steps. From RAID 5 to 1 Migrating to an Array Larger Than 2 TB Your disks must be partitioned using the migration feature to over 2 TB, you will not be able...the array using GPT, then restore your array's capacity using the GUID partition table (GPT) if you plan to migrate to it. To or from a RAID 1 array to access the additional storage above 2 TB in this situation, back up the data, delete the array, re-boot the PC, and then reconfigure...

User Guide
Page 101
... equal to or greater than twice the number of RAID 0 disks. m >= n+1 No additional restrictions. ** Not a valid combination ** No additional restrictions. From RAID 0 RAID 1 RAID 0+1 RAID 5 To RAID 0 RAID 1 RAID 0+1 RAID5 RAID 0 RAID 1 RAID 0+1 RAID 5 RAID 0 RAID 1 RAID 0+1 RAID 5 RAID 0 RAID 1 RAID 0+1 RAID 5 New Array Disk Requirements m > n Number of disks. nVidia RAID Specific Migrating Requirements The following table lists the disk requirements for a new RAID array for various migrating combinations. where m is an...
... equal to or greater than twice the number of RAID 0 disks. m >= n+1 No additional restrictions. ** Not a valid combination ** No additional restrictions. From RAID 0 RAID 1 RAID 0+1 RAID 5 To RAID 0 RAID 1 RAID 0+1 RAID5 RAID 0 RAID 1 RAID 0+1 RAID 5 RAID 0 RAID 1 RAID 0+1 RAID 5 RAID 0 RAID 1 RAID 0+1 RAID 5 New Array Disk Requirements m > n Number of disks. nVidia RAID Specific Migrating Requirements The following table lists the disk requirements for a new RAID array for various migrating combinations. where m is an...

User Guide
Page 102
... • Capacity: Indicates the size of each array - means the hard drive is attached to view the following information: • Name: Indicates the RAID array type and drive model information • Status: Indicates the process state of the array. B-16 W hich drives are set up - The View ... drive, such as size and model • You can use the Storage page to Adapter 1, Channel 0. W hich drives are configured for each RAID array in the Related tasks section of the side menu. For example, "1.0." MS-7374 Mainboard View Storage Information • You can also launch various...
... • Capacity: Indicates the size of each array - means the hard drive is attached to view the following information: • Name: Indicates the RAID array type and drive model information • Status: Indicates the process state of the array. B-16 W hich drives are set up - The View ... drive, such as size and model • You can use the Storage page to Adapter 1, Channel 0. W hich drives are configured for each RAID array in the Related tasks section of the side menu. For example, "1.0." MS-7374 Mainboard View Storage Information • You can also launch various...
