User Guide
Page 2
.... Alternatively, please try the following help resources for FAQ, technical guide, BIOS updates, driver updates, and other countries. func=faqIndex Contact our technical staff at: http://support.msi.com.tw/ ii Copyright Notice The material in the United States and/or other information:...is given as to make changes without notice. PS/2 and OS®/2 are registered trademarks of purchase or local distributor. Visit the MSI website for further guidance. Our products are registered trademarks of its contents. AMD, Athlon™, Athlon™ XP, Thoroughbred™, ...
.... Alternatively, please try the following help resources for FAQ, technical guide, BIOS updates, driver updates, and other countries. func=faqIndex Contact our technical staff at: http://support.msi.com.tw/ ii Copyright Notice The material in the United States and/or other information:...is given as to make changes without notice. PS/2 and OS®/2 are registered trademarks of purchase or local distributor. Visit the MSI website for further guidance. Our products are registered trademarks of its contents. AMD, Athlon™, Athlon™ XP, Thoroughbred™, ...
User Guide
Page 8
... ...3-16 BIOS Setting Password 3-17 Cell Menu ...3-18 USERSETTINGS 3-23 Load Fail-Safe/ Optimized Defaults 3-24 Appendix A Realtek ALC888 Audio A-1 Installing the Realtek HD Audio Driver A-2 viii Getting Started 1-1 Mainboard Specifications 1-2 Mainboard Layout 1-4 Packing Checklist 1-5 Chapter 2.
... ...3-16 BIOS Setting Password 3-17 Cell Menu ...3-18 USERSETTINGS 3-23 Load Fail-Safe/ Optimized Defaults 3-24 Appendix A Realtek ALC888 Audio A-1 Installing the Realtek HD Audio Driver A-2 viii Getting Started 1-1 Mainboard Specifications 1-2 Mainboard Layout 1-4 Packing Checklist 1-5 Chapter 2.
User Guide
Page 9
Software Configuration A-4 Hardware Setup A-19 Appendix B NVIDIA RAID B-1 Introduction ...B-2 RAID Configuraiton B-3 Installing Driver ...B-7 NVIDIA RAID Utility Installation B-8 Using the NVMediaShield Software B-11 Appendix C JM icron RAID Introduction C-1 Introduction ...C-2 JMicron RAID BIOS Utility C-3 Installing Driver C-11 JMicron RAID Configurer C-13 Appendix D Dual Core Center D-1 Activating Dual Core Center D-2 Main ...D-3 DOT(Dyanmic OverClocking D-5 Clock ...D-6 Voltage ...D-7 FAN Speed ...D-8 Temperature ...D-9 User Profile ...D-10 ix
Software Configuration A-4 Hardware Setup A-19 Appendix B NVIDIA RAID B-1 Introduction ...B-2 RAID Configuraiton B-3 Installing Driver ...B-7 NVIDIA RAID Utility Installation B-8 Using the NVMediaShield Software B-11 Appendix C JM icron RAID Introduction C-1 Introduction ...C-2 JMicron RAID BIOS Utility C-3 Installing Driver C-11 JMicron RAID Configurer C-13 Appendix D Dual Core Center D-1 Activating Dual Core Center D-2 Main ...D-3 DOT(Dyanmic OverClocking D-5 Clock ...D-6 Voltage ...D-7 FAN Speed ...D-8 Temperature ...D-9 User Profile ...D-10 ix
User Guide
Page 14
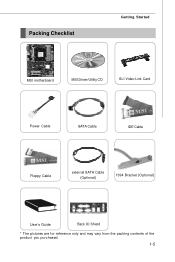
Packing Checklist Getting Started MSI motherboard MSI Driver/Utility CD SLI Video Link Card Power Cable SATA Cable IDE Cable Floppy Cable external SATA Cable (Optional) 1394 Bracket (Optional) User's Guide Back IO Shield * The pictures are for reference only and may vary from the packing contents of the product you purchased. 1-5
Packing Checklist Getting Started MSI motherboard MSI Driver/Utility CD SLI Video Link Card Power Cable SATA Cable IDE Cable Floppy Cable external SATA Cable (Optional) 1394 Bracket (Optional) User's Guide Back IO Shield * The pictures are for reference only and may vary from the packing contents of the product you purchased. 1-5
User Guide
Page 36
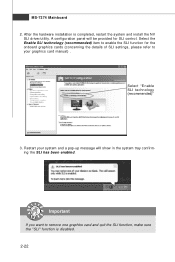
...is disabled. 2-22 A configuration panel will show in the system tray confirming the SLI has been enabled. Select the Enable SLI technology (recommended) item to enable the SLI function for SLI control. Important If you want to your system and a pop-up message will... be provided for the onboard graphics cards (concerning the details of SLI settings, please refer to remove one graphics card and quit the SLI function, make sure the "SLI" function is completed, restart the system and install the NV SLI driver...
...is disabled. 2-22 A configuration panel will show in the system tray confirming the SLI has been enabled. Select the Enable SLI technology (recommended) item to enable the SLI function for SLI control. Important If you want to your system and a pop-up message will... be provided for the onboard graphics cards (concerning the details of SLI settings, please refer to remove one graphics card and quit the SLI function, make sure the "SLI" function is completed, restart the system and install the NV SLI driver...
User Guide
Page 37
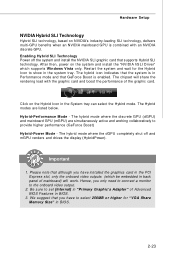
...1. Be sure to provide higher performance (GeForce Boost) Hybrid-Power Mode - After then, power on the system and install the "NVIDIA hSLI Driver" which be embedded in the PCI Express slot, only the onboard video outputs (which supports Windows Vista only. The hybrid icon indicates that the ... load with an NVIDIA discrete GPU. The hybrid mode where the discrete GPU (dGPU) and mainboard GPU (mGPU) are listed below. Enabling Hybrid SLI Technology Power off and mGPU renders and drives the display (HybridPower). Click on the Hybrid Icon in BIOS. 3. The hybrid mode where the dGPU...
...1. Be sure to provide higher performance (GeForce Boost) Hybrid-Power Mode - After then, power on the system and install the "NVIDIA hSLI Driver" which be embedded in the PCI Express slot, only the onboard video outputs (which supports Windows Vista only. The hybrid icon indicates that the ... load with an NVIDIA discrete GPU. The hybrid mode where the discrete GPU (dGPU) and mainboard GPU (mGPU) are listed below. Enabling Hybrid SLI Technology Power off and mGPU renders and drives the display (HybridPower). Click on the Hybrid Icon in BIOS. 3. The hybrid mode where the dGPU...

User Guide
Page 54
... sets the function of the USB device to wake up the system from S3 (Suspend to [OS], the wake up events will need an VGA driver to [S3], users can select the options in the power on / off . Settings are : [Power On/Off] The power button functions as normal power on... card does not support the initialization feature, the display may work abnormally or not function after a power failure or interrupt occurs. Therefore, if the VGA driver of the PS/2 keyboard is set the wake up (resumes) from S3. Setting to RAM) sleep state. Wake Up Event By Setting to [BIOS] activates...
... sets the function of the USB device to wake up the system from S3 (Suspend to [OS], the wake up events will need an VGA driver to [S3], users can select the options in the power on / off . Settings are : [Power On/Off] The power button functions as normal power on... card does not support the initialization feature, the display may work abnormally or not function after a power failure or interrupt occurs. Therefore, if the VGA driver of the PS/2 keyboard is set the wake up (resumes) from S3. Setting to RAM) sleep state. Wake Up Event By Setting to [BIOS] activates...

User Guide
Page 66
... will automatically appear. 2. Hence, the program screens shown here in different operating systems. 1. Follow the procedures described below to install the drivers for different operating systems. Installation for Realtek ALC888 codec to function properly before you can get access to 2-, 4-, 6-, 8- For Windows®...; XP, you must install W indows® 2000 Service Pack4 or later before installing the driver. Insert the application CD into the CD-ROM drive. Click here Important The HD Audio Configuration software utility is under continuous update to...
... will automatically appear. 2. Hence, the program screens shown here in different operating systems. 1. Follow the procedures described below to install the drivers for different operating systems. Installation for Realtek ALC888 codec to function properly before you can get access to 2-, 4-, 6-, 8- For Windows®...; XP, you must install W indows® 2000 Service Pack4 or later before installing the driver. Insert the application CD into the CD-ROM drive. Click here Important The HD Audio Configuration software utility is under continuous update to...

User Guide
Page 67
Click here Select this option Click here A-3 Click Finish to install the Realtek High Definition Audio Driver. 4. Click Next to restart the system. Realtek ALC888 Audio 3.
Click here Select this option Click here A-3 Click Finish to install the Realtek High Definition Audio Driver. 4. Click Next to restart the system. Realtek ALC888 Audio 3.
User Guide
Page 68
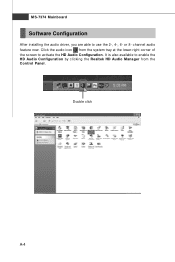
MS-7374 Mainboard Software Configuration After installing the audio driver, you are able to activate the HD Audio Configuration. or 8- Click the audio icon from the Control Panel. channel audio feature now. It is also available to enable the HD Audio Configuration by clicking the Realtek HD Audio M anager from the system tray at the lower-right corner of the screen to use the 2-, 4-, 6- Double click A-4
MS-7374 Mainboard Software Configuration After installing the audio driver, you are able to activate the HD Audio Configuration. or 8- Click the audio icon from the Control Panel. channel audio feature now. It is also available to enable the HD Audio Configuration by clicking the Realtek HD Audio M anager from the system tray at the lower-right corner of the screen to use the 2-, 4-, 6- Double click A-4
User Guide
Page 82
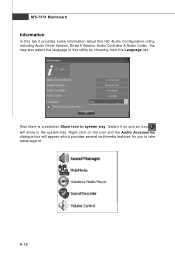
Switch it provides some information about this utility by choosing from the Language list. MS-7374 Mainboard Information In this tab it on the icon and the Audio Accessories dialogue box will show in system tray. A-18 You may also select the language of . Right-click on and an icon will appear which provides several multimedia features for you to take advantage of this HD Audio Configuration utility, including Audio Driver Version, DirectX Version, Audio Controller & Audio Codec. Also there is a selection Show icon in the system tray.
Switch it provides some information about this utility by choosing from the Language list. MS-7374 Mainboard Information In this tab it on the icon and the Audio Accessories dialogue box will show in system tray. A-18 You may also select the language of . Right-click on and an icon will appear which provides several multimedia features for you to take advantage of this HD Audio Configuration utility, including Audio Driver Version, DirectX Version, Audio Controller & Audio Codec. Also there is a selection Show icon in the system tray.
User Guide
Page 86
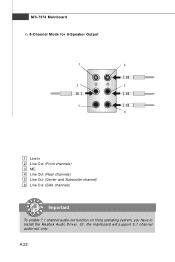
A-22 Or, the mainboard will support 5.1 channel audio-out only. MS-7374 Mainboard n 8-Channel Mode for 8-Speaker Output 1 4 2 5 3 6 1 Line In 2 Line Out (Front channels) 3 MIC 4 Line Out (Rear channels) 5 Line Out (Center and Subwoofer channel) 6 Line Out (Side channels) Important To enable 7.1 channel audio-out function on Vista operating system, you have to install the Realtek Audio Driver.
A-22 Or, the mainboard will support 5.1 channel audio-out only. MS-7374 Mainboard n 8-Channel Mode for 8-Speaker Output 1 4 2 5 3 6 1 Line In 2 Line Out (Front channels) 3 MIC 4 Line Out (Rear channels) 5 Line Out (Center and Subwoofer channel) 6 Line Out (Side channels) Important To enable 7.1 channel audio-out function on Vista operating system, you have to install the Realtek Audio Driver.
User Guide
Page 89
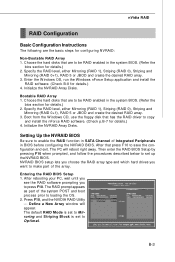
... The following are to be RAID enabled in the system BIOS. (Refer the bios section for details.) 2. Choose the hard disks that has the RAID driver to loading the OS. 2.
... The following are to be RAID enabled in the system BIOS. (Refer the bios section for details.) 2. Choose the hard disks that has the RAID driver to loading the OS. 2.
User Guide
Page 92
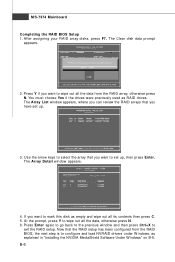
If you want to wipe out all the data from the RAID BIOS, the next step is to configure and load NVRAID drivers under W indows, as RAID drives. Press Y if you want to exit the RAID setup. You must choose Yes if the drives were previously used as ...
If you want to wipe out all the data from the RAID BIOS, the next step is to configure and load NVRAID drivers under W indows, as RAID drives. Press Y if you want to exit the RAID setup. You must choose Yes if the drives were previously used as ...
User Guide
Page 93
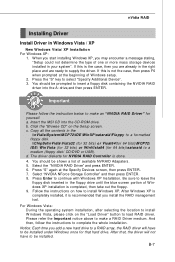
... USB). Notice: Each time you may encounter a message stating, "Setup could not determine the type of available NVRAID Adapaters. 5. nVidia RAID Installing Driver Install Driver in the floppy drive until the blue screen portion of W indows setup. 2. W hen you start installing W indows XP, you add a new...selecting the location to install W indows Vista, please click on the Setup screen. After that you are already in your system". Insert the MSI CD into the A: drive,and then press ENTER. And then, follow the instruction below to select "Specify Additional Device". 3. If this...
... USB). Notice: Each time you may encounter a message stating, "Setup could not determine the type of available NVRAID Adapaters. 5. nVidia RAID Installing Driver Install Driver in the floppy drive until the blue screen portion of W indows setup. 2. W hen you start installing W indows XP, you add a new...selecting the location to install W indows Vista, please click on the Setup screen. After that you are already in your system". Insert the MSI CD into the A: drive,and then press ENTER. And then, follow the instruction below to select "Specify Additional Device". 3. If this...
User Guide
Page 94
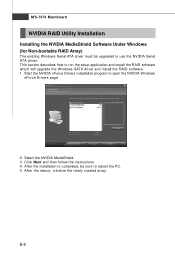
...NVIDIA MediaShield Software Under Windows (for Non-bootable RAID Array) The existing W indows Serial ATA driver must be sure to use the NVIDIA Serial ATA driver. Start the NVIDIA nForce Drivers installation program to run the setup application and install the RAID software which will upgrade the W... indows SATA driver and install the RAID software. 1. After the reboot, initialize the newly created array....
...NVIDIA MediaShield Software Under Windows (for Non-bootable RAID Array) The existing W indows Serial ATA driver must be sure to use the NVIDIA Serial ATA driver. Start the NVIDIA nForce Drivers installation program to run the setup application and install the RAID software which will upgrade the W... indows SATA driver and install the RAID software. 1. After the reboot, initialize the newly created array....

User Guide
Page 105
... to enter the JMicron BIOS RAID utility. Revert an existed-RAID HDD to non-RAID. Solve Mirror Conflict - Save And Exit Setup - RAID Disk Driver List The menu shows the current configuration of RAID set . Rebuild data, when RAID 1 or RAID 10 data mirroring is presented below. Create a ...new legacy RAID set . Save all settings and exit the BIOS utility. After that, save the configuration and exit. Hard Disk Driver List The menu shows the model number and capacities of each section is lost. Delete a legacy RAID set RAID mode for the JMicron 36x ATA...
... to enter the JMicron BIOS RAID utility. Revert an existed-RAID HDD to non-RAID. Solve Mirror Conflict - Save And Exit Setup - RAID Disk Driver List The menu shows the current configuration of RAID set . Rebuild data, when RAID 1 or RAID 10 data mirroring is presented below. Create a ...new legacy RAID set . Save all settings and exit the BIOS utility. After that, save the configuration and exit. Hard Disk Driver List The menu shows the model number and capacities of each section is lost. Delete a legacy RAID set RAID mode for the JMicron 36x ATA...
User Guide
Page 109
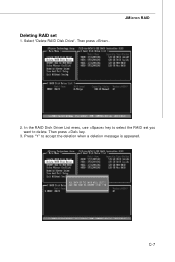
Then press . Then press key. 3. C-7 JMicron RAID 2. Press "Y" to delete. Select "Delete RAID Disk Drive". In the RAID Disk Driver List menu, use key to select the RAID set 1. Deleting RAID set you want to accept the deletion when a deletion message is appeared.
Then press . Then press key. 3. C-7 JMicron RAID 2. Press "Y" to delete. Select "Delete RAID Disk Drive". In the RAID Disk Driver List menu, use key to select the RAID set 1. Deleting RAID set you want to accept the deletion when a deletion message is appeared.
User Guide
Page 110
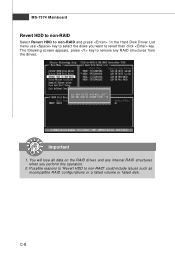
The following screen appears, press key to non-RAID' could include issues such as incompatible RAID configurations or a failed volume or failed disk. C-8 You will lose all data on the RAID drives and any RAID structures from the drives. Possible reasons to 'Revert HDD to remove any internal RAID structures when you want to revert then click key. Important 1. In the Hard Disk Driver List menu use key to non-RAID and press . MS-7374 Mainboard Revert HDD to non-RAID Select Revert HDD to select the disks you perform this operation. 2.
The following screen appears, press key to non-RAID' could include issues such as incompatible RAID configurations or a failed volume or failed disk. C-8 You will lose all data on the RAID drives and any RAID structures from the drives. Possible reasons to 'Revert HDD to remove any internal RAID structures when you want to revert then click key. Important 1. In the Hard Disk Driver List menu use key to non-RAID and press . MS-7374 Mainboard Revert HDD to non-RAID Select Revert HDD to select the disks you perform this operation. 2.
User Guide
Page 111
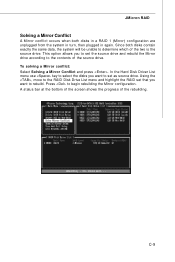
In the Hard Disk Driver List menu use key to select the disks you want to begin rebuilding the Mirror configuration. C-9 JMicron RAID Solving a Mirror Conflict A Mirror conflict occurs when ...
In the Hard Disk Driver List menu use key to select the disks you want to begin rebuilding the Mirror configuration. C-9 JMicron RAID Solving a Mirror Conflict A Mirror conflict occurs when ...


