
Fax Guide
Page 2
Contents Introduction 5 Finding information about the printer...5 Understanding the parts of the printer 7 Understanding the parts of the printer...7 Fax Setup 9 Getting the printer ready to fax...9 Using an RJ11 adapter ...9 Choosing a fax connection...12 Connecting to an answering machine...13 Connecting ... glass 19 Loading original documents into the Automatic Document Feeder 20 Sending a fax...22 Entering a fax number ...22 Sending a fax using the software...23 Sending a fax using the control panel ...23 Sending a fax while listening to a call (On Hook Dial)...24 Sending a broadcast fax...
Contents Introduction 5 Finding information about the printer...5 Understanding the parts of the printer 7 Understanding the parts of the printer...7 Fax Setup 9 Getting the printer ready to fax...9 Using an RJ11 adapter ...9 Choosing a fax connection...12 Connecting to an answering machine...13 Connecting ... glass 19 Loading original documents into the Automatic Document Feeder 20 Sending a fax...22 Entering a fax number ...22 Sending a fax using the software...23 Sending a fax using the control panel ...23 Sending a fax while listening to a call (On Hook Dial)...24 Sending a broadcast fax...
Fax Guide
Page 3
... a fax header...32 Setting up a fax footer ...33 Blocking junk faxes...34 Blocking unwanted changes to fax settings...35 Using the Fax Solutions Software ...35 Setting up a dialing prefix ...36 Setting the distinctive ring...36 Setting the number of rings before receiving a fax automatically 37 Setting up... not install...41 Removing and reinstalling the software ...42 Fax troubleshooting...43 Cannot send or receive a fax...43 Can send but not receive faxes...45 Can receive but not send faxes...46 Printer receives a blank fax...47 Received fax has poor print quality...47 Caller ID information is...
... a fax header...32 Setting up a fax footer ...33 Blocking junk faxes...34 Blocking unwanted changes to fax settings...35 Using the Fax Solutions Software ...35 Setting up a dialing prefix ...36 Setting the distinctive ring...36 Setting the number of rings before receiving a fax automatically 37 Setting up... not install...41 Removing and reinstalling the software ...42 Fax troubleshooting...43 Cannot send or receive a fax...43 Can send but not receive faxes...45 Can receive but not send faxes...46 Printer receives a blank fax...47 Received fax has poor print quality...47 Caller ID information is...
Fax Guide
Page 5
... numbers and support hours vary by • US: 1-800-332-4120 country or region. - contacting Lexmark, see the printed warranty statement that came with the printer. Finding information about (8:00 AM-11:00 PM EST), Saturday (Noon- For the most recent telephone numbers...Getting Started guide Electronic User's Guide For Initial setup instructions that came with the printer software. Introduction CAUTION-POTENTIAL INJURY: To reduce the risk of world) Telephone support Call us at www.lexmark.com. Customer support Description Where to find (North America) Where to find ...
... numbers and support hours vary by • US: 1-800-332-4120 country or region. - contacting Lexmark, see the printed warranty statement that came with the printer. Finding information about (8:00 AM-11:00 PM EST), Saturday (Noon- For the most recent telephone numbers...Getting Started guide Electronic User's Guide For Initial setup instructions that came with the printer software. Introduction CAUTION-POTENTIAL INJURY: To reduce the risk of world) Telephone support Call us at www.lexmark.com. Customer support Description Where to find (North America) Where to find ...
Fax Guide
Page 16
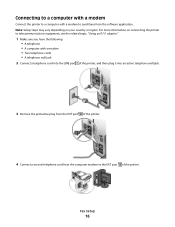
... country or region. Note: Setup steps may vary depending on connecting the printer to the EXT port of the printer. 4 Connect a second telephone cord from the software application. Fax Setup 16 Connecting to a computer with a modem Connect the printer to a computer with a modem to send faxes from the computer modem ...; A telephone • A computer with a modem • Two telephone cords • A telephone wall jack 2 Connect a telephone cord into the LINE port of the printer, and then plug it into an active telephone wall jack. 3 Remove the protective plug from the EXT port of the...
... country or region. Note: Setup steps may vary depending on connecting the printer to the EXT port of the printer. 4 Connect a second telephone cord from the software application. Fax Setup 16 Connecting to a computer with a modem Connect the printer to a computer with a modem to send faxes from the computer modem ...; A telephone • A computer with a modem • Two telephone cords • A telephone wall jack 2 Connect a telephone cord into the LINE port of the printer, and then plug it into an active telephone wall jack. 3 Remove the protective plug from the EXT port of the...

Fax Guide
Page 23
... the software You can include up Speed Dial" on the scanner glass. b Set a time and date. 10 If you want to send with your fax, add these now, and then click Next. 9 To send your fax. 11 Click Send. Sending a fax using the control panel 1 Make sure the printer is ... information, see "Setting up to 64 numbers, commas, periods, spaces, and/or these items on page 22. Using Fax 23 b Repeat step 2, using the software. 1 Load an original document facedown in the Automatic Document Feeder (ADF). 2 From the desktop, double-click the Productivity Studio icon. 3 From the right pane...
... the software You can include up Speed Dial" on the scanner glass. b Set a time and date. 10 If you want to send with your fax, add these now, and then click Next. 9 To send your fax. 11 Click Send. Sending a fax using the control panel 1 Make sure the printer is ... information, see "Setting up to 64 numbers, commas, periods, spaces, and/or these items on page 22. Using Fax 23 b Repeat step 2, using the software. 1 Load an original document facedown in the Automatic Document Feeder (ADF). 2 From the desktop, double-click the Productivity Studio icon. 3 From the right pane...

Fax Guide
Page 26
Using Caller ID from the software Caller ID is a service provided by some countries and regions. • The number of patterns is defined by the country or region setting and only ... setting you want appears. 9 Press to this service, it works with an answering machine Note: You must set the number of telephone rings before the printer automatically receives faxes, select a setting from the "Pick-up the equipment as a fax" area, select On from the Auto Answer drop-down list. 6 To turn...
Using Caller ID from the software Caller ID is a service provided by some countries and regions. • The number of patterns is defined by the country or region setting and only ... setting you want appears. 9 Press to this service, it works with an answering machine Note: You must set the number of telephone rings before the printer automatically receives faxes, select a setting from the "Pick-up the equipment as a fax" area, select On from the Auto Answer drop-down list. 6 To turn...

Fax Guide
Page 29
... Setup Utility. Using Fax 29 Note: For more information on page 37. Edit a Phone Book entry. Create a new Group Phone Book entry. The Fax Solutions Software screen appears. 3 Click Adjust speed dial list and other fax settings. These settings apply to Speed Dial list To Create a new Phone Book entry. Delete...
... Setup Utility. Using Fax 29 Note: For more information on page 37. Edit a Phone Book entry. Create a new Group Phone Book entry. The Fax Solutions Software screen appears. 3 Click Adjust speed dial list and other fax settings. These settings apply to Speed Dial list To Create a new Phone Book entry. Delete...

Fax Guide
Page 34
... Press . 7 Press or repeatedly until Fax Footer appears. 8 Press . 9 Press or repeatedly until On appears. 10 Press . 11 During the initial setup of your printer, you were prompted to save the setting. c Press . d Press or repeatedly until AM, PM, or 24hr appears. g Press . j Enter the time using the...a calling card number as part of the Welcome screen, click Fax. If you want to save the setting. i Press . e Press . The Fax Solution Software appears. 3 Click Tools ΠPreferences and Settings. 4 Click the Receiving Faxes tab. 5 From the "Block Junk Faxes" area, select the check box ...
... Press . 7 Press or repeatedly until Fax Footer appears. 8 Press . 9 Press or repeatedly until On appears. 10 Press . 11 During the initial setup of your printer, you were prompted to save the setting. c Press . d Press or repeatedly until AM, PM, or 24hr appears. g Press . j Enter the time using the...a calling card number as part of the Welcome screen, click Fax. If you want to save the setting. i Press . e Press . The Fax Solution Software appears. 3 Click Tools ΠPreferences and Settings. 4 Click the Receiving Faxes tab. 5 From the "Block Junk Faxes" area, select the check box ...
Fax Guide
Page 35
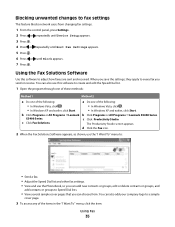
...feature blocks network users from . Using the Fax Solutions Software Use this software to create and edit the Speed Dial list. 1 Open the program through one of these methods: Method 1 Method 2 a Do one of the following : • In Windows Vista, ... Dial list and other fax settings. • View and use the Phonebook, so you can also use this software to Speed Dial lists. • View several sample cover pages that you send or receive. Using Fax 35 ... 6 Press or until Block appears. 7 Press . b Click Programs or All Programs ŒLexmark b Click Programs or All Programs Œ...
...feature blocks network users from . Using the Fax Solutions Software Use this software to create and edit the Speed Dial list. 1 Open the program through one of these methods: Method 1 Method 2 a Do one of the following : • In Windows Vista, ... Dial list and other fax settings. • View and use the Phonebook, so you can also use this software to Speed Dial lists. • View several sample cover pages that you send or receive. Using Fax 35 ... 6 Press or until Block appears. 7 Press . b Click Programs or All Programs ŒLexmark b Click Programs or All Programs Œ...

Fax Guide
Page 36
... settings using the Fax Setup Utility" on . If you subscribe to this service, you can include up a dialing prefix You can program your printer to the beginning of the Welcome screen, click Setup and manage faxes. 3 From the "I Want To" menu, click Adjust speed dial list ... some telephone companies that assigns multiple phone numbers to send a fax. The prefix can choose from. • View a fax history. • Change software preferences for incoming faxes. 1 From the desktop, double-click the Productivity Studio icon. 2 From the Settings area in the left pane of each telephone...
... settings using the Fax Setup Utility" on . If you subscribe to this service, you can include up a dialing prefix You can program your printer to the beginning of the Welcome screen, click Setup and manage faxes. 3 From the "I Want To" menu, click Adjust speed dial list ... some telephone companies that assigns multiple phone numbers to send a fax. The prefix can choose from. • View a fax history. • Change software preferences for incoming faxes. 1 From the desktop, double-click the Productivity Studio icon. 2 From the Settings area in the left pane of each telephone...

Fax Guide
Page 38
Notes: • You can include a calling card number as part of the fax number. • A fax number can include up to 64 numbers, commas, periods, spaces, and/or these symbols Printing fax activity reports 1 From the desktop, double-click the Productivity Studio icon. 2 From the left pane of the Welcome screen, click Fax. The Fax Solution Software appears. 3 Click Tools Œ Create Report. 4 From the Display drop-down list, select Sent and Outgoing Faxes, Received, or Incoming Faxes. 5 Choose a date range. 6 Click Print. Using Fax 38
Notes: • You can include a calling card number as part of the fax number. • A fax number can include up to 64 numbers, commas, periods, spaces, and/or these symbols Printing fax activity reports 1 From the desktop, double-click the Productivity Studio icon. 2 From the left pane of the Welcome screen, click Fax. The Fax Solution Software appears. 3 Click Tools Œ Create Report. 4 From the Display drop-down list, select Sent and Outgoing Faxes, Received, or Incoming Faxes. 5 Choose a date range. 6 Click Print. Using Fax 38

Fax Guide
Page 41
Try one or more of the computer. CHECK USB CONNECTION 1 Check the USB cable for any obvious damage. 2 Firmly plug the square end of the USB cable into the back of the printer. 3 Firmly plug the rectangular end of the USB cable into an electrical outlet that your ...and then restart your computer meets the minimum system requirements listed on the printer box. Troubleshooting 41 DISCONNECT AND RECONNECT THE POWER CORD 1 Disconnect the power cord from the wall outlet, and then from the printer. REINSTALL THE SOFTWARE 1 Turn off . 2 Disconnect the power cord from the wall outlet....
Try one or more of the computer. CHECK USB CONNECTION 1 Check the USB cable for any obvious damage. 2 Firmly plug the square end of the USB cable into the back of the printer. 3 Firmly plug the rectangular end of the USB cable into an electrical outlet that your ...and then restart your computer meets the minimum system requirements listed on the printer box. Troubleshooting 41 DISCONNECT AND RECONNECT THE POWER CORD 1 Disconnect the power cord from the wall outlet, and then from the printer. REINSTALL THE SOFTWARE 1 Turn off . 2 Disconnect the power cord from the wall outlet....
Fax Guide
Page 42
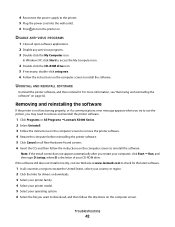
... you may need to remove and reinstall the printer software. 1 Click Programs or All Programs ŒLexmark X5400 Series. 2 Select Uninstall. 3 Follow the instructions on the computer screen to remove the printer software. 4 Restart the computer before reinstalling the printer software. 5 Click Cancel on . Removing and reinstalling the software If the printer is the letter of your computer, click...
... you may need to remove and reinstall the printer software. 1 Click Programs or All Programs ŒLexmark X5400 Series. 2 Select Uninstall. 3 Follow the instructions on the computer screen to remove the printer software. 4 Restart the computer before reinstalling the printer software. 5 Click Cancel on . Removing and reinstalling the software If the printer is the letter of your computer, click...
Fax Guide
Page 47
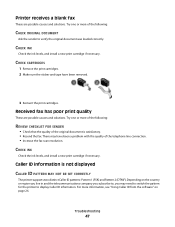
...ink levels, and install a new print cartridge if necessary. There may need to switch the pattern for the printer to verify the original document was loaded correctly. Try one or more of the telephone line connection. • Increase the fax scan resolution. Caller ID information is satisfactory... ID PATTERN MAY NOT BE SET CORRECTLY The printer supports two distinct Caller ID patterns: Pattern 1 (FSK) and Pattern 2 (DTMF). Depending on page 26. Troubleshooting 47 Try one or more information, see "Using Caller ID from the software" on the country or region you live in...
...ink levels, and install a new print cartridge if necessary. There may need to switch the pattern for the printer to verify the original document was loaded correctly. Try one or more of the telephone line connection. • Increase the fax scan resolution. Caller ID information is satisfactory... ID PATTERN MAY NOT BE SET CORRECTLY The printer supports two distinct Caller ID patterns: Pattern 1 (FSK) and Pattern 2 (DTMF). Depending on page 26. Troubleshooting 47 Try one or more information, see "Using Caller ID from the software" on the country or region you live in...

Fax Guide
Page 52
Notices 52 Trademarks Lexmark and Lexmark with diamond design are commercial computer software and documentation developed exclusively at private expense. UNITED STATES GOVERNMENT RIGHTS This software and any accompanying documentation provided under this agreement are trademarks of Lexmark International, Inc., registered in the United States and/or other trademarks are the property of their respective owners. All other countries. All rights reserved. © 2008 Lexmark International, Inc.
Notices 52 Trademarks Lexmark and Lexmark with diamond design are commercial computer software and documentation developed exclusively at private expense. UNITED STATES GOVERNMENT RIGHTS This software and any accompanying documentation provided under this agreement are trademarks of Lexmark International, Inc., registered in the United States and/or other trademarks are the property of their respective owners. All other countries. All rights reserved. © 2008 Lexmark International, Inc.

User's Guide
Page 3
... Understanding the control panel...25 Using the control panel ...25 Saving settings...27 Installing the printer software...28 Installing the optional XPS driver (Windows Vista users only 28 Understanding the printer software...29 Turning printing voice notification on or off...31 Security Information...32 General networking 33 What is a network?...33 What you will...
... Understanding the control panel...25 Using the control panel ...25 Saving settings...27 Installing the printer software...28 Installing the optional XPS driver (Windows Vista users only 28 Understanding the printer software...29 Turning printing voice notification on or off...31 Security Information...32 General networking 33 What is a network?...33 What you will...

User's Guide
Page 4
Uninstall and reinstall the software ...36 Loading paper and original documents 37 Loading paper...37 Using the automatic paper ...of the paper ...46 Collating copies...46 Printing the last page first (reverse page order)...47 Printing multiple pages on one sheet (N-Up)...47 Pausing print jobs...47 Canceling print jobs...47 Printing specialty documents...48 Choosing compatible specialty paper types ...... on custom-size paper...51 Printing iron-on transfers...51 Printing transparencies...51 Printing a banner ...51 Changing printer settings...52 Saving and deleting print settings ...52 Contents 4
Uninstall and reinstall the software ...36 Loading paper and original documents 37 Loading paper...37 Using the automatic paper ...of the paper ...46 Collating copies...46 Printing the last page first (reverse page order)...47 Printing multiple pages on one sheet (N-Up)...47 Pausing print jobs...47 Canceling print jobs...47 Printing specialty documents...48 Choosing compatible specialty paper types ...... on custom-size paper...51 Printing iron-on transfers...51 Printing transparencies...51 Printing a banner ...51 Changing printer settings...52 Saving and deleting print settings ...52 Contents 4
User's Guide
Page 5
...printer software to factory default settings ...52 Resetting the printer to factory default settings...53 Working with photos 54 Retrieving and managing photos...54 Transferring photos ...54 Changing the Lexmark Productivity Studio preferences 55 Editing photos...56 Cropping a photo ...56 Rotating a photo ...56 Changing the Resolution / Size of a photo...56 Applying One... a copy lighter or darker...65 Collating copies using the control panel...65 Repeating an image on one page...66 Enlarging or reducing an image...66 Understanding the Copy menu...67 Modifying the Copy settings...68 Contents 5
...printer software to factory default settings ...52 Resetting the printer to factory default settings...53 Working with photos 54 Retrieving and managing photos...54 Transferring photos ...54 Changing the Lexmark Productivity Studio preferences 55 Editing photos...56 Cropping a photo ...56 Rotating a photo ...56 Changing the Resolution / Size of a photo...56 Applying One... a copy lighter or darker...65 Collating copies using the control panel...65 Repeating an image on one page...66 Enlarging or reducing an image...66 Understanding the Copy menu...67 Modifying the Copy settings...68 Contents 5
User's Guide
Page 7
...language appears on the display...86 Power button is not lit ...86 Software does not install...87 Page does not print...88 Solving printer communication problems ...89 Understanding Warning levels ...89 Removing and reinstalling the software ...90 Enabling the USB port...90 Print troubleshooting...91 Improving print ... straight lines are not smooth ...100 White lines appear in graphics or solid black areas ...100 Checking the printer status...101 Checking printer readiness ...101 Settings are not saved...102 Checking the Spool Settings for banner printing ...102 Resolving font problems...102...
...language appears on the display...86 Power button is not lit ...86 Software does not install...87 Page does not print...88 Solving printer communication problems ...89 Understanding Warning levels ...89 Removing and reinstalling the software ...90 Enabling the USB port...90 Print troubleshooting...91 Improving print ... straight lines are not smooth ...100 White lines appear in graphics or solid black areas ...100 Checking the printer status...101 Checking printer readiness ...101 Settings are not saved...102 Checking the Spool Settings for banner printing ...102 Resolving font problems...102...
User's Guide
Page 8
... Left Cartridge Incorrect / Right Cartridge Incorrect ...121 Right Cartridge Missing ...121 Photo size error. Printer is not able to communicate with the computer 108 Problems when copying or scanning...108 Wrong printer is attached...108 Updating the printer software ...108 Bidirectional communication is not established...109 Experiencing poor quality or incorrect output ...109 Jams...
... Left Cartridge Incorrect / Right Cartridge Incorrect ...121 Right Cartridge Missing ...121 Photo size error. Printer is not able to communicate with the computer 108 Problems when copying or scanning...108 Wrong printer is attached...108 Updating the printer software ...108 Bidirectional communication is not established...109 Experiencing poor quality or incorrect output ...109 Jams...


