Fax Guide
Page 3
... print cartridges...39 Troubleshooting 40 Setup Troubleshooting...40 Incorrect language appears on the display...40 Power button is not lit ...40 Software does not install...41 Removing and reinstalling the software ...42 Fax troubleshooting...43 Cannot send or receive a fax...43 Can send but not receive faxes...45 Can receive but not send faxes...46 Printer receives a blank fax...47 Received fax has poor print quality...47 Caller ID information is not displayed...47 Fax Error ...48 Fax Mode Unsupported...48 Remote Fax Error...48 Phone Line Busy ...49 Phone Line Error...
... print cartridges...39 Troubleshooting 40 Setup Troubleshooting...40 Incorrect language appears on the display...40 Power button is not lit ...40 Software does not install...41 Removing and reinstalling the software ...42 Fax troubleshooting...43 Cannot send or receive a fax...43 Can send but not receive faxes...45 Can receive but not send faxes...46 Printer receives a blank fax...47 Received fax has poor print quality...47 Caller ID information is not displayed...47 Fax Error ...48 Fax Mode Unsupported...48 Remote Fax Error...48 Phone Line Busy ...49 Phone Line Error...

Fax Guide
Page 32
... "I Want To" menu, click Adjust speed dial list and other fax settings. 4 Click the Ringing and Answering tab. 5 From the Auto Answer drop-down list, select On. 6 Click OK to on . Print a test page. • Device Setup-Customize printer setup settings. • Defaults-Customize printer settings. Answer all incoming phone calls. Adjust the brightness of rings you set is used to send a fax. Use this information: 1 From the control panel, press Fax Mode. 2 Press . 3 Press or repeatedly until Fax Setup appears. Align cartridges. - View ink levels. -
... "I Want To" menu, click Adjust speed dial list and other fax settings. 4 Click the Ringing and Answering tab. 5 From the Auto Answer drop-down list, select On. 6 Click OK to on . Print a test page. • Device Setup-Customize printer setup settings. • Defaults-Customize printer settings. Answer all incoming phone calls. Adjust the brightness of rings you set is used to send a fax. Use this information: 1 From the control panel, press Fax Mode. 2 Press . 3 Press or repeatedly until Fax Setup appears. Align cartridges. - View ink levels. -
Fax Guide
Page 45
... the control panel, press Fax Mode. 2 Press . 3 Press or repeatedly until Fax Setup appears. 4 Press . 5 Press or repeatedly until Ringing and Answering appears. 6 Press . 7 Press or repeatedly until After Dial appears. 10 Press . Can send but not receive faxes These are using a distinctive ring, see "Setting the distinctive ring" on page 36. IS YOUR PRINTER MEMORY FULL? CHECK INK Check the ink levels, and install a new cartridge if necessary. Try one or more...
... the control panel, press Fax Mode. 2 Press . 3 Press or repeatedly until Fax Setup appears. 4 Press . 5 Press or repeatedly until Ringing and Answering appears. 6 Press . 7 Press or repeatedly until After Dial appears. 10 Press . Can send but not receive faxes These are using a distinctive ring, see "Setting the distinctive ring" on page 36. IS YOUR PRINTER MEMORY FULL? CHECK INK Check the ink levels, and install a new cartridge if necessary. Try one or more...

User's Guide
Page 4
... Loading original documents on the scanner glass 43 Printing 44 Printing basic documents...44 Printing a document...44 Printing a Web page ...44 Printing photos or images from a Web page ...45 Printing multiple copies of a document...45 Printing on both sides of the paper ...46 Collating copies...46 Printing the last page first (reverse page order)...47 Printing multiple pages on one sheet (N-Up)...47 Pausing print jobs...47 Canceling print jobs...47 Printing specialty documents...48 Choosing compatible specialty paper types ...48 Printing envelopes ...48 Printing greeting cards, index cards...
... Loading original documents on the scanner glass 43 Printing 44 Printing basic documents...44 Printing a document...44 Printing a Web page ...44 Printing photos or images from a Web page ...45 Printing multiple copies of a document...45 Printing on both sides of the paper ...46 Collating copies...46 Printing the last page first (reverse page order)...47 Printing multiple pages on one sheet (N-Up)...47 Pausing print jobs...47 Canceling print jobs...47 Printing specialty documents...48 Choosing compatible specialty paper types ...48 Printing envelopes ...48 Printing greeting cards, index cards...
User's Guide
Page 7
... photos contain white lines ...99 Vertical straight lines are not smooth ...100 White lines appear in graphics or solid black areas ...100 Checking the printer status...101 Checking printer readiness ...101 Settings are not saved...102 Checking the Spool Settings for banner printing ...102 Resolving font problems...102 Printer is busy printing another job ...103 Ready or Busy Printing is listed as the status...103 Printing a test page...103 Test page does not print ...104 Checking external devices...105 Removing an external print server ...105 Cable...
... photos contain white lines ...99 Vertical straight lines are not smooth ...100 White lines appear in graphics or solid black areas ...100 Checking the printer status...101 Checking printer readiness ...101 Settings are not saved...102 Checking the Spool Settings for banner printing ...102 Resolving font problems...102 Printer is busy printing another job ...103 Ready or Busy Printing is listed as the status...103 Printing a test page...103 Test page does not print ...104 Checking external devices...105 Removing an external print server ...105 Cable...
User's Guide
Page 11
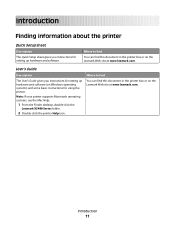
... printer Quick Setup sheet Description The Quick Setup sheet gives you instructions for using the printer. User's Guide Description The User's Guide gives you instructions for setting up hardware and software (on the Lexmark Web site at www.lexmark.com. Note: If your printer supports Macintosh operating systems, see the Mac Help: 1 From the Finder desktop, double-click the Lexmark X5400 Series folder. 2 Double-click the printer Help icon. Where to find You can find this document in the printer box or on the Lexmark Web...
... printer Quick Setup sheet Description The Quick Setup sheet gives you instructions for using the printer. User's Guide Description The User's Guide gives you instructions for setting up hardware and software (on the Lexmark Web site at www.lexmark.com. Note: If your printer supports Macintosh operating systems, see the Mac Help: 1 From the Finder desktop, double-click the Lexmark X5400 Series folder. 2 Double-click the printer Help icon. Where to find You can find this document in the printer box or on the Lexmark Web...
User's Guide
Page 12
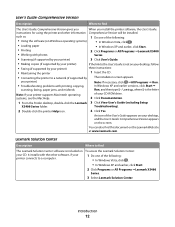
... the screen. your printer) these instructions: • Maintaining the printer 1 Insert the CD. • Connecting the printer to a computer. Lexmark Solution Center Description Where to find this document on Windows operating systems) • In Windows Vista, click . • Loading paper • In Windows XP and earlier, click Start. • Printing 2 Click Programs or All Programs ŒLexmark X5400 • Working with printing, copying, Note: If necessary, click ŒAll Programs Œ Run. Troubleshooting). 2 Double-click the printer Help...
... the screen. your printer) these instructions: • Maintaining the printer 1 Insert the CD. • Connecting the printer to a computer. Lexmark Solution Center Description Where to find this document on Windows operating systems) • In Windows Vista, click . • Loading paper • In Windows XP and earlier, click Start. • Printing 2 Click Programs or All Programs ŒLexmark X5400 • Working with printing, copying, Note: If necessary, click ŒAll Programs Œ Run. Troubleshooting). 2 Double-click the printer Help...

User's Guide
Page 25
...the control panel The display shows: • Printer status • Messages • Menus 2 4 3 5 6 Press 1 2 Copy Mode 1 To • Turn the printer on . 1 2 3 4 Use the To 1 Scanner unit Access the print cartridges. 2 Print cartridge carrier Install, replace, or remove a print cartridge. 3 USB port Connect the printer to a computer using a USB cable. 4 Power supply with port Connect the printer to a power source. Setting up the printer 25 Access the copy default screen and make copies. Note: The mode is selected when the button light is on and off. • Stop the...
...the control panel The display shows: • Printer status • Messages • Menus 2 4 3 5 6 Press 1 2 Copy Mode 1 To • Turn the printer on . 1 2 3 4 Use the To 1 Scanner unit Access the print cartridges. 2 Print cartridge carrier Install, replace, or remove a print cartridge. 3 USB port Connect the printer to a computer using a USB cable. 4 Power supply with port Connect the printer to a power source. Setting up the printer 25 Access the copy default screen and make copies. Note: The mode is selected when the button light is on and off. • Stop the...
User's Guide
Page 28
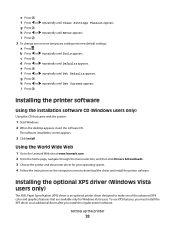
... change one or more temporary settings into new default settings: a Press . c Press . f Press or repeatedly until Tools appears. i Press . Installing the optional XPS driver (Windows Vista users only) The XML Paper Specification (XPS) driver is an optional printer driver designed to download the driver and install the printer software. g Press . b Press or repeatedly until Set Defaults appears. Using the World Wide Web 1 Go to the Lexmark Web site at www.lexmark.com. 2 From the home page, navigate through the menu selection...
... change one or more temporary settings into new default settings: a Press . c Press . f Press or repeatedly until Tools appears. i Press . Installing the optional XPS driver (Windows Vista users only) The XML Paper Specification (XPS) driver is an optional printer driver designed to download the driver and install the printer software. g Press . b Press or repeatedly until Set Defaults appears. Using the World Wide Web 1 Go to the Lexmark Web site at www.lexmark.com. 2 From the home page, navigate through the menu selection...
User's Guide
Page 29
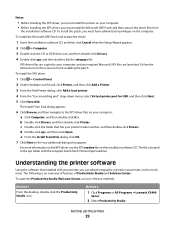
... double-click the setupxps file. Understanding the printer software Using the software that installed with the setupxps batch file (D:\Drivers\xps\readme). To open the Productivity Studio Welcome Screen, use one of Productivity Studio and Solution Center. To install the XPS driver: 1 Click ΠControl Panel. 2 Under Hardware and Sound, click Printer, and then click Add a Printer. 3 From the Add Printer dialog, click Add a local printer. 4 From the "Use an existing port" drop-down menu, select Virtual printer port for USB...
... double-click the setupxps file. Understanding the printer software Using the software that installed with the setupxps batch file (D:\Drivers\xps\readme). To open the Productivity Studio Welcome Screen, use one of Productivity Studio and Solution Center. To install the XPS driver: 1 Click ΠControl Panel. 2 Under Hardware and Sound, click Printer, and then click Add a Printer. 3 From the Add Printer dialog, click Add a local printer. 4 From the "Use an existing port" drop-down menu, select Virtual printer port for USB...

User's Guide
Page 67
... or Photo. 8 Press Start Color or Start Black. Clean cartridges. - Print a test page. • Device Setup-Customize printer setup settings. • Defaults-Customize printer settings. * Temporary setting. Lighter / Darker* Adjust the brightness of the paper loaded. Original Size* Specify the size of the original document. Original Type* Specify the type of the original document. Resize* • Specify the percentage for enlarging or reducing the original copy. • Specify a specific copy size. • Create a multiple-page poster. Paper Type Specify the type of...
... or Photo. 8 Press Start Color or Start Black. Clean cartridges. - Print a test page. • Device Setup-Customize printer setup settings. • Defaults-Customize printer settings. * Temporary setting. Lighter / Darker* Adjust the brightness of the paper loaded. Original Size* Specify the size of the original document. Original Type* Specify the type of the original document. Resize* • Specify the percentage for enlarging or reducing the original copy. • Specify a specific copy size. • Create a multiple-page poster. Paper Type Specify the type of...

User's Guide
Page 74
...Print a test page. • Device Setup-Customize printer setup settings. • Defaults-Customize printer settings. * Temporary setting. Use this To Quality* Adjust the quality of the original document. Scanning to a computer over a network (Direct IP Printing). 2 Load an original document facedown into the ADF. Align cartridges. - Place these items on saving temporary and other setting selections. 9 Press Start Color or Start Black. The scan default screen appears. 2 Press or repeatedly until the scan destination you want appears. 3 If you do not want to change a setting...
...Print a test page. • Device Setup-Customize printer setup settings. • Defaults-Customize printer settings. * Temporary setting. Use this To Quality* Adjust the quality of the original document. Scanning to a computer over a network (Direct IP Printing). 2 Load an original document facedown into the ADF. Align cartridges. - Place these items on saving temporary and other setting selections. 9 Press Start Color or Start Black. The scan default screen appears. 2 Press or repeatedly until the scan destination you want appears. 3 If you do not want to change a setting...

User's Guide
Page 91
... . Series. 2 Click Solution Center. 3 Click the Contact Information tab. Do not use Lexmark Photo Paper or Lexmark PerfectFinish Photo Paper. CHECK PRINT CARTRIDGES If the document still does not have the print quality you find the problem? For more information, see "Installing print cartridges" on your print job, press Copy Mode, Scan Mode, or Photo Card. 2 Press . 3 Press or repeatedly until Quality appears. 4 Press . 5 Press or repeatedly until the quality you are not compatible with this type...
... . Series. 2 Click Solution Center. 3 Click the Contact Information tab. Do not use Lexmark Photo Paper or Lexmark PerfectFinish Photo Paper. CHECK PRINT CARTRIDGES If the document still does not have the print quality you find the problem? For more information, see "Installing print cartridges" on your print job, press Copy Mode, Scan Mode, or Photo Card. 2 Press . 3 Press or repeatedly until Quality appears. 4 Press . 5 Press or repeatedly until the quality you are not compatible with this type...
User's Guide
Page 95
.../Speed setting. Use the Quick Print or Normal setting to go down too quickly These are removed from the print cartridge carrier. Ink levels seem incorrect These are not updated during a print job; The type of documents you print and the print quality you select affect the amount of a print job. The ink levels displayed in the Printing Status window when you print photos or graphics. The ink levels may seem inconsistent in the printer software are possible solutions. Because photos...
.../Speed setting. Use the Quick Print or Normal setting to go down too quickly These are removed from the print cartridge carrier. Ink levels seem incorrect These are not updated during a print job; The type of documents you print and the print quality you select affect the amount of a print job. The ink levels displayed in the Printing Status window when you print photos or graphics. The ink levels may seem inconsistent in the printer software are possible solutions. Because photos...

User's Guide
Page 109
...; White lines appear in graphics or solid black areas • Characters are missing or unexpected • Colors on printout are possible solutions. 3 Click Install. 4 When the Existing Printer Driver Found dialog box appears, select Update the existing driver software. Try one or more square end of the USB cable is plugged into this print server. Check to make sure the device is working properly and that the light is connected to...
...; White lines appear in graphics or solid black areas • Characters are missing or unexpected • Colors on printout are possible solutions. 3 Click Install. 4 When the Existing Printer Driver Found dialog box appears, select Update the existing driver software. Try one or more square end of the USB cable is plugged into this print server. Check to make sure the device is working properly and that the light is connected to...

User's Guide
Page 113
... "Paper jam in the printer" on page 111 and "Paper jam in the paper support" on page 37. • Try loading one page, envelope, or sheet of the following : CLEAR BANNER PAPER JAMS 1 Press to print. Windows 2000 users, click Start Œ Settings Œ Printers. 2 Double-click the print queue device. 3 Click Printer. • Make sure no check mark appears next to Pause Printing. • If a check mark does not appear next to Set As Default Printer, you must select the print queue device for and clear...
... "Paper jam in the printer" on page 111 and "Paper jam in the paper support" on page 37. • Try loading one page, envelope, or sheet of the following : CLEAR BANNER PAPER JAMS 1 Press to print. Windows 2000 users, click Start Œ Settings Œ Printers. 2 Double-click the print queue device. 3 Click Printer. • Make sure no check mark appears next to Pause Printing. • If a check mark does not appear next to Set As Default Printer, you must select the print queue device for and clear...

User's Guide
Page 133
... 31 Maintenance 31 Troubleshooting 31 using 31 C cable connections checking 103, 105 canceling scan job 72 canceling print jobs 47 cannot print to network printer 36 cannot scan to computer over network 118 cards loading 39 printing 48 carrier jam error 120 cartridge error 119 cartridges, print aligning 81 cleaning 81 installing 78 ordering 84 preserving 83 removing 79 using genuine Lexmark 80 wiping 82 Index 133 CD printing photos from 60 transferring all photos and documents 54 transferring selected photos and documents 54 changing temporary files preferences 55 changing e-mail screen...
... 31 Maintenance 31 Troubleshooting 31 using 31 C cable connections checking 103, 105 canceling scan job 72 canceling print jobs 47 cannot print to network printer 36 cannot scan to computer over network 118 cards loading 39 printing 48 carrier jam error 120 cartridge error 119 cartridges, print aligning 81 cleaning 81 installing 78 ordering 84 preserving 83 removing 79 using genuine Lexmark 80 wiping 82 Index 133 CD printing photos from 60 transferring all photos and documents 54 transferring selected photos and documents 54 changing temporary files preferences 55 changing e-mail screen...

User's Guide
Page 134
... of paper 123 paper jam 123 photo ink low 120 photo size error 121 print cartridge missing 122 printing failure 123 right cartridge error 121 right cartridge incorrect 121 right cartridge missing 121 error messages troubleshooting cover open error 120 Ethernet network information needed for setting up Ethernet printing 33 Ethernet networking 33 Ethernet setup information needed for 33 Exposure changing setting 59 exterior of the printer cleaning 83 external devices checking 105 e-mail attaching a scanned image 76 attaching files 76 E-mail button 29 e-mail screen preferences changing 77...
... of paper 123 paper jam 123 photo ink low 120 photo size error 121 print cartridge missing 122 printing failure 123 right cartridge error 121 right cartridge incorrect 121 right cartridge missing 121 error messages troubleshooting cover open error 120 Ethernet network information needed for setting up Ethernet printing 33 Ethernet networking 33 Ethernet setup information needed for 33 Exposure changing setting 59 exterior of the printer cleaning 83 external devices checking 105 e-mail attaching a scanned image 76 attaching files 76 E-mail button 29 e-mail screen preferences changing 77...
User's Guide
Page 136
...) paper guide 24 Automatic Document Feeder (ADF) paper stop 24 control panel 24 paper exit tray 24 paper guide 24 paper support 24 power supply port 25 print cartridge carrier 25 scanner glass 24 scanner unit 25 top cover 24 USB port 25 pausing print jobs 47 PDF creating from a scan 72 photo adjusting hue 58 adjusting saturation 58 applying color effect 59 blurring 57 cropping 56 enhancing 57 sharpening 57 photo cards, loading 39 Photo Greeting Cards button 29 photo ink low 120 Photo Packages 61 Photo Packages button 29 photo paper, loading 37 Photo resolution/size changing 56 photo size error...
...) paper guide 24 Automatic Document Feeder (ADF) paper stop 24 control panel 24 paper exit tray 24 paper guide 24 paper support 24 power supply port 25 print cartridge carrier 25 scanner glass 24 scanner unit 25 top cover 24 USB port 25 pausing print jobs 47 PDF creating from a scan 72 photo adjusting hue 58 adjusting saturation 58 applying color effect 59 blurring 57 cropping 56 enhancing 57 sharpening 57 photo cards, loading 39 Photo Greeting Cards button 29 photo ink low 120 Photo Packages 61 Photo Packages button 29 photo paper, loading 37 Photo resolution/size changing 56 photo size error...

User's Guide
Page 137
... 59 multiple photos at one time using computer 71 over a network 74 photo to Library 71 removing wavy (moire) patterns 59 saving scanned image 69 to computer 74 using the control panel 69 scanning a document 69 scanning takes too long or freezes the computer 117 searched folders preferences changing 55 security information 32 setting up printer on wired network 33 settings are not saved 102 settings, saving 27 setup troubleshooting incorrect language appears on display 86 page does not print 88 power button...
... 59 multiple photos at one time using computer 71 over a network 74 photo to Library 71 removing wavy (moire) patterns 59 saving scanned image 69 to computer 74 using the control panel 69 scanning a document 69 scanning takes too long or freezes the computer 117 searched folders preferences changing 55 security information 32 setting up printer on wired network 33 settings are not saved 102 settings, saving 27 setup troubleshooting incorrect language appears on display 86 page does not print 88 power button...


