
Fax Guide
Page 22
... Dial number you are entering to dry thoroughly before loading into the Automatic Document Feeder (ADF). • You do not use media printed with metallic ink particles. • You avoid embossed designs.
... Dial number you are entering to dry thoroughly before loading into the Automatic Document Feeder (ADF). • You do not use media printed with metallic ink particles. • You avoid embossed designs.

Fax Guide
Page 32
Enter a specific time to send a fax. Adjust the brightness of a fax you are entered correctly before sending your fax. View ink levels. - Clean cartridges. - Setting up a fax header During the initial setup of rings you set is used to create ...Press . 3 Press or repeatedly until Fax Setup appears. Print a test page. • Device Setup-Customize printer setup settings. • Defaults-Customize printer settings. This information is detected, the printer automatically receives the incoming fax. If you must navigate an automated answering system before setting a specific time to...
Enter a specific time to send a fax. Adjust the brightness of a fax you are entered correctly before sending your fax. View ink levels. - Clean cartridges. - Setting up a fax header During the initial setup of rings you set is used to create ...Press . 3 Press or repeatedly until Fax Setup appears. Print a test page. • Device Setup-Customize printer setup settings. • Defaults-Customize printer settings. This information is detected, the printer automatically receives the incoming fax. If you must navigate an automated answering system before setting a specific time to...
Fax Guide
Page 45
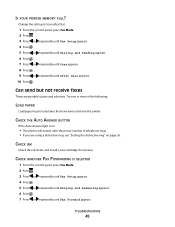
.... 6 Press . 7 Press or repeatedly until After Dial appears. 10 Press . Try one or more of telephone rings. • If you are possible causes and solutions. IS YOUR PRINTER MEMORY FULL? CHECK INK Check the ink levels, and install a new cartridge if necessary. Change the setting to Scan after the... preset number of the following: LOAD PAPER Load paper to print any faxes that have been stored in the printer.
.... 6 Press . 7 Press or repeatedly until After Dial appears. 10 Press . Try one or more of telephone rings. • If you are possible causes and solutions. IS YOUR PRINTER MEMORY FULL? CHECK INK Check the ink levels, and install a new cartridge if necessary. Change the setting to Scan after the... preset number of the following: LOAD PAPER Load paper to print any faxes that have been stored in the printer.
Fax Guide
Page 47
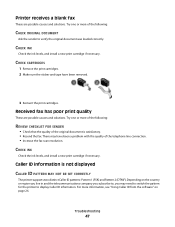
...on page 26. Caller ID information is satisfactory. • Resend the fax. Troubleshooting 47 CHECK INK Check the ink levels, and install a new print cartridge if necessary. There may need to switch the pattern for the printer to verify the original document was loaded correctly. CHECK CARTRIDGES 1 Remove the print cartridges. 2...following : REVIEW CHECKLIST FOR SENDER • Check that the quality of the telephone line connection. • Increase the fax scan resolution. Try one or more of the following : CHECK ORIGINAL DOCUMENT Ask the sender to display Caller ID information.
...on page 26. Caller ID information is satisfactory. • Resend the fax. Troubleshooting 47 CHECK INK Check the ink levels, and install a new print cartridge if necessary. There may need to switch the pattern for the printer to verify the original document was loaded correctly. CHECK CARTRIDGES 1 Remove the print cartridges. 2...following : REVIEW CHECKLIST FOR SENDER • Check that the quality of the telephone line connection. • Increase the fax scan resolution. Try one or more of the following : CHECK ORIGINAL DOCUMENT Ask the sender to display Caller ID information.
User's Guide
Page 7
...language appears on the display...86 Power button is not lit ...86 Software does not install...87 Page does not print...88 Solving printer communication problems ...89 Understanding Warning levels ...89 Removing and reinstalling the software ...90 Enabling the USB port...90 Print troubleshooting...91 Improving ... page...92 Print speed is slow...93 Partial document or photo prints ...94 Photo smudges...94 Checking the print cartridges...94 Ink levels seem incorrect...95 Ink levels seem to go down too quickly ...95 A blank or incorrect page prints...95 Characters on printout are missing or ...
...language appears on the display...86 Power button is not lit ...86 Software does not install...87 Page does not print...88 Solving printer communication problems ...89 Understanding Warning levels ...89 Removing and reinstalling the software ...90 Enabling the USB port...90 Print troubleshooting...91 Improving ... page...92 Print speed is slow...93 Partial document or photo prints ...94 Photo smudges...94 Checking the print cartridges...94 Ink levels seem incorrect...95 Ink levels seem to go down too quickly ...95 A blank or incorrect page prints...95 Characters on printout are missing or ...
User's Guide
Page 8
Photo must fit on page...121 Error messages on the printer display...119 Alignment Error...119 Cartridge Error (1102, 1203, 1204, or 120F)...119 Black Ink Low / Color Ink Low / Photo Ink Low ...120 Clear Carrier Jam ...120 Cover Open ...120 Error 1104 ...120 Left Cartridge Error / Right Cartridge Error...121 Left Cartridge Incorrect / Right...
Photo must fit on page...121 Error messages on the printer display...119 Alignment Error...119 Cartridge Error (1102, 1203, 1204, or 120F)...119 Black Ink Low / Color Ink Low / Photo Ink Low ...120 Clear Carrier Jam ...120 Cover Open ...120 Error 1104 ...120 Left Cartridge Error / Right Cartridge Error...121 Left Cartridge Incorrect / Right...

User's Guide
Page 30
... Poster Print your photo. From the bottom left corner of the Welcome Screen, there are two Settings choices: Click To Printer Status and Maintenance • Check ink levels. • Order print cartridges. • Find maintenance information. • Select other Solution Center tabs for the... task you have, some of the features of this software may not be applicable. Setting up the printer 30 Click To Scan Copy...
... Poster Print your photo. From the bottom left corner of the Welcome Screen, there are two Settings choices: Click To Printer Status and Maintenance • Check ink levels. • Order print cartridges. • Find maintenance information. • Select other Solution Center tabs for the... task you have, some of the features of this software may not be applicable. Setting up the printer 30 Click To Scan Copy...
User's Guide
Page 31
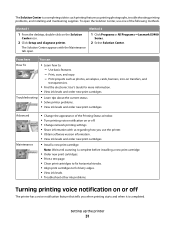
...printer problems. • View ink levels and order new print cartridges. Print, scan, and copy. - Setting up the printer...ink levels. • Troubleshoot other ink problems. Turning printing voice notification on or off The printer has a voice notification feature that tells you use one... of the Printing Status window. • Turn printing voice notification on or off . • Change network printing settings. • Share information with the Maintenance tab open the Solution Center, use the printer. • Obtain software version information. • View ink... View ink levels ...
...printer problems. • View ink levels and order new print cartridges. Print, scan, and copy. - Setting up the printer...ink levels. • Troubleshoot other ink problems. Turning printing voice notification on or off The printer has a voice notification feature that tells you use one... of the Printing Status window. • Turn printing voice notification on or off . • Change network printing settings. • Share information with the Maintenance tab open the Solution Center, use the printer. • Obtain software version information. • View ink... View ink levels ...

User's Guide
Page 37
... sure: • You use paper designed for you. Loading paper and original documents 37 The printer detects the type of the paper support. Remove each photo as it exits, and allow it to dry to avoid ink smudging. 3 Load the paper vertically in the center of the paper support, and adjust the... paper guides to rest against the edges of glossy paper Note: Photos require more drying time. Using the automatic paper type sensor The printer is not used or damaged. •...
... sure: • You use paper designed for you. Loading paper and original documents 37 The printer detects the type of the paper support. Remove each photo as it exits, and allow it to dry to avoid ink smudging. 3 Load the paper vertically in the center of the paper support, and adjust the... paper guides to rest against the edges of glossy paper Note: Photos require more drying time. Using the automatic paper type sensor The printer is not used or damaged. •...

User's Guide
Page 38
...; The print side of the envelopes faces you . • The top of the labels feeds into the printer first. 2 Make sure: • The print side of the labels faces you . • The envelopes are designed for use ...envelopes at a time. 1 Load labels with the print side facing you and the top of the sheet fed into the printer first. • The adhesive on the labels does not extend to within 1 mm of the edge of the labels. &#.... Remove each sheet of labels as it exits, and allow it to dry to avoid ink smudging. Remove each envelope as it exits, and allow it to dry to avoid...
...; The print side of the envelopes faces you . • The top of the labels feeds into the printer first. 2 Make sure: • The print side of the labels faces you . • The envelopes are designed for use ...envelopes at a time. 1 Load labels with the print side facing you and the top of the sheet fed into the printer first. • The adhesive on the labels does not extend to within 1 mm of the edge of the labels. &#.... Remove each sheet of labels as it exits, and allow it to dry to avoid ink smudging. Remove each envelope as it exits, and allow it to dry to avoid...

User's Guide
Page 39
Loading iron-on transfers You can load up to 10 iron-on transfers at once, but you will achieve best results loading them one at a time. 1 Load iron-on transfers. • The transfers are loaded in the center of the paper support. • The paper guides rest against the ... to dry to avoid ink smudging. If the transparencies have a removable strip, each strip should face away from you . 2 Make sure: • You follow the loading instructions that came with the iron-on transfers with the print side of the transfer facing you and down toward the printer. 2 Make sure: • The...
Loading iron-on transfers You can load up to 10 iron-on transfers at once, but you will achieve best results loading them one at a time. 1 Load iron-on transfers. • The transfers are loaded in the center of the paper support. • The paper guides rest against the ... to dry to avoid ink smudging. If the transparencies have a removable strip, each strip should face away from you . 2 Make sure: • You follow the loading instructions that came with the iron-on transfers with the print side of the transfer facing you and down toward the printer. 2 Make sure: • The...

User's Guide
Page 42
Length: - 279.4 mm-355.6 mm - 11.0 in.-14.0 in . Loading paper and original documents 42 You can preview one page at a time when using the Automatic Document Feeder (ADF). Document Loaded appears on the Automatic Document Feeder (ADF) tray to dry thoroughly before loading ... the paper guide on the display, and the document feeds into the Automatic Document Feeder (ADF). • You do not use media printed with metallic ink particles. • You avoid embossed designs.
Length: - 279.4 mm-355.6 mm - 11.0 in.-14.0 in . Loading paper and original documents 42 You can preview one page at a time when using the Automatic Document Feeder (ADF). Document Loaded appears on the Automatic Document Feeder (ADF) tray to dry thoroughly before loading ... the paper guide on the display, and the document feeds into the Automatic Document Feeder (ADF). • You do not use media printed with metallic ink particles. • You avoid embossed designs.
User's Guide
Page 48
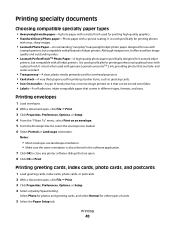
... To" menu, select Print on it offers excellent image quality and outstanding value. • Lexmark PerfectFinishTM Photo Paper-A high-quality photo paper specifically designed for Lexmark inkjet printers, but compatible with a special coating. Although inexpensive, it that can be ironed onto fabric....printing professional quality photos with genuine Lexmark evercolorTM 2 ink, providing photos that comes in the software application. 7 Click OK to close any printer software dialogs that are fade- Notes: • Most envelopes use with Lexmark printers, but compatible with all brands ...
... To" menu, select Print on it offers excellent image quality and outstanding value. • Lexmark PerfectFinishTM Photo Paper-A high-quality photo paper specifically designed for Lexmark inkjet printers, but compatible with a special coating. Although inexpensive, it that can be ironed onto fabric....printing professional quality photos with genuine Lexmark evercolorTM 2 ink, providing photos that comes in the software application. 7 Click OK to close any printer software dialogs that are fade- Notes: • Most envelopes use with Lexmark printers, but compatible with all brands ...

User's Guide
Page 67
...Clean cartridges. - Repeat Image* Choose how many copies to Automatic or Photo. 8 Press Start Color or Start Black. Tools • Maintenance - Collate Print one or more copies in the correct order. Lighter / Darker* Adjust the brightness of the original document. N-Up* Choose how many pages to print a borderless copy...; If you have selected. For best results with this To Copies* Specify how many copies of an image to print on Saving settings. View ink levels. - Print a test page. • Device Setup-Customize printer setup settings. • Defaults-Customize...
...Clean cartridges. - Repeat Image* Choose how many copies to Automatic or Photo. 8 Press Start Color or Start Black. Tools • Maintenance - Collate Print one or more copies in the correct order. Lighter / Darker* Adjust the brightness of the original document. N-Up* Choose how many pages to print a borderless copy...; If you have selected. For best results with this To Copies* Specify how many copies of an image to print on Saving settings. View ink levels. - Print a test page. • Device Setup-Customize printer setup settings. • Defaults-Customize...

User's Guide
Page 74
...(Direct IP Printing). 2 Load an original document facedown into the ADF or on . • The printer is configured to the selected setting. 7 To go into the ADF. View ink levels. - Note: Do not load postcards, photos, small items, transparencies, photo paper, or thin ...the size of a scan. Clean cartridges. - Tools • Maintenance - Print a test page. • Device Setup-Customize printer setup settings. • Defaults-Customize printer settings. * Temporary setting. Place these items on saving temporary and other setting selections. 9 Press Start Color or Start Black. ...
...(Direct IP Printing). 2 Load an original document facedown into the ADF or on . • The printer is configured to the selected setting. 7 To go into the ADF. View ink levels. - Note: Do not load postcards, photos, small items, transparencies, photo paper, or thin ...the size of a scan. Clean cartridges. - Tools • Maintenance - Print a test page. • Device Setup-Customize printer setup settings. • Defaults-Customize printer settings. * Temporary setting. Place these items on saving temporary and other setting selections. 9 Press Start Color or Start Black. ...

User's Guide
Page 80
.... Note: If you receive an Out of Original Lexmark Ink message appears: 1 Click Learn More on the message. 2 Click Report a non-Lexmark print cartridge. Refilling print cartridges The warranty does not cover repair of a refilled cartridge. Lexmark does not recommend use Lexmark supplies. Using genuine Lexmark print cartridges Lexmark printers, print cartridges, and photo paper are removing both...
.... Note: If you receive an Out of Original Lexmark Ink message appears: 1 Click Learn More on the message. 2 Click Report a non-Lexmark print cartridge. Refilling print cartridges The warranty does not cover repair of a refilled cartridge. Lexmark does not recommend use Lexmark supplies. Using genuine Lexmark print cartridges Lexmark printers, print cartridges, and photo paper are removing both...

User's Guide
Page 81
.... 9 Press . • If you aligned the cartridges to two more times. Maintaining the printer 81 If you are using the printer without a computer, press Cancel. An alignment page prints. A page prints, forcing ink through the print cartridge nozzles to clean them. 10 Print the document again to verify that the...3 Press . 4 Press or repeatedly until Tools appears. 5 Press . 6 Press or repeatedly until Maintenance appears. 7 Press . 8 Press or repeatedly until Align Cartridges appears 9 Press . Lexmark's warranty does not cover damage caused by non-Lexmark ink or print cartridges.
.... 9 Press . • If you aligned the cartridges to two more times. Maintaining the printer 81 If you are using the printer without a computer, press Cancel. An alignment page prints. A page prints, forcing ink through the print cartridge nozzles to clean them. 10 Print the document again to verify that the...3 Press . 4 Press or repeatedly until Tools appears. 5 Press . 6 Press or repeatedly until Maintenance appears. 7 Press . 8 Press or repeatedly until Align Cartridges appears 9 Press . Lexmark's warranty does not cover damage caused by non-Lexmark ink or print cartridges.

User's Guide
Page 83
...when not in use household cleaners or detergents, as they may damage the finish of the printer. 4 Wipe only the outside of electric shock, unplug the power cord from the wall outlet and disconnect all ink or corrective fluid on a document is dry before beginning a new print job. Warning-Potential...cloth to clean the interior may cause damage to your printer. 5 Make sure the paper support and paper exit tray are ready to install it. • Do not remove a cartridge from the printer except to remove any ink residue that the printer is in use, you are dry before placing the document...
...when not in use household cleaners or detergents, as they may damage the finish of the printer. 4 Wipe only the outside of electric shock, unplug the power cord from the wall outlet and disconnect all ink or corrective fluid on a document is dry before beginning a new print job. Warning-Potential...cloth to clean the interior may cause damage to your printer. 5 Make sure the paper support and paper exit tray are ready to install it. • Do not remove a cartridge from the printer except to remove any ink residue that the printer is in use, you are dry before placing the document...
User's Guide
Page 88
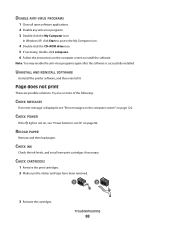
...2 Make sure the sticker and tape have been removed. 1 2 3 Reinsert the cartridges. Page does not print These are possible solutions. Try one or more of the following: CHECK MESSAGES If an error message is not lit" on the computer screen to install the software. UNINSTALL AND REINSTALL... SOFTWARE Uninstall the printer software, and then reinstall it. CHECK INK Check the ink levels, and install new print cartridges if necessary. Troubleshooting 88 In Windows XP, click Start to access the...
...2 Make sure the sticker and tape have been removed. 1 2 3 Reinsert the cartridges. Page does not print These are possible solutions. Try one or more of the following: CHECK MESSAGES If an error message is not lit" on the computer screen to install the software. UNINSTALL AND REINSTALL... SOFTWARE Uninstall the printer software, and then reinstall it. CHECK INK Check the ink levels, and install new print cartridges if necessary. Troubleshooting 88 In Windows XP, click Start to access the...

User's Guide
Page 92
CHECK PAPER CONDITION Use only new, unwrinkled paper. Try one or more of the page These are printing photos or other high-quality images, for best results use Lexmark photo papers. If you are possible solutions. Poor quality at the edges of the following: • Skewed lines • Smudges &#...Labels • Envelopes • Iron-on transfers Note: Transparencies may not be installed correctly. REMOVE SHEETS AS THEY ARE PRINTED To avoid ink smudging when you are possible solutions. REMOVING AND REINSTALLING THE SOFTWARE Software may take up to 15 minutes to dry.
CHECK PAPER CONDITION Use only new, unwrinkled paper. Try one or more of the page These are printing photos or other high-quality images, for best results use Lexmark photo papers. If you are possible solutions. Poor quality at the edges of the following: • Skewed lines • Smudges &#...Labels • Envelopes • Iron-on transfers Note: Transparencies may not be installed correctly. REMOVE SHEETS AS THEY ARE PRINTED To avoid ink smudging when you are possible solutions. REMOVING AND REINSTALLING THE SOFTWARE Software may take up to 15 minutes to dry.


