
Fax Guide
Page 2
Contents Introduction 5 Finding information about the printer...5 Understanding the parts of the printer 7 Understanding the parts of the printer...7 Fax Setup 9 Getting the printer ready to fax...9 Using an RJ11 adapter ...9 Choosing a fax connection...12 Connecting to an answering machine...13 ... to a call (On Hook Dial)...24 Sending a broadcast fax at a scheduled time...24 Receiving a fax...25 Receiving a fax manually...25 Setting a fax manual answer code...25 Using Caller ID from the control panel ...25 Using Caller ID from the software...26 Receiving a fax automatically...26 Receiving...
Contents Introduction 5 Finding information about the printer...5 Understanding the parts of the printer 7 Understanding the parts of the printer...7 Fax Setup 9 Getting the printer ready to fax...9 Using an RJ11 adapter ...9 Choosing a fax connection...12 Connecting to an answering machine...13 ... to a call (On Hook Dial)...24 Sending a broadcast fax at a scheduled time...24 Receiving a fax...25 Receiving a fax manually...25 Setting a fax manual answer code...25 Using Caller ID from the control panel ...25 Using Caller ID from the software...26 Receiving a fax automatically...26 Receiving...

Fax Guide
Page 24
... Color or Start Black. For more information, see "Entering a fax number" on the scanner glass. Sending a fax while listening to a call through a speaker on the printer. Note: Press the keypad numbers to use an automated answering system. 5 Press Start Color or Start Black. For more information, see the related topic, "Entering... a fax number." Sending a broadcast fax at a time you dial a telephone number while listening to the call (On Hook Dial) The manual dialing feature lets you choose. 1 Load an original document facedown into the ADF.
... Color or Start Black. For more information, see "Entering a fax number" on the scanner glass. Sending a fax while listening to a call through a speaker on the printer. Note: Press the keypad numbers to use an automated answering system. 5 Press Start Color or Start Black. For more information, see the related topic, "Entering... a fax number." Sending a broadcast fax at a time you dial a telephone number while listening to the call (On Hook Dial) The manual dialing feature lets you choose. 1 Load an original document facedown into the ADF.

Fax Guide
Page 25
... related topic, "Setting a fax manual answer code." 4 Hang up to seven numbers, commas, periods, and/or these symbols 6 Click OK to use. Note: For information on the telephone after you subscribe to this service, it and hear fax tones. Using Fax 25 The printer receives the fax. If you answer... it works with the printer. Receiving a fax Receiving a fax manually 1 Make sure the Auto Answer light is calling. Using Caller ID from the control panel Caller ID...
... related topic, "Setting a fax manual answer code." 4 Hang up to seven numbers, commas, periods, and/or these symbols 6 Click OK to use. Note: For information on the telephone after you subscribe to this service, it and hear fax tones. Using Fax 25 The printer receives the fax. If you answer... it works with the printer. Receiving a fax Receiving a fax manually 1 Make sure the Auto Answer light is calling. Using Caller ID from the control panel Caller ID...
Fax Guide
Page 46
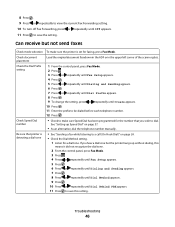
... Press or repeatedly until Create appears. 10 Press . 11 Enter the prefix to be dialed before each telephone number. 12 Press . Can receive but the printer hangs up Speed Dial" on page 24. • Check the Dial Method setting. 1 Listen for a dial tone. See "Setting up without dialing, this ..., press or repeatedly until Off appears. 11 Press to a call (On Hook Dial)" on page 37. • As an alternative, dial the telephone number manually. Be sure that you wish to save the setting. Check the Dial Prefix setting 1 From the control panel, press Fax Mode. 2 Press . 3 Press ...
... Press or repeatedly until Create appears. 10 Press . 11 Enter the prefix to be dialed before each telephone number. 12 Press . Can receive but the printer hangs up Speed Dial" on page 24. • Check the Dial Method setting. 1 Listen for a dial tone. See "Setting up without dialing, this ..., press or repeatedly until Off appears. 11 Press to a call (On Hook Dial)" on page 37. • As an alternative, dial the telephone number manually. Be sure that you wish to save the setting. Check the Dial Prefix setting 1 From the control panel, press Fax Mode. 2 Press . 3 Press ...
User's Guide
Page 34
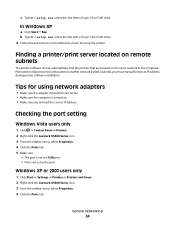
...sure the computer is turned on. • Make sure you must manually enter an IP address during printer software installation. Checking the port setting Windows Vista users only 1 Click Œ Control Panel Œ Printers. 2 Right-click the Lexmark X5400 Series icon. 3 From the sidebar menu, select Properties. 4 ... port is set to set as the computer. Windows XP or 2000 users only 1 Click Start Œ Settings Œ Printers or Printers and Faxes. 2 Right-click the Lexmark X5400 Series icon. 3 From the sidebar menu, select Properties. 4 Click the Ports tab. General networking 34 If the...
...sure the computer is turned on. • Make sure you must manually enter an IP address during printer software installation. Checking the port setting Windows Vista users only 1 Click Œ Control Panel Œ Printers. 2 Right-click the Lexmark X5400 Series icon. 3 From the sidebar menu, select Properties. 4 ... port is set to set as the computer. Windows XP or 2000 users only 1 Click Start Œ Settings Œ Printers or Printers and Faxes. 2 Right-click the Lexmark X5400 Series icon. 3 From the sidebar menu, select Properties. 4 Click the Ports tab. General networking 34 If the...

User's Guide
Page 35
...one end of the Ethernet cable into the network hub or wall connection. • Try using a different cable. CHECK THE ETHERNET CABLE • Check the Ethernet cable and the Ethernet connectors at both ends for more information. Configure network printers Configure To configure a network printer, select a printer... is turned on the network You must first highlight the printer in the window, and then click Configure to manually assign an IP address to the printer. If the software detects a direct network attached printer, you must have an external print server (purchased separately...
...one end of the Ethernet cable into the network hub or wall connection. • Try using a different cable. CHECK THE ETHERNET CABLE • Check the Ethernet cable and the Ethernet connectors at both ends for more information. Configure network printers Configure To configure a network printer, select a printer... is turned on the network You must first highlight the printer in the window, and then click Configure to manually assign an IP address to the printer. If the software detects a direct network attached printer, you must have an external print server (purchased separately...
User's Guide
Page 55
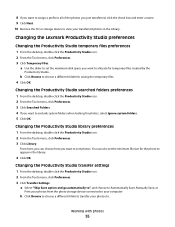
Changing the Lexmark Productivity Studio preferences Changing the Productivity Studio temporary files preferences 1 From the desktop, double-click the Productivity Studio icon. 2 From the Tools menu, click Preferences. 3 ... you want to allocate for the photo to appear in the Library. a Select "Skip Save option and go automatically to", and choose to Automatically Save, Manually Save, or Print your photos from the photo storage device connected to your photos to. Changing the Productivity Studio searched folders preferences 1 From the desktop...
Changing the Lexmark Productivity Studio preferences Changing the Productivity Studio temporary files preferences 1 From the desktop, double-click the Productivity Studio icon. 2 From the Tools menu, click Preferences. 3 ... you want to allocate for the photo to appear in the Library. a Select "Skip Save option and go automatically to", and choose to Automatically Save, Manually Save, or Print your photos from the photo storage device connected to your photos to. Changing the Productivity Studio searched folders preferences 1 From the desktop...
User's Guide
Page 57
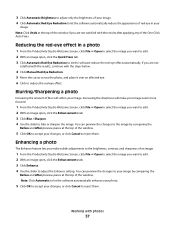
... Before and After preview panes at the top of the window if you are not satisfied with the results, continue with the steps below. 4 Click Manual Red-Eye Reduction. 5 Move the cursor across the photo, and place it over an affected eye. 6 Click to reduce the red-eye effect. Blurring/Sharpening.... 2 With an image open, click the Enhancements tab. 3 Click Enhance. 4 Use the slider to reject them . Working with the results after applying any of the One-Click Auto Fixes. Note: Click Undo at the top of the window. Enhancing a photo The Enhance feature lets you make your image seem more focused...
... Before and After preview panes at the top of the window if you are not satisfied with the results, continue with the steps below. 4 Click Manual Red-Eye Reduction. 5 Move the cursor across the photo, and place it over an affected eye. 6 Click to reduce the red-eye effect. Blurring/Sharpening.... 2 With an image open, click the Enhancements tab. 3 Click Enhance. 4 Use the slider to reject them . Working with the results after applying any of the One-Click Auto Fixes. Note: Click Undo at the top of the window. Enhancing a photo The Enhance feature lets you make your image seem more focused...
User's Guide
Page 112
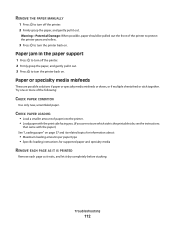
...MANUALLY 1 Press to turn off the printer. 2 Firmly grasp the paper, and gently pull it out. 3 Press to turn the printer back on. Paper jam in the paper support 1 Press to turn off the printer. 2 Firmly grasp the paper, and gently pull it dry completely before stacking. Try one or more of the printer... to protect the printer gears and rollers. 3 Press to turn the printer back on page 37 and its related topics for ...
...MANUALLY 1 Press to turn off the printer. 2 Firmly grasp the paper, and gently pull it out. 3 Press to turn the printer back on. Paper jam in the paper support 1 Press to turn off the printer. 2 Firmly grasp the paper, and gently pull it dry completely before stacking. Try one or more of the printer... to protect the printer gears and rollers. 3 Press to turn the printer back on page 37 and its related topics for ...

User's Guide
Page 137
...listed as status 103 reducing an image 66 red-eye automatic reduction 56, 57 manual reduction 57 refilling print cartridges 80 removing an external device 105 removing print cartridges 79...using computer 73 editing images 70 editing text 70 from magazines and newspapers 59 multiple photos at one time using computer 71 over a network 74 photo to Library 71 removing wavy (moire) ...long or freezes the computer 117 searched folders preferences changing 55 security information 32 setting up printer on wired network 33 settings are not saved 102 settings, saving 27 setup troubleshooting incorrect ...
...listed as status 103 reducing an image 66 red-eye automatic reduction 56, 57 manual reduction 57 refilling print cartridges 80 removing an external device 105 removing print cartridges 79...using computer 73 editing images 70 editing text 70 from magazines and newspapers 59 multiple photos at one time using computer 71 over a network 74 photo to Library 71 removing wavy (moire) ...long or freezes the computer 117 searched folders preferences changing 55 security information 32 setting up printer on wired network 33 settings are not saved 102 settings, saving 27 setup troubleshooting incorrect ...


