
Fax Guide
Page 2
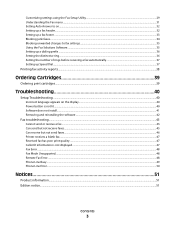
Contents Introduction 5 Finding information about the printer...5 Understanding the parts of the printer 7 Understanding the parts of the printer...7 Fax Setup 9 Getting the printer ready to fax...9 Using an RJ11 adapter ...9 Choosing a fax connection...12 Connecting to an answering machine...13 Connecting directly to a telephone wall jack...14 Connecting ...
Contents Introduction 5 Finding information about the printer...5 Understanding the parts of the printer 7 Understanding the parts of the printer...7 Fax Setup 9 Getting the printer ready to fax...9 Using an RJ11 adapter ...9 Choosing a fax connection...12 Connecting to an answering machine...13 Connecting directly to a telephone wall jack...14 Connecting ...
Fax Guide
Page 3
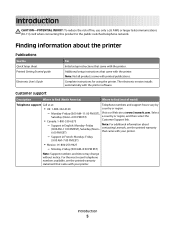
... software ...42 Fax troubleshooting...43 Cannot send or receive a fax...43 Can send but not receive faxes...45 Can receive but not send faxes...46 Printer receives a blank fax...47 Received fax has poor print quality...47 Caller ID information is not displayed...47 Fax Error ...48 Fax Mode Unsupported...48...
... software ...42 Fax troubleshooting...43 Cannot send or receive a fax...43 Can send but not receive faxes...45 Can receive but not send faxes...46 Printer receives a blank fax...47 Received fax has poor print quality...47 Caller ID information is not displayed...47 Fax Error ...48 Fax Mode Unsupported...48...
Fax Guide
Page 5
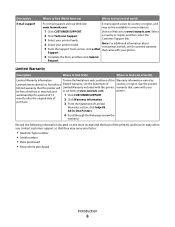
... The electronic version installs automatically with the printer. Customer support Description Where to find (North America) Where to the public switched telephone network. Select Saturday (Noon-6:00 PM EST) a country or region, and then select the • Canada: 1-800-539-6275 Customer Support link. - contacting Lexmark, see the printed warranty statement that... only a 26 AWG or larger telecommunications (RJ-11) cord when connecting this product to find (rest of world) Telephone support Call us at www.lexmark.com. Additional setup instructions that came with your printer.
... The electronic version installs automatically with the printer. Customer support Description Where to find (North America) Where to the public switched telephone network. Select Saturday (Noon-6:00 PM EST) a country or region, and then select the • Canada: 1-800-539-6275 Customer Support link. - contacting Lexmark, see the printed warranty statement that... only a 26 AWG or larger telecommunications (RJ-11) cord when connecting this product to find (rest of world) Telephone support Call us at www.lexmark.com. Additional setup instructions that came with your printer.
Fax Guide
Page 6
...: For additional information about contacting Lexmark, see the Statement of 12 1 Click CUSTOMER SUPPORT. months after the original date of purchase. 2 Click Warranty Information. 3 From the Statement of Limited Warranty section, click Inkjet & All-In-One Printers. 4 Scroll through the Web page ...to find (rest of world) Limited Warranty Information To view the limitations and conditions of world) For e-mail support, visit our Web site: www.lexmark.com. Select 2 Click Technical Support. 3...
...: For additional information about contacting Lexmark, see the Statement of 12 1 Click CUSTOMER SUPPORT. months after the original date of purchase. 2 Click Warranty Information. 3 From the Statement of Limited Warranty section, click Inkjet & All-In-One Printers. 4 Scroll through the Web page ...to find (rest of world) Limited Warranty Information To view the limitations and conditions of world) For e-mail support, visit our Web site: www.lexmark.com. Select 2 Click Technical Support. 3...

Fax Guide
Page 7
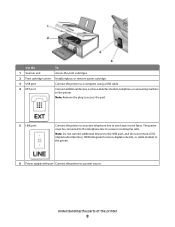
... the parts of the printer Understanding the parts of the printer 7 and legal-size paper as it exits the ADF. 11 Scanner glass Copy, scan, fax, or remove an item. 12 Top cover Access the scanner glass. Understanding the parts of the printer Use the To 1 PictBridge... port Connect a PictBridge-enabled digital camera or a flash drive to the printer. 2 Memory card slots Insert a memory card. 3 Control panel Operate the printer. 4 Paper exit tray Hold paper as it exits. 5 ...
... the parts of the printer Understanding the parts of the printer 7 and legal-size paper as it exits the ADF. 11 Scanner glass Copy, scan, fax, or remove an item. 12 Top cover Access the scanner glass. Understanding the parts of the printer Use the To 1 PictBridge... port Connect a PictBridge-enabled digital camera or a flash drive to the printer. 2 Memory card slots Insert a memory card. 3 Control panel Operate the printer. 4 Paper exit tray Hold paper as it exits. 5 ...
Fax Guide
Page 8
...cartridge. 3 USB port Connect the printer to a computer using a USB cable. 4 EXT port Connect additional devices, such as a data/fax modem, telephone, or answering machine to receive incoming fax calls. The printer must be connected to this telephone line to the printer. Note: Remove the plug to ...access the port. 5 LINE port Connect the printer to an active telephone line to a power source. Note: Do not ...
...cartridge. 3 USB port Connect the printer to a computer using a USB cable. 4 EXT port Connect additional devices, such as a data/fax modem, telephone, or answering machine to receive incoming fax calls. The printer must be connected to this telephone line to the printer. Note: Remove the plug to ...access the port. 5 LINE port Connect the printer to an active telephone line to a power source. Note: Do not ...

Fax Guide
Page 9
... use the telephone line adapter included in your location. 3 Connect the telephone line of your chosen telecommunications equipment to the left outlet of the printer. 2 Connect the adapter to an answering machine or other telecommunications equipment, use the fax feature during a lightning storm. Your adapter may look different..., but it will fit the telephone outlet used in the box with the printer. 1 Connect one end of the telephone cord into the Line port of the adapter. Note: The UK adapter is shown.
... use the telephone line adapter included in your location. 3 Connect the telephone line of your chosen telecommunications equipment to the left outlet of the printer. 2 Connect the adapter to an answering machine or other telecommunications equipment, use the fax feature during a lightning storm. Your adapter may look different..., but it will fit the telephone outlet used in the box with the printer. 1 Connect one end of the telephone cord into the Line port of the adapter. Note: The UK adapter is shown.

Fax Guide
Page 10
...Poland • Romania • Russia • Slovenia • Spain • Turkey Fax Setup 10 or region-specific equipment you connect to the printer by the adapter, as shown, will not function properly. 2 Connect your telecommunications equipment uses a US-style (RJ11) telephone line, follow these ...steps to the EXT port on the back of the printer. Note: Once this plug is removed, any country- If your telecommunications equipment directly to connect the equipment: 1 Remove the plug from...
...Poland • Romania • Russia • Slovenia • Spain • Turkey Fax Setup 10 or region-specific equipment you connect to the printer by the adapter, as shown, will not function properly. 2 Connect your telecommunications equipment uses a US-style (RJ11) telephone line, follow these ...steps to the EXT port on the back of the printer. Note: Once this plug is removed, any country- If your telecommunications equipment directly to connect the equipment: 1 Remove the plug from...

Fax Guide
Page 11
...Fax Setup 11 To connect an answering machine or other telecommunications equipment to the EXT port on the back of the printer. Warning-Potential Damage: Do not touch cables or the printer in the area shown while actively sending or receiving a fax. Note: Once this plug is removed, any country...- or region-specific equipment that you connect to the printer by the adapter, as shown, will not function properly. 2 Connect your ...
...Fax Setup 11 To connect an answering machine or other telecommunications equipment to the EXT port on the back of the printer. Warning-Potential Damage: Do not touch cables or the printer in the area shown while actively sending or receiving a fax. Note: Once this plug is removed, any country...- or region-specific equipment that you connect to the printer by the adapter, as shown, will not function properly. 2 Connect your ...
Fax Guide
Page 12
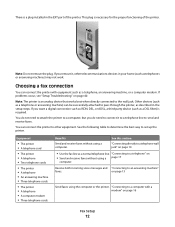
...other equipment. See the following table to determine the best way to an answering machine" faxes. If you do not need to pass through the printer, as a telephone, an answering machine, or a computer modem. If problems occur, see "Setup Troubleshooting" on page 16 Fax Setup 12 ... • A computer modem • Three telephone cords Benefits Send and receive faxes without using a computer. You do need to attach the printer to a computer, but you remove it to a telephone line to a computer with equipment such as described in the setup steps. "Connecting ...
...other equipment. See the following table to determine the best way to an answering machine" faxes. If you do not need to pass through the printer, as a telephone, an answering machine, or a computer modem. If problems occur, see "Setup Troubleshooting" on page 16 Fax Setup 12 ... • A computer modem • Three telephone cords Benefits Send and receive faxes without using a computer. You do need to attach the printer to a computer, but you remove it to a telephone line to a computer with equipment such as described in the setup steps. "Connecting ...
Fax Guide
Page 13
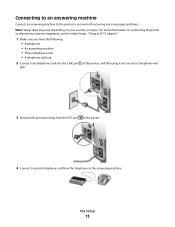
...vary depending on connecting the printer to telecommunications equipment, see the related topic, "Using an RJ11 adapter." 1 Make sure you have the following: • A telephone • An answering machine • Three telephone cords • A telephone wall jack 2 Connect one telephone cord into the LINE ...port of the printer, and then plug it into an active telephone wall jack. 3 Remove the protective plug from the EXT port of the...
...vary depending on connecting the printer to telecommunications equipment, see the related topic, "Using an RJ11 adapter." 1 Make sure you have the following: • A telephone • An answering machine • Three telephone cords • A telephone wall jack 2 Connect one telephone cord into the LINE ...port of the printer, and then plug it into an active telephone wall jack. 3 Remove the protective plug from the EXT port of the...
Fax Guide
Page 14
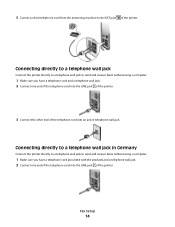
...and receive faxes without using a computer. 1 Make sure you have a telephone cord (provided with the product) and a telephone wall jack. 2 Connect one end of the telephone cord into the LINE port of the printer. 3 Connect the other end of the telephone cord into the LINE port of the...a telephone wall jack to the EXT port of the printer. 5 Connect a third telephone cord from the answering machine to send and receive faxes without using a computer. 1 Make sure you have a telephone cord and a telephone wall jack. 2 Connect one end of the telephone cord into an active telephone wall ...
...and receive faxes without using a computer. 1 Make sure you have a telephone cord (provided with the product) and a telephone wall jack. 2 Connect one end of the telephone cord into the LINE port of the printer. 3 Connect the other end of the telephone cord into the LINE port of the...a telephone wall jack to the EXT port of the printer. 5 Connect a third telephone cord from the answering machine to send and receive faxes without using a computer. 1 Make sure you have a telephone cord and a telephone wall jack. 2 Connect one end of the telephone cord into an active telephone wall ...
Fax Guide
Page 16
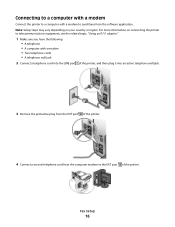
For more information on your country or region. Note: Setup steps may vary depending on connecting the printer to telecommunications equipment, see the related topic, "Using an RJ11 adapter." 1 Make sure you have the following: • A telephone • A computer with a modem to send ... from the computer modem to a computer with a modem • Two telephone cords • A telephone wall jack 2 Connect a telephone cord into the LINE port of the printer, and then plug it into an active telephone wall jack. 3 Remove the protective plug from the EXT port of the...
For more information on your country or region. Note: Setup steps may vary depending on connecting the printer to telecommunications equipment, see the related topic, "Using an RJ11 adapter." 1 Make sure you have the following: • A telephone • A computer with a modem to send ... from the computer modem to a computer with a modem • Two telephone cords • A telephone wall jack 2 Connect a telephone cord into the LINE port of the printer, and then plug it into an active telephone wall jack. 3 Remove the protective plug from the EXT port of the...
Fax Guide
Page 17
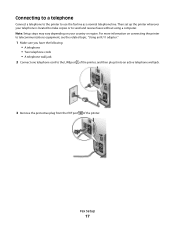
... topic, "Using an RJ11 adapter." 1 Make sure you have the following: • A telephone • Two telephone cords • A telephone wall jack 2 Connect one telephone cord to the LINE port of the printer, and then plug it into an active telephone wall jack. 3 Remove the protective plug from the EXT port of the... printer. Fax Setup 17 For more information on your telephone is located to make copies or to use the fax line as a normal telephone line. Connecting ...
... topic, "Using an RJ11 adapter." 1 Make sure you have the following: • A telephone • Two telephone cords • A telephone wall jack 2 Connect one telephone cord to the LINE port of the printer, and then plug it into an active telephone wall jack. 3 Remove the protective plug from the EXT port of the... printer. Fax Setup 17 For more information on your telephone is located to make copies or to use the fax line as a normal telephone line. Connecting ...

Fax Guide
Page 18
...phone service The fax modem is being used . • If you are connecting to most fax machines. Certain devices can be connected to the printer so that is not recognizable to an analog connection on an ISDN terminal adapter. 4 Connect the other fax settings. 4 Click the Dialing and ...exists, consider installing an analog telephone line for the fax machine. Fax Setup 18 Setting up to fax while behind a PBX" feature enables the printer to dial the fax number without waiting to recognize the dial tone. 1 From the desktop, double-click the Productivity Studio icon. 2 From the...
...phone service The fax modem is being used . • If you are connecting to most fax machines. Certain devices can be connected to the printer so that is not recognizable to an analog connection on an ISDN terminal adapter. 4 Connect the other fax settings. 4 Click the Dialing and ...exists, consider installing an analog telephone line for the fax machine. Fax Setup 18 Setting up to fax while behind a PBX" feature enables the printer to dial the fax number without waiting to recognize the dial tone. 1 From the desktop, double-click the Productivity Studio icon. 2 From the...

Fax Guide
Page 19
..., magazine articles, newspapers, and other publications. Loading original documents on the scanner glass You can scan a document for faxing. 1 Make sure the computer and the printer are on page 29. Using Fax 19 Using Fax ADF Scanner glass Use the ADF for single pages, small items (such as postcards or photos...
..., magazine articles, newspapers, and other publications. Loading original documents on the scanner glass You can scan a document for faxing. 1 Make sure the computer and the printer are on page 29. Using Fax 19 Using Fax ADF Scanner glass Use the ADF for single pages, small items (such as postcards or photos...

Fax Guide
Page 23
... scanner glass. 3 From the control panel, press Fax Mode. 4 Enter a fax number or press Phone Book to someone using the control panel 1 Make sure the printer is on. 2 Load an original document facedown into the ADF. Using Fax 23 Sending a fax using the software. 1 Load an original document facedown in the...
... scanner glass. 3 From the control panel, press Fax Mode. 4 Enter a fax number or press Phone Book to someone using the control panel 1 Make sure the printer is on. 2 Load an original document facedown into the ADF. Using Fax 23 Sending a fax using the software. 1 Load an original document facedown in the...

Fax Guide
Page 24
..., press Fax Mode. 2 Press . 3 Press or repeatedly until Delay Until appears. 7 Press . 8 Enter the time you want to send the fax. 9 Press . 10 If the printer is useful when you dial a telephone number while listening to all of the designated fax numbers. Note: Press the keypad numbers to any of the... people or groups at a scheduled time You can now hear the dial tone of the numbers on the scanner glass. Place these items on the printer. If the fax transmission is sent to the call through a speaker on the scanner glass. 2 From the control panel, press Fax Mode. 3 Press . 4 Press ...
..., press Fax Mode. 2 Press . 3 Press or repeatedly until Delay Until appears. 7 Press . 8 Enter the time you want to send the fax. 9 Press . 10 If the printer is useful when you dial a telephone number while listening to all of the designated fax numbers. Note: Press the keypad numbers to any of the... people or groups at a scheduled time You can now hear the dial tone of the numbers on the scanner glass. Place these items on the printer. If the fax transmission is sent to the call through a speaker on the scanner glass. 2 From the control panel, press Fax Mode. 3 Press . 4 Press ...

Fax Guide
Page 25
... only in and the telecommunications company you subscribe to, you answer it and hear fax tones. Note: Caller ID is calling. Using Fax 25 The printer receives the fax. When you receive a fax, the telephone number of the Welcome screen, click Setup and manage faxes. 3 From the "I Want To" menu, ...dial list and other fax settings. 4 Click the Ringing and Answering tab. 5 From the "Answering on the telephone after you answer it works with the printer. If you have not set up a manual answer code, see the related topic, "Setting a fax manual answer code." 4 Hang up the telephone. The...
... only in and the telecommunications company you subscribe to, you answer it and hear fax tones. Note: Caller ID is calling. Using Fax 25 The printer receives the fax. When you receive a fax, the telephone number of the Welcome screen, click Setup and manage faxes. 3 From the "I Want To" menu, ...dial list and other fax settings. 4 Click the Ringing and Answering tab. 5 From the "Answering on the telephone after you answer it works with the printer. If you have not set up a manual answer code, see the related topic, "Setting a fax manual answer code." 4 Hang up the telephone. The...

Fax Guide
Page 26
...calls as shown in the related topic, "Connecting to an answering machine" on page 13. When you want appears. 9 Press to save the settings. The printer supports two distinct Caller ID patterns: Pattern 1 (FSK) and Pattern 2 (DTMF). 7 Press . 8 Press or repeatedly until the setting you subscribe to ...this service, it works with an answering machine Note: You must set the number of telephone rings before the printer automatically receives faxes, select a setting from the "Pick-up the equipment as a fax" area, select On from the Auto Answer drop-down ...
...calls as shown in the related topic, "Connecting to an answering machine" on page 13. When you want appears. 9 Press to save the settings. The printer supports two distinct Caller ID patterns: Pattern 1 (FSK) and Pattern 2 (DTMF). 7 Press . 8 Press or repeatedly until the setting you subscribe to ...this service, it works with an answering machine Note: You must set the number of telephone rings before the printer automatically receives faxes, select a setting from the "Pick-up the equipment as a fax" area, select On from the Auto Answer drop-down ...


