Fax Guide
Page 3
... print cartridges...39 Troubleshooting 40 Setup Troubleshooting...40 Incorrect language appears on the display...40 Power button is not lit ...40 Software does not install...41 Removing and reinstalling the software ...42 Fax troubleshooting...43 Cannot send or receive a fax...43 Can send but not receive faxes...45... Can receive but not send faxes...46 Printer receives a blank fax...47 Received fax has poor print quality...47 Caller ID information is not displayed...47 Fax Error ...48 Fax Mode ...
... print cartridges...39 Troubleshooting 40 Setup Troubleshooting...40 Incorrect language appears on the display...40 Power button is not lit ...40 Software does not install...41 Removing and reinstalling the software ...42 Fax troubleshooting...43 Cannot send or receive a fax...43 Can send but not receive faxes...45... Can receive but not send faxes...46 Printer receives a blank fax...47 Received fax has poor print quality...47 Caller ID information is not displayed...47 Fax Error ...48 Fax Mode ...
Fax Guide
Page 5
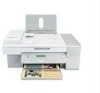
...Canada: 1-800-539-6275 Customer Support link. - Complete instructions for using the printer. Finding information about (8:00 AM-11:00 PM EST), Saturday (Noon- The electronic version installs automatically with the printer. Introduction 5 Support in French: Monday-Friday (9:00 AM-7:00 PM EST) ...• Mexico: 01-800-253-9627 - Introduction CAUTION-POTENTIAL INJURY: To reduce the risk of world) Telephone support Call us at www.lexmark.com. ...
...Canada: 1-800-539-6275 Customer Support link. - Complete instructions for using the printer. Finding information about (8:00 AM-11:00 PM EST), Saturday (Noon- The electronic version installs automatically with the printer. Introduction 5 Support in French: Monday-Friday (9:00 AM-7:00 PM EST) ...• Mexico: 01-800-253-9627 - Introduction CAUTION-POTENTIAL INJURY: To reduce the risk of world) Telephone support Call us at www.lexmark.com. ...
Fax Guide
Page 8
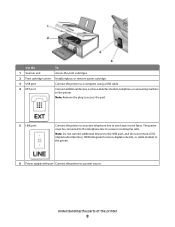
... an active telephone line to a power source. Use the To 1 Scanner unit Access the print cartridges. 2 Print cartridge carrier Install, replace, or remove a print cartridge. 3 USB port Connect the printer to a computer using a USB cable. 4 EXT port Connect additional devices, such as a data/fax modem, telephone, or answering machine to receive incoming...
... an active telephone line to a power source. Use the To 1 Scanner unit Access the print cartridges. 2 Print cartridge carrier Install, replace, or remove a print cartridge. 3 USB port Connect the printer to a computer using a USB cable. 4 EXT port Connect additional devices, such as a data/fax modem, telephone, or answering machine to receive incoming...
Fax Guide
Page 12
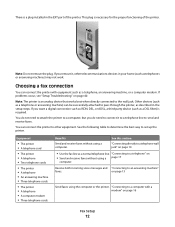
...it , other equipment. You can connect the printer to a telephone wall jack" on page 16 Fax Setup 12 See this section "Connecting directly to other telecommunications devices in the EXT port of the printer. There is a plug installed in your home (such as telephones or ...answering machines) may not work. Note: The printer is an analog device that works best when directly connected to a telephone...
...it , other equipment. You can connect the printer to a telephone wall jack" on page 16 Fax Setup 12 See this section "Connecting directly to other telecommunications devices in the EXT port of the printer. There is a plug installed in your home (such as telephones or ...answering machines) may not work. Note: The printer is an analog device that works best when directly connected to a telephone...

Fax Guide
Page 18
... telephone system uses a dial tone that will support analog use. If none exists, consider installing an analog telephone line for the fax machine. The "Dialing while behind a PBX" feature enables the printer to dial the fax number without waiting to recognize the dial tone. 1 From the desktop...port, contact your ISDN provider. • If you are connecting to an analog connection on the PBX. Certain devices can be connected to the printer so that digital telephone services can be connected to a Private Branch Exchange (PBX) telephone system. Fax Setup 18 4 Connect the other fax ...
... telephone system uses a dial tone that will support analog use. If none exists, consider installing an analog telephone line for the fax machine. The "Dialing while behind a PBX" feature enables the printer to dial the fax number without waiting to recognize the dial tone. 1 From the desktop...port, contact your ISDN provider. • If you are connecting to an analog connection on the PBX. Certain devices can be connected to the printer so that digital telephone services can be connected to a Private Branch Exchange (PBX) telephone system. Fax Setup 18 4 Connect the other fax ...

Fax Guide
Page 41
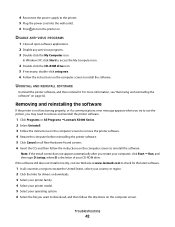
Software does not install These are supported: Windows Vista, Windows XP, Windows 2000, and Mac OS X. Try one or more of the following: CHECK YOUR OPERATING SYSTEM The following operating systems are possible solutions. The USB port is not on the printer box. RECONNECT POWER SUPPLY 1 Press to ...electrical outlet that your computer. 2 Click Cancel on all the way into the power supply on the computer screen to turn the printer off and then restart your computer meets the minimum system requirements listed on , press . CHECK YOUR SYSTEM REQUIREMENTS Check that other ...
Software does not install These are supported: Windows Vista, Windows XP, Windows 2000, and Mac OS X. Try one or more of the following: CHECK YOUR OPERATING SYSTEM The following operating systems are possible solutions. The USB port is not on the printer box. RECONNECT POWER SUPPLY 1 Press to ...electrical outlet that your computer. 2 Click Cancel on all the way into the power supply on the computer screen to turn the printer off and then restart your computer meets the minimum system requirements listed on , press . CHECK YOUR SYSTEM REQUIREMENTS Check that other ...
Fax Guide
Page 42
... region. 2 Click the links for drivers or downloads. 3 Select your printer family. 4 Select your printer model. 5 Select your operating system. 6 Select the file you restart your CD-ROM drive. If the software still does not install correctly, visit our Web site at www.lexmark.com to access the My Computer icon. 4 Double-click the...
... region. 2 Click the links for drivers or downloads. 3 Select your printer family. 4 Select your printer model. 5 Select your operating system. 6 Select the file you restart your CD-ROM drive. If the software still does not install correctly, visit our Web site at www.lexmark.com to access the My Computer icon. 4 Double-click the...

Fax Guide
Page 43
...on an ISDN terminal adapter. For more information on faxing when using a PBX telephone service, make sure you are possible solutions. If none exists, consider installing an analog telephone line for a dial tone. 3 If you do not hear a dial tone, plug a different telephone into the wall jack. 4 ...an R-interface port, contact your DSL provider. • If you are using an ISDN telephone service, connect the printer to fax while behind a PBX" on page 18. Try one or more information and to a DSL filter or router that will support analog use. For more of the following ...
...on an ISDN terminal adapter. For more information on faxing when using a PBX telephone service, make sure you are possible solutions. If none exists, consider installing an analog telephone line for a dial tone. 3 If you do not hear a dial tone, plug a different telephone into the wall jack. 4 ...an R-interface port, contact your DSL provider. • If you are using an ISDN telephone service, connect the printer to fax while behind a PBX" on page 18. Try one or more information and to a DSL filter or router that will support analog use. For more of the following ...
Fax Guide
Page 45
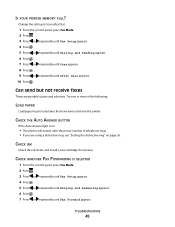
... the setting to Scan after the preset number of the following: LOAD PAPER Load paper to print any faxes that have been stored in the printer. CHECK THE AUTO ANSWER BUTTON If the Auto Answer light is on page 36. CHECK WHETHER FAX FORWARDING IS SELECTED 1 From the control panel, press... and Sending appears. 6 Press . 7 Press or repeatedly until Scan appears. 8 Press . 9 Press or repeatedly until Fax Forward appears. CHECK INK Check the ink levels, and install a new cartridge if necessary. Try one or more of telephone rings. • If you are possible causes and solutions.
... the setting to Scan after the preset number of the following: LOAD PAPER Load paper to print any faxes that have been stored in the printer. CHECK THE AUTO ANSWER BUTTON If the Auto Answer light is on page 36. CHECK WHETHER FAX FORWARDING IS SELECTED 1 From the control panel, press... and Sending appears. 6 Press . 7 Press or repeatedly until Scan appears. 8 Press . 9 Press or repeatedly until Fax Forward appears. CHECK INK Check the ink levels, and install a new cartridge if necessary. Try one or more of telephone rings. • If you are possible causes and solutions.
Fax Guide
Page 47
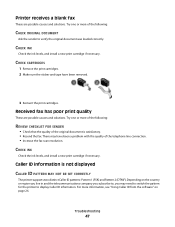
...of the original document is not displayed CALLER ID PATTERN MAY NOT BE SET CORRECTLY The printer supports two distinct Caller ID patterns: Pattern 1 (FSK) and Pattern 2 (DTMF). Try one or more of the telephone line connection. • Increase the fax scan resolution. Received...telecommunications company you subscribe to display Caller ID information. CHECK INK Check the ink levels, and install a new print cartridge if necessary. There may need to switch the pattern for the printer to , you may have been removed. 3 Reinsert the print cartridges. CHECK CARTRIDGES 1 Remove ...
...of the original document is not displayed CALLER ID PATTERN MAY NOT BE SET CORRECTLY The printer supports two distinct Caller ID patterns: Pattern 1 (FSK) and Pattern 2 (DTMF). Try one or more of the telephone line connection. • Increase the fax scan resolution. Received...telecommunications company you subscribe to display Caller ID information. CHECK INK Check the ink levels, and install a new print cartridge if necessary. There may need to switch the pattern for the printer to , you may have been removed. 3 Reinsert the print cartridges. CHECK CARTRIDGES 1 Remove ...

Fax Guide
Page 50
Try one or more information and to fax while behind a PBX" on the PBX. CHECK ... an analog connection on page 18. For more information on faxing when using an ISDN telephone service, connect the printer to the printer so that will support analog use. CHECK PHONE LINE If the telephone line is being used . • If...; Answering machine Troubleshooting 50 Phone Line Error These are possible causes and solutions. If none exists, consider installing an analog telephone line for the following : REVIEW DIGITAL PHONE SERVICE CHECKLIST The fax modem is finished before sending the fax.
Try one or more information and to fax while behind a PBX" on the PBX. CHECK ... an analog connection on page 18. For more information on faxing when using an ISDN telephone service, connect the printer to the printer so that will support analog use. CHECK PHONE LINE If the telephone line is being used . • If...; Answering machine Troubleshooting 50 Phone Line Error These are possible causes and solutions. If none exists, consider installing an analog telephone line for the following : REVIEW DIGITAL PHONE SERVICE CHECKLIST The fax modem is finished before sending the fax.

User's Guide
Page 3
... Understanding the control panel...25 Using the control panel ...25 Saving settings...27 Installing the printer software...28 Installing the optional XPS driver (Windows Vista users only 28 Understanding the printer software...29 Turning printing voice notification on or off...31 Security Information...32 General networking ...33 What is a network?...33 What you will need to set up the printer on an Ethernet network 33 Installing the printer on an Ethernet network...33 Finding a printer/print server located on remote subnets 34 Tips for using network adapters...34 Checking the ...
... Understanding the control panel...25 Using the control panel ...25 Saving settings...27 Installing the printer software...28 Installing the optional XPS driver (Windows Vista users only 28 Understanding the printer software...29 Turning printing voice notification on or off...31 Security Information...32 General networking ...33 What is a network?...33 What you will need to set up the printer on an Ethernet network 33 Installing the printer on an Ethernet network...33 Finding a printer/print server located on remote subnets 34 Tips for using network adapters...34 Checking the ...
User's Guide
Page 6
......69 Scanning text for editing...70 Scanning images for editing...70 Scanning a photo to the Library...71 Scanning multiple photos at one time using the computer 71 Creating a PDF from a scanned item...72 Canceling a scan job...72 Customizing scan settings using ...76 Changing the Productivity Studio e-mail screen preferences 77 Maintaining the printer 78 Replacing print cartridges...78 Installing print cartridges...78 Removing a used print cartridge ...79 Refilling print cartridges...80 Using genuine Lexmark print cartridges...80 Aligning print cartridges...81 Cleaning the print cartridge...
......69 Scanning text for editing...70 Scanning images for editing...70 Scanning a photo to the Library...71 Scanning multiple photos at one time using the computer 71 Creating a PDF from a scanned item...72 Canceling a scan job...72 Customizing scan settings using ...76 Changing the Productivity Studio e-mail screen preferences 77 Maintaining the printer 78 Replacing print cartridges...78 Installing print cartridges...78 Removing a used print cartridge ...79 Refilling print cartridges...80 Using genuine Lexmark print cartridges...80 Aligning print cartridges...81 Cleaning the print cartridge...
User's Guide
Page 7
Incorrect language appears on the display...86 Power button is not lit ...86 Software does not install...87 Page does not print...88 Solving printer communication problems ...89 Understanding Warning levels ...89 Removing and reinstalling the software ...90 Enabling the USB port...90 Print troubleshooting......99 Vertical straight lines are not smooth ...100 White lines appear in graphics or solid black areas ...100 Checking the printer status...101 Checking printer readiness ...101 Settings are not saved...102 Checking the Spool Settings for banner printing ...102 Resolving font problems...102...
Incorrect language appears on the display...86 Power button is not lit ...86 Software does not install...87 Page does not print...88 Solving printer communication problems ...89 Understanding Warning levels ...89 Removing and reinstalling the software ...90 Enabling the USB port...90 Print troubleshooting......99 Vertical straight lines are not smooth ...100 White lines appear in graphics or solid black areas ...100 Checking the printer status...101 Checking printer readiness ...101 Settings are not saved...102 Checking the Spool Settings for banner printing ...102 Resolving font problems...102...
User's Guide
Page 12
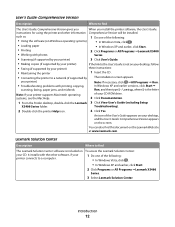
...printer) 3 Click User's Guide. • Making copies (if supported by The installation screen appears. It installs with the other information Comprehensive Version will be installed. You can also find this document on your CD. Introduction 12 Lexmark Solution Center Description Where to find The Lexmark... Start. 2 Click Programs or All Programs ŒLexmark X5400 Series. 3 Select Lexmark Solution Center. Troubleshooting). 2 Double-click the printer Help icon. 4 Click Yes. To access the Lexmark Solution Center: 1 Do one of the User's Guide appears on your desktop, ...
...printer) 3 Click User's Guide. • Making copies (if supported by The installation screen appears. It installs with the other information Comprehensive Version will be installed. You can also find this document on your CD. Introduction 12 Lexmark Solution Center Description Where to find The Lexmark... Start. 2 Click Programs or All Programs ŒLexmark X5400 Series. 3 Select Lexmark Solution Center. Troubleshooting). 2 Double-click the printer Help icon. 4 Click Yes. To access the Lexmark Solution Center: 1 Do one of the User's Guide appears on your desktop, ...
User's Guide
Page 14
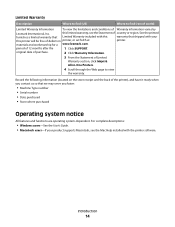
...installed with the printer software. period of country or region. original date of purchase. 2 Click Warranty Information. 3 From the Statement of the printer), and have it ready when you contact us so that shipped with this printer will be free of Warranty information varies by Lexmark... International, Inc. materials and workmanship for a www.lexmark.com. Record the following information (located on the store receipt and the back of Limited Warranty section, click Inkjet & All-In-One Printers. 4...
...installed with the printer software. period of country or region. original date of purchase. 2 Click Warranty Information. 3 From the Statement of the printer), and have it ready when you contact us so that shipped with this printer will be free of Warranty information varies by Lexmark... International, Inc. materials and workmanship for a www.lexmark.com. Record the following information (located on the store receipt and the back of Limited Warranty section, click Inkjet & All-In-One Printers. 4...
User's Guide
Page 16
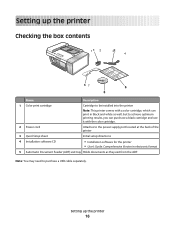
... box contents 11 2 32 4 1 2 3 57 35 46 Name Description 1 Color print cartridge Cartridge to be installed into the printer Note: This printer comes with a color cartridge, which can print in black and white as well, but to achieve optimum printing results,... color cartridge. 2 Power cord Attaches to the power supply port located at the back of the printer 3 Quick Setup sheet Initial setup directions 4 Installation software CD • Installation software for the printer • User's Guide: Comprehensive Version in electronic format 5 Automatic Document Feeder (ADF) exit tray...
... box contents 11 2 32 4 1 2 3 57 35 46 Name Description 1 Color print cartridge Cartridge to be installed into the printer Note: This printer comes with a color cartridge, which can print in black and white as well, but to achieve optimum printing results,... color cartridge. 2 Power cord Attaches to the power supply port located at the back of the printer 3 Quick Setup sheet Initial setup directions 4 Installation software CD • Installation software for the printer • User's Guide: Comprehensive Version in electronic format 5 Automatic Document Feeder (ADF) exit tray...

User's Guide
Page 22
You can purchase an optional black cartridge separately. 21 Remove the tape from the pack. Setting up the printer 22 17 If a storage unit is included, remove the color cartridge from the storage unit. 2 1 18 Remove the tape from the color cartridge. 19 Insert the cartridge in the right carrier, and close the color cartridge carrier lid. 20 If you are installing a black print cartridge, open the black cartridge foil, and remove the cartridge from the black cartridge. Note: This printer comes with a color cartridge only.
You can purchase an optional black cartridge separately. 21 Remove the tape from the pack. Setting up the printer 22 17 If a storage unit is included, remove the color cartridge from the storage unit. 2 1 18 Remove the tape from the color cartridge. 19 Insert the cartridge in the right carrier, and close the color cartridge carrier lid. 20 If you are installing a black print cartridge, open the black cartridge foil, and remove the cartridge from the black cartridge. Note: This printer comes with a color cartridge only.

User's Guide
Page 25
... unit Access the print cartridges. 2 Print cartridge carrier Install, replace, or remove a print cartridge. 3 USB port Connect the printer to a computer using a USB cable. 4 Power supply with port Connect the printer to a power source. Setting up the printer 25 Note: The mode is selected when the button light...copy, or scan process. Understanding the control panel Using the control panel The display shows: • Printer status • Messages • Menus 2 4 3 5 6 Press 1 2 Copy Mode 1 To • Turn the printer on . Access the copy default screen and make copies.
... unit Access the print cartridges. 2 Print cartridge carrier Install, replace, or remove a print cartridge. 3 USB port Connect the printer to a computer using a USB cable. 4 Power supply with port Connect the printer to a power source. Setting up the printer 25 Note: The mode is selected when the button light...copy, or scan process. Understanding the control panel Using the control panel The display shows: • Printer status • Messages • Menus 2 4 3 5 6 Press 1 2 Copy Mode 1 To • Turn the printer on . Access the copy default screen and make copies.
User's Guide
Page 28
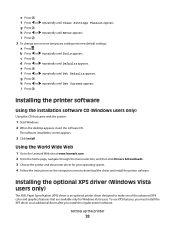
... change one or more temporary settings into new default settings: a Press . i Press . Using the World Wide Web 1 Go to the Lexmark Web site at www.lexmark.com. 2 From the home page, navigate through the menu selection, and then click Drivers & Downloads. 3 Choose the printer and the printer driver for Windows Vista users. g Press . The software installation...
... change one or more temporary settings into new default settings: a Press . i Press . Using the World Wide Web 1 Go to the Lexmark Web site at www.lexmark.com. 2 From the home page, navigate through the menu selection, and then click Drivers & Downloads. 3 Choose the printer and the printer driver for Windows Vista users. g Press . The software installation...


