User's Guide for Windows
Page 6
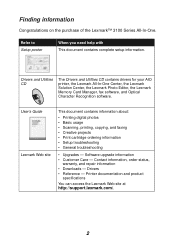
... • General troubleshooting • Upgrades - Drivers and Utilities CD The Drivers and Utilities CD contains drivers for your AIO printer, the Lexmark All-In-One Center, the Lexmark Solution Center, the Lexmark Photo Editor, the Lexmark Memory Card Manager, fax software, and Optical Character Recognition software. Refer to Setup poster When you need help with...
... • General troubleshooting • Upgrades - Drivers and Utilities CD The Drivers and Utilities CD contains drivers for your AIO printer, the Lexmark All-In-One Center, the Lexmark Solution Center, the Lexmark Photo Editor, the Lexmark Memory Card Manager, fax software, and Optical Character Recognition software. Refer to Setup poster When you need help with...
User's Guide for Windows
Page 13
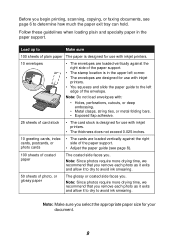
...left corner. • The envelopes are loaded vertically against the right side of the paper support. • The stamp location is designed for use with inkjet printers. • The thickness does not exceed 0.025 inches. 10 greeting cards, index • The cards are designed for your document. 9 photo cards...photo as it exits and allow it to dry to Make sure 100 sheets of plain paper The paper is designed for use with inkjet printers. 10 envelopes • The envelopes are loaded vertically against the right cards, postcards, or side of coated paper The coated side ...
...left corner. • The envelopes are loaded vertically against the right side of the paper support. • The stamp location is designed for use with inkjet printers. • The thickness does not exceed 0.025 inches. 10 greeting cards, index • The cards are designed for your document. 9 photo cards...photo as it exits and allow it to dry to Make sure 100 sheets of plain paper The paper is designed for use with inkjet printers. 10 envelopes • The envelopes are loaded vertically against the right cards, postcards, or side of coated paper The coated side ...
User's Guide for Windows
Page 14
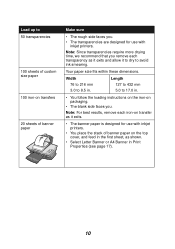
...100 iron-on transfers 20 sheets of banner paper on packaging. • The blank side faces you . • The transparencies are designed for use with inkjet printers. • You place the stack of banner paper Make sure • The rough side faces you . Length 127 to 432 mm 5.0 to 17.0 in...the top cover, and feed in the first sheet, as it exits and allow it exits. • The banner paper is designed for use with inkjet printers. Note: For best results, remove each transparency as shown. • Select Letter Banner or A4 Banner in . Your paper size fits within these ...
...100 iron-on transfers 20 sheets of banner paper on packaging. • The blank side faces you . • The transparencies are designed for use with inkjet printers. • You place the stack of banner paper Make sure • The rough side faces you . Length 127 to 432 mm 5.0 to 17.0 in...the top cover, and feed in the first sheet, as it exits and allow it exits. • The banner paper is designed for use with inkjet printers. Note: For best results, remove each transparency as shown. • Select Letter Banner or A4 Banner in . Your paper size fits within these ...
User's Guide for Windows
Page 22
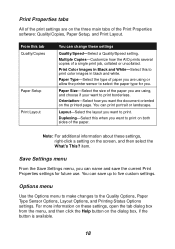
...the menu, and then click the Help button on the screen, and then select the What's This? Print Color Images in Black and White-Select this when you want to print color images in black and white. Duplexing-Select this to print on both sides of the paper. Note: For additional... printed page. item. Paper Size-Select the size of a single print job, collated or uncollated. Orientation-Select how you are using or allow the printer sensor to print. Multiple Copies-Customize how the AIO prints several copies of the paper you want to the Quality Options, Paper Type Sensor Options...
...the menu, and then click the Help button on the screen, and then select the What's This? Print Color Images in Black and White-Select this when you want to print color images in black and white. Duplexing-Select this to print on both sides of the paper. Note: For additional... printed page. item. Paper Size-Select the size of a single print job, collated or uncollated. Orientation-Select how you are using or allow the printer sensor to print. Multiple Copies-Customize how the AIO prints several copies of the paper you want to the Quality Options, Paper Type Sensor Options...
User's Guide for Windows
Page 23
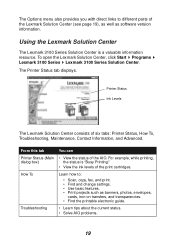
... (Main • View the status of six tabs: Printer Status, How To, Troubleshooting, Maintenance, Contact Information, and Advanced. Printer Status Ink Levels The Lexmark Solution Center consists of the AIO. How To Learn how to different parts of the print cartridges. ...• Solve AIO problems. 19 To open the Lexmark Solution Center, click Start Programs Lexmark 3100 Series Lexmark 3100 Series Solution Center. For example, while printing, dialog box) the status is a valuable information resource. The Printer Status tab displays. The Options menu also provides you ...
... (Main • View the status of six tabs: Printer Status, How To, Troubleshooting, Maintenance, Contact Information, and Advanced. Printer Status Ink Levels The Lexmark Solution Center consists of the AIO. How To Learn how to different parts of the print cartridges. ...• Solve AIO problems. 19 To open the Lexmark Solution Center, click Start Programs Lexmark 3100 Series Lexmark 3100 Series Solution Center. For example, while printing, dialog box) the status is a valuable information resource. The Printer Status tab displays. The Options menu also provides you ...
User's Guide for Windows
Page 44
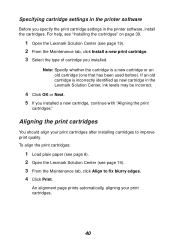
... the print cartridges You should align your print cartridges. 40 For help, see "Installing the cartridges" on page 39. 1 Open the Lexmark Solution Center (see page 19). 3 From the Maintenance tab, click Align to improve print quality. Note: Specify whether the cartridge is ...incorrectly identified as new cartridge in the printer software, install the cartridges. Specifying cartridge settings in the printer software Before you specify the print cartridge settings in the Lexmark Solution Center, ink levels may be incorrect. 4 Click OK or Next. ...
... the print cartridges You should align your print cartridges. 40 For help, see "Installing the cartridges" on page 39. 1 Open the Lexmark Solution Center (see page 19). 3 From the Maintenance tab, click Align to improve print quality. Note: Specify whether the cartridge is ...incorrectly identified as new cartridge in the printer software, install the cartridges. Specifying cartridge settings in the printer software Before you specify the print cartridge settings in the Lexmark Solution Center, ink levels may be incorrect. 4 Click OK or Next. ...
User's Guide for Windows
Page 48
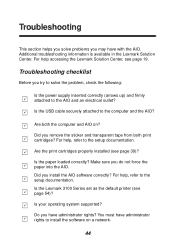
... Center, see page 39)? For help , refer to the setup documentation. Are the print cartridges properly installed (see page 19. Is the Lexmark 3100 Series set as the default printer (see page 54)? You must have administrator rights to the setup documentation. For help , refer to install the software on ? Are both...
... Center, see page 39)? For help , refer to the setup documentation. Are the print cartridges properly installed (see page 19. Is the Lexmark 3100 Series set as the default printer (see page 54)? You must have administrator rights to the setup documentation. For help , refer to install the software on ? Are both...
User's Guide for Windows
Page 49
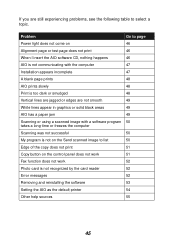
... My program is not recognized by the card reader 52 Error messages 52 Removing and reinstalling the software 53 Setting the AIO as the default printer 54 Other help sources 55 45
... My program is not recognized by the card reader 52 Error messages 52 Removing and reinstalling the software 53 Setting the AIO as the default printer 54 Other help sources 55 45
User's Guide for Windows
Page 50
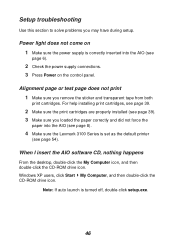
... this section to solve problems you remove the sticker and transparent tape from both print cartridges. Note: If auto launch is set as the default printer (see page 6). 2 Check the power supply connections. 3 Press Power on 1 Make sure the power supply is correctly inserted into the AIO (see page ...8). 4 Make sure the Lexmark 3100 Series is turned off, double-click setup.exe. 46 Windows XP users, click Start My Computer, and then double-click the CD-ROM drive...
... this section to solve problems you remove the sticker and transparent tape from both print cartridges. Note: If auto launch is set as the default printer (see page 6). 2 Check the power supply connections. 3 Press Power on 1 Make sure the power supply is correctly inserted into the AIO (see page ...8). 4 Make sure the Lexmark 3100 Series is turned off, double-click setup.exe. 46 Windows XP users, click Start My Computer, and then double-click the CD-ROM drive...
User's Guide for Windows
Page 51
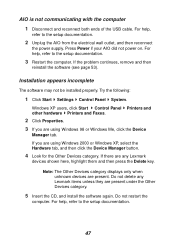
... the CD, and install the software again. Press Power if your AIO did not power on. Windows XP users, click Start Control Panel other hardware Printers and Faxes. 2 Click Properties. If there are using Windows 98 or Windows Me, click the Device Manager tab. For help , refer to the ...setup documentation. 47 Do not restart the computer. Printers and 3 If you are any Lexmark items unless they are using Windows 2000 or Windows XP, select the Hardware tab, and then click the Device Manager button. 4 Look ...
... the CD, and install the software again. Press Power if your AIO did not power on. Windows XP users, click Start Control Panel other hardware Printers and Faxes. 2 Click Properties. If there are using Windows 98 or Windows Me, click the Device Manager tab. For help , refer to the ...setup documentation. 47 Do not restart the computer. Printers and 3 If you are any Lexmark items unless they are using Windows 2000 or Windows XP, select the Hardware tab, and then click the Device Manager button. 4 Look ...
User's Guide for Windows
Page 52
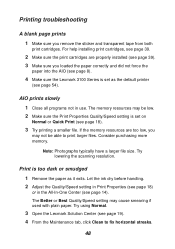
...click Clean to print larger files. Note: Photographs typically have a larger file size. Try lowering the scanning resolution. Try using Normal. 3 Open the Lexmark Solution Center (see page 14). For help installing print cartridges, see page 39. 2 Make sure the print cartridges are too low, you remove the ... tape from both print cartridges. Consider purchasing more memory. Print is too dark or smudged 1 Remove the paper as the default printer (see page 18). 3 Try printing a smaller file. The Better or Best Quality/Speed setting may be able to fix horizontal streaks. 48
...click Clean to print larger files. Note: Photographs typically have a larger file size. Try lowering the scanning resolution. Try using Normal. 3 Open the Lexmark Solution Center (see page 14). For help installing print cartridges, see page 39. 2 Make sure the print cartridges are too low, you remove the ... tape from both print cartridges. Consider purchasing more memory. Print is too dark or smudged 1 Remove the paper as the default printer (see page 18). 3 Try printing a smaller file. The Better or Best Quality/Speed setting may be able to fix horizontal streaks. 48
User's Guide for Windows
Page 53
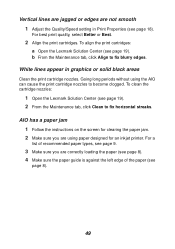
... Center (see page 19). 2 From the Maintenance tab, click Clean to fix horizontal streaks. To clean the cartridge nozzles: 1 Open the Lexmark Solution Center (see page 19). b From the Maintenance tab, click Align to fix blurry edges. White lines appear in Print Properties (see page 8). 49 Going .../Speed setting in graphics or solid black areas Clean the print cartridge nozzles. AIO has a paper jam 1 Follow the instructions on the screen for an inkjet printer. Vertical lines are jagged or edges are using the AIO can cause the print cartridge nozzles to become clogged.
... Center (see page 19). 2 From the Maintenance tab, click Clean to fix horizontal streaks. To clean the cartridge nozzles: 1 Open the Lexmark Solution Center (see page 19). b From the Maintenance tab, click Align to fix blurry edges. White lines appear in Print Properties (see page 8). 49 Going .../Speed setting in graphics or solid black areas Clean the print cartridge nozzles. AIO has a paper jam 1 Follow the instructions on the screen for an inkjet printer. Vertical lines are jagged or edges are using the AIO can cause the print cartridge nozzles to become clogged.
User's Guide for Windows
Page 57
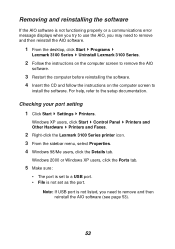
Windows XP users, click Start Control Panel Printers and Other Hardware Printers and Faxes. 2 Right-click the Lexmark 3100 Series printer icon. 3 From the sidebar menu, select Properties. 4 Windows 98/Me users, click the Details tab. Note: If USB port is not listed, you may need...or Windows XP users, click the Ports tab. 5 Make sure: • The port is set as the port. Checking your port setting 1 Click Start Settings Printers. Removing and reinstalling the software If the AIO software is not functioning properly or a communications error message displays when you try to use the AIO...
Windows XP users, click Start Control Panel Printers and Other Hardware Printers and Faxes. 2 Right-click the Lexmark 3100 Series printer icon. 3 From the sidebar menu, select Properties. 4 Windows 98/Me users, click the Details tab. Note: If USB port is not listed, you may need...or Windows XP users, click the Ports tab. 5 Make sure: • The port is set as the port. Checking your port setting 1 Click Start Settings Printers. Removing and reinstalling the software If the AIO software is not functioning properly or a communications error message displays when you try to use the AIO...
User's Guide for Windows
Page 58
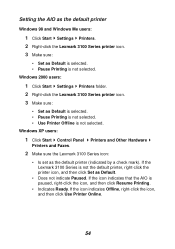
...the icon, and then click Resume Printing. • Indicates Ready. Windows XP users: 1 Click Start Control Panel Printers and Other Hardware Printers and Faxes. 2 Make sure the Lexmark 3100 Series icon: • Is set as Default. • Does not indicate Paused. If the icon indicates Offline... as Default is selected. • Pause Printing is not selected. Setting the AIO as the default printer Windows 98 and Windows Me users: 1 Click Start Settings Printers. 2 Right-click the Lexmark 3100 Series printer icon. 3 Make sure: • Set as Default is selected. • Pause Printing is not...
...the icon, and then click Resume Printing. • Indicates Ready. Windows XP users: 1 Click Start Control Panel Printers and Other Hardware Printers and Faxes. 2 Make sure the Lexmark 3100 Series icon: • Is set as Default. • Does not indicate Paused. If the icon indicates Offline... as Default is selected. • Pause Printing is not selected. Setting the AIO as the default printer Windows 98 and Windows Me users: 1 Click Start Settings Printers. 2 Right-click the Lexmark 3100 Series printer icon. 3 Make sure: • Set as Default is selected. • Pause Printing is not...
User's Guide for Windows
Page 63
...loading 10 printing 17 L layout selecting 18 Lexmark All-In-One Center opening 13 using 13 Lexmark Photo Editor opening 21 using 21 Lexmark Solution Center 19 Advanced tab 20 Contact Information tab 20 How To tab 19 Maintenance tab 20 opening 19 Printer Status tab 19 Troubleshooting tab 19 loading ... slots 5 paper support 5 scanner unit 6 parts of your All-In-One 5 photo cards loading 9 photo cartridge part number 38 photo paper loading 9 Photo/Color Copy button 7 photos 26 adding text 26 borderless 27 cropping 28 editing 29 finding 24 printing 17 scanning 34 sharing 29 poor quality printing 48...
...loading 10 printing 17 L layout selecting 18 Lexmark All-In-One Center opening 13 using 13 Lexmark Photo Editor opening 21 using 21 Lexmark Solution Center 19 Advanced tab 20 Contact Information tab 20 How To tab 19 Maintenance tab 20 opening 19 Printer Status tab 19 Troubleshooting tab 19 loading ... slots 5 paper support 5 scanner unit 6 parts of your All-In-One 5 photo cards loading 9 photo cartridge part number 38 photo paper loading 9 Photo/Color Copy button 7 photos 26 adding text 26 borderless 27 cropping 28 editing 29 finding 24 printing 17 scanning 34 sharing 29 poor quality printing 48...


