User's Guide for Windows
Page 13
... size for your document. 9 photo cards • Adjust the paper guide (see page 6 to avoid ink smearing. 50 sheets of the paper support. • The stamp location is designed for use with inkjet printers. • The thickness does not exceed 0.025 inches. 10 greeting cards, index • The cards ...sure you . Load up to Make sure 100 sheets of plain paper The paper is designed for use with inkjet printers. • You squeeze and slide the paper guide to avoid ink smearing. Note: Since photos require more drying time, we recommend that you remove each photo as it exits ...
... size for your document. 9 photo cards • Adjust the paper guide (see page 6 to avoid ink smearing. 50 sheets of the paper support. • The stamp location is designed for use with inkjet printers. • The thickness does not exceed 0.025 inches. 10 greeting cards, index • The cards ...sure you . Load up to Make sure 100 sheets of plain paper The paper is designed for use with inkjet printers. • You squeeze and slide the paper guide to avoid ink smearing. Note: Since photos require more drying time, we recommend that you remove each photo as it exits ...
User's Guide for Windows
Page 14
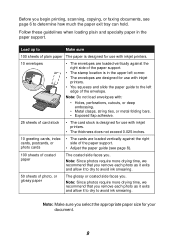
...the iron-on transfers 20 sheets of banner paper Make sure • The rough side faces you. • The transparencies are designed for use with inkjet printers. • You place the stack of custom size paper 100 iron-on packaging. • The blank side faces you. Note: For best results..., remove each transparency as it exits and allow it exits. • The banner paper is designed for use with inkjet printers. Width 76 to 216 mm 3.0 to 8.5 in. Your paper size fits within these dimensions. Load up to 50 transparencies 100 sheets of banner ...
...the iron-on transfers 20 sheets of banner paper Make sure • The rough side faces you. • The transparencies are designed for use with inkjet printers. • You place the stack of custom size paper 100 iron-on packaging. • The blank side faces you. Note: For best results..., remove each transparency as it exits and allow it exits. • The banner paper is designed for use with inkjet printers. Width 76 to 216 mm 3.0 to 8.5 in. Your paper size fits within these dimensions. Load up to 50 transparencies 100 sheets of banner ...
User's Guide for Windows
Page 23
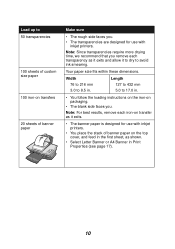
...; Use basic features. • Print projects such as software version information. Printer Status Ink Levels The Lexmark Solution Center consists of the print cartridges. Using the Lexmark Solution Center The Lexmark 3100 Series Solution Center is "Busy Printing." • View the ink levels of six tabs: Printer Status, How To, Troubleshooting, Maintenance, Contact Information, and Advanced. From...
...; Use basic features. • Print projects such as software version information. Printer Status Ink Levels The Lexmark Solution Center consists of the print cartridges. Using the Lexmark Solution Center The Lexmark 3100 Series Solution Center is "Busy Printing." • View the ink levels of six tabs: Printer Status, How To, Troubleshooting, Maintenance, Contact Information, and Advanced. From...
User's Guide for Windows
Page 44
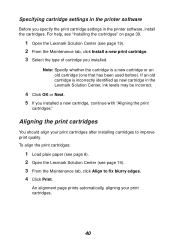
...after installing cartridges to fix blurry edges. 4 Click Print. For help, see "Installing the cartridges" on page 39. 1 Open the Lexmark Solution Center (see page 19). 3 From the Maintenance tab, click Align to improve print quality. Note: Specify whether the cartridge is ...incorrectly identified as new cartridge in the printer software, install the cartridges. Specifying cartridge settings in the printer software Before you specify the print cartridge settings in the Lexmark Solution Center, ink levels may be incorrect. 4 Click OK or Next. 5 If you...
...after installing cartridges to fix blurry edges. 4 Click Print. For help, see "Installing the cartridges" on page 39. 1 Open the Lexmark Solution Center (see page 19). 3 From the Maintenance tab, click Align to improve print quality. Note: Specify whether the cartridge is ...incorrectly identified as new cartridge in the printer software, install the cartridges. Specifying cartridge settings in the printer software Before you specify the print cartridge settings in the Lexmark Solution Center, ink levels may be incorrect. 4 Click OK or Next. 5 If you...
User's Guide for Windows
Page 52
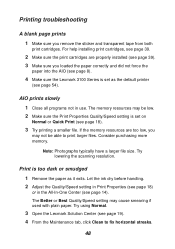
Try using Normal. 3 Open the Lexmark Solution Center (see page 19). 4 From the Maintenance tab, click Clean to print larger files. Let the ink dry before handling. 2 Adjust the Quality/Speed setting in Print Properties (see page 18) or in use. The Better or Best Quality/Speed ... sure you may not be low. 2 Make sure the Print Properties Quality/Speed setting is too dark or smudged 1 Remove the paper as the default printer (see page 18). 3 Try printing a smaller file. Note: Photographs typically have a larger file size. For help installing print cartridges, see page 14). AIO...
Try using Normal. 3 Open the Lexmark Solution Center (see page 19). 4 From the Maintenance tab, click Clean to print larger files. Let the ink dry before handling. 2 Adjust the Quality/Speed setting in Print Properties (see page 18) or in use. The Better or Best Quality/Speed ... sure you may not be low. 2 Make sure the Print Properties Quality/Speed setting is too dark or smudged 1 Remove the paper as the default printer (see page 18). 3 Try printing a smaller file. Note: Photographs typically have a larger file size. For help installing print cartridges, see page 14). AIO...
User's Guide for Windows
Page 63
...ink levels viewing 19 installing print cartridges 39 iron-on transfers loading 10 printing 17 L layout selecting 18 Lexmark All-In-One Center opening 13 using 13 Lexmark Photo Editor opening 21 using 21 Lexmark Solution Center 19 Advanced tab 20 Contact Information tab 20 How To tab 19 Maintenance tab 20 opening 19 Printer... 5 scanner unit 6 parts of your All-In-One 5 photo cards loading 9 photo cartridge part number 38 photo paper loading 9 Photo/Color Copy button 7 photos 26 adding text 26 borderless 27 cropping 28 editing 29 finding 24 printing 17 scanning 34 sharing 29 poor quality printing ...
...ink levels viewing 19 installing print cartridges 39 iron-on transfers loading 10 printing 17 L layout selecting 18 Lexmark All-In-One Center opening 13 using 13 Lexmark Photo Editor opening 21 using 21 Lexmark Solution Center 19 Advanced tab 20 Contact Information tab 20 How To tab 19 Maintenance tab 20 opening 19 Printer... 5 scanner unit 6 parts of your All-In-One 5 photo cards loading 9 photo cartridge part number 38 photo paper loading 9 Photo/Color Copy button 7 photos 26 adding text 26 borderless 27 cropping 28 editing 29 finding 24 printing 17 scanning 34 sharing 29 poor quality printing ...


