User's Guide for Windows
Page 10
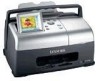
... supply Silver, metal contacts are on the top of labels • 10 envelopes • 10 cards • 1 transparency • 1 photo page Note: To avoid smearing ink, remove each transparency or photo from the paper exit tray before the next one exits the AIO. Hold paper as it exits the AIO. Squeeze... of plain paper • 10 sheets of the power supply. 6 # Use the 4 Scanner unit 5 Paper exit tray 6 Top cover 7 Paper guide To Access the print cartridges. Photos and transparencies may require up to 15 minutes to the left edge of the paper for scanning.
... supply Silver, metal contacts are on the top of labels • 10 envelopes • 10 cards • 1 transparency • 1 photo page Note: To avoid smearing ink, remove each transparency or photo from the paper exit tray before the next one exits the AIO. Hold paper as it exits the AIO. Squeeze... of plain paper • 10 sheets of the power supply. 6 # Use the 4 Scanner unit 5 Paper exit tray 6 Top cover 7 Paper guide To Access the print cartridges. Photos and transparencies may require up to 15 minutes to the left edge of the paper for scanning.
User's Guide for Windows
Page 23
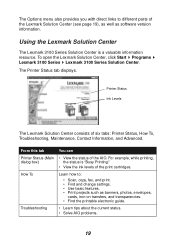
... status. • Solve AIO problems. 19 How To Learn how to different parts of the print cartridges. Printer Status Ink Levels The Lexmark Solution Center consists of the AIO. To open the Lexmark Solution Center, click Start Programs Lexmark 3100 Series Lexmark 3100 Series Solution Center. The Options menu also provides you with direct links to : •...
... status. • Solve AIO problems. 19 How To Learn how to different parts of the print cartridges. Printer Status Ink Levels The Lexmark Solution Center consists of the AIO. To open the Lexmark Solution Center, click Start Programs Lexmark 3100 Series Lexmark 3100 Series Solution Center. The Options menu also provides you with direct links to : •...
User's Guide for Windows
Page 24
... Advanced You can • Install a new print cartridge. • View shopping options for new cartridges. • Print a test page. • Clean to fix horizontal streaks. • Troubleshoot other ink problems. • Align to fix blurry edges. • Remove Japanese postcard residue. • Learn how to contact Lexmark by phone, e-mail, or on the World...
... Advanced You can • Install a new print cartridge. • View shopping options for new cartridges. • Print a test page. • Clean to fix horizontal streaks. • Troubleshoot other ink problems. • Align to fix blurry edges. • Remove Japanese postcard residue. • Learn how to contact Lexmark by phone, e-mail, or on the World...
User's Guide for Windows
Page 44
... print quality. Note: Specify whether the cartridge is incorrectly identified as new cartridge in the Lexmark Solution Center, ink levels may be incorrect. 4 Click OK or Next. 5 If you specify the print cartridge settings in the printer software Before you installed a new cartridge, continue with "Aligning the print cartridges." To align the print cartridges: 1 Load plain paper (see page...
... print quality. Note: Specify whether the cartridge is incorrectly identified as new cartridge in the Lexmark Solution Center, ink levels may be incorrect. 4 Click OK or Next. 5 If you specify the print cartridge settings in the printer software Before you installed a new cartridge, continue with "Aligning the print cartridges." To align the print cartridges: 1 Load plain paper (see page...

User's Guide for Windows
Page 45
...8226; Colors on print jobs are not satisfied with water. 41 If you may be on the nozzles or contacts. To wipe the print cartridge nozzles and contacts: 1 Remove the print cartridges (...the Lexmark Solution Center (see page 38). 2 Dampen a clean, lint-free cloth with the print quality, follow the instructions for wiping the print cartridge nozzles and contacts. Wiping the print cartridge nozzles ...and contacts If the print quality does not improve after cleaning the print cartridge nozzles, dried ink may need ...
...8226; Colors on print jobs are not satisfied with water. 41 If you may be on the nozzles or contacts. To wipe the print cartridge nozzles and contacts: 1 Remove the print cartridges (...the Lexmark Solution Center (see page 38). 2 Dampen a clean, lint-free cloth with the print quality, follow the instructions for wiping the print cartridge nozzles and contacts. Wiping the print cartridge nozzles ...and contacts If the print quality does not improve after cleaning the print cartridge nozzles, dried ink may need ...
User's Guide for Windows
Page 47
... supplies To order supplies or locate a dealer near you, visit the Lexmark Web site at www.lexmark.com. Refilling cartridges can affect print quality and may cause damage to Lexmark for an extended period of time because the ink will not print correctly if left exposed for recycling: 1 Visit our ...Web site: www.lexmark.com/recycle 2 Follow the instructions on your screen. 43 Note: Use the cartridge storage unit that was packaged with new photo print cartridges. Lexmark's All-In-One warranty ...
... supplies To order supplies or locate a dealer near you, visit the Lexmark Web site at www.lexmark.com. Refilling cartridges can affect print quality and may cause damage to Lexmark for an extended period of time because the ink will not print correctly if left exposed for recycling: 1 Visit our ...Web site: www.lexmark.com/recycle 2 Follow the instructions on your screen. 43 Note: Use the cartridge storage unit that was packaged with new photo print cartridges. Lexmark's All-In-One warranty ...
User's Guide for Windows
Page 52
...printer (see page 18). 3 Try printing a smaller file. Printing troubleshooting A blank page prints 1 Make sure you may not be low. 2 Make sure the Print Properties Quality/Speed setting is set as it exits. For help installing print cartridges...tape from both print cartridges. The memory resources may cause smearing if used with plain paper. Note: Photographs typically have a larger file size. Let the ink dry before handling....page 8). 4 Make sure the Lexmark 3100 Series is set on Normal or Quick Print (see page 54). Try using Normal. 3 Open the Lexmark Solution Center (see page 14...
...printer (see page 18). 3 Try printing a smaller file. Printing troubleshooting A blank page prints 1 Make sure you may not be low. 2 Make sure the Print Properties Quality/Speed setting is set as it exits. For help installing print cartridges...tape from both print cartridges. The memory resources may cause smearing if used with plain paper. Note: Photographs typically have a larger file size. Let the ink dry before handling....page 8). 4 Make sure the Lexmark 3100 Series is set on Normal or Quick Print (see page 54). Try using Normal. 3 Open the Lexmark Solution Center (see page 14...
User's Guide for Windows
Page 56
...; Unplug and then plug the USB cable in the All-In-One Center. To verify your computer screen. • Paper jam • Cover open • Ink Low • Paper out • Cartridge error 52 Photo card is the default fax driver in again.
...; Unplug and then plug the USB cable in the All-In-One Center. To verify your computer screen. • Paper jam • Cover open • Ink Low • Paper out • Cartridge error 52 Photo card is the default fax driver in again.

User's Guide for Windows
Page 62
...text to page layout 26 adding text to photos 30 Advanced tab 20 AIO software 13 album page 26 aligning print cartridges 40 All-In-One Center, see Lexmark All-In-One Center 13 All-In-One Main Page Copy section 14 Creative Tasks section 15 Preview section 15 Scan... 41 part numbers 38 viewing ink levels of 19 wiping 41 cartridges, print aligning 40 cleaning contacts 41 cleaning nozzles 41 installing 39 part numbers 38 preserving 43 removing 38 replacing 38 choosing layout for photos 26 cleaning, print cartridge nozzles 41 coated paper loading 9 color cartridge part number 38 Contact Information ...
...text to page layout 26 adding text to photos 30 Advanced tab 20 AIO software 13 album page 26 aligning print cartridges 40 All-In-One Center, see Lexmark All-In-One Center 13 All-In-One Main Page Copy section 14 Creative Tasks section 15 Preview section 15 Scan... 41 part numbers 38 viewing ink levels of 19 wiping 41 cartridges, print aligning 40 cleaning contacts 41 cleaning nozzles 41 installing 39 part numbers 38 preserving 43 removing 38 replacing 38 choosing layout for photos 26 cleaning, print cartridge nozzles 41 coated paper loading 9 color cartridge part number 38 Contact Information ...
User's Guide for Windows
Page 63
...ink levels viewing 19 installing print cartridges 39 iron-on transfers loading 10 printing 17 L layout selecting 18 Lexmark All-In-One Center opening 13 using 13 Lexmark Photo Editor opening 21 using 21 Lexmark Solution Center 19 Advanced tab 20 Contact Information tab 20 How To tab 19 Maintenance tab 20 opening 19 Printer...31 loading 31 Paper Feed button 7 Paper Setup tab 18 paper size selecting 18 paper type selecting 18 part numbers black cartridge 38 color cartridge 38 photo cartridge 38 parts control panel 5 memory card slots 5 paper support 5 scanner unit 6 parts of your All-In-One 5 photo...
...ink levels viewing 19 installing print cartridges 39 iron-on transfers loading 10 printing 17 L layout selecting 18 Lexmark All-In-One Center opening 13 using 13 Lexmark Photo Editor opening 21 using 21 Lexmark Solution Center 19 Advanced tab 20 Contact Information tab 20 How To tab 19 Maintenance tab 20 opening 19 Printer...31 loading 31 Paper Feed button 7 Paper Setup tab 18 paper size selecting 18 paper type selecting 18 part numbers black cartridge 38 color cartridge 38 photo cartridge 38 parts control panel 5 memory card slots 5 paper support 5 scanner unit 6 parts of your All-In-One 5 photo...
User's Guide for Windows
Page 64
... section Preview Now button 34 Print/Copy preview 15 Scan preview 15 print cartridges aligning 40 cleaning nozzles 41 installing 39 part numbers 38 preserving 43 removing 38 replacing 38 viewing ink levels of 19 wiping nozzles 41 Print Layout tab 18 print nozzles cleaning ... prints 48 Printing Status window changing appearance of 20 Q Quality/Copies tab 18 R recycling Lexmark products 43 reinstalling software 53 removing print cartridges 38 removing software 53 repeat images 15 replacing print cartridges 38 S Safety information ii Save Settings menu 18 Saved Images page Open with... section 15...
... section Preview Now button 34 Print/Copy preview 15 Scan preview 15 print cartridges aligning 40 cleaning nozzles 41 installing 39 part numbers 38 preserving 43 removing 38 replacing 38 viewing ink levels of 19 wiping nozzles 41 Print Layout tab 18 print nozzles cleaning ... prints 48 Printing Status window changing appearance of 20 Q Quality/Copies tab 18 R recycling Lexmark products 43 reinstalling software 53 removing print cartridges 38 removing software 53 repeat images 15 replacing print cartridges 38 S Safety information ii Save Settings menu 18 Saved Images page Open with... section 15...

