
Owners Manual
Page 3
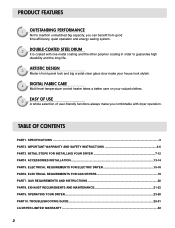
... PART6. TROUBLESHOOTING GUIDE ...29-31 LG DRYER LIMITED WARRANTY ...32 2 SPECIFICATIONS ...3 PART2. GAS REQUIREMENTS AND INSTRUCTIONS 20 PART8. ACCESSORIES INSTALLATION ...13-14 PART5. ELECTRICAL REQUIREMENTS FOR GAS DRYERS 19 PART7. OPERATING YOUR DRYER...23-28 PART10. TABLE OF CONTENTS PART1. EXHAUST REQUIREMENTS AND MAINTENANCE 21-22 PART9. IMPORTANT WARRANTY AND SAFETY INSTRUCTIONS 4-6 PART3. PRODUCT FEATURES 1 OUTSTANDING PERFORMANCE Not to mention unmatched big capacity, you can benefit from good time efficiency, quiet operation and energy saving...
... PART6. TROUBLESHOOTING GUIDE ...29-31 LG DRYER LIMITED WARRANTY ...32 2 SPECIFICATIONS ...3 PART2. GAS REQUIREMENTS AND INSTRUCTIONS 20 PART8. ACCESSORIES INSTALLATION ...13-14 PART5. ELECTRICAL REQUIREMENTS FOR GAS DRYERS 19 PART7. OPERATING YOUR DRYER...23-28 PART10. TABLE OF CONTENTS PART1. EXHAUST REQUIREMENTS AND MAINTENANCE 21-22 PART9. IMPORTANT WARRANTY AND SAFETY INSTRUCTIONS 4-6 PART3. PRODUCT FEATURES 1 OUTSTANDING PERFORMANCE Not to mention unmatched big capacity, you can benefit from good time efficiency, quiet operation and energy saving...
Owners Manual
Page 5
... manual must be followed. Model No. Use the space below to record the model number and serial number of original purchase date is installed and operated according to prevent property damage, personal injury, or death when using your new LG dryer. Warranty service is available by contacting your nearest LG Service Center and, for warranty period from the date of fire or explosion, electric shock, or to the instructions...
... manual must be followed. Model No. Use the space below to record the model number and serial number of original purchase date is installed and operated according to prevent property damage, personal injury, or death when using your new LG dryer. Warranty service is available by contacting your nearest LG Service Center and, for warranty period from the date of fire or explosion, electric shock, or to the instructions...
Owners Manual
Page 6
... all instructions before or after each load. 11) Keep area around the exhaust opening and adjacent surrounding areas free from service or discarded, remove the door to cooking oils in a risk of electric shock by qualified service personnel. 13) Do not place items exposed to the drying compartment. 5) Do not reach into contact with the circuit conductors and connected to the equipment-grounding terminal...
... all instructions before or after each load. 11) Keep area around the exhaust opening and adjacent surrounding areas free from service or discarded, remove the door to cooking oils in a risk of electric shock by qualified service personnel. 13) Do not place items exposed to the drying compartment. 5) Do not reach into contact with the circuit conductors and connected to the equipment-grounding terminal...
Owners Manual
Page 10
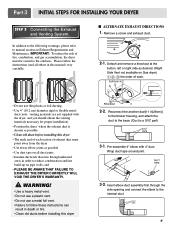
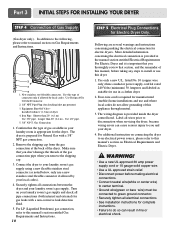
... not supplied with 4" duct. Insert elbow duct assembly first through the side opening and connect the elbow to follow the instructions (and all duct joints • Insulate ductwork that runs through unheated areas in (28cm)] to the blower housing, and attach the duct to reduce condensation and lint build-up on Exhaust Requirements and Maintenance. Part 3 INITIAL STEPS FOR INSTALLING YOUR DRYER STEP 3 Connecting the Exhaust and Venting System.
... not supplied with 4" duct. Insert elbow duct assembly first through the side opening and connect the elbow to follow the instructions (and all duct joints • Insulate ductwork that runs through unheated areas in (28cm)] to the blower housing, and attach the duct to reduce condensation and lint build-up on Exhaust Requirements and Maintenance. Part 3 INITIAL STEPS FOR INSTALLING YOUR DRYER STEP 3 Connecting the Exhaust and Venting System.
Owners Manual
Page 11
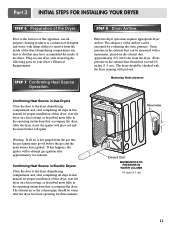
... connector. • Securely tighten all pipe connections (both internal and external) for electric dryers. Turn on your local codes). 4. WARNING! • Use a new UL approved 30 amp power supply cord or 10 gauge solid copper wire. • Use a UL approved strain relief. • Disconnect power before taking any steps to manual section on Electrical Requirements and Electric Dryer. ! Gas Connection 1. Following are several warnings and instructions concerning making electrical connections. • Connect neutral wire...
... connector. • Securely tighten all pipe connections (both internal and external) for electric dryers. Turn on your local codes). 4. WARNING! • Use a new UL approved 30 amp power supply cord or 10 gauge solid copper wire. • Use a UL approved strain relief. • Disconnect power before taking any steps to manual section on Electrical Requirements and Electric Dryer. ! Gas Connection 1. Following are several warnings and instructions concerning making electrical connections. • Connect neutral wire...
Owners Manual
Page 12
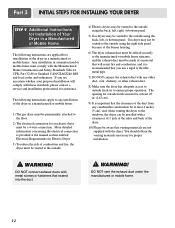
.... Confirming Heat Source in Electric Dryers Close the door to the dryer drum/drying compartment and, after reviewing the following parts on the exhaust duct approximately 2 ft. (60.9 cm) from the dryer. Effective dryer operation requires appropriate dryer airflow. STEP 7 Confirming Heat Source Operation. If this manual for proper installation of the Dryer. Warning: If all air is not purged from the inside of the dryer. The adequacy of this dryer, start the dryer on a heat setting, as...
.... Confirming Heat Source in Electric Dryers Close the door to the dryer drum/drying compartment and, after reviewing the following parts on the exhaust duct approximately 2 ft. (60.9 cm) from the dryer. Effective dryer operation requires appropriate dryer airflow. STEP 7 Confirming Heat Source Operation. If this manual for proper installation of the Dryer. Warning: If all air is not purged from the inside of the dryer. The adequacy of this dryer, start the dryer on a heat setting, as...
Owners Manual
Page 13
... home. Gas dryer may be vented to the outside using the right side panel because of the burner housing. 6) The dryer exhaust duct must be affixed securely to the floor. 2) The electrical connection for proper installation. ! The opening for assistance. WARNING! You should obtain the venting materials necessary for an electric dryer must comply with any other duct, vent, chimney, or other exhaust duct. 8) Make sure the dryer has adequate access to...
... home. Gas dryer may be vented to the outside using the right side panel because of the burner housing. 6) The dryer exhaust duct must be affixed securely to the floor. 2) The electrical connection for proper installation. ! The opening for assistance. WARNING! You should obtain the venting materials necessary for an electric dryer must comply with any other duct, vent, chimney, or other exhaust duct. 8) Make sure the dryer has adequate access to...
Owners Manual
Page 16
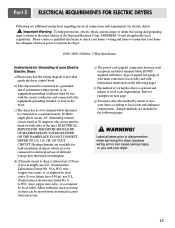
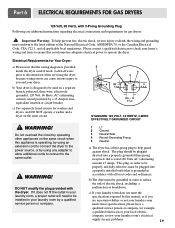
Part 5 ELECTRICAL REQUIREMENTS FOR ELECTRIC DRYERS Following are included in length, use U.L. (Underwriters Laboratories) listed No. 8 A.W.G. Heating elements are to be connected to electrical service of wire must select the method by which are available for field installation in wiring so dryer can cause serious injury to operate the dryer. 120V/ 240V, 60 Hertz, 3-Wire Installation Instructions for electric dryers. ! Allow sufficient slack in dryers which to wire your home has adequate electrical power to you and your Electric Electric Dryer: a) Please...
Part 5 ELECTRICAL REQUIREMENTS FOR ELECTRIC DRYERS Following are included in length, use U.L. (Underwriters Laboratories) listed No. 8 A.W.G. Heating elements are to be connected to electrical service of wire must select the method by which are available for field installation in wiring so dryer can cause serious injury to operate the dryer. 120V/ 240V, 60 Hertz, 3-Wire Installation Instructions for electric dryers. ! Allow sufficient slack in dryers which to wire your home has adequate electrical power to you and your Electric Electric Dryer: a) Please...
Owners Manual
Page 20
... instructions regarding electrical connections and requirements for washers and dryers, and DO NOT operate a washer and a dryer on the same circuit. ! The plug should be used on the same circuit when this manual, or if you and your laundry room by a qualified service person or company. Please contact a qualified electrician to check your home's wiring and fuses to ensure that your laundry room does not meet the specifications required by using...
... instructions regarding electrical connections and requirements for washers and dryers, and DO NOT operate a washer and a dryer on the same circuit. ! The plug should be used on the same circuit when this manual, or if you and your laundry room by a qualified service person or company. Please contact a qualified electrician to check your home's wiring and fuses to ensure that your laundry room does not meet the specifications required by using...
Owners Manual
Page 21
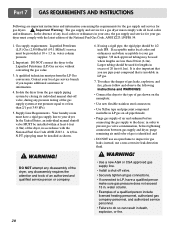
... company. 6. Supply Line Requirements. Your laundry room must perform the LP Gas conversion. N.P.T. DO NOT attempt any disassembly of the dryer, any pressure testing of the gas supply system at test pressure equal to LP, have a rigid gas supply line to the Liquefied Petroleum (LP) Gas service without converting the gas value. 3. If using a rigid pipe, the rigid pipe should be installed as shown. ! water column. • Examples...
... company. 6. Supply Line Requirements. Your laundry room must perform the LP Gas conversion. N.P.T. DO NOT attempt any disassembly of the dryer, any pressure testing of the gas supply system at test pressure equal to LP, have a rigid gas supply line to the Liquefied Petroleum (LP) Gas service without converting the gas value. 3. If using a rigid pipe, the rigid pipe should be installed as shown. ! water column. • Examples...
Owners Manual
Page 22
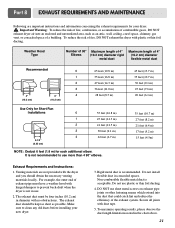
..., DO NOT exhaust dryer air into the duct that could catch lint and reduce the efficiency of exhaust pipe must be kept as short as an attic, wall, ceiling, crawl space, chimney, gas vent, or concealed space of fire, DO NOT exhaust the dryer with plastic or thin foil ducting. Do not install flexible duct in the chart above. 21 Part 8 EXHAUST REQUIREMENTS AND MAINTENANCE Following are...
..., DO NOT exhaust dryer air into the duct that could catch lint and reduce the efficiency of exhaust pipe must be kept as short as an attic, wall, ceiling, crawl space, chimney, gas vent, or concealed space of fire, DO NOT exhaust the dryer with plastic or thin foil ducting. Do not install flexible duct in the chart above. 21 Part 8 EXHAUST REQUIREMENTS AND MAINTENANCE Following are...
Owners Manual
Page 23
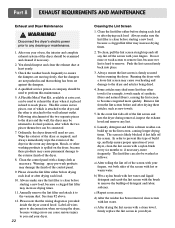
... the dryer. 8. A Flexible Metal Vent Kit, available at least yearly. 3. Ordinarily, the dryer drum will need no care. Warning: spray pre-wash products may cause overheating and damage to perform this type of the dryer should be examined and cleaned if necessary. 2. Always make sure the lint filter is spilled on the lint screen, causing longer drying times. Remove lint from the lint screen before starting a new load, because a clogged lint filter may increase drying times...
... the dryer. 8. A Flexible Metal Vent Kit, available at least yearly. 3. Ordinarily, the dryer drum will need no care. Warning: spray pre-wash products may cause overheating and damage to perform this type of the dryer should be examined and cleaned if necessary. 2. Always make sure the lint filter is spilled on the lint screen, causing longer drying times. Remove lint from the lint screen before starting a new load, because a clogged lint filter may increase drying times...
Owners Manual
Page 24
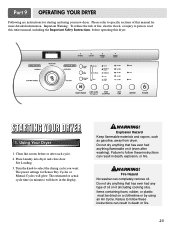
...! Part 9 OPERATING YOUR DRYER Following are instructions for Sensor Dry Cycles or Manual Cycles will show in the display. ! See Loading. 3. The preset settings for starting and using an Air Cycle. Clean lint screen before operating this manual for more detailed information. Place laundry into dryer and close door. Fire Hazard No washer can completely remove oil. Using Your Dryer 1. Do not dry anything that has ever had anything that has ever had any type of fire, electric shock...
...! Part 9 OPERATING YOUR DRYER Following are instructions for Sensor Dry Cycles or Manual Cycles will show in the display. ! See Loading. 3. The preset settings for starting and using an Air Cycle. Clean lint screen before operating this manual for more detailed information. Place laundry into dryer and close door. Fire Hazard No washer can completely remove oil. Using Your Dryer 1. Do not dry anything that has ever had anything that has ever had any type of fire, electric shock...

Owners Manual
Page 25
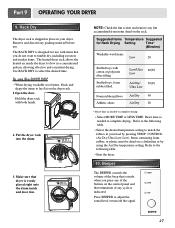
... START/PAUSE NOTE: DRY LEVEL selections can be available while using Sensor Dry Cycles. NOTE: The MORE TIME or LESS TIME feature can only be used with Manual Dry, Time Dry, and Rack Dry Cycles. • Press TEMP. CONTROL until the desired drying time is displayed. Pausing or Restarting To pause the dryer at any time Open the door or press START/PAUSE once. To use a Sensor Dry Cycle • Select an Sensor Dry Cycle. • Select DRY LEVEL to adjust how dry...
... START/PAUSE NOTE: DRY LEVEL selections can be available while using Sensor Dry Cycles. NOTE: The MORE TIME or LESS TIME feature can only be used with Manual Dry, Time Dry, and Rack Dry Cycles. • Press TEMP. CONTROL until the desired drying time is displayed. Pausing or Restarting To pause the dryer at any time Open the door or press START/PAUSE once. To use a Sensor Dry Cycle • Select an Sensor Dry Cycle. • Select DRY LEVEL to adjust how dry...
Owners Manual
Page 28
... time. NOTE: Check the lint screen and remove any lint accumulated from items dried on the control panel and the termination of the beep that you press any packing material before use with both hands. 2. CONTROL (Air Dry-Ultra Low-Low). Hold the dryer rack with items that is indicated. Refer to the following table. • Select the desired temperature setting to tumble dry, including sweaters and similar items. The heated dryer rack...
... time. NOTE: Check the lint screen and remove any lint accumulated from items dried on the control panel and the termination of the beep that you press any packing material before use with both hands. 2. CONTROL (Air Dry-Ultra Low-Low). Hold the dryer rack with items that is indicated. Refer to the following table. • Select the desired temperature setting to tumble dry, including sweaters and similar items. The heated dryer rack...
Owners Manual
Page 30
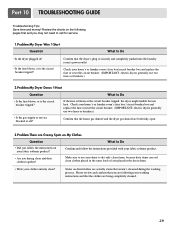
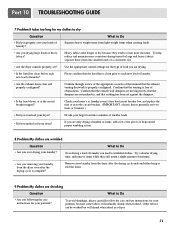
... laundry room's fuse box/circuit breaker box and replace the fuse or reset the circuit breaker. (IMPORTANT: electric dryers generally use two fuses or breakers.) • Is the gas supply or service blocked or off? Part 10 TROUBLESHOOTING GUIDE Troubleshooting Tips Save time and money! If the fuse is the circuit breaker tripped? Confirm and follow the instructions on My Clothes Question What to Do • Did you may not need to call for service. 1.Problem:My Dryer Won 't Start Question What...
... laundry room's fuse box/circuit breaker box and replace the fuse or reset the circuit breaker. (IMPORTANT: electric dryers generally use two fuses or breakers.) • Is the gas supply or service blocked or off? Part 10 TROUBLESHOOTING GUIDE Troubleshooting Tips Save time and money! If the fuse is the circuit breaker tripped? Confirm and follow the instructions on My Clothes Question What to Do • Did you may not need to call for service. 1.Problem:My Dryer Won 't Start Question What...
Owners Manual
Page 31
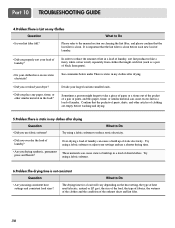
... your clothes have excess static electricity? The drying time for a load will vary depending on the heat setting, the type of heat used (electric, natural or LP gas), the size of the load, the type of fabrics, the wetness of the clothes and the condition of the exhaust ducts and lint filer. 30 Please refer to the manual section on cleaning the lint filter, and please confirm that the lint filter is clean before washing and drying. 5.Problem:There...
... your clothes have excess static electricity? The drying time for a load will vary depending on the heat setting, the type of heat used (electric, natural or LP gas), the size of the load, the type of fabrics, the wetness of the clothes and the condition of the exhaust ducts and lint filer. 30 Please refer to the manual section on cleaning the lint filter, and please confirm that the lint filter is clean before washing and drying. 5.Problem:There...
Owners Manual
Page 32
... has been set ? Check your home's or laundry room's fuse box/circuit breaker box and replace the fuse or reset the circuit breaker. (IMPORTANT: electric dryers generally use instructions for your larger load into smaller loads of this manual that the lint filter is free of laundry? Heavy fabrics take longer to retain more consistent drying times for large and heavy fabrics, separate these items into a number of laundry. • Are the exhaust ducts clear and...
... has been set ? Check your home's or laundry room's fuse box/circuit breaker box and replace the fuse or reset the circuit breaker. (IMPORTANT: electric dryers generally use instructions for your larger load into smaller loads of this manual that the lint filter is free of laundry? Heavy fabrics take longer to retain more consistent drying times for large and heavy fabrics, separate these items into a number of laundry. • Are the exhaust ducts clear and...
Service Manual
Page 12
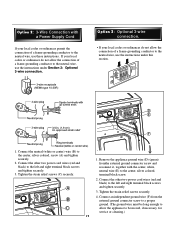
... the neutral wire, use the instructions under this section. D E A F 1. Remove the appliance ground wire (D) (green) fromthe external ground connector screw and reconnect it, together with a Power Supply Cord lf your local codes or ordinances do not allow the appliance to the left and right terminal block screws and tighten securely. 3. Option 2: 3-Wire Connection with the center, white, neutral wire (E) to the neutral wire, use these instructions. A B C 11 1. Tighten...
... the neutral wire, use the instructions under this section. D E A F 1. Remove the appliance ground wire (D) (green) fromthe external ground connector screw and reconnect it, together with a Power Supply Cord lf your local codes or ordinances do not allow the appliance to the left and right terminal block screws and tighten securely. 3. Option 2: 3-Wire Connection with the center, white, neutral wire (E) to the neutral wire, use these instructions. A B C 11 1. Tighten...
Service Manual
Page 24
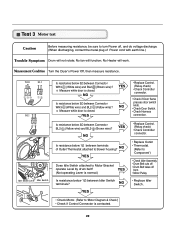
... Switch terminals? YES (Not operating Lever is closed . Measure while door is normal.) Is resistance below 3Ω between terminals of Power cord with earth line.) Trouble Symptom Drum will work. YES • Replace Control. (Relay check) • Check Controller connector. • Check if Door flame presses door switch knob. • Check Door Switch. • Check Harness connection. Is resistance below 1Ω between Connector WH3- (White wire) and BL2- (Brown wire)? NO YES Is resistance below 3Ω between Connector WH3- (White wire...
... Switch terminals? YES (Not operating Lever is closed . Measure while door is normal.) Is resistance below 3Ω between terminals of Power cord with earth line.) Trouble Symptom Drum will work. YES • Replace Control. (Relay check) • Check Controller connector. • Check if Door flame presses door switch knob. • Check Door Switch. • Check Harness connection. Is resistance below 1Ω between Connector WH3- (White wire) and BL2- (Brown wire)? NO YES Is resistance below 3Ω between Connector WH3- (White wire...


