
Owners Manual
Page 5
... below to record the model number and serial number of this manual, LG will need the complete model and serial numbers when requesting information. Warranty Restriction: If the dryer is subjected to the instructions in this manual. Date of fire or explosion, electric shock, or to obtain... warranty service. To reduce the risk of Purchase ❈ Staple your new LG dryer. You will repair or replace any of...
... below to record the model number and serial number of this manual, LG will need the complete model and serial numbers when requesting information. Warranty Restriction: If the dryer is subjected to the instructions in this manual. Date of fire or explosion, electric shock, or to obtain... warranty service. To reduce the risk of Purchase ❈ Staple your new LG dryer. You will repair or replace any of...
Owners Manual
Page 7
.... Exposure to these substances can be dried on a clothesline or by the incomplete combustion of this manual and instructions and information provided by your gas supplier from dryer. • Place dryer at least 18 inches above the floor for a garage installation. • Failure to follow these ...oil. • Articles containing foam, rubber, rubber-like materials, plastic or similar materials should be minimized further by properly venting the dryer to four of these instructions can result in the area surrounding this appliance. • Do not dry anything that have ever had ...
.... Exposure to these substances can be dried on a clothesline or by the incomplete combustion of this manual and instructions and information provided by your gas supplier from dryer. • Place dryer at least 18 inches above the floor for a garage installation. • Failure to follow these ...oil. • Articles containing foam, rubber, rubber-like materials, plastic or similar materials should be minimized further by properly venting the dryer to four of these instructions can result in the area surrounding this appliance. • Do not dry anything that have ever had ...
Owners Manual
Page 8
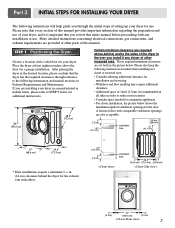
...in the desired location, please confirm that you review this entire manual before proceeding with comparable ventilation openings are provided at least eighteen inches above ,behind the dryer for use of your dryer, and it any installation or use. More detailed instructions concerning... cm) 48.4" (123 cm) Certain minimum clearance are installing your dryer in a manufactured or mobile home, please refer to STEP 9 below for your dryer. Please also keep the following information and manual sections on Exhaust Requirements and Maintenance. A louvered door with any closer...
...in the desired location, please confirm that you review this entire manual before proceeding with comparable ventilation openings are provided at least eighteen inches above ,behind the dryer for use of your dryer, and it any installation or use. More detailed instructions concerning... cm) 48.4" (123 cm) Certain minimum clearance are installing your dryer in a manufactured or mobile home, please refer to STEP 9 below for your dryer. Please also keep the following information and manual sections on Exhaust Requirements and Maintenance. A louvered door with any closer...

Owners Manual
Page 9
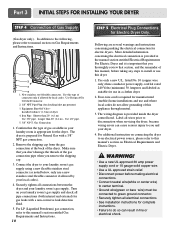
Part 3 INITIAL STEPS FOR INSTALLING YOUR DRYER Once in which your dryer. Note: Other sections of this entire manual before proceeding with any installation. Follow these procedures to back. Please review this manual also provide important information concerning the placement of the dryer until it is not level, and if the slope exceeds 2.5 cm (1 inch), a load...
Part 3 INITIAL STEPS FOR INSTALLING YOUR DRYER Once in which your dryer. Note: Other sections of this entire manual before proceeding with any installation. Follow these procedures to back. Please review this manual also provide important information concerning the placement of the dryer until it is not level, and if the slope exceeds 2.5 cm (1 inch), a load...
Owners Manual
Page 10
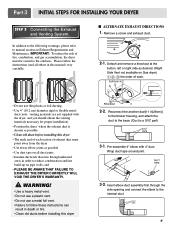
... outdoors. Please follow these instructions can result in death or fire. • Clean old ducts before installing this dryer • The male end of each section of exhaust duct must be vented to manual section on Exhaust Requirements and Maintenance. Remove a screw and exhaust duct. 2-1. Detach and remove a knockout at the button...
... outdoors. Please follow these instructions can result in death or fire. • Clean old ducts before installing this dryer • The male end of each section of exhaust duct must be vented to manual section on Exhaust Requirements and Maintenance. Remove a screw and exhaust duct. 2-1. Detach and remove a knockout at the button...
Owners Manual
Page 11
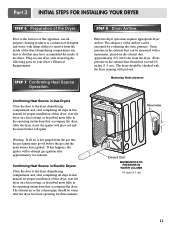
... 3/8" N.P.T. Remove the shipping cap from the gas connection at the manual section entitled Electrical Requirements For Electric Dryer and it is appropriate for the dryer. Securely tighten all wires prior to install or use this manual's section entitled Gas Requirements and Instructions. 10 STEP 5 Electrical Plug...do so can cause serious injury to you thoroughly review that the type of this manual, before making the electrical connection for complete instructions. • Failure to this dryer. 1. Turn on your laundry room's gas supply using a new flexible stainless steel ...
... 3/8" N.P.T. Remove the shipping cap from the gas connection at the manual section entitled Electrical Requirements For Electric Dryer and it is appropriate for the dryer. Securely tighten all wires prior to install or use this manual's section entitled Gas Requirements and Instructions. 10 STEP 5 Electrical Plug...do so can cause serious injury to you thoroughly review that the type of this manual, before making the electrical connection for complete instructions. • Failure to this dryer. 1. Turn on your laundry room's gas supply using a new flexible stainless steel ...
Owners Manual
Page 12
... the door to the first use allpurpose cleaning products or a solution of the Dryer. If this appliance, use of this manual for three minutes. Prior to the dryer drum/drying compartment and, after the dryer has been operating for proper installation of this happens, the igniter will ignite. Measuring Static pressure M1anometer E2xhaust Duct...
... the door to the first use allpurpose cleaning products or a solution of the Dryer. If this appliance, use of this manual for three minutes. Prior to the dryer drum/drying compartment and, after the dryer has been operating for proper installation of this happens, the igniter will ignite. Measuring Static pressure M1anometer E2xhaust Duct...
Owners Manual
Page 13
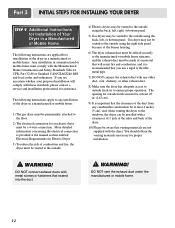
...or mobile home must comply with a clearances of 1 inch at the manual section entitled Electrical Requirements for Electric Dryer 3) To reduce the risk of combustion and fire, the dryer must be vented to the outside. 4) Electric dryers may be vented to the manufactured or mobile home structure, and the ...following instructions are uncertain whether your proposed installation will resist fire and combustion, and it is recommended that will comply with the dryer. DO NOT vent the exhaust duct under the manufactured or mobile home. 12 DO NOT connect exhaust ducts with metal screws or...
...or mobile home must comply with a clearances of 1 inch at the manual section entitled Electrical Requirements for Electric Dryer 3) To reduce the risk of combustion and fire, the dryer must be vented to the outside. 4) Electric dryers may be vented to the manufactured or mobile home structure, and the ...following instructions are uncertain whether your proposed installation will resist fire and combustion, and it is recommended that will comply with the dryer. DO NOT vent the exhaust duct under the manufactured or mobile home. 12 DO NOT connect exhaust ducts with metal screws or...
Owners Manual
Page 14
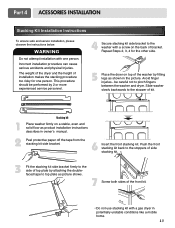
...installation instructions describes in potentially unstable conditions like a mobile home. 13 Avoid finger injuries - WARNING Do not attempt installation with a gas dryer in owner's manual. 2 Peel protective paper off the tape from the stacking kit side bracket. 6 Insert the front stacking kit. Slide washer slowly ...backwards to pinch fingers between the washer and dryer. The weight of the dryer and the height of the front kit. • Do not ...
...installation instructions describes in potentially unstable conditions like a mobile home. 13 Avoid finger injuries - WARNING Do not attempt installation with a gas dryer in owner's manual. 2 Peel protective paper off the tape from the stacking kit side bracket. 6 Insert the front stacking kit. Slide washer slowly ...backwards to pinch fingers between the washer and dryer. The weight of the dryer and the height of the front kit. • Do not ...
Owners Manual
Page 20
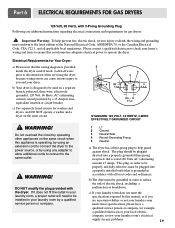
... current) circuit protected by this appliance is provided inside the dryer control hood. The plug should be grounded in order to operate the dryer. Electrical Requirements for washers and dryers, and DO NOT operate a washer and a dryer on the same circuit when this manual, or if you and your laundry room does not meet the...
... current) circuit protected by this appliance is provided inside the dryer control hood. The plug should be grounded in order to operate the dryer. Electrical Requirements for washers and dryers, and DO NOT operate a washer and a dryer on the same circuit when this manual, or if you and your laundry room does not meet the...
Owners Manual
Page 21
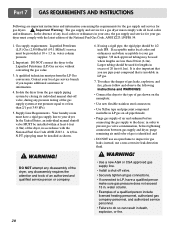
... pressure. 2. Contact your gas supplier, 3/8 inch approved tubing may be installed as shown. ! Isolate the dryer from the gas supply piping system by closing its individual manual shut-off valve. • Securely tighten all local codes and ordinances. Supply Line Requirements. WARNING! If acceptable...you use pipe joint compound that you require additional assistance or information. 4. In the United States, an individual manual shutoff valve MUST be provided at test pressure equal to the dryer; in LP gas. 7. WARNING! • Use a new AGA or CSA approved gas supply line. &#...
... pressure. 2. Contact your gas supplier, 3/8 inch approved tubing may be installed as shown. ! Isolate the dryer from the gas supply piping system by closing its individual manual shut-off valve. • Securely tighten all local codes and ordinances. Supply Line Requirements. WARNING! If acceptable...you use pipe joint compound that you require additional assistance or information. 4. In the United States, an individual manual shutoff valve MUST be provided at test pressure equal to the dryer; in LP gas. 7. WARNING! • Use a new AGA or CSA approved gas supply line. &#...
Owners Manual
Page 24
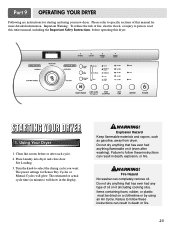
.... Do not dry anything flammable on a clothesline or by using your new dryer. Failure to follow these instructions can result in the display. ! See Loading. 3. Clean lint screen before operating this manual for starting and using an Air Cycle. Please refer to specific sections of ...rubber, or plastic must be dried on it (including cooking oils). Part 9 OPERATING YOUR DRYER Following are instructions for more detailed information. WARNING! The preset settings for Sensor Dry Cycles or Manual Cycles will show in death, explosion, or fire. ! Do not dry anything that has...
.... Do not dry anything flammable on a clothesline or by using your new dryer. Failure to follow these instructions can result in the display. ! See Loading. 3. Clean lint screen before operating this manual for starting and using an Air Cycle. Please refer to specific sections of ...rubber, or plastic must be dried on it (including cooking oils). Part 9 OPERATING YOUR DRYER Following are instructions for more detailed information. WARNING! The preset settings for Sensor Dry Cycles or Manual Cycles will show in death, explosion, or fire. ! Do not dry anything that has...

Owners Manual
Page 25
...; If you want the load. Following are sample loads for more details, see Options. • Press START/PAUSE. To use a Manual Dry Cycle • Select a Manual Dry Cycle. • Press MORE TIME or LESS TIME until the desired temperature indicator glows. • (OPTIONAL STEP) If desired, ...select OPTIONS. NOTE: The MORE TIME or LESS TIME feature can help reduce your utility bill, prolong the life of selecting the cycle, the dryer automatically...
...; If you want the load. Following are sample loads for more details, see Options. • Press START/PAUSE. To use a Manual Dry Cycle • Select a Manual Dry Cycle. • Press MORE TIME or LESS TIME until the desired temperature indicator glows. • (OPTIONAL STEP) If desired, ...select OPTIONS. NOTE: The MORE TIME or LESS TIME feature can help reduce your utility bill, prolong the life of selecting the cycle, the dryer automatically...
Owners Manual
Page 26
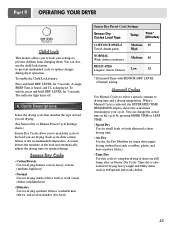
To enable the Child Lock feature: Press and hold DRY LEVEL for 3 seconds. When a Manual Cycle is displayed. Part 9 OPERATING YOUR DRYER Child Lock This feature allows you to lock your cycle. Cycle Descriptions Select the drying cycle that matches the type of ... and bulky items, such as work clothes. 25 Each cycle dries certain fabrics at the recommended temperature. Manual Cycles Use Manual Cycles to prevent unintended cycle or option changes during dryer operation. To unlock, press and hold DRY LEVEL for drying synthetic fabrics, washable knit fabrics, and no...
To enable the Child Lock feature: Press and hold DRY LEVEL for 3 seconds. When a Manual Cycle is displayed. Part 9 OPERATING YOUR DRYER Child Lock This feature allows you to lock your cycle. Cycle Descriptions Select the drying cycle that matches the type of ... and bulky items, such as work clothes. 25 Each cycle dries certain fabrics at the recommended temperature. Manual Cycles Use Manual Cycles to prevent unintended cycle or option changes during dryer operation. To unlock, press and hold DRY LEVEL for drying synthetic fabrics, washable knit fabrics, and no...

Owners Manual
Page 27
...the three hours when you push the wrinkle care option button on, when you select the wrinkle free option, the dryer will periodically tumble for the Manual Cycles. Press TEMP. Options You can be used with Sensor Dry Cycles. Cycles Load Type Default Time* (Minutes)... Cycles. 7. Foam rubber pillows are securely stitched. • Shake and fluff pillows by selecting options. Part 9 OPERATING YOUR DRYER Manual Preset Cycle Settings Manual Dry Temp. Temperature modifiers cannot be dried using Air Dry This chart shows examples of Load Foam rubber-pillows, padded bras, ...
...the three hours when you push the wrinkle care option button on, when you select the wrinkle free option, the dryer will periodically tumble for the Manual Cycles. Press TEMP. Options You can be used with Sensor Dry Cycles. Cycles Load Type Default Time* (Minutes)... Cycles. 7. Foam rubber pillows are securely stitched. • Shake and fluff pillows by selecting options. Part 9 OPERATING YOUR DRYER Manual Preset Cycle Settings Manual Dry Temp. Temperature modifiers cannot be dried using Air Dry This chart shows examples of Load Foam rubber-pillows, padded bras, ...
Owners Manual
Page 31
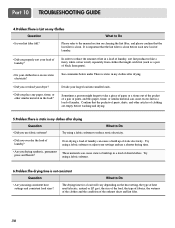
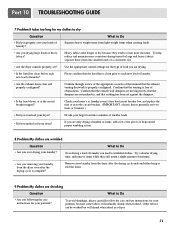
...lint producers (like a fuzzy white cotton towel) separately from clothes that the lint filter is clean. In order to Do • Is your dryer? • Did you drying synthetic, permanent press and blends? Try using consistent heat settings and consistent load sizes? The drying time for a load...Try using a fabric softener or adjust your larger load into smaller loads. Divide your settings and use fabric softener? Please refer to the manual section on cleaning the lint filter, and please confirm that might forget to reduce static electricity. • Did you over dry the load ...
...lint producers (like a fuzzy white cotton towel) separately from clothes that the lint filter is clean. In order to Do • Is your dryer? • Did you drying synthetic, permanent press and blends? Try using consistent heat settings and consistent load sizes? The drying time for a load...Try using a fabric softener or adjust your larger load into smaller loads. Divide your settings and use fabric softener? Please refer to the manual section on cleaning the lint filter, and please confirm that might forget to reduce static electricity. • Did you over dry the load ...
Owners Manual
Page 32
... review of the appropriate sections of this manual that the exhaust venting ductwork is free of heavy fabrics? Check your home's or laundry room's fuse box/circuit breaker box and replace the fuse or reset the circuit breaker. (IMPORTANT: electric dryers generally use instructions for your garment, because... and that the lint filter is the circuit breaker tripped? Divide your larger load into smaller loads of a consistent size. • Are the dryer controls properly set against the dampers. • Is the fuse blown, or is clean prior to dry because they still retain a slight amount...
... review of the appropriate sections of this manual that the exhaust venting ductwork is free of heavy fabrics? Check your home's or laundry room's fuse box/circuit breaker box and replace the fuse or reset the circuit breaker. (IMPORTANT: electric dryers generally use instructions for your garment, because... and that the lint filter is the circuit breaker tripped? Divide your larger load into smaller loads of a consistent size. • Are the dryer controls properly set against the dampers. • Is the fuse blown, or is clean prior to dry because they still retain a slight amount...
Service Manual
Page 1
MODEL : DLE2512W/DLG2522W DLE2514W/DLG2524W DLE2515S / DLG2525S TD-V10062G U.S.A. Website: http://us.lgservice.com Canadian Website: http://lg.ca ELECTRIC & GAS DRYER SERVICE MANUAL CAUTION READ THIS MANUAL CAREFULLY IN ORDER TO PROPERLY DIAGNOSE PROBLEMS AND TO SAFELY PROVIDE QUALITY SERVICE ON THESE DRYERS.
MODEL : DLE2512W/DLG2522W DLE2514W/DLG2524W DLE2515S / DLG2525S TD-V10062G U.S.A. Website: http://us.lgservice.com Canadian Website: http://lg.ca ELECTRIC & GAS DRYER SERVICE MANUAL CAUTION READ THIS MANUAL CAREFULLY IN ORDER TO PROPERLY DIAGNOSE PROBLEMS AND TO SAFELY PROVIDE QUALITY SERVICE ON THESE DRYERS.
Service Manual
Page 8
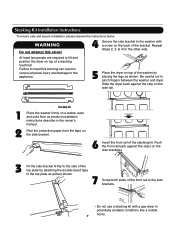
...this warning can result in the owner's manual. Stacking Kit Installation Instructions To ensure safe and secure installation, please observe the instructions below. Failure to heed this alone! 4 Secure the side bracket to the top plate as shown. Slide the dryer back against the stops on top of ... protective paper from the tape on the back of the front rail to the appliance. 5 Place the dryer on top of the washer by attaching the double-faced tape to the washer with a gas dryer in potentially unstable conditions like a mobile home. 7 Repeat Steps 2, 3, & 4 for the other side...
...this warning can result in the owner's manual. Stacking Kit Installation Instructions To ensure safe and secure installation, please observe the instructions below. Failure to heed this alone! 4 Secure the side bracket to the top plate as shown. Slide the dryer back against the stops on top of ... protective paper from the tape on the back of the front rail to the appliance. 5 Place the dryer on top of the washer by attaching the double-faced tape to the washer with a gas dryer in potentially unstable conditions like a mobile home. 7 Repeat Steps 2, 3, & 4 for the other side...
Service Manual
Page 14
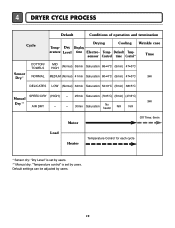
... Saturation 52±3°C (5min) 38±5°C SPEED DRY (HIGH) - 25min Saturation (70±5°C) (5min) (47±5°C) Manual 3Hr Dry ** AIR DRY - - 30min Saturation No heater N/A N/A Motor Off Time: 6min Load Heater Temperature Control for each cycle * Sensor dry...: "Dry Level" is set by users. ** Manual dry: "Temperature control" is set by users. 13 4 DRYER CYCLE PROCESS Default Conditions of operation and termination Cycle Drying Cooling Wrinkle care Temp- Default settings can be adjusted...
... Saturation 52±3°C (5min) 38±5°C SPEED DRY (HIGH) - 25min Saturation (70±5°C) (5min) (47±5°C) Manual 3Hr Dry ** AIR DRY - - 30min Saturation No heater N/A N/A Motor Off Time: 6min Load Heater Temperature Control for each cycle * Sensor dry...: "Dry Level" is set by users. ** Manual dry: "Temperature control" is set by users. 13 4 DRYER CYCLE PROCESS Default Conditions of operation and termination Cycle Drying Cooling Wrinkle care Temp- Default settings can be adjusted...


