
Owners Manual
Page 7
... or use any phone in this appliance. • Do not dry anything that have ever had anything flammable on it, even after washing. • No washer can be dried on any gas or electrical appliance. • Do not touch any other reproductive harm and requires businesses to warn customers of potential...
... or use any phone in this appliance. • Do not dry anything that have ever had anything flammable on it, even after washing. • No washer can be dried on any gas or electrical appliance. • Do not touch any other reproductive harm and requires businesses to warn customers of potential...
Owners Manual
Page 14
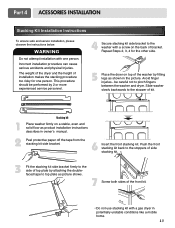
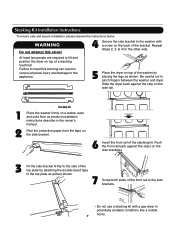
... more experienced service personnel. 4 Secure stacking kit side bracket to the stopper of the washer by attaching the doublefaced tape to pinch fingers between the washer and dryer. Slide washer slowly backwards to the washer with a screw on the back of installation makes the stacking procedure too risky for the... other side. 5 Place the dryer on top of kit. 1 Stacking kit Place washer firmly on a stable, even and solid floor as picture shows. 7 Screw both sides of the front kit. • Do not use stacking...
... more experienced service personnel. 4 Secure stacking kit side bracket to the stopper of the washer by attaching the doublefaced tape to pinch fingers between the washer and dryer. Slide washer slowly backwards to the washer with a screw on the back of installation makes the stacking procedure too risky for the... other side. 5 Place the dryer on top of kit. 1 Stacking kit Place washer firmly on a stable, even and solid floor as picture shows. 7 Screw both sides of the front kit. • Do not use stacking...
Owners Manual
Page 20
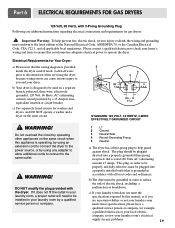
... laundry room by this appliance is rated 120 Volts AC (alternating current) 15 Amps. c) If your dryer. c) Use separately fused circuits for washers and dryers, and DO NOT operate a washer and a dryer on the same circuit when this manual, or if you and your laundry room does not meet the specifications required...
... laundry room by this appliance is rated 120 Volts AC (alternating current) 15 Amps. c) If your dryer. c) Use separately fused circuits for washers and dryers, and DO NOT operate a washer and a dryer on the same circuit when this manual, or if you and your laundry room does not meet the specifications required...
Owners Manual
Page 24
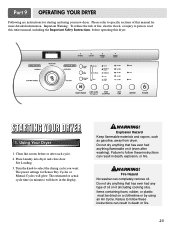
STARTING YOUR DRYER 1. The preset settings for Sensor Dry Cycles or Manual Cycles will show in death or fire. 23 WARNING! Fire Hazard No washer can result in minutes) will glow. Turn the knob to person, read this entire manual, including the Important Safety Instructions, before or after washing). Explosion ...
STARTING YOUR DRYER 1. The preset settings for Sensor Dry Cycles or Manual Cycles will show in death or fire. 23 WARNING! Fire Hazard No washer can result in minutes) will glow. Turn the knob to person, read this entire manual, including the Important Safety Instructions, before or after washing). Explosion ...

Service Manual
Page 3
... electrical, electronic, and mechanical appliance repair. Avoid touching electronic parts or terminal contacts; RECONNECT ALL GROUNDING DEVICES If grounding wires, screws, straps, clips, nuts, or washers used to complete a path to repair a major appliance may damage or weaken the electronic control assembly. WARNING ! Touch your gas supplier, call your building. OR...
... electrical, electronic, and mechanical appliance repair. Avoid touching electronic parts or terminal contacts; RECONNECT ALL GROUNDING DEVICES If grounding wires, screws, straps, clips, nuts, or washers used to complete a path to repair a major appliance may damage or weaken the electronic control assembly. WARNING ! Touch your gas supplier, call your building. OR...
Service Manual
Page 8
...washing machine! At least two people are required to lift and position the dryer on the side brackets. 3 Fit the side bracket firmly to the washer with a gas dryer in potentially unstable conditions like a mobile home. 7 Slide the dryer back against the stops on top of the stacking kit..., please observe the instructions below. Push the front rail back against the stop on the side rail. 1 2 Stacking kit Place the washer firmly on the back of the top plate by placing the legs as product installation instructions describe in serious physical injury and damage to the...
...washing machine! At least two people are required to lift and position the dryer on the side brackets. 3 Fit the side bracket firmly to the washer with a gas dryer in potentially unstable conditions like a mobile home. 7 Slide the dryer back against the stops on top of the stacking kit..., please observe the instructions below. Push the front rail back against the stop on the side rail. 1 2 Stacking kit Place the washer firmly on the back of the top plate by placing the legs as product installation instructions describe in serious physical injury and damage to the...
Service Manual
Page 9
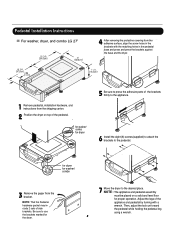
...NOTE : The appliance and pedestal assembly must be placed on top of the pedestal. , for washer/ combo for dryer 5 Be sure to press the adhesive parts of the brackets firmly to the ...the dryer on a solid and level floor for proper operation. Pedestal Installation Instructions For washer, dryer, and combo LG 27" 4 AAtftaecr hretmheovdinogubthle-pfarocteedcttivaepecoovfetrhinegbfroamcktehteto the dardyheersaivsesshuorfwacnes, oaltighne tbhenstcpreawrtshoolfetshien bthreackets ablriagcnkwetisthwtihthetheedgmeaatcnhdincgahnoblees aintttahcehpeeddteostahle pbeadseesatnadl wpritehssscarnedwpsr...
...NOTE : The appliance and pedestal assembly must be placed on top of the pedestal. , for washer/ combo for dryer 5 Be sure to press the adhesive parts of the brackets firmly to the ...the dryer on a solid and level floor for proper operation. Pedestal Installation Instructions For washer, dryer, and combo LG 27" 4 AAtftaecr hretmheovdinogubthle-pfarocteedcttivaepecoovfetrhinegbfroamcktehteto the dardyheersaivsesshuorfwacnes, oaltighne tbhenstcpreawrtshoolfetshien bthreackets ablriagcnkwetisthwtihthetheedgmeaatcnhdincgahnoblees aintttahcehpeeddteostahle pbeadseesatnadl wpritehssscarnedwpsr...

Service Manual
Page 36
Remove 2 screws and cover (Air guide). 5. Remove the fan. 7. Disconnect the motor clamp and motor. 1. Disconnect the electrode sensor. 1. Disassemble the top plate. 2. Remove 7 screws. 5. Remove the Drum assembly. 4. Remove the Drum assembly. 4. 1. Remove the Cabinet Cover and Tub Drum [Front]. 3. Remove the Back Cover. 35 Remove the Cover Grid. 4. Remove the bolt and washer. 6. Remove 3 screws. 3. Disassemble the top plate. 2. Remove the Cabinet Cover and Tub Drum [Front]. 3. Remove the filter. 2.
Remove 2 screws and cover (Air guide). 5. Remove the fan. 7. Disconnect the motor clamp and motor. 1. Disconnect the electrode sensor. 1. Disassemble the top plate. 2. Remove 7 screws. 5. Remove the Drum assembly. 4. Remove the Drum assembly. 4. 1. Remove the Cabinet Cover and Tub Drum [Front]. 3. Remove the Back Cover. 35 Remove the Cover Grid. 4. Remove the bolt and washer. 6. Remove 3 screws. 3. Disassemble the top plate. 2. Remove the Cabinet Cover and Tub Drum [Front]. 3. Remove the filter. 2.


