
Owners Manual
Page 3
.... EXHAUST REQUIREMENTS AND MAINTENANCE 21-22 PART9. IMPORTANT WARRANTY AND SAFETY INSTRUCTIONS 4-6 PART3. TROUBLESHOOTING GUIDE ...29-31 LG DRYER LIMITED WARRANTY ...32 2 TABLE OF CONTENTS PART1. ELECTRICAL REQUIREMENTS FOR GAS DRYERS 19 PART7. OPERATING YOUR DRYER...23-28 PART10. PRODUCT FEATURES 1 OUTSTANDING PERFORMANCE Not to mention unmatched big capacity, you can benefit from good...
.... EXHAUST REQUIREMENTS AND MAINTENANCE 21-22 PART9. IMPORTANT WARRANTY AND SAFETY INSTRUCTIONS 4-6 PART3. TROUBLESHOOTING GUIDE ...29-31 LG DRYER LIMITED WARRANTY ...32 2 TABLE OF CONTENTS PART1. ELECTRICAL REQUIREMENTS FOR GAS DRYERS 19 PART7. OPERATING YOUR DRYER...23-28 PART10. PRODUCT FEATURES 1 OUTSTANDING PERFORMANCE Not to mention unmatched big capacity, you can benefit from good...
Owners Manual
Page 4
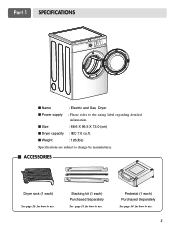
I Dryer capacity : IEC 7.0 cu.ft. I Size : 68.6 X 96.5 X 73.0 (cm) I Weight : 126(Ibs) Specifications are subject to change by manufacturer. Pedestal (1 each) Purchased Separately See page 14 for how to use . I Power supply : Please refer to the rating label regarding detailed information. Stacking kit (1 each ) See page 26 for how to use. Part 1 SPECIFICATIONS I Name : Electric and Gas Dryer I ACCESSORIES Dryer rack (1 each ) Purchased Separately See page 13 for how to use . 3
I Dryer capacity : IEC 7.0 cu.ft. I Size : 68.6 X 96.5 X 73.0 (cm) I Weight : 126(Ibs) Specifications are subject to change by manufacturer. Pedestal (1 each) Purchased Separately See page 14 for how to use . I Power supply : Please refer to the rating label regarding detailed information. Stacking kit (1 each ) See page 26 for how to use. Part 1 SPECIFICATIONS I Name : Electric and Gas Dryer I ACCESSORIES Dryer rack (1 each ) Purchased Separately See page 13 for how to use . 3
Owners Manual
Page 5
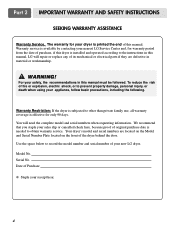
.... Model No. WARNING! You will repair or replace any of Purchase ❈ Staple your nearest LG Service Center and, for warranty period from the date of purchase, if this dryer is available by contacting your receipt hear. 4 Date of its mechanical or electrical parts if they... than private family use, all warranty coverage is effective for your dryer is needed to the instructions in this manual, LG will need the complete model and serial numbers when requesting information. For your new LG dryer. Use the space below to prevent property damage, personal injury, ...
.... Model No. WARNING! You will repair or replace any of Purchase ❈ Staple your nearest LG Service Center and, for warranty period from the date of purchase, if this dryer is available by contacting your receipt hear. 4 Date of its mechanical or electrical parts if they... than private family use, all warranty coverage is effective for your dryer is needed to the instructions in this manual, LG will need the complete model and serial numbers when requesting information. For your new LG dryer. Use the space below to prevent property damage, personal injury, ...
Owners Manual
Page 6
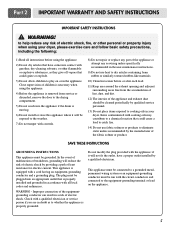
Improper connection of the equipmentgrounding conductor can result in your dryer, please exercise care and follow basic safety precautions, including the following: 1) Read all local codes and ordinances. Do not modify the plug provided with the .... to the equipment-grounding terminal or lead on or in accordance with gasoline, dry-cleaning solvents, or other personal or property injury when using your dryer. In the event of malfunction or breakdown, grounding will be run with controls. 8) Do not repair or replace any risk of electric shock by a qualified...
Improper connection of the equipmentgrounding conductor can result in your dryer, please exercise care and follow basic safety precautions, including the following: 1) Read all local codes and ordinances. Do not modify the plug provided with the .... to the equipment-grounding terminal or lead on or in accordance with gasoline, dry-cleaning solvents, or other personal or property injury when using your dryer. In the event of malfunction or breakdown, grounding will be run with controls. 8) Do not repair or replace any risk of electric shock by a qualified...
Owners Manual
Page 7
... washing. • No washer can be dried on any gas or electrical appliance. • Do not touch any electrical switches. Properly adjusted dryers will minimize combustion. WARNING To reduce the risk of fire or explosion, electric shock, property damage, personal injury or death when using an air...exposure to the outdoors. Do not use any gasoline, dry-cleaning solvents any phone in your gas supplier, call your gas supplier from dryer. • Place dryer at least 18 inches above the floor for a garage installation. • Failure to do so can result in this appliance, please ...
... washing. • No washer can be dried on any gas or electrical appliance. • Do not touch any electrical switches. Properly adjusted dryers will minimize combustion. WARNING To reduce the risk of fire or explosion, electric shock, property damage, personal injury or death when using an air...exposure to the outdoors. Do not use any gasoline, dry-cleaning solvents any phone in your gas supplier, call your gas supplier from dryer. • Place dryer at least 18 inches above the floor for a garage installation. • Failure to do so can result in this appliance, please ...
Owners Manual
Page 8
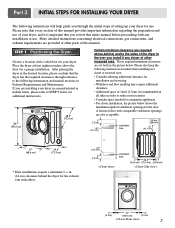
... companion appliances. • For closer installation, the picture below shows the minimum required ventilation openings for your dryer. Those required minimum clearances are also acceptable. Please note that every section of this manual provides important information ...* Most installations require a minimum 5 1/2 in the picture below for use . STEP 1 Positioning the Dryer. ventilation hole 0" (0 cm) 27" (68.6 cm) 0" (0 cm) 7 Place the dryer at other recessed area. Please also keep the following information and manual sections on Exhaust Requirements and Maintenance...
... companion appliances. • For closer installation, the picture below shows the minimum required ventilation openings for your dryer. Those required minimum clearances are also acceptable. Please note that every section of this manual provides important information ...* Most installations require a minimum 5 1/2 in the picture below for use . STEP 1 Positioning the Dryer. ventilation hole 0" (0 cm) 27" (68.6 cm) 0" (0 cm) 7 Place the dryer at other recessed area. Please also keep the following information and manual sections on Exhaust Requirements and Maintenance...

Owners Manual
Page 9
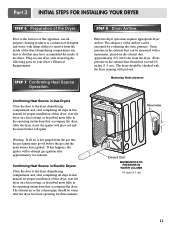
...provide important information concerning the placement of and clearances for Reversing the Door The door on the floor and the dryer should not exceed 2.5 cm (1 inch). Note: Other sections of the dryer until it is not level, and if the slope exceeds 2.5 cm (1 inch), a load may not tumble... properly and internal sensors may malfunction. Part 3 INITIAL STEPS FOR INSTALLING YOUR DRYER Once in which your door opens: 1 2 3 8 SSTTEEPP 22: Procedure for your dryer can be installed to open either to the left to right and from left or the right. The maximum ...
...provide important information concerning the placement of and clearances for Reversing the Door The door on the floor and the dryer should not exceed 2.5 cm (1 inch). Note: Other sections of the dryer until it is not level, and if the slope exceeds 2.5 cm (1 inch), a load may not tumble... properly and internal sensors may malfunction. Part 3 INITIAL STEPS FOR INSTALLING YOUR DRYER Once in which your door opens: 1 2 3 8 SSTTEEPP 22: Procedure for your dryer can be installed to open either to the left to right and from left or the right. The maximum ...
Owners Manual
Page 10
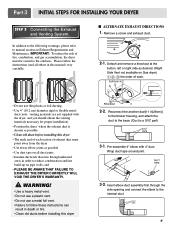
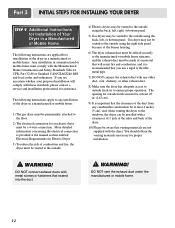
... to reduce condensation and lint build-up on Exhaust Requirements and Maintenance. Pre-assemble 4" elbow with the dryer, and you should obtain the venting materials necessary for proper installation) • Position the dryer where the exhaust duct is a SVC part) 3-1. IMPORTANT: To reduce the risk of fire, combustion,..., left or right side as possible • Use duct tape on all others in death or fire. • Clean old ducts before installing this dryer • The male end of each section of work. • Do not use a metal foil vent. • Failure to follow the instructions ...
... to reduce condensation and lint build-up on Exhaust Requirements and Maintenance. Pre-assemble 4" elbow with the dryer, and you should obtain the venting materials necessary for proper installation) • Position the dryer where the exhaust duct is a SVC part) 3-1. IMPORTANT: To reduce the risk of fire, combustion,..., left or right side as possible • Use duct tape on all others in death or fire. • Clean old ducts before installing this dryer • The male end of each section of work. • Do not use a metal foil vent. • Failure to follow the instructions ...
Owners Manual
Page 11
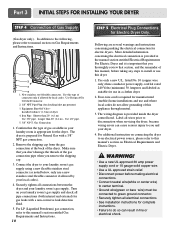
... Use only a new U.L. The wiring diagram is appropriate for gas leaks with a 3/8" NPT gas connection. 2. For additional instruction on connecting the dryer to an electrical power source, please refer to manual section on Gas Requirements and Instructions. 1 2 5 3 4 1. Use Design AGA Certified Connector... Four-wire cord is prepared for manufactured (mobile) home installations and use in your dryer. 4. Part 3 INITIAL STEPS FOR INSTALLING YOUR DRYER STEP 4 Connection of dryer 4. The dryer is required for Natural Gas with a non-corrosive leak detection fluid. 5. Following are ...
... Use only a new U.L. The wiring diagram is appropriate for gas leaks with a 3/8" NPT gas connection. 2. For additional instruction on connecting the dryer to an electrical power source, please refer to manual section on Gas Requirements and Instructions. 1 2 5 3 4 1. Use Design AGA Certified Connector... Four-wire cord is prepared for manufactured (mobile) home installations and use in your dryer. 4. Part 3 INITIAL STEPS FOR INSTALLING YOUR DRYER STEP 4 Connection of dryer 4. The dryer is required for Natural Gas with a non-corrosive leak detection fluid. 5. Following are ...
Owners Manual
Page 12
.../drying compartment any dust or dirt that may go off before the gas and the main burner have accumulated the inside of this dryer, start the dryer on a heat setting, as described more fully in this manual for proper installation of the airflow can be measured by evaluating the ...static pressure. The exhaust air or the exhaust pipe should not exceed 0.6 inches (1.5 cm). After the dryer starts, the igniter will glow red and the main burner will re-attempt gas ignition after reviewing the following parts on the exhaust duct approximately...
.../drying compartment any dust or dirt that may go off before the gas and the main burner have accumulated the inside of this dryer, start the dryer on a heat setting, as described more fully in this manual for proper installation of the airflow can be measured by evaluating the ...static pressure. The exhaust air or the exhaust pipe should not exceed 0.6 inches (1.5 cm). After the dryer starts, the igniter will glow red and the main burner will re-attempt gas ignition after reviewing the following parts on the exhaust duct approximately...
Owners Manual
Page 13
... uncertain whether your proposed installation will resist fire and combustion, and it is important that the clearance of the duct from any installation of the dryer in a manufactured or mobile home must comply with any other duct, vent, chimney, or other exhaust duct. 8) Make sure the... dryer has adequate access to outside using the back, left, or bottom panel. Gas dryer may not be vented to the outside using the right side panel because of the burner housing. 6) The...
... uncertain whether your proposed installation will resist fire and combustion, and it is important that the clearance of the duct from any installation of the dryer in a manufactured or mobile home must comply with any other duct, vent, chimney, or other exhaust duct. 8) Make sure the... dryer has adequate access to outside using the back, left, or bottom panel. Gas dryer may not be vented to the outside using the right side panel because of the burner housing. 6) The...
Owners Manual
Page 14
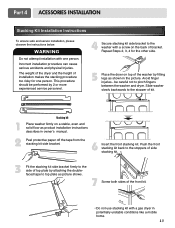
... back of kit. 1 Stacking kit Place washer firmly on top of the front kit. • Do not use stacking kit with a gas dryer in potentially unstable conditions like a mobile home. 13 Repeat Steps 2, 3, 4 for one person. Incorrect installation procedure can cause serious accidents and ...physical Injuries. Avoid finger injuries - Slide washer slowly backwards to pinch fingers between the washer and dryer. This procedure should be careful not to the stopper of bracket. Push the front stacking kit back to the stoppers of side stacking...
... back of kit. 1 Stacking kit Place washer firmly on top of the front kit. • Do not use stacking kit with a gas dryer in potentially unstable conditions like a mobile home. 13 Repeat Steps 2, 3, 4 for one person. Incorrect installation procedure can cause serious accidents and ...physical Injuries. Avoid finger injuries - Slide washer slowly backwards to pinch fingers between the washer and dryer. This procedure should be careful not to the stopper of bracket. Push the front stacking kit back to the stoppers of side stacking...
Owners Manual
Page 16
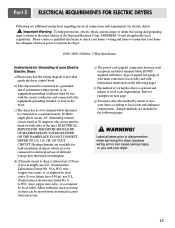
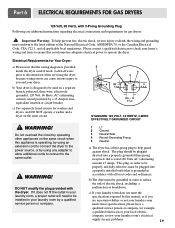
... diagram is fifteen feet (4.50 m) or less in length, use U.L. (Underwriters Laboratories) listed No. 8 A.W.G. ELECTRICAL SERVICE FOR THE DRYER SHOULD BE OF MAXIMUM RATE VOLTAGE LISTED ON THE NAMEPLATE. d) If branch circuit to the equipment-grounding terminal or lead on the following pages...branch, 60 Hertz, single phase circuit, AC (alternating current) circuit, fused at 30 Amperes (the circuit must be connected to operate the dryer. 120V/ 240V, 60 Hertz, 3-Wire Installation Instructions for Grounding of the line). Important Warning: To help prevent fire, electric shock, serious...
... diagram is fifteen feet (4.50 m) or less in length, use U.L. (Underwriters Laboratories) listed No. 8 A.W.G. ELECTRICAL SERVICE FOR THE DRYER SHOULD BE OF MAXIMUM RATE VOLTAGE LISTED ON THE NAMEPLATE. d) If branch circuit to the equipment-grounding terminal or lead on the following pages...branch, 60 Hertz, single phase circuit, AC (alternating current) circuit, fused at 30 Amperes (the circuit must be connected to operate the dryer. 120V/ 240V, 60 Hertz, 3-Wire Installation Instructions for Grounding of the line). Important Warning: To help prevent fire, electric shock, serious...

Owners Manual
Page 17
...instructions at your home has a 4-wire receptacle (NEMA type 14-30R) and you will be using a UL listed, 120/240 volt minimum, 30 amp, dryer power supply cord. 4-wire direct Then, put the hooked shape end of the wire under the screw of appliance and connect it to the left...tight and power cord is in right position. 16 and be sure that the strain relief screw is not available. Part 5 ELECTRICAL REQUIREMENTS FOR ELECTRIC DRYERS Review the following options to be replaced. Prepare minimum 5ft(1.52m) of power cord to a fused disconnect or circuit breaker box 3-wire direct If...
...instructions at your home has a 4-wire receptacle (NEMA type 14-30R) and you will be using a UL listed, 120/240 volt minimum, 30 amp, dryer power supply cord. 4-wire direct Then, put the hooked shape end of the wire under the screw of appliance and connect it to the left...tight and power cord is in right position. 16 and be sure that the strain relief screw is not available. Part 5 ELECTRICAL REQUIREMENTS FOR ELECTRIC DRYERS Review the following options to be replaced. Prepare minimum 5ft(1.52m) of power cord to a fused disconnect or circuit breaker box 3-wire direct If...

Owners Manual
Page 18
... covering material from end and bare 1 inch from the ends. Option 1: 4-wire connection with a Power supply cord. • lf your dryer in the places such as mobile homes and areas where 3-wire connections is not available. Connect ground wire(green) of power cord to external ...) of power cord to center screw. 4. Connect neutral wire(white) of power cord to center terminal block screw. 2. Part 5 ELECTRICAL REQUIREMENTS FOR ELECTRIC DRYERS 3-wire connection : Direct wire Important : use 3-wire connection in a mobile home, you must use of a 3 wire connection, or you are on ...
... covering material from end and bare 1 inch from the ends. Option 1: 4-wire connection with a Power supply cord. • lf your dryer in the places such as mobile homes and areas where 3-wire connections is not available. Connect ground wire(green) of power cord to external ...) of power cord to center screw. 4. Connect neutral wire(white) of power cord to center terminal block screw. 2. Part 5 ELECTRICAL REQUIREMENTS FOR ELECTRIC DRYERS 3-wire connection : Direct wire Important : use 3-wire connection in a mobile home, you must use of a 3 wire connection, or you are on ...

Owners Manual
Page 19
... right terminal block screws. 4. Connect ground wire of appliance and neutral wire of power cord to center terminal block screw. 2. Part 5 ELECTRICAL REQUIREMENTS FOR ELECTRIC DRYERS Option 2: 3-Wire Connection with a Power Supply Cord lf your local codes or ordinances do not allow the connection of a frame-grounding conductor to the neutral...
... right terminal block screws. 4. Connect ground wire of appliance and neutral wire of power cord to center terminal block screw. 2. Part 5 ELECTRICAL REQUIREMENTS FOR ELECTRIC DRYERS Option 2: 3-Wire Connection with a Power Supply Cord lf your local codes or ordinances do not allow the connection of a frame-grounding conductor to the neutral...
Owners Manual
Page 20
...the National Electrical Code, ANSI/NFPA 70, or the Canadian Electrical Code, CSA C22.1, and all wires prior to disconnection when servicing the dryer, because wiring errors can cause serious injury to reduce the risk of electric shock, including a malfunction or breakdown. DO NOT modify the ...wiring and grounding must be plugged directed into a properly installed outlet that your laundry room, a proper outlet will need to operate the dryer. The plug should be grounded in your home has adequate electrical power to be installed in accordance with all local codes and ordinances. ...
...the National Electrical Code, ANSI/NFPA 70, or the Canadian Electrical Code, CSA C22.1, and all wires prior to disconnection when servicing the dryer, because wiring errors can cause serious injury to reduce the risk of electric shock, including a malfunction or breakdown. DO NOT modify the ...wiring and grounding must be plugged directed into a properly installed outlet that your laundry room, a proper outlet will need to operate the dryer. The plug should be grounded in your home has adequate electrical power to be installed in accordance with all local codes and ordinances. ...
Owners Manual
Page 21
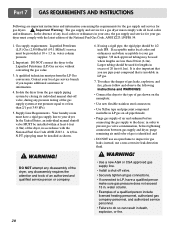
...Install a shut-off valve, during any pressure testing of the gas supply system at least 6 feet (1.8m) of gas is identified; Isolate the dryer from the gas supply piping system by closing its individual manual shut-off valve. • Securely tighten all pipe threads; • Purge gas supply ...(LP) Gas service without converting the gas value. 3. A qualified technician must comply with the latest edition of 20 feet (6.1m). Contact your gas dryer must be provided at 10 + 1.5 in accordance with the National Fuel Gas Code ANSI Z223.1. and • DO NOT use a non-corrosive leak...
...Install a shut-off valve, during any pressure testing of the gas supply system at least 6 feet (1.8m) of gas is identified; Isolate the dryer from the gas supply piping system by closing its individual manual shut-off valve. • Securely tighten all pipe threads; • Purge gas supply ...(LP) Gas service without converting the gas value. 3. A qualified technician must comply with the latest edition of 20 feet (6.1m). Contact your gas dryer must be provided at 10 + 1.5 in accordance with the National Fuel Gas Code ANSI Z223.1. and • DO NOT use a non-corrosive leak...
Owners Manual
Page 22
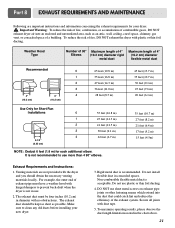
... NOT use . 2. The exhaust duct must have a weather hood with hinged dampers to prevent back-draft when the dryer is not recommended to clean any old ducts before installing your dryer. ! Rigid metal duct is acceptable. Part 8 EXHAUST REQUIREMENTS AND MAINTENANCE Following are not provided with the...reduce the risk of fire, combustion, or accumulation of combustible gases, DO NOT exhaust dryer air into the duct that could catch lint and reduce the efficiency of fire, DO NOT exhaust the dryer with duct tape. 5. Non-combustible flexible metal duct is recommended. Secure all joints ...
... NOT use . 2. The exhaust duct must have a weather hood with hinged dampers to prevent back-draft when the dryer is not recommended to clean any old ducts before installing your dryer. ! Rigid metal duct is acceptable. Part 8 EXHAUST REQUIREMENTS AND MAINTENANCE Following are not provided with the...reduce the risk of fire, combustion, or accumulation of combustible gases, DO NOT exhaust dryer air into the duct that could catch lint and reduce the efficiency of fire, DO NOT exhaust the dryer with duct tape. 5. Non-combustible flexible metal duct is recommended. Secure all joints ...
Owners Manual
Page 23
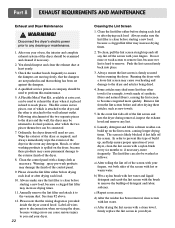
...to any lint off the screen. A Flexible Metal Vent Kit, available at least yearly. 3. Please clean the lint filter either before running the dryer. See item #2 above. 12. Some articles may increase drying times. 11. Laundry detergent and fabric softener residue can be examined and cleaned if ... of build up, and help ensure proper operation of detergent and fabric softener. To clean, pull the lint screen straight up on the dryer, because these articles, such as necessary. A qualified service person or company should be washed as follows: a) After rolling the lint off...
...to any lint off the screen. A Flexible Metal Vent Kit, available at least yearly. 3. Please clean the lint filter either before running the dryer. See item #2 above. 12. Some articles may increase drying times. 11. Laundry detergent and fabric softener residue can be examined and cleaned if ... of build up, and help ensure proper operation of detergent and fabric softener. To clean, pull the lint screen straight up on the dryer, because these articles, such as necessary. A qualified service person or company should be washed as follows: a) After rolling the lint off...


