
Owners Manual
Page 5
WARNING! For your new LG dryer. You will repair or replace any of your safety, the recommendations in this manual. Use the space below to record the model number and serial number of its mechanical or electrical parts if they are located on the ...❈ Staple your sales slip or cancelled check here, because proof of purchase, if this manual, LG will need the complete model and serial numbers when requesting information. Warranty service is available by contacting your nearest LG Service Center and, for warranty period from the date of original purchase date is installed and...
WARNING! For your new LG dryer. You will repair or replace any of your safety, the recommendations in this manual. Use the space below to record the model number and serial number of its mechanical or electrical parts if they are located on the ...❈ Staple your sales slip or cancelled check here, because proof of purchase, if this manual, LG will need the complete model and serial numbers when requesting information. Warranty service is available by contacting your nearest LG Service Center and, for warranty period from the date of original purchase date is installed and...
Owners Manual
Page 7
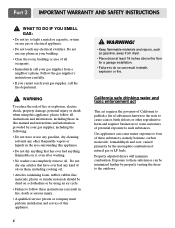
..., rubber, rubber-like materials, plastic or similar materials should be minimized further by the incomplete combustion of all instructions and information, including those in this manual and instructions and information provided by your gas supplier, including the following: • Do not store or use any electrical switches. Gas appliances can result...
..., rubber, rubber-like materials, plastic or similar materials should be minimized further by the incomplete combustion of all instructions and information, including those in this manual and instructions and information provided by your gas supplier, including the following: • Do not store or use any electrical switches. Gas appliances can result...
Owners Manual
Page 8
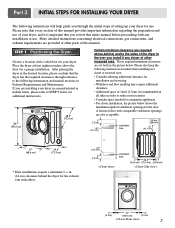
...please confirm that the dryer has the required clearances through the initial steps of 1inch (2.5cm) is important that every section of this manual provides important information regarding the preparation and use of the dryer in the ever you are installing your dryer. ventilation hole 0" (0...may require additional clearance. • Additional space of setting up your dryer for the exhaust vent with any closer of this manual. More detailed instructions concerning electrical connections, gas connections, and exhaust requirements are required above the floor for the door. If ...
...please confirm that the dryer has the required clearances through the initial steps of 1inch (2.5cm) is important that every section of this manual provides important information regarding the preparation and use of the dryer in the ever you are installing your dryer. ventilation hole 0" (0...may require additional clearance. • Additional space of setting up your dryer for the exhaust vent with any closer of this manual. More detailed instructions concerning electrical connections, gas connections, and exhaust requirements are required above the floor for the door. If ...

Owners Manual
Page 9
... if the slope exceeds 2.5 cm (1 inch), a load may not tumble properly and internal sensors may malfunction. Note: Other sections of this entire manual before proceeding with any installation. SSTTEEPP 22: Procedure for your dryer can be installed to open either to the left to right and from front...the direction in position, adjust the leveling legs of the dryer from left to right or from front to back. Please review this manual also provide important information concerning the placement of and clearances for Reversing the Door The door on the floor and the dryer should not...
... if the slope exceeds 2.5 cm (1 inch), a load may not tumble properly and internal sensors may malfunction. Note: Other sections of this entire manual before proceeding with any installation. SSTTEEPP 22: Procedure for your dryer can be installed to open either to the left to right and from front...the direction in position, adjust the leveling legs of the dryer from left to right or from front to back. Please review this manual also provide important information concerning the placement of and clearances for Reversing the Door The door on the floor and the dryer should not...
Owners Manual
Page 10
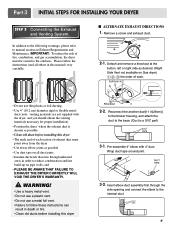
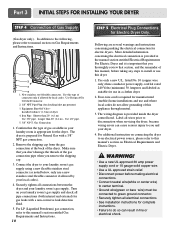
..., left or right side as desired. (Right Side Vent not available on all others in death or fire. • Clean old ducts before installing this manual) very carefully. WARNING! • Use a heavy metal vent. • Do not use a plastic vent. • Do not use thin plastic or foil... duct tape around joint. 3-2. Insert elbow duct assembly first through unheated areas in (28cm)] to the blower housing, and attach the duct to manual section on pipe walls; Part 3 INITIAL STEPS FOR INSTALLING YOUR DRYER STEP 3 Connecting the Exhaust and Venting System. and • PLEASE BE AWARE...
..., left or right side as desired. (Right Side Vent not available on all others in death or fire. • Clean old ducts before installing this manual) very carefully. WARNING! • Use a heavy metal vent. • Do not use a plastic vent. • Do not use thin plastic or foil... duct tape around joint. 3-2. Insert elbow duct assembly first through unheated areas in (28cm)] to the blower housing, and attach the duct to manual section on pipe walls; Part 3 INITIAL STEPS FOR INSTALLING YOUR DRYER STEP 3 Connecting the Exhaust and Venting System. and • PLEASE BE AWARE...
Owners Manual
Page 11
... to do not allow grounding of this dryer. 1. Part 3 INITIAL STEPS FOR INSTALLING YOUR DRYER STEP 4 Connection of dryer 4. Use this manual, before making the electrical connection for checking inlet gas pressure) 3. Use Design AGA Certified Connector. 2. 1/8" NPT Pipe Plug (for electric dryers... only). Shorter than 20' (6.1 m) - Use 1/2" pipe. 5. 3/8" N.P.T. Remove the shipping cap from the gas connection at the manual section entitled Electrical Requirements For Electric Dryer and it is required for the dryer. Make sure that the type of connector only if allowed ...
... to do not allow grounding of this dryer. 1. Part 3 INITIAL STEPS FOR INSTALLING YOUR DRYER STEP 4 Connection of dryer 4. Use this manual, before making the electrical connection for checking inlet gas pressure) 3. Use Design AGA Certified Connector. 2. 1/8" NPT Pipe Plug (for electric dryers... only). Shorter than 20' (6.1 m) - Use 1/2" pipe. 5. 3/8" N.P.T. Remove the shipping cap from the gas connection at the manual section entitled Electrical Requirements For Electric Dryer and it is required for the dryer. Make sure that the type of connector only if allowed ...
Owners Manual
Page 12
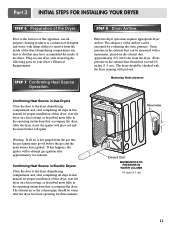
... the dryer. Confirming Heat Source in Electric Dryers Close the door to the dryer drum/drying compartment and, after completing all steps in this manual for three minutes. The adequacy of the airflow can be checked with the dryer running with a manometer, placed on a heat setting, as... described more fully in this manual for proper installation of this happens, the igniter will ignite. Static pressure in Gas Dryers Close the door to remove from the dryer. Measuring ...
... the dryer. Confirming Heat Source in Electric Dryers Close the door to the dryer drum/drying compartment and, after completing all steps in this manual for three minutes. The adequacy of the airflow can be checked with the dryer running with a manometer, placed on a heat setting, as... described more fully in this manual for proper installation of this happens, the igniter will ignite. Static pressure in Gas Dryers Close the door to remove from the dryer. Measuring ...
Owners Manual
Page 13
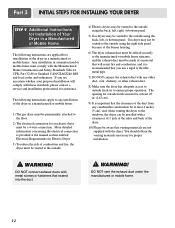
..., the dryer can be a 4-wire connection. WARNING! More detailed information concerning the electrical connection is recommended that will comply with a clearances of 1 inch at the manual section entitled Electrical Requirements for Electric Dryer 3) To reduce the risk of the dryer in a manufactured or mobile home. WARNING! DO NOT vent the exhaust...
..., the dryer can be a 4-wire connection. WARNING! More detailed information concerning the electrical connection is recommended that will comply with a clearances of 1 inch at the manual section entitled Electrical Requirements for Electric Dryer 3) To reduce the risk of the dryer in a manufactured or mobile home. WARNING! DO NOT vent the exhaust...
Owners Manual
Page 14
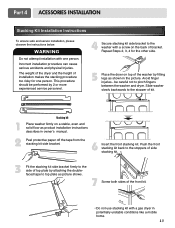
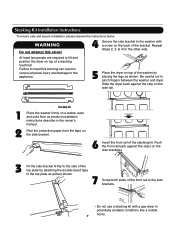
... firmly to the side of top plate by 2 or more experienced service personnel. 4 Secure stacking kit side bracket to top plate as shown in owner's manual. 2 Peel protective paper off the tape from the stacking kit side bracket. 6 Insert the front stacking kit. The weight of the dryer and the height...
... firmly to the side of top plate by 2 or more experienced service personnel. 4 Secure stacking kit side bracket to top plate as shown in owner's manual. 2 Peel protective paper off the tape from the stacking kit side bracket. 6 Insert the front stacking kit. The weight of the dryer and the height...
Owners Manual
Page 20
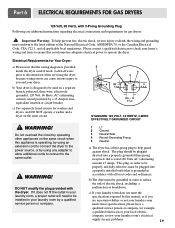
... Your Dryer: a) Please note that is rated 120 Volts AC (alternating current) 15 Amps. b) The dryer must be used on the same circuit when this manual, or if you and your dryer. b) Your dryer is operating, by using an extension cord to connect the dryer to you are additional instructions regarding...
... Your Dryer: a) Please note that is rated 120 Volts AC (alternating current) 15 Amps. b) The dryer must be used on the same circuit when this manual, or if you and your dryer. b) Your dryer is operating, by using an extension cord to connect the dryer to you are additional instructions regarding...
Owners Manual
Page 21
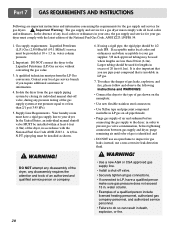
...following instructions and WARNINGS: • Connect the dryer to the dryer; Isolate the dryer from the gas supply piping system by closing its individual manual shut-off valve. • Securely tighten all gas connections. • If connected to LP, have a rigid gas supply line to the...your dryer. water column. • Examples of the dryer, any local codes or ordinances in . In the United States, an individual manual shutoff valve MUST be used where lengths are important instructions and information concerning the requirements for the gas supply and service for your gas ...
...following instructions and WARNINGS: • Connect the dryer to the dryer; Isolate the dryer from the gas supply piping system by closing its individual manual shut-off valve. • Securely tighten all gas connections. • If connected to LP, have a rigid gas supply line to the...your dryer. water column. • Examples of the dryer, any local codes or ordinances in . In the United States, an individual manual shutoff valve MUST be used where lengths are important instructions and information concerning the requirements for the gas supply and service for your gas ...
Owners Manual
Page 24
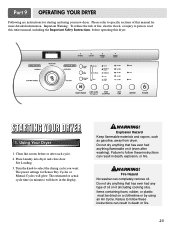
...of oil on it (even after each cycle. 2. Place laundry into dryer and close door. The preset settings for Sensor Dry Cycles or Manual Cycles will show in minutes) will glow. Do not dry anything that has ever had anything that has ever had any type of this ...dryer. Please refer to follow these instructions can completely remove oil. STARTING YOUR DRYER 1. Clean lint screen before operating this manual for starting and using an Air Cycle. Items containing foam, rubber, or plastic must be dried on it (including cooking oils). WARNING! Part 9...
...of oil on it (even after each cycle. 2. Place laundry into dryer and close door. The preset settings for Sensor Dry Cycles or Manual Cycles will show in minutes) will glow. Do not dry anything that has ever had anything that has ever had any type of this ...dryer. Please refer to follow these instructions can completely remove oil. STARTING YOUR DRYER 1. Clean lint screen before operating this manual for starting and using an Air Cycle. Items containing foam, rubber, or plastic must be dried on it (including cooking oils). WARNING! Part 9...

Owners Manual
Page 25
...shuts off . CONTROL until the desired drying time is displayed. Part 9 OPERATING YOUR DRYER 2. Following these instruction can only be used with Manual Dry, Time Dry, and Rack Dry Cycles. • Press TEMP. Tap MORE TIME or LESS TIME and the time will continue from where... the cycle was interrupted if you wish to : • Determine load size by 1 minute intervals. To use a Manual Dry Cycle • Select a Manual Dry Cycle. • Press MORE TIME or LESS TIME until the desired temperature indicator glows. • (OPTIONAL STEP) If desired, select...
...shuts off . CONTROL until the desired drying time is displayed. Part 9 OPERATING YOUR DRYER 2. Following these instruction can only be used with Manual Dry, Time Dry, and Rack Dry Cycles. • Press TEMP. Tap MORE TIME or LESS TIME and the time will continue from where... the cycle was interrupted if you wish to : • Determine load size by 1 minute intervals. To use a Manual Dry Cycle • Select a Manual Dry Cycle. • Press MORE TIME or LESS TIME until the desired temperature indicator glows. • (OPTIONAL STEP) If desired, select...
Owners Manual
Page 26
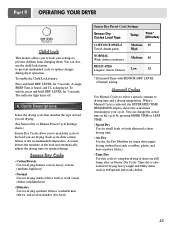
... from changing them. To unlock, press and hold DRY LEVEL for 3 seconds. Each cycle dries certain fabrics at the recommended temperature. Manual Cycles Use Manual Cycles to select a specific amount of load you to match the cycle to prevent unintended cycle or option changes during dryer operation. You... can also use the child lock feature to the load you are drying. (See Sensor Dry or Manual Preset Cycle Settings charts.) Sensor Dry Cycles allow you are drying. To enable the Child Lock feature: Press and hold DRY LEVEL for 3...
... from changing them. To unlock, press and hold DRY LEVEL for 3 seconds. Each cycle dries certain fabrics at the recommended temperature. Manual Cycles Use Manual Cycles to select a specific amount of load you to match the cycle to prevent unintended cycle or option changes during dryer operation. You... can also use the child lock feature to the load you are drying. (See Sensor Dry or Manual Preset Cycle Settings charts.) Sensor Dry Cycles allow you are drying. To enable the Child Lock feature: Press and hold DRY LEVEL for 3...

Owners Manual
Page 27
... the wrinkle care option button on, when you select the wrinkle free option, the dryer will periodically tumble for up to select temperatures for the Manual Cycles. Type of items that can customize your cycles by hand periodically during the cycle. • Dry item completely. Temperature modifiers cannot be dried using... TEMP. WRINKLE CARE When you open the dryer door 26 When using AIR DRY. CONTROL until the desired temperature setting glows. Part 9 OPERATING YOUR DRYER Manual Preset Cycle Settings Manual Dry Temp.
... the wrinkle care option button on, when you select the wrinkle free option, the dryer will periodically tumble for up to select temperatures for the Manual Cycles. Type of items that can customize your cycles by hand periodically during the cycle. • Dry item completely. Temperature modifiers cannot be dried using... TEMP. WRINKLE CARE When you open the dryer door 26 When using AIR DRY. CONTROL until the desired temperature setting glows. Part 9 OPERATING YOUR DRYER Manual Preset Cycle Settings Manual Dry Temp.
Owners Manual
Page 31
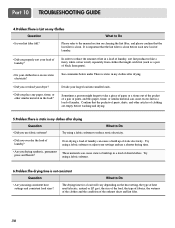
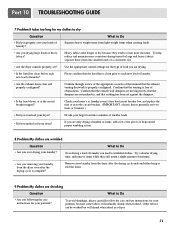
... is Lint on cleaning the lint filter, and please confirm that the lint filter is clean. Divide your lint filter full? Please refer to the manual section on my Clothes Question What to Do • Did you over dry the load of dried clothes. Over-drying a load of laundry can cause...
... is Lint on cleaning the lint filter, and please confirm that the lint filter is clean. Divide your lint filter full? Please refer to the manual section on my Clothes Question What to Do • Did you over dry the load of dried clothes. Over-drying a load of laundry can cause...
Owners Manual
Page 32
.... • Are you removing your laundry from the dryer after the drying cycle is properly configured. Confirm through review of the appropriate sections of this manual that the venting is free of obstructions. Divide your laundry from the dryer soon after the drying cycle ends and either hang or fold the...
.... • Are you removing your laundry from the dryer after the drying cycle is properly configured. Confirm through review of the appropriate sections of this manual that the venting is free of obstructions. Divide your laundry from the dryer soon after the drying cycle ends and either hang or fold the...
Service Manual
Page 1
MODEL : DLE2512W/DLG2522W DLE2514W/DLG2524W DLE2515S / DLG2525S TD-V10062G U.S.A. Website: http://us.lgservice.com Canadian Website: http://lg.ca ELECTRIC & GAS DRYER SERVICE MANUAL CAUTION READ THIS MANUAL CAREFULLY IN ORDER TO PROPERLY DIAGNOSE PROBLEMS AND TO SAFELY PROVIDE QUALITY SERVICE ON THESE DRYERS.
MODEL : DLE2512W/DLG2522W DLE2514W/DLG2524W DLE2515S / DLG2525S TD-V10062G U.S.A. Website: http://us.lgservice.com Canadian Website: http://lg.ca ELECTRIC & GAS DRYER SERVICE MANUAL CAUTION READ THIS MANUAL CAREFULLY IN ORDER TO PROPERLY DIAGNOSE PROBLEMS AND TO SAFELY PROVIDE QUALITY SERVICE ON THESE DRYERS.
Service Manual
Page 8
... the washer and dryer. Peel the protective paper from the tape on a stable, even and solid floor as product installation instructions describe in the owner's manual. Push the front rail back against the stop on the side rail. 1 2 Stacking kit Place the washer firmly on the side bracket. 6 Insert the front...
... the washer and dryer. Peel the protective paper from the tape on a stable, even and solid floor as product installation instructions describe in the owner's manual. Push the front rail back against the stop on the side rail. 1 2 Stacking kit Place the washer firmly on the side bracket. 6 Insert the front...
Service Manual
Page 14
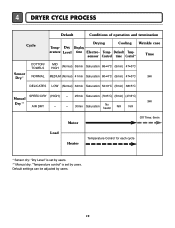
...32min Saturation 52±3°C (5min) 38±5°C SPEED DRY (HIGH) - 25min Saturation (70±5°C) (5min) (47±5°C) Manual 3Hr Dry ** AIR DRY - - 30min Saturation No heater N/A N/A Motor Off Time: 6min Load Heater Temperature Control for each cycle * Sensor dry:... "Dry Level" is set by users. ** Manual dry: "Temperature control" is set by users. 13 Default settings can be adjusted by users. 4 DRYER CYCLE PROCESS Default Conditions of operation ...
...32min Saturation 52±3°C (5min) 38±5°C SPEED DRY (HIGH) - 25min Saturation (70±5°C) (5min) (47±5°C) Manual 3Hr Dry ** AIR DRY - - 30min Saturation No heater N/A N/A Motor Off Time: 6min Load Heater Temperature Control for each cycle * Sensor dry:... "Dry Level" is set by users. ** Manual dry: "Temperature control" is set by users. 13 Default settings can be adjusted by users. 4 DRYER CYCLE PROCESS Default Conditions of operation ...


