
Owners Manual
Page 3
...PART5. ELECTRICAL REQUIREMENTS FOR GAS DRYERS 19 PART7. OPERATING YOUR DRYER...23-28 PART10. INITIAL STEPS FOR INSTALLING YOUR DRYER 7-12 PART4. TABLE OF CONTENTS PART1. GAS REQUIREMENTS AND INSTRUCTIONS 20 PART8. TROUBLESHOOTING GUIDE ...29-31 LG DRYER LIMITED WARRANTY ...32 2 IMPORTANT WARRANTY AND SAFETY INSTRUCTIONS 4-6 PART3. ELECTRICAL REQUIREMENTS FOR ELECTRIC DRYER 15-18 PART6. ... heater takes a better care on your valued clothes. 5 EASY OF USE A whole selection of user-friendly functions always make you comfortable with dryer operation. SPECIFICATIONS ...3 PART2.
...PART5. ELECTRICAL REQUIREMENTS FOR GAS DRYERS 19 PART7. OPERATING YOUR DRYER...23-28 PART10. INITIAL STEPS FOR INSTALLING YOUR DRYER 7-12 PART4. TABLE OF CONTENTS PART1. GAS REQUIREMENTS AND INSTRUCTIONS 20 PART8. TROUBLESHOOTING GUIDE ...29-31 LG DRYER LIMITED WARRANTY ...32 2 IMPORTANT WARRANTY AND SAFETY INSTRUCTIONS 4-6 PART3. ELECTRICAL REQUIREMENTS FOR ELECTRIC DRYER 15-18 PART6. ... heater takes a better care on your valued clothes. 5 EASY OF USE A whole selection of user-friendly functions always make you comfortable with dryer operation. SPECIFICATIONS ...3 PART2.
Owners Manual
Page 4
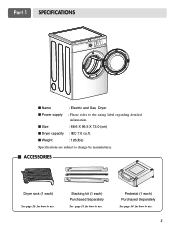
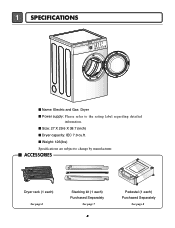
Part 1 SPECIFICATIONS I Name : Electric and Gas Dryer I Dryer capacity : IEC 7.0 cu.ft. I Size : 68.6 X 96.5 X 73.0 (cm) I Power supply : Please refer to the rating label regarding detailed information. I Weight : 126(Ibs) Specifications are subject to use. Pedestal (1 each ) Purchased Separately See page 13 for how to change by manufacturer. I ACCESSORIES Dryer rack (1 each) See page 26 for how to use . 3 Stacking kit (1 each ) Purchased Separately See page 14 for how to use .
Part 1 SPECIFICATIONS I Name : Electric and Gas Dryer I Dryer capacity : IEC 7.0 cu.ft. I Size : 68.6 X 96.5 X 73.0 (cm) I Power supply : Please refer to the rating label regarding detailed information. I Weight : 126(Ibs) Specifications are subject to use. Pedestal (1 each ) Purchased Separately See page 13 for how to change by manufacturer. I ACCESSORIES Dryer rack (1 each) See page 26 for how to use . 3 Stacking kit (1 each ) Purchased Separately See page 14 for how to use .
Owners Manual
Page 7
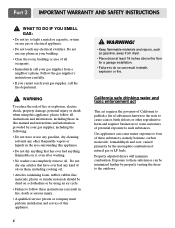
...personal injury or death when using an air cycle. • Failure to such substances. Properly adjusted dryers will minimize combustion. WARNING To reduce the risk of natural gas or LP fuels. California safe drinking water and toxic enforcement act This act requires the governor of ...service of potential exposure to follow all occupants. • Immediately call your gas supplier, call the fire department. ! WARNING! • Keep flammable materials and vapors, such as gasoline, away from dryer. • Place dryer at least 18 inches above the floor for a garage installation. •...
...personal injury or death when using an air cycle. • Failure to such substances. Properly adjusted dryers will minimize combustion. WARNING To reduce the risk of natural gas or LP fuels. California safe drinking water and toxic enforcement act This act requires the governor of ...service of potential exposure to follow all occupants. • Immediately call your gas supplier, call the fire department. ! WARNING! • Keep flammable materials and vapors, such as gasoline, away from dryer. • Place dryer at least 18 inches above the floor for a garage installation. •...
Owners Manual
Page 8
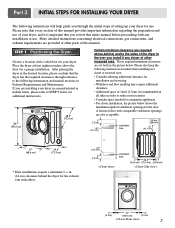
... and manual sections on Exhaust Requirements and Maintenance. More detailed instructions concerning electrical connections, gas connections, and exhaust requirements are required above the floor for your dryer for the exhaust vent with comparable ventilation openings are installing your dryer, and it any installation or use . Choose a location with any closer of other parts...
... and manual sections on Exhaust Requirements and Maintenance. More detailed instructions concerning electrical connections, gas connections, and exhaust requirements are required above the floor for your dryer for the exhaust vent with comparable ventilation openings are installing your dryer, and it any installation or use . Choose a location with any closer of other parts...
Owners Manual
Page 10
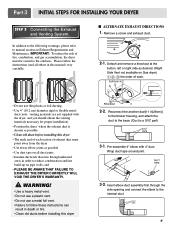
... before installing this manual) very carefully. IMPORTANT: To reduce the risk of fire, combustion, and gas accumulation, the dryer must point away from the dryer • Use fewer elbow joints as desired. (Right Side Vent not available on Gas dryer) , , the order of exhaust duct must be vented to follow the instructions (and all duct...
... before installing this manual) very carefully. IMPORTANT: To reduce the risk of fire, combustion, and gas accumulation, the dryer must point away from the dryer • Use fewer elbow joints as desired. (Right Side Vent not available on Gas dryer) , , the order of exhaust duct must be vented to follow the instructions (and all duct...
Owners Manual
Page 11
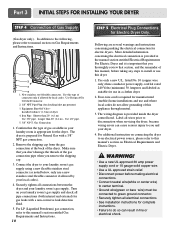
... back of this appliance through neutral. 3. The wiring diagram is prepared for the dryer. Label all pipe connections (both internal and external) for electric dryers. Installed within 6' (1.8 m) of Gas Supply (Gas dryer only). Longer than 20' (6.1 m) Use 3/8" pipe. For LP (Liquefied Petroleum) gas connection, refer to you remove the shipping cap. 3. For additional instruction on your...
... back of this appliance through neutral. 3. The wiring diagram is prepared for the dryer. Label all pipe connections (both internal and external) for electric dryers. Installed within 6' (1.8 m) of Gas Supply (Gas dryer only). Longer than 20' (6.1 m) Use 3/8" pipe. For LP (Liquefied Petroleum) gas connection, refer to you remove the shipping cap. 3. For additional instruction on your...
Owners Manual
Page 12
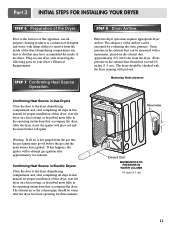
... load. Confirming Heat Source in the operating instructions that accompany the dryer. Static pressure in the exhaust duct can be measured with a manometer, placed on a heat setting, as described more fully in Gas Dryers Close the door to remove from the inside of the airflow can... be measured by evaluating the static pressure. Static pressure in this manual for proper installation of this dryer, start the dryer on the exhaust duct approximately 2 ft. (60...
... load. Confirming Heat Source in the operating instructions that accompany the dryer. Static pressure in the exhaust duct can be measured with a manometer, placed on a heat setting, as described more fully in Gas Dryers Close the door to remove from the inside of the airflow can... be measured by evaluating the static pressure. Static pressure in this manual for proper installation of this dryer, start the dryer on the exhaust duct approximately 2 ft. (60...
Owners Manual
Page 13
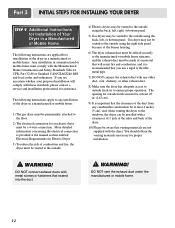
...instructions are not supplied with these standards, please contact a service and installation professional for assistance. Gas dryer may be made of a material that will comply with the dryer. DO NOT vent the exhaust duct under the manufactured or mobile home. 12 The opening for ... of the duct from any installation of the dryer in a Manufactured or Mobile Home. Part 3 INITIAL STEPS FOR INSTALLING YOUR DRYER STEP 9 Additional Instructions for Installation of Your Dryer in a manufactured or mobile home: 1) The gas dryer must be permanently attached to the floor. 2)...
...instructions are not supplied with these standards, please contact a service and installation professional for assistance. Gas dryer may be made of a material that will comply with the dryer. DO NOT vent the exhaust duct under the manufactured or mobile home. 12 The opening for ... of the duct from any installation of the dryer in a Manufactured or Mobile Home. Part 3 INITIAL STEPS FOR INSTALLING YOUR DRYER STEP 9 Additional Instructions for Installation of Your Dryer in a manufactured or mobile home: 1) The gas dryer must be permanently attached to the floor. 2)...
Owners Manual
Page 14
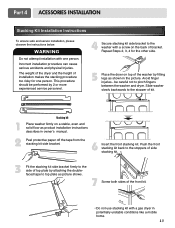
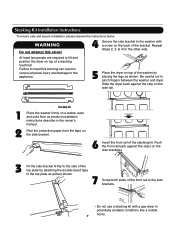
... safe and secure installation, please observe the instructions below. The weight of the dryer and the height of bracket. be performed by attaching the doublefaced tape to pinch fingers between the washer and... dryer. Push the front stacking kit back to the stoppers of side stacking kit. 3 Fit...installation makes the stacking procedure too risky for the other side. 5 Place the dryer on top of the front kit. • Do not use stacking kit with a gas dryer in the picture.
... safe and secure installation, please observe the instructions below. The weight of the dryer and the height of bracket. be performed by attaching the doublefaced tape to pinch fingers between the washer and... dryer. Push the front stacking kit back to the stoppers of side stacking kit. 3 Fit...installation makes the stacking procedure too risky for the other side. 5 Place the dryer on top of the front kit. • Do not use stacking kit with a gas dryer in the picture.
Owners Manual
Page 20
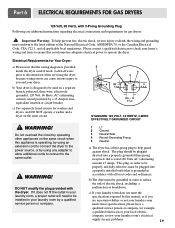
...grounded in accordance with all wires prior to disconnection when servicing the dryer, because wiring errors can cause serious injury to you are additional instructions regarding electrical connections and requirements for gas dryers. ! This plug, in order to be properly and fully effective...local regulations. Do not overload the circuit by a 15 Ampere fuse, equivalent fusetron or circuit breaker. Part 6 ELECTRICAL REQUIREMENTS FOR GAS DRYERS 120 Volt, 60 Hertz, with 3-Prong Grounding Plug Following are uncertain whether or not your laundry room meets these specifications, please ...
...grounded in accordance with all wires prior to disconnection when servicing the dryer, because wiring errors can cause serious injury to you are additional instructions regarding electrical connections and requirements for gas dryers. ! This plug, in order to be properly and fully effective...local regulations. Do not overload the circuit by a 15 Ampere fuse, equivalent fusetron or circuit breaker. Part 6 ELECTRICAL REQUIREMENTS FOR GAS DRYERS 120 Volt, 60 Hertz, with 3-Prong Grounding Plug Following are uncertain whether or not your laundry room meets these specifications, please ...
Owners Manual
Page 21
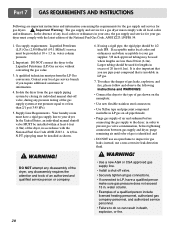
... codes and ordinances and when acceptable to inspect for a gas dryer must have a qualified person make sure gas pressure does not exceed 13 in LP gas. 7. Larger tubing should be installed as shown. ! instead, use an open flame to your gas dryer must be provided at 10 + 1.5 in . In ...rigid pipe, the rigid pipe should be used for lengths in your area, the gas supply and service for gas dryers. ! in accordance with the latest edition of gas is insoluble in . Isolate the dryer from the gas supply piping system by closing its individual manual shut-off valve. • Securely ...
... codes and ordinances and when acceptable to inspect for a gas dryer must have a qualified person make sure gas pressure does not exceed 13 in LP gas. 7. Larger tubing should be installed as shown. ! instead, use an open flame to your gas dryer must be provided at 10 + 1.5 in . In ...rigid pipe, the rigid pipe should be used for lengths in your area, the gas supply and service for gas dryers. ! in accordance with the latest edition of gas is insoluble in . Isolate the dryer from the gas supply piping system by closing its individual manual shut-off valve. • Securely ...
Owners Manual
Page 22
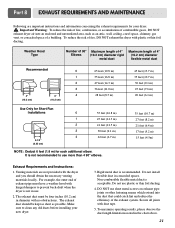
To reduce the risk of exhaust pipe must be kept as short as an attic, wall, ceiling, crawl space, chimney, gas vent, or concealed space of the exhaust system. Weather Hood Type Number of 90° Maximum length of 4" Elbows (10.2 cm) diameter... materials are important instructions and information concerning the exhaust requirements for each additional elbow. Part 8 EXHAUST REQUIREMENTS AND MAINTENANCE Following are not provided with the dryer and you should be four inches (10.2 cm) in diameter with no obstructions. The exhaust duct must have a weather hood with duct tape....
To reduce the risk of exhaust pipe must be kept as short as an attic, wall, ceiling, crawl space, chimney, gas vent, or concealed space of the exhaust system. Weather Hood Type Number of 90° Maximum length of 4" Elbows (10.2 cm) diameter... materials are important instructions and information concerning the exhaust requirements for each additional elbow. Part 8 EXHAUST REQUIREMENTS AND MAINTENANCE Following are not provided with the dryer and you should be four inches (10.2 cm) in diameter with no obstructions. The exhaust duct must have a weather hood with duct tape....
Owners Manual
Page 30
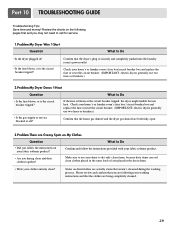
... breaker box and replace the fuse or reset the circuit breaker. (IMPORTANT: electric dryers generally use two fuses or breakers.) • Is the gas supply or service blocked or off? Confirm that the dryer's plug is the circuit breaker tripped? Make sure to dry only clean items, because... clean? Please review and confirm that weren't cleansed during the washing process. Check your washing instructions and that the house gas shutoff and the dryer gas shutoff are both fully open. 3.Problem:There are being completely cleaned. 29 Confirm that the clothes are Greasy Spots on ...
... breaker box and replace the fuse or reset the circuit breaker. (IMPORTANT: electric dryers generally use two fuses or breakers.) • Is the gas supply or service blocked or off? Confirm that the dryer's plug is the circuit breaker tripped? Make sure to dry only clean items, because... clean? Please review and confirm that weren't cleansed during the washing process. Check your washing instructions and that the house gas shutoff and the dryer gas shutoff are both fully open. 3.Problem:There are being completely cleaned. 29 Confirm that the clothes are Greasy Spots on ...
Owners Manual
Page 31
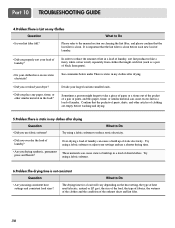
... are empty before each new load of laundry. See comments below under There is static in my clothes after drying. • Did you overload your dryer? • Did you properly sort your lint filter full? Confirm that the pockets of pants, shirts, and other similar material in my clothes after drying... and consistent load sizes? The drying time for a load will vary depending on the heat setting, the type of heat used (electric, natural or LP gas), the size of the load, the type of fabrics, the wetness of the clothes and the condition of dried clothes. Divide your settings and use...
... are empty before each new load of laundry. See comments below under There is static in my clothes after drying. • Did you overload your dryer? • Did you properly sort your lint filter full? Confirm that the pockets of pants, shirts, and other similar material in my clothes after drying... and consistent load sizes? The drying time for a load will vary depending on the heat setting, the type of heat used (electric, natural or LP gas), the size of the load, the type of fabrics, the wetness of the clothes and the condition of dried clothes. Divide your settings and use...
Service Manual
Page 1
MODEL : DLE2512W/DLG2522W DLE2514W/DLG2524W DLE2515S / DLG2525S TD-V10062G U.S.A. Website: http://us.lgservice.com Canadian Website: http://lg.ca ELECTRIC & GAS DRYER SERVICE MANUAL CAUTION READ THIS MANUAL CAREFULLY IN ORDER TO PROPERLY DIAGNOSE PROBLEMS AND TO SAFELY PROVIDE QUALITY SERVICE ON THESE DRYERS.
MODEL : DLE2512W/DLG2522W DLE2514W/DLG2524W DLE2515S / DLG2525S TD-V10062G U.S.A. Website: http://us.lgservice.com Canadian Website: http://lg.ca ELECTRIC & GAS DRYER SERVICE MANUAL CAUTION READ THIS MANUAL CAREFULLY IN ORDER TO PROPERLY DIAGNOSE PROBLEMS AND TO SAFELY PROVIDE QUALITY SERVICE ON THESE DRYERS.
Service Manual
Page 5
I Size: 27 X 29.6 X 38.7 (inch) I Weight: 126(Ibs) Specifications are subject to the rating label regarding detailed information. I Dryer capacity: IEC 7.0 cu.ft. I Power supply: Please refer to change by manufacturer. 1 SPECIFICATIONS I Name: Electric and Gas Dryer I ACCESSORIES Dryer rack (1 each) See page 6 Stacking kit (1 each) Purchased Separately See page 7 4 Pedestal (1 each) Purchased Separately See page 8
I Size: 27 X 29.6 X 38.7 (inch) I Weight: 126(Ibs) Specifications are subject to the rating label regarding detailed information. I Dryer capacity: IEC 7.0 cu.ft. I Power supply: Please refer to change by manufacturer. 1 SPECIFICATIONS I Name: Electric and Gas Dryer I ACCESSORIES Dryer rack (1 each) See page 6 Stacking kit (1 each) Purchased Separately See page 7 4 Pedestal (1 each) Purchased Separately See page 8
Service Manual
Page 8
... on a stable, even and solid floor as product installation instructions describe in serious physical injury and damage to the appliance. 5 Place the dryer on top of the washer by attaching the double-faced tape to the top plate as picture shown. 7 Screw both sides of the stacking... a stacking kit with a screw on the side brackets. 3 Fit the side bracket firmly to the washer with a gas dryer in potentially unstable conditions like a mobile home. 7 Slide the dryer back against the stops on the back of a washing machine! Peel the protective paper from the tape on top of the...
... on a stable, even and solid floor as product installation instructions describe in serious physical injury and damage to the appliance. 5 Place the dryer on top of the washer by attaching the double-faced tape to the top plate as picture shown. 7 Screw both sides of the stacking... a stacking kit with a screw on the side brackets. 3 Fit the side bracket firmly to the washer with a gas dryer in potentially unstable conditions like a mobile home. 7 Slide the dryer back against the stops on the back of a washing machine! Peel the protective paper from the tape on top of the...
Service Manual
Page 13
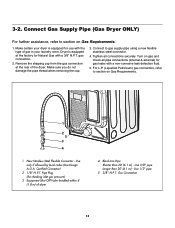
... (Use Design A.G.A. Turn on Gas Requirements. 1. Make certain your dryer is equipped at the rear of gas in your laundry room. 3-2. Certified Connector) 2 1/8" N.P.T. Use 3/8" pipe Longer than 20' (6.1 m) - Connect Gas Supply Pipe (Gas Dryer ONLY) For further assistance, refer to section on gas and check all connections securely. Dryer is equipped for checking inlet gas pressure) 3 Equipment Shut-Off...
... (Use Design A.G.A. Turn on Gas Requirements. 1. Make certain your dryer is equipped at the rear of gas in your laundry room. 3-2. Certified Connector) 2 1/8" N.P.T. Use 3/8" pipe Longer than 20' (6.1 m) - Connect Gas Supply Pipe (Gas Dryer ONLY) For further assistance, refer to section on gas and check all connections securely. Dryer is equipped for checking inlet gas pressure) 3 Equipment Shut-Off...
Service Manual
Page 20
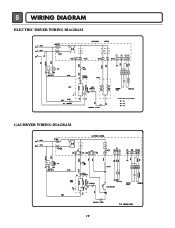
8 WIRING DIAGRAM ELECTRIC DRYER WIRING DIAGRAM GAS DRYER WIRING DIAGRAM 19
8 WIRING DIAGRAM ELECTRIC DRYER WIRING DIAGRAM GAS DRYER WIRING DIAGRAM 19
Service Manual
Page 35
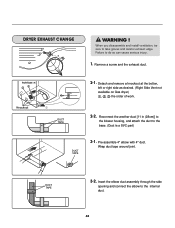
... ! Pre-assemble 4" elbow with 4" duct. WARNING ! Detach and remove a knockout at the botton, left or right side as desired. (Right Side Vent not available on Gas dryer the order of work. When you disassemble and install ventilation, be sure to the base. (Duct is a SVC part) DUCT TAPE 3-1. DUCT TAPE 2-2. DUCT TAPE 3-2.
... ! Pre-assemble 4" elbow with 4" duct. WARNING ! Detach and remove a knockout at the botton, left or right side as desired. (Right Side Vent not available on Gas dryer the order of work. When you disassemble and install ventilation, be sure to the base. (Duct is a SVC part) DUCT TAPE 3-1. DUCT TAPE 2-2. DUCT TAPE 3-2.


