
Owners Manual
Page 6
... your dryer, please exercise care and follow basic safety precautions, including the following: 1) Read all local codes and ordinances. Close supervision of electric shock. to help reduce any servicing unless specifically recommended in the user-maintenance instructions. 9) Do not use fabric softners or products to eliminate static unless recommended by the...
... your dryer, please exercise care and follow basic safety precautions, including the following: 1) Read all local codes and ordinances. Close supervision of electric shock. to help reduce any servicing unless specifically recommended in the user-maintenance instructions. 9) Do not use fabric softners or products to eliminate static unless recommended by the...
Owners Manual
Page 8
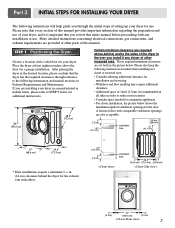
... or mobile home, please refer to STEP 9 below . If you are installing your dryer. Part 3 INITIAL STEPS FOR INSTALLING YOUR DRYER The following instructions will help guide you through reference to the following instructions in mind when installing in a closet or recessed area: • Consider allowing additional clearance for installation and...
... or mobile home, please refer to STEP 9 below . If you are installing your dryer. Part 3 INITIAL STEPS FOR INSTALLING YOUR DRYER The following instructions will help guide you through reference to the following instructions in mind when installing in a closet or recessed area: • Consider allowing additional clearance for installation and...
Owners Manual
Page 16
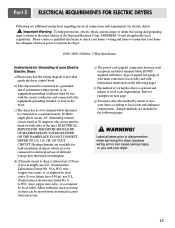
... in dryers which to wire your Electric Electric Dryer: a) Please note that the wiring diagram is provided inside the dryer control hood. Important Warning: To help prevent fire, electric shock, serious injury or death, the wiring and grounding must be connected to electrical service of wiring the dryer is optional and...
... in dryers which to wire your Electric Electric Dryer: a) Please note that the wiring diagram is provided inside the dryer control hood. Important Warning: To help prevent fire, electric shock, serious injury or death, the wiring and grounding must be connected to electrical service of wiring the dryer is optional and...
Owners Manual
Page 20
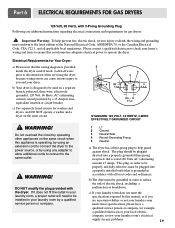
Important Warning: To help guard against shock. b) Your dryer is provided inside the dryer control hood. WARNING! b) The dryer must be installed in order to reduce the risk of ... ordinances. STANDARD 120 VOLT, 60 HERTZ, 3-WIRE EFFECTIVELY GROUNDED CIRCUIT 1 L1 2 Ground 3 Neutral Side 4 Round Grounding Prong 5 Neutral a) The dryer has a three-prong plug to help prevent fire, electric shock, serious injury or death, the wiring and grounding must be used on a separate branch, polarized, three-wire, effectively grounded, 120 Volt...
Important Warning: To help guard against shock. b) Your dryer is provided inside the dryer control hood. WARNING! b) The dryer must be installed in order to reduce the risk of ... ordinances. STANDARD 120 VOLT, 60 HERTZ, 3-WIRE EFFECTIVELY GROUNDED CIRCUIT 1 L1 2 Ground 3 Neutral Side 4 Round Grounding Prong 5 Neutral a) The dryer has a three-prong plug to help prevent fire, electric shock, serious injury or death, the wiring and grounding must be used on a separate branch, polarized, three-wire, effectively grounded, 120 Volt...
Owners Manual
Page 23
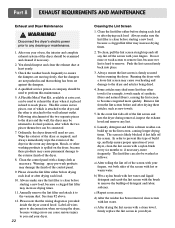
... is attached to exhaust the dryer when it to remove the buildup of the control panel. 9. To clean, pull the lint screen straight up , and help ensure proper operation of the dryer should be connected. 7. In the event lint falls off the screen with a damp cloth as necessary. This Kit comes...
... is attached to exhaust the dryer when it to remove the buildup of the control panel. 9. To clean, pull the lint screen straight up , and help ensure proper operation of the dryer should be connected. 7. In the event lint falls off the screen with a damp cloth as necessary. This Kit comes...

Owners Manual
Page 25
... MORE or LESS automatically adjusts the sensed time needed. 3. To restart the dryer Close the door. NOTE: The MORE TIME or LESS TIME feature can help reduce your utility bill, prolong the life of your drying cycle after pressing START/PAUSE, press START/PAUSE again. 24 4. Following these instruction can be...
... MORE or LESS automatically adjusts the sensed time needed. 3. To restart the dryer Close the door. NOTE: The MORE TIME or LESS TIME feature can help reduce your utility bill, prolong the life of your drying cycle after pressing START/PAUSE, press START/PAUSE again. 24 4. Following these instruction can be...

Owners Manual
Page 27
WRINKLE CARE When you open the dryer door 26 When using AIR DRY. This option helps to prevent the wrinkle that form when a load remains in the dryer after to three hours after the cycle is not available with the Sensor ...
WRINKLE CARE When you open the dryer door 26 When using AIR DRY. This option helps to prevent the wrinkle that form when a load remains in the dryer after to three hours after the cycle is not available with the Sensor ...
Owners Manual
Page 32
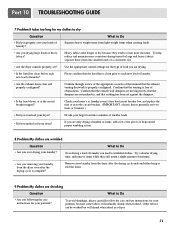
... the items. 9.Problem:My clothes are wrinkled Question • Are you over drying your larger load into smaller loads of laundry? To help ensure proper tumbling action. 8.Problem:My clothes are shrinking Question What to Do • Are you following the care instructions for your dryer...retain more consistent drying times for large and heavy fabrics, separate these items into a number of items, add a few extra pieces to help reduce and maintain more moisture. Confirm that the venting is free of this manual that nothing has been set ? To avoid shrinkage, ...
... the items. 9.Problem:My clothes are wrinkled Question • Are you over drying your larger load into smaller loads of laundry? To help ensure proper tumbling action. 8.Problem:My clothes are shrinking Question What to Do • Are you following the care instructions for your dryer...retain more consistent drying times for large and heavy fabrics, separate these items into a number of items, add a few extra pieces to help reduce and maintain more moisture. Confirm that the venting is free of this manual that nothing has been set ? To avoid shrinkage, ...


