
Owners Manual
Page 6
...with all instructions before or after each load. 11) Keep area around the exhaust opening and adjacent surrounding areas free from service or discarded, remove the door to the drying compartment. 5) Do not reach into contact with a cord having an equipment-grounding conductor and a grounding plug. ...the appliance. 5 In the event of malfunction or breakdown, grounding will not fit the outlet, have come into the appliance if the drum is equipped with gasoline, dry-cleaning solvents, or other flammable or explosive substances, as to the equipment-grounding terminal or lead on ...
...with all instructions before or after each load. 11) Keep area around the exhaust opening and adjacent surrounding areas free from service or discarded, remove the door to the drying compartment. 5) Do not reach into contact with a cord having an equipment-grounding conductor and a grounding plug. ...the appliance. 5 In the event of malfunction or breakdown, grounding will not fit the outlet, have come into the appliance if the drum is equipped with gasoline, dry-cleaning solvents, or other flammable or explosive substances, as to the equipment-grounding terminal or lead on ...
Owners Manual
Page 12
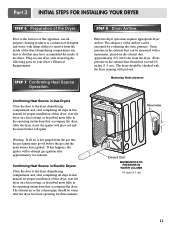
... the main burner have accumulated the inside of the Dryer. Confirming Heat Source in Electric Dryers Close the door to remove from the inside of the dryer drum/drying compartment any dust or dirt that accompany the dryer. The dryer should be measured by evaluating the static pressure.... WATER COLUMN 0.6 inche (1.5 cm) 11 The exhaust air or the exhaust pipe should not exceed 0.6 inches (1.5 cm). Prior to the dryer drum/drying compartment and, after the dryer has been operating for three minutes. If this appliance, use allpurpose cleaning products or a solution of detergent and...
... the main burner have accumulated the inside of the Dryer. Confirming Heat Source in Electric Dryers Close the door to remove from the inside of the dryer drum/drying compartment any dust or dirt that accompany the dryer. The dryer should be measured by evaluating the static pressure.... WATER COLUMN 0.6 inche (1.5 cm) 11 The exhaust air or the exhaust pipe should not exceed 0.6 inches (1.5 cm). Prior to the dryer drum/drying compartment and, after the dryer has been operating for three minutes. If this appliance, use allpurpose cleaning products or a solution of detergent and...
Owners Manual
Page 23
... maintenance. 1. c) Repeat as required, and always immediately wipe the exterior of the dryer in your fingers. WARNING! Ordinarily, the dryer drum will need no care. Clean the lint filter either before starting a new load, because a clogged lint filter may cause permanent damage to...lint screen with a clean towel, firmly replace the lint screen in the event any lint. 6. Disconnect the dryer's electric power prior to remove. A qualified service person or company should be connected. 7. Clean the control panel with hot water. Always make sure the lint filter is ...
... maintenance. 1. c) Repeat as required, and always immediately wipe the exterior of the dryer in your fingers. WARNING! Ordinarily, the dryer drum will need no care. Clean the lint filter either before starting a new load, because a clogged lint filter may cause permanent damage to...lint screen with a clean towel, firmly replace the lint screen in the event any lint. 6. Disconnect the dryer's electric power prior to remove. A qualified service person or company should be connected. 7. Clean the control panel with hot water. Always make sure the lint filter is ...
Owners Manual
Page 28
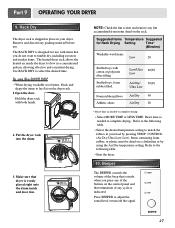
... any cycle is shipped in place in your load by using the Air Dry temperature setting. Put the dryer rack into the drum 3. NOTE: Check the lint screen and remove any of the buttons on the dryer rack. 1.Open the door. CONTROL (Air Dry-Ultra Low-Low). Items containing foam, rubber, or... sweaters and similar items. The heated dryer rack allows the heated air inside and door rim. The RACK DRY is evenly placed right onto the drum inside the dryer to complete drying. • Select MORE TIME or LESS TIME. To use the RACK DRY • When drying washable wool items, block...
... any cycle is shipped in place in your load by using the Air Dry temperature setting. Put the dryer rack into the drum 3. NOTE: Check the lint screen and remove any of the buttons on the dryer rack. 1.Open the door. CONTROL (Air Dry-Ultra Low-Low). Items containing foam, rubber, or... sweaters and similar items. The heated dryer rack allows the heated air inside and door rim. The RACK DRY is evenly placed right onto the drum inside the dryer to complete drying. • Select MORE TIME or LESS TIME. To use the RACK DRY • When drying washable wool items, block...

Service Manual
Page 34
... the door. 2. Replace the lamp shield and screw. 33 Loosen belt from motor and idler pulleys. 4. Remove Cover Cabinet. 3. CHANGING THE DRUM LAMP 1. Remove the bulb and replace with a 15 watt, 120 volt candelabra-base bulb. 5. Disassemble the top plate. 2. Carefully remove the drum. Disconnect the door lamp and electrode sensor connector. 4. Disassemble the Tub...
... the door. 2. Replace the lamp shield and screw. 33 Loosen belt from motor and idler pulleys. 4. Remove Cover Cabinet. 3. CHANGING THE DRUM LAMP 1. Remove the bulb and replace with a 15 watt, 120 volt candelabra-base bulb. 5. Disassemble the top plate. 2. Carefully remove the drum. Disconnect the door lamp and electrode sensor connector. 4. Disassemble the Tub...

Service Manual
Page 36
Remove the Cover Grid. 4. Remove 2 screws and cover (Air guide). 5. Remove 7 screws. 5. Remove the Cabinet Cover and Tub Drum [Front]. 3. Remove the fan. 7. Remove the Back Cover. 35 Remove the filter. 2. Disassemble the top plate. 2. Remove the Cabinet Cover and Tub Drum [Front]. 3. Disconnect the electrode sensor. 1. Disconnect the motor clamp and motor. 1. Remove 3 screws. 3. Remove the Drum assembly. 4. Remove the bolt and washer. 6. 1. Remove the Drum assembly. 4. Disassemble the top plate. 2.
Remove the Cover Grid. 4. Remove 2 screws and cover (Air guide). 5. Remove 7 screws. 5. Remove the Cabinet Cover and Tub Drum [Front]. 3. Remove the fan. 7. Remove the Back Cover. 35 Remove the filter. 2. Disassemble the top plate. 2. Remove the Cabinet Cover and Tub Drum [Front]. 3. Disconnect the electrode sensor. 1. Disconnect the motor clamp and motor. 1. Remove 3 screws. 3. Remove the Drum assembly. 4. Remove the bolt and washer. 6. 1. Remove the Drum assembly. 4. Disassemble the top plate. 2.

Service Manual
Page 37
Remove the Drum assembly and Tub Drum [Rear]. 4. Remove the filter and 2 screws. 4. Disassemble the top plate. 2. 1. Disassemble the top plate. 2. Remove the air duct. 1. Remove the Cover Cabinet and Tub Drum [Front]. 3. Remove the roller from the Tub Drum [Front]. 5. Remove the Cover Cabinet. 3. Disconnect the Air duct from the Tub Drum [Front] and Tub Drum [Rear]. 36
Remove the Drum assembly and Tub Drum [Rear]. 4. Remove the filter and 2 screws. 4. Disassemble the top plate. 2. 1. Disassemble the top plate. 2. Remove the air duct. 1. Remove the Cover Cabinet and Tub Drum [Front]. 3. Remove the roller from the Tub Drum [Front]. 5. Remove the Cover Cabinet. 3. Disconnect the Air duct from the Tub Drum [Front] and Tub Drum [Rear]. 36


