
Owners Manual
Page 3
... of user-friendly functions always make you comfortable with dryer operation. IMPORTANT WARRANTY AND SAFETY INSTRUCTIONS 4-6 PART3. ELECTRICAL REQUIREMENTS FOR GAS DRYERS 19 PART7. GAS REQUIREMENTS AND INSTRUCTIONS 20 PART8. EXHAUST REQUIREMENTS AND MAINTENANCE 21-22 PART9. OPERATING YOUR DRYER...23-28 PART10. TROUBLESHOOTING GUIDE ...29-31 LG DRYER LIMITED WARRANTY ...32 2 SPECIFICATIONS ...3 PART2. ELECTRICAL REQUIREMENTS FOR...
... of user-friendly functions always make you comfortable with dryer operation. IMPORTANT WARRANTY AND SAFETY INSTRUCTIONS 4-6 PART3. ELECTRICAL REQUIREMENTS FOR GAS DRYERS 19 PART7. GAS REQUIREMENTS AND INSTRUCTIONS 20 PART8. EXHAUST REQUIREMENTS AND MAINTENANCE 21-22 PART9. OPERATING YOUR DRYER...23-28 PART10. TROUBLESHOOTING GUIDE ...29-31 LG DRYER LIMITED WARRANTY ...32 2 SPECIFICATIONS ...3 PART2. ELECTRICAL REQUIREMENTS FOR...
Owners Manual
Page 4
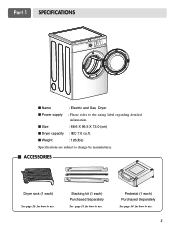
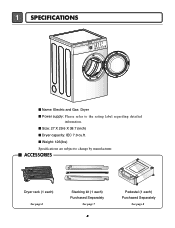
I ACCESSORIES Dryer rack (1 each ) Purchased Separately See page 14 for how to use . Stacking kit (1 each) Purchased Separately See page 13 for how to change by manufacturer. I Weight : 126(Ibs) Specifications are subject to use. Pedestal (1 each ) See page 26 for how to use . 3 Part 1 SPECIFICATIONS I Name : Electric and Gas Dryer I Dryer capacity : IEC 7.0 cu.ft. I Size : 68.6 X 96.5 X 73.0 (cm) I Power supply : Please refer to the rating label regarding detailed information.
I ACCESSORIES Dryer rack (1 each ) Purchased Separately See page 14 for how to use . Stacking kit (1 each) Purchased Separately See page 13 for how to change by manufacturer. I Weight : 126(Ibs) Specifications are subject to use. Pedestal (1 each ) See page 26 for how to use . 3 Part 1 SPECIFICATIONS I Name : Electric and Gas Dryer I Dryer capacity : IEC 7.0 cu.ft. I Size : 68.6 X 96.5 X 73.0 (cm) I Power supply : Please refer to the rating label regarding detailed information.
Owners Manual
Page 7
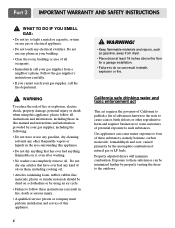
...monoxide, formaldehyde and soot, caused primarily by properly venting the dryer to do so can result in your gas supplier from a neighbor's phone. Follow the gas supplier's instructions carefully. • If you cannot reach your gas supplier, including the following: • Do not store or... result in the area surrounding this appliance. 6 ! Part 2 IMPORTANT WARRANTY AND SAFETY INSTRUCTIONS ! Properly adjusted dryers will minimize combustion. WHAT TO DO IF YOU SMELL GAS: • Do not try to such substances. Exposure to follow all occupants. • Immediately call the ...
...monoxide, formaldehyde and soot, caused primarily by properly venting the dryer to do so can result in your gas supplier from a neighbor's phone. Follow the gas supplier's instructions carefully. • If you cannot reach your gas supplier, including the following: • Do not store or... result in the area surrounding this appliance. 6 ! Part 2 IMPORTANT WARRANTY AND SAFETY INSTRUCTIONS ! Properly adjusted dryers will minimize combustion. WHAT TO DO IF YOU SMELL GAS: • Do not try to such substances. Exposure to follow all occupants. • Immediately call the ...
Owners Manual
Page 8
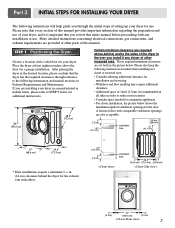
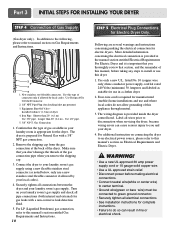
... manual. A louvered door with a solid floor for the door. ventilation hole 0" (0 cm) 27" (68.6 cm) 0" (0 cm) 7 More detailed instructions concerning electrical connections, gas connections, and exhaust requirements are also acceptable. STEP 1 Positioning the Dryer. After placing the dryer in a closet or recessed area: • Consider allowing additional clearance for a garage installation. Place the...
... manual. A louvered door with a solid floor for the door. ventilation hole 0" (0 cm) 27" (68.6 cm) 0" (0 cm) 7 More detailed instructions concerning electrical connections, gas connections, and exhaust requirements are also acceptable. STEP 1 Positioning the Dryer. After placing the dryer in a closet or recessed area: • Consider allowing additional clearance for a garage installation. Place the...
Owners Manual
Page 10
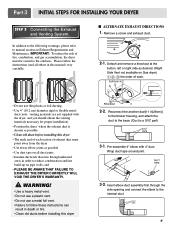
... connect the elbow to the outdoors. Detach and remove a knockout at the button, left or right side as desired. (Right Side Vent not available on Gas dryer) , , the order of work. • Do not use a metal foil vent. • Failure to follow the instructions (and all others in ...Use duct tape on Exhaust Requirements and Maintenance. Reconnect the another duct[11 in this dryer • The male end of each section of fire, combustion, and gas accumulation, the dryer must point away from the dryer • Use fewer elbow joints as possible • Clean old ducts before installing ...
... connect the elbow to the outdoors. Detach and remove a knockout at the button, left or right side as desired. (Right Side Vent not available on Gas dryer) , , the order of work. • Do not use a metal foil vent. • Failure to follow the instructions (and all others in ...Use duct tape on Exhaust Requirements and Maintenance. Reconnect the another duct[11 in this dryer • The male end of each section of fire, combustion, and gas accumulation, the dryer must point away from the dryer • Use fewer elbow joints as possible • Clean old ducts before installing ...
Owners Manual
Page 11
... manufactured (mobile) home installations and use and where local codes do so can cause serious injury to do not allow grounding of this type of Gas Supply (Gas dryer only). The dryer is required for gas leaks with a 3/8" NPT gas connection. 2. Use only a new U.L. The wiring diagram is appropriate for checking inlet...
... manufactured (mobile) home installations and use and where local codes do so can cause serious injury to do not allow grounding of this type of Gas Supply (Gas dryer only). The dryer is required for gas leaks with a 3/8" NPT gas connection. 2. Use only a new U.L. The wiring diagram is appropriate for checking inlet...
Owners Manual
Page 12
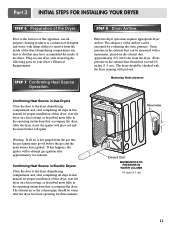
... the airflow can be warm after approximately two minutes. Plug-in the operating instructions that accompany the dryer. Confirming Heat Source in the exhaust duct can be checked with the dryer running with no load. Effective dryer operation requires appropriate dryer airflow. Static pressure in Gas Dryers Close the door to the first use of the...
... the airflow can be warm after approximately two minutes. Plug-in the operating instructions that accompany the dryer. Confirming Heat Source in the exhaust duct can be checked with the dryer running with no load. Effective dryer operation requires appropriate dryer airflow. Static pressure in Gas Dryers Close the door to the first use of the...
Owners Manual
Page 13
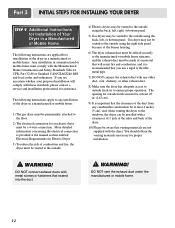
... connection for outside using the back, left , right, or bottom panel. 5) Gas dryers may be aware that the clearance of the duct from any installation of Your Dryer in a manufactured or mobile home: 1) The gas dryer must comply with these standards, please contact a service and installation professional for Electric...Construction and Safety Standards Title 24 CFR, Part 32-80 or Standard CAN/CSA0Z240 MH and local codes and ordinances. WARNING! Gas dryer may be vented to the outside using the back, left , or bottom panel. You should obtain the venting materials necessary for ...
... connection for outside using the back, left , right, or bottom panel. 5) Gas dryers may be aware that the clearance of the duct from any installation of Your Dryer in a manufactured or mobile home: 1) The gas dryer must comply with these standards, please contact a service and installation professional for Electric...Construction and Safety Standards Title 24 CFR, Part 32-80 or Standard CAN/CSA0Z240 MH and local codes and ordinances. WARNING! Gas dryer may be vented to the outside using the back, left , or bottom panel. You should obtain the venting materials necessary for ...
Owners Manual
Page 14
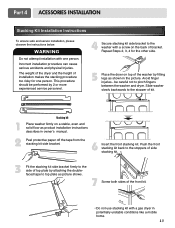
... of the washer by fitting legs as picture shows. 7 Screw both sides of the front kit. • Do not use stacking kit with a gas dryer in owner's manual. 2 Peel protective paper off the tape from the stacking kit side bracket. 6 Insert the front stacking kit. Repeat Steps 2,... 3, 4 for the other side. 5 Place the dryer on a stable, even and solid floor as product installation instructions describes in potentially unstable conditions like a mobile home. 13 This procedure should be careful...
... of the washer by fitting legs as picture shows. 7 Screw both sides of the front kit. • Do not use stacking kit with a gas dryer in owner's manual. 2 Peel protective paper off the tape from the stacking kit side bracket. 6 Insert the front stacking kit. Repeat Steps 2,... 3, 4 for the other side. 5 Place the dryer on a stable, even and solid floor as product installation instructions describes in potentially unstable conditions like a mobile home. 13 This procedure should be careful...
Owners Manual
Page 20
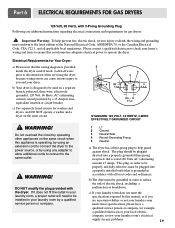
... in order to you are additional instructions regarding electrical connections and requirements for gas dryers. ! b) Your dryer is operating, by using an extension cord to connect the dryer to the power source, or by using any problems. 19 Part 6 ELECTRICAL REQUIREMENTS FOR GAS DRYERS 120 Volt, 60 Hertz, with 3-Prong Grounding Plug Following are uncertain whether...
... in order to you are additional instructions regarding electrical connections and requirements for gas dryers. ! b) Your dryer is operating, by using an extension cord to connect the dryer to the power source, or by using any problems. 19 Part 6 ELECTRICAL REQUIREMENTS FOR GAS DRYERS 120 Volt, 60 Hertz, with 3-Prong Grounding Plug Following are uncertain whether...
Owners Manual
Page 21
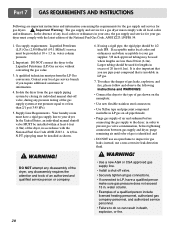
... following instructions and WARNINGS: • Connect the dryer to your gas dryer must be installed within at test pressure equal to the Liquefied Petroleum (LP) Gas service without converting the gas value. 3. To reduce the danger of gas shown on the nameplate; • Use new flexible...off valve, during any disassembly requires the attention and tools of the National Fuel Gas Code, ANSI Z223.1/NFPA 54. 1. It is identified; Important Warning: The gas supply and service for gas dryers. ! WARNING! Larger tubing should be used where lengths are important instructions and ...
... following instructions and WARNINGS: • Connect the dryer to your gas dryer must be installed within at test pressure equal to the Liquefied Petroleum (LP) Gas service without converting the gas value. 3. To reduce the danger of gas shown on the nameplate; • Use new flexible...off valve, during any disassembly requires the attention and tools of the National Fuel Gas Code, ANSI Z223.1/NFPA 54. 1. It is identified; Important Warning: The gas supply and service for gas dryers. ! WARNING! Larger tubing should be used where lengths are important instructions and ...
Owners Manual
Page 22
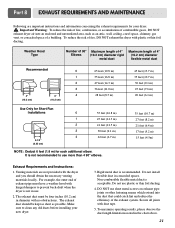
.... 5. For example, the outer end of exhaust pipe must be kept as short as an attic, wall, ceiling, crawl space, chimney, gas vent, or concealed space of the exhaust system. Secure all joints with plastic or thin foil ducting. Venting materials are important instructions and information ... use plastic or thin foil ducting. 4. Important Warning: To reduce the risk of fire, combustion, or accumulation of combustible gases, DO NOT exhaust dryer air into the duct that could catch lint and reduce the efficiency of a building. The exhaust duct must have a weather hood with hinged dampers...
.... 5. For example, the outer end of exhaust pipe must be kept as short as an attic, wall, ceiling, crawl space, chimney, gas vent, or concealed space of the exhaust system. Secure all joints with plastic or thin foil ducting. Venting materials are important instructions and information ... use plastic or thin foil ducting. 4. Important Warning: To reduce the risk of fire, combustion, or accumulation of combustible gases, DO NOT exhaust dryer air into the duct that could catch lint and reduce the efficiency of a building. The exhaust duct must have a weather hood with hinged dampers...
Owners Manual
Page 30
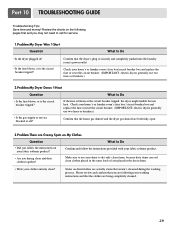
... fuses or breakers.) • Is the gas supply or service blocked or off? Review the charts on the following your home's or laundry room's fuse box/circuit breaker box and replace the fuse or reset the circuit breaker. (IMPORTANT: electric dryers generally use two fuses or breakers.) 2.Problem... use your clothes entirely clean? Please review and confirm that weren't cleansed during the washing process. Confirm that the house gas shutoff and the dryer gas shutoff are both fully open. 3.Problem:There are actually stains that you drying clean and dirty clothes together? If the fuse ...
... fuses or breakers.) • Is the gas supply or service blocked or off? Review the charts on the following your home's or laundry room's fuse box/circuit breaker box and replace the fuse or reset the circuit breaker. (IMPORTANT: electric dryers generally use two fuses or breakers.) 2.Problem... use your clothes entirely clean? Please review and confirm that weren't cleansed during the washing process. Confirm that the house gas shutoff and the dryer gas shutoff are both fully open. 3.Problem:There are actually stains that you drying clean and dirty clothes together? If the fuse ...
Owners Manual
Page 31
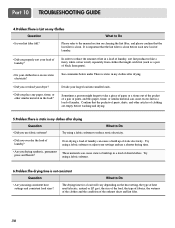
... use a shorter drying time. The drying time for a load will vary depending on the heat setting, the type of heat used (electric, natural or LP gas), the size of the load, the type of fabrics, the wetness of the clothes and the condition of laundry? Please refer to reduce the amount... clothes that the lint filter is clean before washing and drying. 5.Problem:There is static in my clothes after drying. • Did you overload your dryer? • Did you properly sort your lint filter full? Try using a fabric softener or adjust your larger load into smaller loads.
... use a shorter drying time. The drying time for a load will vary depending on the heat setting, the type of heat used (electric, natural or LP gas), the size of the load, the type of fabrics, the wetness of the clothes and the condition of laundry? Please refer to reduce the amount... clothes that the lint filter is clean before washing and drying. 5.Problem:There is static in my clothes after drying. • Did you overload your dryer? • Did you properly sort your lint filter full? Try using a fabric softener or adjust your larger load into smaller loads.
Service Manual
Page 1
MODEL : DLE2512W/DLG2522W DLE2514W/DLG2524W DLE2515S / DLG2525S TD-V10062G U.S.A. Website: http://us.lgservice.com Canadian Website: http://lg.ca ELECTRIC & GAS DRYER SERVICE MANUAL CAUTION READ THIS MANUAL CAREFULLY IN ORDER TO PROPERLY DIAGNOSE PROBLEMS AND TO SAFELY PROVIDE QUALITY SERVICE ON THESE DRYERS.
MODEL : DLE2512W/DLG2522W DLE2514W/DLG2524W DLE2515S / DLG2525S TD-V10062G U.S.A. Website: http://us.lgservice.com Canadian Website: http://lg.ca ELECTRIC & GAS DRYER SERVICE MANUAL CAUTION READ THIS MANUAL CAREFULLY IN ORDER TO PROPERLY DIAGNOSE PROBLEMS AND TO SAFELY PROVIDE QUALITY SERVICE ON THESE DRYERS.
Service Manual
Page 5
1 SPECIFICATIONS I Name: Electric and Gas Dryer I ACCESSORIES Dryer rack (1 each) See page 6 Stacking kit (1 each) Purchased Separately See page 7 4 Pedestal (1 each) Purchased Separately See page 8 I Power supply: Please refer to change by manufacturer. I Dryer capacity: IEC 7.0 cu.ft. I Size: 27 X 29.6 X 38.7 (inch) I Weight: 126(Ibs) Specifications are subject to the rating label regarding detailed information.
1 SPECIFICATIONS I Name: Electric and Gas Dryer I ACCESSORIES Dryer rack (1 each) See page 6 Stacking kit (1 each) Purchased Separately See page 7 4 Pedestal (1 each) Purchased Separately See page 8 I Power supply: Please refer to change by manufacturer. I Dryer capacity: IEC 7.0 cu.ft. I Size: 27 X 29.6 X 38.7 (inch) I Weight: 126(Ibs) Specifications are subject to the rating label regarding detailed information.
Service Manual
Page 8
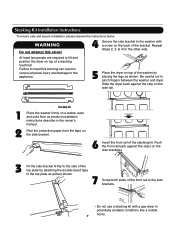
...rail of a washing machine! Repeat Steps 2, 3, & 4 for the other side. Slide the dryer back against the stops on the back of the front rail to pinch fingers between the washer and dryer. Peel the protective paper from the tape on top of the washer by attaching the double... shown. 7 Screw both sides of the bracket. Be careful not to the side brackets. • Do not use a stacking kit with a gas dryer in potentially unstable conditions like a mobile home. 7 Stacking Kit Installation Instructions To ensure safe and secure installation, please observe the instructions below. Failure...
...rail of a washing machine! Repeat Steps 2, 3, & 4 for the other side. Slide the dryer back against the stops on the back of the front rail to pinch fingers between the washer and dryer. Peel the protective paper from the tape on top of the washer by attaching the double... shown. 7 Screw both sides of the bracket. Be careful not to the side brackets. • Do not use a stacking kit with a gas dryer in potentially unstable conditions like a mobile home. 7 Stacking Kit Installation Instructions To ensure safe and secure installation, please observe the instructions below. Failure...
Service Manual
Page 13
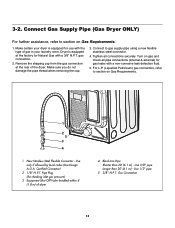
... leak detection fluid. 5. Use 3/8" pipe Longer than 20' (6.1 m) - Connect Gas Supply Pipe (Gas Dryer ONLY) For further assistance, refer to gas supply pipe using a new flexible stainless steel connector. 4. Gas Connection 12 Dryer is equipped for checking inlet gas pressure) 3 Equipment Shut-Off Valve-Installed within 6' (1.8 m) of gas in your laundry room. Make sure you do not damage...
... leak detection fluid. 5. Use 3/8" pipe Longer than 20' (6.1 m) - Connect Gas Supply Pipe (Gas Dryer ONLY) For further assistance, refer to gas supply pipe using a new flexible stainless steel connector. 4. Gas Connection 12 Dryer is equipped for checking inlet gas pressure) 3 Equipment Shut-Off Valve-Installed within 6' (1.8 m) of gas in your laundry room. Make sure you do not damage...
Service Manual
Page 20
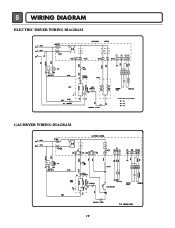
8 WIRING DIAGRAM ELECTRIC DRYER WIRING DIAGRAM GAS DRYER WIRING DIAGRAM 19
8 WIRING DIAGRAM ELECTRIC DRYER WIRING DIAGRAM GAS DRYER WIRING DIAGRAM 19
Service Manual
Page 35
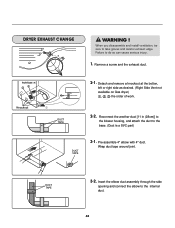
... to the internal duct. 34 Insert the elbow duct assembly through the side opening and connect the elbow to do so can cause serious injury. 1. DRYER EXHAUST CHANGE ! Remove a screw and the exhaust duct. 2-1. DUCT TAPE 2-2. Wrap duct tape around joint. Reconnect the another duct [11 in (28cm)]... edge. DUCT TAPE 3-2. Detach and remove a knockout at the botton, left or right side as desired. (Right Side Vent not available on Gas dryer the order of work. When you disassemble and install ventilation, be sure to the base. (Duct is a SVC part) DUCT TAPE 3-1. WARNING !
... to the internal duct. 34 Insert the elbow duct assembly through the side opening and connect the elbow to do so can cause serious injury. 1. DRYER EXHAUST CHANGE ! Remove a screw and the exhaust duct. 2-1. DUCT TAPE 2-2. Wrap duct tape around joint. Reconnect the another duct [11 in (28cm)]... edge. DUCT TAPE 3-2. Detach and remove a knockout at the botton, left or right side as desired. (Right Side Vent not available on Gas dryer the order of work. When you disassemble and install ventilation, be sure to the base. (Duct is a SVC part) DUCT TAPE 3-1. WARNING !


