
Owners Manual
Page 3
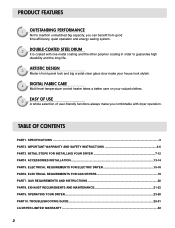
...29-31 LG DRYER LIMITED WARRANTY ...32 2 GAS REQUIREMENTS AND INSTRUCTIONS 20 PART8. EXHAUST REQUIREMENTS AND MAINTENANCE 21-22 PART9. TABLE OF CONTENTS PART1. ELECTRICAL REQUIREMENTS FOR GAS DRYERS 19 PART7. INITIAL STEPS FOR INSTALLING YOUR DRYER 7-12 PART4. OPERATING YOUR DRYER...23-28... PART10. ELECTRICAL REQUIREMENTS FOR ELECTRIC DRYER 15-18 PART6. ACCESSORIES INSTALLATION ...13-14 PART5. PRODUCT ...
...29-31 LG DRYER LIMITED WARRANTY ...32 2 GAS REQUIREMENTS AND INSTRUCTIONS 20 PART8. EXHAUST REQUIREMENTS AND MAINTENANCE 21-22 PART9. TABLE OF CONTENTS PART1. ELECTRICAL REQUIREMENTS FOR GAS DRYERS 19 PART7. INITIAL STEPS FOR INSTALLING YOUR DRYER 7-12 PART4. OPERATING YOUR DRYER...23-28... PART10. ELECTRICAL REQUIREMENTS FOR ELECTRIC DRYER 15-18 PART6. ACCESSORIES INSTALLATION ...13-14 PART5. PRODUCT ...
Owners Manual
Page 4
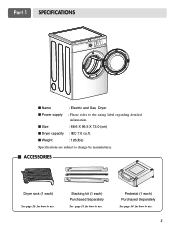
I ACCESSORIES Dryer rack (1 each) See page 26 for how to use. Stacking kit (1 each ) Purchased Separately See page 14 for how to the rating label regarding detailed information. I Weight : 126(Ibs) Specifications are subject to use . Pedestal (1 each ) Purchased Separately See page 13 for how to change by manufacturer. Part 1 SPECIFICATIONS I Name : Electric and Gas Dryer I Dryer capacity : IEC 7.0 cu.ft. I Size : 68.6 X 96.5 X 73.0 (cm) I Power supply : Please refer to use . 3
I ACCESSORIES Dryer rack (1 each) See page 26 for how to use. Stacking kit (1 each ) Purchased Separately See page 14 for how to the rating label regarding detailed information. I Weight : 126(Ibs) Specifications are subject to use . Pedestal (1 each ) Purchased Separately See page 13 for how to change by manufacturer. Part 1 SPECIFICATIONS I Name : Electric and Gas Dryer I Dryer capacity : IEC 7.0 cu.ft. I Size : 68.6 X 96.5 X 73.0 (cm) I Power supply : Please refer to use . 3
Owners Manual
Page 5
... receipt hear. 4 Date of this manual must be followed. Your dryer's model and serial numbers are defective in this dryer is effective for your new LG dryer. Warranty service is available by contacting your nearest LG Service Center and, for warranty period from the date of purchase, ...if this manual, LG will need the complete model and serial numbers when requesting...
... receipt hear. 4 Date of this manual must be followed. Your dryer's model and serial numbers are defective in this dryer is effective for your new LG dryer. Warranty service is available by contacting your nearest LG Service Center and, for warranty period from the date of purchase, ...if this manual, LG will need the complete model and serial numbers when requesting...
Owners Manual
Page 6
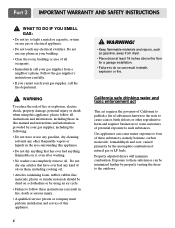
Items contaminated with gasoline, dry-cleaning solvents, or other personal or property injury when using your dryer. In the event of malfunction or breakdown, grounding will reduce the risk of electric shock by a qualified electrician. The plug must..., remove the door to cooking oils in a risk of least resistance for electric current. Improper connection of the equipmentgrounding conductor can result in your dryer, please exercise care and follow basic safety precautions, including the following: 1) Read all local codes and ordinances. This appliance must be connected to...
Items contaminated with gasoline, dry-cleaning solvents, or other personal or property injury when using your dryer. In the event of malfunction or breakdown, grounding will reduce the risk of electric shock by a qualified electrician. The plug must..., remove the door to cooking oils in a risk of least resistance for electric current. Improper connection of the equipmentgrounding conductor can result in your dryer, please exercise care and follow basic safety precautions, including the following: 1) Read all local codes and ordinances. This appliance must be connected to...
Owners Manual
Page 7
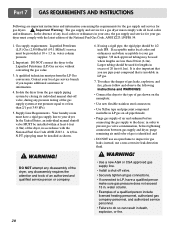
...; Do not try to such substances. Follow the gas supplier's instructions carefully. • If you cannot reach your gas supplier from dryer. • Place dryer at least 18 inches above the floor for a garage installation. • Failure to do so can cause minor exposure to the outdoors... Do not touch any electrical switches. Do not dry any articles that has ever had any phone in death, explosion or fire. Properly adjusted dryers will minimize combustion. WARNING! • Keep flammable materials and vapors, such as gasoline, away from a neighbor's phone. Do not use any...
...; Do not try to such substances. Follow the gas supplier's instructions carefully. • If you cannot reach your gas supplier from dryer. • Place dryer at least 18 inches above the floor for a garage installation. • Failure to do so can cause minor exposure to the outdoors... Do not touch any electrical switches. Do not dry any articles that has ever had any phone in death, explosion or fire. Properly adjusted dryers will minimize combustion. WARNING! • Keep flammable materials and vapors, such as gasoline, away from a neighbor's phone. Do not use any...
Owners Manual
Page 8
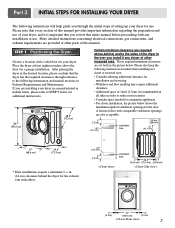
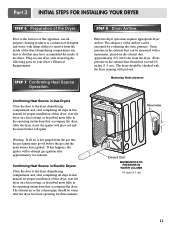
...8226; Consider allowing additional clearance for installation and servicing. • Wall,door and flow molding may require additional clearance. • Additional space of your dryer, and it any installation or use . ventilation hole 27" (68.6 cm) 29.6" (75.3 cm) * Most installations require a minimum 5 ...are set forth in the desired location, please confirm that every section of setting up your dryer for your dryer. Part 3 INITIAL STEPS FOR INSTALLING YOUR DRYER The following instructions will help guide you through reference to the following information and manual sections on...
...8226; Consider allowing additional clearance for installation and servicing. • Wall,door and flow molding may require additional clearance. • Additional space of your dryer, and it any installation or use . ventilation hole 27" (68.6 cm) 29.6" (75.3 cm) * Most installations require a minimum 5 ...are set forth in the desired location, please confirm that every section of setting up your dryer for your dryer. Part 3 INITIAL STEPS FOR INSTALLING YOUR DRYER The following instructions will help guide you through reference to the following information and manual sections on...

Owners Manual
Page 9
... be installed to open either to the left to right or from front to reverse the direction in position, adjust the leveling legs of the dryer until it is not level, and if the slope exceeds 2.5 cm (1 inch), a load may not tumble properly and internal sensors may malfunction. Please ...placement of and clearances for Reversing the Door The door on the floor and the dryer should not exceed 2.5 cm (1 inch). Part 3 INITIAL STEPS FOR INSTALLING YOUR DRYER Once in which your door opens: 1 2 3 8 If the dryer is level from left to right and from front to back should not rock. Follow...
... be installed to open either to the left to right or from front to reverse the direction in position, adjust the leveling legs of the dryer until it is not level, and if the slope exceeds 2.5 cm (1 inch), a load may not tumble properly and internal sensors may malfunction. Please ...placement of and clearances for Reversing the Door The door on the floor and the dryer should not exceed 2.5 cm (1 inch). Part 3 INITIAL STEPS FOR INSTALLING YOUR DRYER Once in which your door opens: 1 2 3 8 If the dryer is level from left to right and from front to back should not rock. Follow...
Owners Manual
Page 10
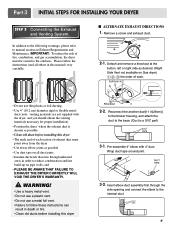
...as possible • Clean old ducts before installing this manual) very carefully. and • PLEASE BE AWARE THAT FAILURE TO EXHAUST THE DRYER CORRECTLY WILL VOID THE DRYER'S WARRANTY. ! Wrap duct tape around joint. 3-2. IMPORTANT: To reduce the risk of exhaust duct must be vented to the outdoors. ... internal duct. 9 In addition to the following warnings, please refer to the base. (Duct is shorter as possible • Use duct tape on Gas dryer) , , the order of work. • Do not use a metal foil vent. • Failure to follow the instructions (and all duct joints ...
...as possible • Clean old ducts before installing this manual) very carefully. and • PLEASE BE AWARE THAT FAILURE TO EXHAUST THE DRYER CORRECTLY WILL VOID THE DRYER'S WARRANTY. ! Wrap duct tape around joint. 3-2. IMPORTANT: To reduce the risk of exhaust duct must be vented to the outdoors. ... internal duct. 9 In addition to the following warnings, please refer to the base. (Duct is shorter as possible • Use duct tape on Gas dryer) , , the order of work. • Do not use a metal foil vent. • Failure to follow the instructions (and all duct joints ...
Owners Manual
Page 11
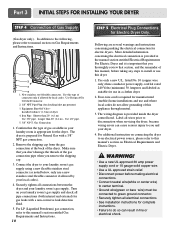
... Remove the shipping cap from the gas connection at the manual section entitled Electrical Requirements For Electric Dryer and it is appropriate for electric dryers. Connect the dryer to install or use in a clothes dryer. 2. Turn on Gas Requirements and Instructions. 1 2 5 3 4 1. Use only a... do not allow grounding of gas available in fire or electrical shock. Use this manual's section on Electrical Requirements and Electric Dryer. ! Shorter than 20' (6.1 m) - More detailed information concerning the electrical connection is required for manufactured (mobile) home ...
... Remove the shipping cap from the gas connection at the manual section entitled Electrical Requirements For Electric Dryer and it is appropriate for electric dryers. Connect the dryer to install or use in a clothes dryer. 2. Turn on Gas Requirements and Instructions. 1 2 5 3 4 1. Use only a... do not allow grounding of gas available in fire or electrical shock. Use this manual's section on Electrical Requirements and Electric Dryer. ! Shorter than 20' (6.1 m) - More detailed information concerning the electrical connection is required for manufactured (mobile) home ...
Owners Manual
Page 12
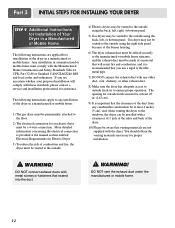
...from the gas line, the gas igniter may go off before the gas and the main burner have accumulated the inside of this dryer, start the dryer on a heat setting, as described more fully in this manual for proper installation of detergent and water, with damp clothes to ...allpurpose cleaning products or a solution of this happens, the igniter will ignite. STEP 7 Confirming Heat Source Operation. The adequacy of the Dryer. The dryer should not exceed 0.6 inches (1.5 cm). After the dryer starts, the igniter will glow red and the main burner will re-attempt gas ignition after the...
...from the gas line, the gas igniter may go off before the gas and the main burner have accumulated the inside of this dryer, start the dryer on a heat setting, as described more fully in this manual for proper installation of detergent and water, with damp clothes to ...allpurpose cleaning products or a solution of this happens, the igniter will ignite. STEP 7 Confirming Heat Source Operation. The adequacy of the Dryer. The dryer should not exceed 0.6 inches (1.5 cm). After the dryer starts, the igniter will glow red and the main burner will re-attempt gas ignition after the...
Owners Manual
Page 13
... be aware that venting materials are not supplied with these standards, please contact a service and installation professional for assistance. Gas dryer may be a 4-wire connection. WARNING! The following instructions are uncertain whether your proposed installation will resist fire and combustion, and... the exhaust duct under the manufactured or mobile home. 12 Part 3 INITIAL STEPS FOR INSTALLING YOUR DRYER STEP 9 Additional Instructions for Installation of Your Dryer in a manufactured or mobile home must comply with the Manufactured Home Construction and Safety Standards Title 24...
... be aware that venting materials are not supplied with these standards, please contact a service and installation professional for assistance. Gas dryer may be a 4-wire connection. WARNING! The following instructions are uncertain whether your proposed installation will resist fire and combustion, and... the exhaust duct under the manufactured or mobile home. 12 Part 3 INITIAL STEPS FOR INSTALLING YOUR DRYER STEP 9 Additional Instructions for Installation of Your Dryer in a manufactured or mobile home must comply with the Manufactured Home Construction and Safety Standards Title 24...
Owners Manual
Page 14
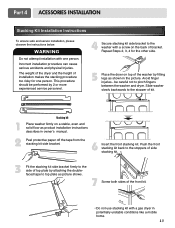
... off the tape from the stacking kit side bracket. 6 Insert the front stacking kit. Repeat Steps 2, 3, 4 for one person. The weight of the dryer and the height of bracket. Push the front stacking kit back to the stoppers of side stacking kit. 3 Fit the stacking kit side bracket firmly... the stopper of kit. 1 Stacking kit Place washer firmly on top of the front kit. • Do not use stacking kit with a gas dryer in potentially unstable conditions like a mobile home. 13 Slide washer slowly backwards to the washer with one person. This procedure should be careful not to...
... off the tape from the stacking kit side bracket. 6 Insert the front stacking kit. Repeat Steps 2, 3, 4 for one person. The weight of the dryer and the height of bracket. Push the front stacking kit back to the stoppers of side stacking kit. 3 Fit the stacking kit side bracket firmly... the stopper of kit. 1 Stacking kit Place washer firmly on top of the front kit. • Do not use stacking kit with a gas dryer in potentially unstable conditions like a mobile home. 13 Slide washer slowly backwards to the washer with one person. This procedure should be careful not to...
Owners Manual
Page 16
...local codes. If over fifteen feet (4.50 m), use U.L. (Underwriters Laboratories) listed No. 10 A.W.G. Label all applicable local regulations. DO NOT CONNECT DRYER TO 110, 115, OR 120 VOLT CIRCUIT. Important Warning: To help prevent fire, electric shock, serious injury or death, the wiring and grounding ...must select the method by which are to be connected to electrical service of your dryer according to a separate branch, 60 Hertz, single phase circuit, AC (alternating current) circuit, fused at 30 Amperes (the circuit must ...
...local codes. If over fifteen feet (4.50 m), use U.L. (Underwriters Laboratories) listed No. 10 A.W.G. Label all applicable local regulations. DO NOT CONNECT DRYER TO 110, 115, OR 120 VOLT CIRCUIT. Important Warning: To help prevent fire, electric shock, serious injury or death, the wiring and grounding ...must select the method by which are to be connected to electrical service of your dryer according to a separate branch, 60 Hertz, single phase circuit, AC (alternating current) circuit, fused at 30 Amperes (the circuit must ...

Owners Manual
Page 17
...(white) of appliance and connect it to the left and right terminal block screws. 3. and be using a UL listed, 120/240 volt minimum, 30 amp, dryer power supply cord. 3-wire receptacle (NEMA type10-30R) 4-wire connection : Direct wire Important : use 4-wire connection in order for your home: 4-wire receptacle (NEMA ... home has a 4-wire receptacle (NEMA type 14-30R) and you will be connecting to be using a UL listed, 120/240 volt minimum, 30 amp, dryer power supply cord. 4-wire direct Then, put the hooked shape end of the wire under the screw of length in the places such as mobile...
...(white) of appliance and connect it to the left and right terminal block screws. 3. and be using a UL listed, 120/240 volt minimum, 30 amp, dryer power supply cord. 3-wire receptacle (NEMA type10-30R) 4-wire connection : Direct wire Important : use 4-wire connection in order for your home: 4-wire receptacle (NEMA ... home has a 4-wire receptacle (NEMA type 14-30R) and you will be connecting to be using a UL listed, 120/240 volt minimum, 30 amp, dryer power supply cord. 4-wire direct Then, put the hooked shape end of the wire under the screw of length in the places such as mobile...

Owners Manual
Page 18
...covering material from end and bare 1 inch from the ends. Option 1: 4-wire connection with a Power supply cord. • lf your dryer in order for dryer to center terminal block screw. 2. Then, put the hooked shape end of the wire under the screw of power cord to be replaced....screw is in right position. 17 Connect red and black wire to the left and right terminal block screws. 3. Part 5 ELECTRICAL REQUIREMENTS FOR ELECTRIC DRYERS 3-wire connection : Direct wire Important : use a 4wire connection. Make sure that all terminal block nuts are on tight and power cord is tightened...
...covering material from end and bare 1 inch from the ends. Option 1: 4-wire connection with a Power supply cord. • lf your dryer in order for dryer to center terminal block screw. 2. Then, put the hooked shape end of the wire under the screw of power cord to be replaced....screw is in right position. 17 Connect red and black wire to the left and right terminal block screws. 3. Part 5 ELECTRICAL REQUIREMENTS FOR ELECTRIC DRYERS 3-wire connection : Direct wire Important : use a 4wire connection. Make sure that all terminal block nuts are on tight and power cord is tightened...

Owners Manual
Page 19
... connection. Connect ground wire of appliance and neutral wire of power cord to the left and right terminal block screws. 4. Part 5 ELECTRICAL REQUIREMENTS FOR ELECTRIC DRYERS Option 2: 3-Wire Connection with a Power Supply Cord lf your local codes or ordinances permit the connection of a frame-grounding conductor to the neutral wire, use...
... connection. Connect ground wire of appliance and neutral wire of power cord to the left and right terminal block screws. 4. Part 5 ELECTRICAL REQUIREMENTS FOR ELECTRIC DRYERS Option 2: 3-Wire Connection with a Power Supply Cord lf your local codes or ordinances permit the connection of a frame-grounding conductor to the neutral wire, use...
Owners Manual
Page 20
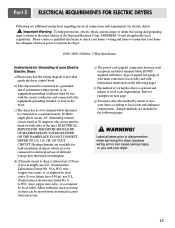
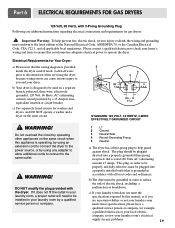
... Electrical Requirements for any adapter to allow additional cords to connect to be plugged directed into a properly installed outlet that your dryer. The plug should be installed in accordance with all applicable local regulations. Please contact a qualified electrician to check your home... STANDARD 120 VOLT, 60 HERTZ, 3-WIRE EFFECTIVELY GROUNDED CIRCUIT 1 L1 2 Ground 3 Neutral Side 4 Round Grounding Prong 5 Neutral a) The dryer has a three-prong plug to help prevent fire, electric shock, serious injury or death, the wiring and grounding must conform to the power ...
... Electrical Requirements for any adapter to allow additional cords to connect to be plugged directed into a properly installed outlet that your dryer. The plug should be installed in accordance with all applicable local regulations. Please contact a qualified electrician to check your home... STANDARD 120 VOLT, 60 HERTZ, 3-WIRE EFFECTIVELY GROUNDED CIRCUIT 1 L1 2 Ground 3 Neutral Side 4 Round Grounding Prong 5 Neutral a) The dryer has a three-prong plug to help prevent fire, electric shock, serious injury or death, the wiring and grounding must conform to the power ...
Owners Manual
Page 21
...local codes and ordinances. If using a rigid pipe, the rigid pipe should be installed within at least 6 feet (1.8m) of the dryer, in excess of 20 feet (6.1m). water column. • Examples of a qualified person include licensed heating personnel, authorized gas company ...personnel, and authorized service personnel. • Failure to inspect for a gas dryer must be 1/2 inch IPS. Supply Line Requirements. A 1/8 in death, explosion, or fire. 20 and • DO NOT use an open flame...
...local codes and ordinances. If using a rigid pipe, the rigid pipe should be installed within at least 6 feet (1.8m) of the dryer, in excess of 20 feet (6.1m). water column. • Examples of a qualified person include licensed heating personnel, authorized gas company ...personnel, and authorized service personnel. • Failure to inspect for a gas dryer must be 1/2 inch IPS. Supply Line Requirements. A 1/8 in death, explosion, or fire. 20 and • DO NOT use an open flame...
Owners Manual
Page 22
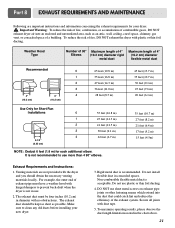
..., gas vent, or concealed space of a building. Non-combustible flexible metal duct is not recommended to clean any old ducts before installing your dryer. ! Make sure to use . 2. Weather Hood Type Number of 90° Maximum length of 4" Elbows (10.2 cm) diameter rigid metal... duct Maximum length of the exhaust system. Important Warning: To reduce the risk of fire, combustion, or accumulation of combustible gases, DO NOT exhaust dryer air into the duct that could catch lint and reduce the efficiency of 4" (10.2 cm) diameter flexible metal duct Recommended 0 1 2 3 4" (10.2 ...
..., gas vent, or concealed space of a building. Non-combustible flexible metal duct is not recommended to clean any old ducts before installing your dryer. ! Make sure to use . 2. Weather Hood Type Number of 90° Maximum length of 4" Elbows (10.2 cm) diameter rigid metal... duct Maximum length of the exhaust system. Important Warning: To reduce the risk of fire, combustion, or accumulation of combustible gases, DO NOT exhaust dryer air into the duct that could catch lint and reduce the efficiency of 4" (10.2 cm) diameter flexible metal duct Recommended 0 1 2 3 4" (10.2 ...
Owners Manual
Page 23
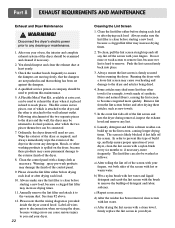
... panel. 9. d) After the residue has been removed, rinse screen with a damp cloth as necessary. Part 8 EXHAUST REQUIREMENTS AND MAINTENANCE Exhaust and Dryer Maintenance ! After one of the lint screen and into place. 3. Following attachment of the screen with a loose lint screen may damage the finish ...clean the lint filter either before starting a new load, because a clogged lint filter may cause permanent damage to the exterior finish of the dryer should be used to ensure the dampers are moving freely, that the dampers are not pushed in the event any lint. 6. c) Repeat as...
... panel. 9. d) After the residue has been removed, rinse screen with a damp cloth as necessary. Part 8 EXHAUST REQUIREMENTS AND MAINTENANCE Exhaust and Dryer Maintenance ! After one of the lint screen and into place. 3. Following attachment of the screen with a loose lint screen may damage the finish ...clean the lint filter either before starting a new load, because a clogged lint filter may cause permanent damage to the exterior finish of the dryer should be used to ensure the dampers are moving freely, that the dampers are not pushed in the event any lint. 6. c) Repeat as...


