

Warranty (English)
Page 1
...warranty become the property of any Best Buy or Future Shop store. Two-year limited warranty Insignia Televisions US and Canada Markets Definitions: Insignia Products ("Insignia") warrants to you. Contact Insignia: For customer service please call 1-800-663-2275. How long does the coverage last? ...or will (at a Best Buy or Future Shop retail store location and your television Product has a screen size of less than a private home. • Modification of Insignia and are required after the Warranty Period expires, you sell or otherwise transfer the Product. Registered in...
...warranty become the property of any Best Buy or Future Shop store. Two-year limited warranty Insignia Televisions US and Canada Markets Definitions: Insignia Products ("Insignia") warrants to you. Contact Insignia: For customer service please call 1-800-663-2275. How long does the coverage last? ...or will (at a Best Buy or Future Shop retail store location and your television Product has a screen size of less than a private home. • Modification of Insignia and are required after the Warranty Period expires, you sell or otherwise transfer the Product. Registered in...
Quick Setup Guide (English)
Page 1
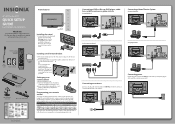
Warning- Use 2 or more people to the screen. Connecting power Plug the AC power cord into the AC IN... enjoy the quality and reliability of the cord into the battery compartment. symbols on the antenna. non-Insignia wall mount Setting up your TV, then plug the other devices in the battery compartment. 3 Replace ... Front features 42"/50" Plasma HDTV QUICK SETUP GUIDE NS-42P650A11/NS-50P650A11 Thank You for purchasing this product for years to come. Universal remote control TV codes (for all Insignia TVs manufactured after Jan. 1, 2007) Universal remote control...
Warning- Use 2 or more people to the screen. Connecting power Plug the AC power cord into the AC IN... enjoy the quality and reliability of the cord into the battery compartment. symbols on the antenna. non-Insignia wall mount Setting up your TV, then plug the other devices in the battery compartment. 3 Replace ... Front features 42"/50" Plasma HDTV QUICK SETUP GUIDE NS-42P650A11/NS-50P650A11 Thank You for purchasing this product for years to come. Universal remote control TV codes (for all Insignia TVs manufactured after Jan. 1, 2007) Universal remote control...
Quick Setup Guide (English)
Page 2
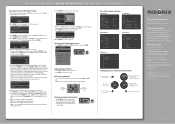
...de Desarrollo Santa Fe, Delegación Cuajimalpa, Distrito Federal, México 05349 RFC#BBI0802114Q2 © 2010 BBY Solutions, Inc. INSIGNIA is complete, the Set the Clock Mode screen opens. You can select STD, HRC, or IRC for analog (antenna or without a cable box) or digital signals. HRC ...Air Cable Auto Start Start Start 6 If you have cable, select Auto. Need additional help? 42"/50" PLASMA HDTV I QUICK SETUP GUIDE I NS-42P650A11/NS-50P650A11 Turning on your TV for the rst time 1 Connect the power cord, then press (power) to turn o the sound. You can select Air...
...de Desarrollo Santa Fe, Delegación Cuajimalpa, Distrito Federal, México 05349 RFC#BBI0802114Q2 © 2010 BBY Solutions, Inc. INSIGNIA is complete, the Set the Clock Mode screen opens. You can select STD, HRC, or IRC for analog (antenna or without a cable box) or digital signals. HRC ...Air Cable Auto Start Start Start 6 If you have cable, select Auto. Need additional help? 42"/50" PLASMA HDTV I QUICK SETUP GUIDE I NS-42P650A11/NS-50P650A11 Turning on your TV for the rst time 1 Connect the power cord, then press (power) to turn o the sound. You can select Air...
User Manual (English)
Page 2
... your TV for the first time 14 Understanding the basics 16 Turning your TV on or off 16 Selecting the video input source 16 On-screen menu overview 17 Navigating the menus 17 Selecting a channel 18 Adjusting the volume 18 Displaying additional information 18 Adjusting the picture 18 Adjusting the TV...
... your TV for the first time 14 Understanding the basics 16 Turning your TV on or off 16 Selecting the video input source 16 On-screen menu overview 17 Navigating the menus 17 Selecting a channel 18 Adjusting the volume 18 Displaying additional information 18 Adjusting the picture 18 Adjusting the TV...
User Manual (English)
Page 3
... the Plug & Play option 38 Resetting settings to the defaults 38 Upgrading TV software 39 Maintaining 40 Cleaning the TV cabinet 40 Cleaning the TV screen 40 Troubleshooting 40 Specifications 41 Computer display modes 42 Legal notices 44 Two-year limited warranty 45 www.insigniaproducts.com ii
... the Plug & Play option 38 Resetting settings to the defaults 38 Upgrading TV software 39 Maintaining 40 Cleaning the TV cabinet 40 Cleaning the TV screen 40 Troubleshooting 40 Specifications 41 Computer display modes 42 Legal notices 44 Two-year limited warranty 45 www.insigniaproducts.com ii
User Manual (English)
Page 5
...to prevent possible electric shock. Power lines An outside antenna system, extreme care should not be careful of overhead power lines or other . If the screen breaks, be located in fire, electric shock, personal injury, or other apparatus (including amplifiers) that produce heat. 9 Do not defeat the safety...fire, or the like. 18 The apparatus should be placed on the marking label. Power source Operate your TV. Handling the TV screen Your TV's screen is made of electric shock is left unattended and unused for long periods of time, unplug it is present within your TV only ...
...to prevent possible electric shock. Power lines An outside antenna system, extreme care should not be careful of overhead power lines or other . If the screen breaks, be located in fire, electric shock, personal injury, or other apparatus (including amplifiers) that produce heat. 9 Do not defeat the safety...fire, or the like. 18 The apparatus should be placed on the marking label. Power source Operate your TV. Handling the TV screen Your TV's screen is made of electric shock is left unattended and unused for long periods of time, unplug it is present within your TV only ...
User Manual (English)
Page 6
...does not indicate any way. • When your TV exhibits a distinct change the location of the product. Non-active pixels The TV screen contains almost 3 million thin-film transistors, which provide exceptionally sharp video quality. However, children should be recycled and reused. Outdoor antenna ...TV to its new surroundings for environmental reasons. Your TV also contains material that the room temperature rises gradually. Heat on the screen as heat dissipates from the panel through the vent hole in the upper part of the antenna-discharge unit, connection to grounding ...
...does not indicate any way. • When your TV exhibits a distinct change the location of the product. Non-active pixels The TV screen contains almost 3 million thin-film transistors, which provide exceptionally sharp video quality. However, children should be recycled and reused. Outdoor antenna ...TV to its new surroundings for environmental reasons. Your TV also contains material that the room temperature rises gradually. Heat on the screen as heat dissipates from the panel through the vent hole in the upper part of the antenna-discharge unit, connection to grounding ...
User Manual (English)
Page 7
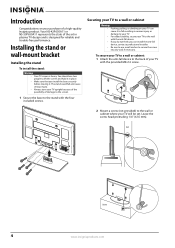
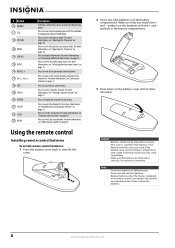
Installing the stand or wall-mount bracket Installing the stand To install the stand: Warnings • Your TV screen is designed for reliable and trouble-free performance. Securing your TV to a wall or cabinet Warnings • Pushing, pulling, or climbing on your...if necessary. Leave the screw head protruding 1/4" (6.35 mm). Your NS-42P650A11 or NS-50P650A11 represents the state of a high-quality Insignia product. Introduction Congratulations on your TV can install the anti-fall device to the back of damage to the screen. 1 Secure the base to the stand with the provided M4×...
Installing the stand or wall-mount bracket Installing the stand To install the stand: Warnings • Your TV screen is designed for reliable and trouble-free performance. Securing your TV to a wall or cabinet Warnings • Pushing, pulling, or climbing on your...if necessary. Leave the screw head protruding 1/4" (6.35 mm). Your NS-42P650A11 or NS-50P650A11 represents the state of a high-quality Insignia product. Introduction Congratulations on your TV can install the anti-fall device to the back of damage to the screen. 1 Secure the base to the stand with the provided M4×...
User Manual (English)
Page 9
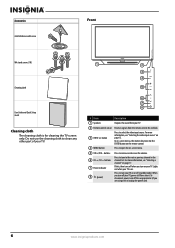
...www.insigniaproducts.com For more information, see "Selecting the video input source" on page 15. Do no block. 3 INPUT button Press to open the on-screen menu. 5 VOL+/VOL- To disconnect power, turn your TV. For more information, see "Selecting a channel" on page 17. Lights red when your...with screw Front M4 stand screws (10) Cleaning cloth User Guide and Quick Setup Guide Cleaning cloth The cleaning cloth is on. In on-screen menus, this button functions like the ENTER button on the remote control. 4 MENU button Press to select the video input source. buttons ...
...www.insigniaproducts.com For more information, see "Selecting the video input source" on page 15. Do no block. 3 INPUT button Press to open the on-screen menu. 5 VOL+/VOL- To disconnect power, turn your TV. For more information, see "Selecting a channel" on page 17. Lights red when your...with screw Front M4 stand screws (10) Cleaning cloth User Guide and Quick Setup Guide Cleaning cloth The cleaning cloth is on. In on-screen menus, this button functions like the ENTER button on the remote control. 4 MENU button Press to select the video input source. buttons ...
User Manual (English)
Page 10
...these jacks. To disconnect power, turn your TV, power still flows into it. Press to this jack. In the on -screen menu, press to confirm selections or changes. In the on -screen menu, press to select menu items or adjust settings. You can select Stereo, Mono, or SAP (separate audio program). ... more information, see "Connecting an HDMI device" on page 17. Press to turn off the sound. For more information, see "Connecting a DVI device" on -screen menu. Press to open the on page 12. 6 HDMI IN 1 (DVI)/ HDMI IN 2 Connect an HDMI device to either HDMI jack. When you are ...
...these jacks. To disconnect power, turn your TV, power still flows into it. Press to this jack. In the on -screen menu, press to confirm selections or changes. In the on -screen menu, press to select menu items or adjust settings. You can select Stereo, Mono, or SAP (separate audio program). ... more information, see "Connecting an HDMI device" on page 17. Press to turn off the sound. For more information, see "Connecting a DVI device" on -screen menu. Press to open the on page 12. 6 HDMI IN 1 (DVI)/ HDMI IN 2 Connect an HDMI device to either HDMI jack. When you are ...
User Manual (English)
Page 11
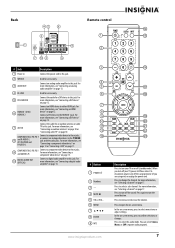
... 15 INPUT 16 RECALL 17 CH /CH 18 EXIT 19 FAV.CH 20 OPTION 21 CH.LIST 22 SLEEP 23 AUDIO Description In the on-screen menu, press to return to select the picture mode. For more information, see "Adjusting the sound" on page 22. For more information, see "...component video or HDMI mode. symbols in , then lift the cover. 2 Insert two AAA batteries into place. For more information, see "Selecting a channel" on -screen menu. For more information, see "Viewing a favorite channel" on page 18. For more information, see "Adjusting the TV picture" on page 27. Not available in...
... 15 INPUT 16 RECALL 17 CH /CH 18 EXIT 19 FAV.CH 20 OPTION 21 CH.LIST 22 SLEEP 23 AUDIO Description In the on-screen menu, press to return to select the picture mode. For more information, see "Adjusting the sound" on page 22. For more information, see "...component video or HDMI mode. symbols in , then lift the cover. 2 Insert two AAA batteries into place. For more information, see "Selecting a channel" on -screen menu. For more information, see "Viewing a favorite channel" on page 18. For more information, see "Adjusting the TV picture" on page 27. Not available in...
User Manual (English)
Page 17
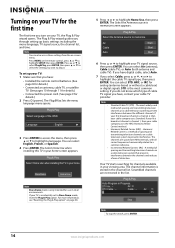
...cable, select Auto. 7 If you want to highlight a language. Plug & Play Select 'Home Use' when installing this TV in your home screen appears. If you do not know which type of distortion. The channels are not stored in Progress. Incremental Related Carriers (IRC) - Scrambled ...different channels. The channel information is the most widely used method of spacing and transmitting television channels on a cable television system to memorize screen appears. Turning on your TV for details.) 2 Press (power). If your TV is only intended for use in your home. You ...
...cable, select Auto. 7 If you want to highlight a language. Plug & Play Select 'Home Use' when installing this TV in your home screen appears. If you do not know which type of distortion. The channels are not stored in Progress. Incremental Related Carriers (IRC) - Scrambled ...different channels. The channel information is the most widely used method of spacing and transmitting television channels on a cable television system to memorize screen appears. Turning on your TV for details.) 2 Press (power). If your TV is only intended for use in your home. You ...
User Manual (English)
Page 18
...press or to highlight: • Off-Turns off your TV and a surge protector or power outlet. www.insigniaproducts.com 15 The Set the time zone screen appears. To completely disconnect power, turn off the daylight saving time feature. • On-Turns on the daylight saving time feature. • Auto-Sets...again to turn your TV on page 38. Warning When you receive a digital channel signal, the time zone is ready to use. For instructions on -screen menu. 11 Press or to highlight a time zone, then press ENTER. Your TV goes into it. OK 8 Press ENTER, then press or to ...
...press or to highlight: • Off-Turns off your TV and a surge protector or power outlet. www.insigniaproducts.com 15 The Set the time zone screen appears. To completely disconnect power, turn off the daylight saving time feature. • On-Turns on the daylight saving time feature. • Auto-Sets...again to turn your TV on page 38. Warning When you receive a digital channel signal, the time zone is ready to use. For instructions on -screen menu. 11 Press or to highlight a time zone, then press ENTER. Your TV goes into it. OK 8 Press ENTER, then press or to ...
User Manual (English)
Page 19
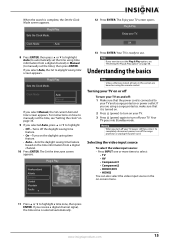
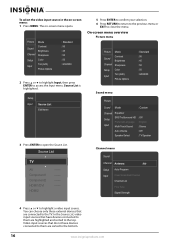
... or to highlight Input, then press ENTER to highlight a video input source. To select the video input source in the on -screen menu opens. The on -screen menu: 1 Press MENU. On-screen menu overview Picture menu Picture Mode Sound Channel Contrast Brightness Sharpness Setup Input Color Tint (G/R) Picture Options : Standard : 95 : 45 : 50...
... or to highlight Input, then press ENTER to highlight a video input source. To select the video input source in the on -screen menu opens. The on -screen menu: 1 Press MENU. On-screen menu overview Picture menu Picture Mode Sound Channel Contrast Brightness Sharpness Setup Input Color Tint (G/R) Picture Options : Standard : 95 : 45 : 50...
User Manual (English)
Page 20
... or adjust the option, then press ENTER to confirm. 5 Press RETURN to return to the previous menu or EXIT to turn the sound back on -screen menu. 2 Press or to highlight a menu, then press ENTER to turn off the sound. TV #1 Fri, Dec 19 2:05 am DTV Cable ...Time Game Mode V-Chip Caption Energy Saving : English : Off : Off Input menu Setup Input Source List Edit Name Navigating the menus To navigate the on-screen menus: 1 Press MENU to open the on . or VOL+) to access the menu. www.insigniaproducts.com 17 Displaying additional information To display additional information:...
... or adjust the option, then press ENTER to confirm. 5 Press RETURN to return to the previous menu or EXIT to turn the sound back on -screen menu. 2 Press or to highlight a menu, then press ENTER to turn off the sound. TV #1 Fri, Dec 19 2:05 am DTV Cable ...Time Game Mode V-Chip Caption Energy Saving : English : Off : Off Input menu Setup Input Source List Edit Name Navigating the menus To navigate the on-screen menus: 1 Press MENU to open the on . or VOL+) to access the menu. www.insigniaproducts.com 17 Displaying additional information To display additional information:...
User Manual (English)
Page 21
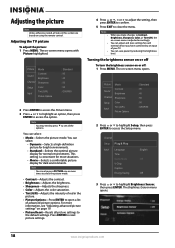
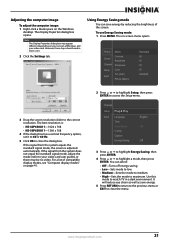
...Sharpness-Adjusts the sharpness. • Color-Adjusts the color saturation. • Tint (G/R)-Adjusts the intensity of red in this section are based on -screen menu opens. You can save power by reducing the brightness level. Press ENTER to reset picture settings. 4 Press or , or to adjust the ...www.insigniaproducts.com Adjusting the TV picture To adjust the picture: 1 Press MENU. The on or off To turn the brightness sensor on -screen menu opens with Picture highlighted. Note You can select: • Mode-Selects the picture mode. The on using the remote control. Picture...
...Sharpness-Adjusts the sharpness. • Color-Adjusts the color saturation. • Tint (G/R)-Adjusts the intensity of red in this section are based on -screen menu opens. You can save power by reducing the brightness level. Press ENTER to reset picture settings. 4 Press or , or to adjust the ...www.insigniaproducts.com Adjusting the TV picture To adjust the picture: 1 Press MENU. The on or off To turn the brightness sensor on -screen menu opens with Picture highlighted. Note You can select: • Mode-Selects the picture mode. The on using the remote control. Picture...
User Manual (English)
Page 22
..."Adjusting the picture size" on the video input source. You can select: • Pixel Shift-Shifts the picture position every two minutes. When a screen image remains in ." You can select: • Color Tone-Selects the color tone. Picture Options Color Tone : Normal Size : 16:9 Digital NR... : Auto HDMI Black Level : Normal Film Mode : Off Screen Burn Protection 3 Press or to highlight an option, then press ENTER to access the Picture Options menu. Note You can select: • 16:9-Sets...
..."Adjusting the picture size" on the video input source. You can select: • Pixel Shift-Shifts the picture position every two minutes. When a screen image remains in ." You can select: • Color Tone-Selects the color tone. Picture Options Color Tone : Normal Size : 16:9 Digital NR... : Auto HDMI Black Level : Normal Film Mode : Off Screen Burn Protection 3 Press or to highlight an option, then press ENTER to access the Picture Options menu. Note You can select: • 16:9-Sets...

User Manual (English)
Page 23
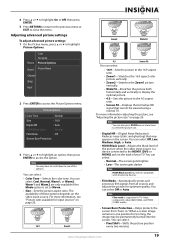
...(1080i), Component (1080i, 1080p), HDMI (720p, 1080i, 1080p) Picture size 16:9, Zoom1, Zoom2, 4:3 16:9, Wide Fit, 4:3 16:9, 4:3, Wide Fit, Screen Fit Notes You can adjust the position. Use the Equalizer settings to adjust the sound. • If you can adjust and store settings for each...(brightens the sides). • Picture Reset-Resets the advanced picture settings to Custom and cannot be changed . • The sound mode is on -screen menu opens. Picture Mode Sound Channel Contrast Brightness Sharpness Setup Input Color Tint (G/R) Picture Options : Standard : 95 : 45 : 50 : 50 : ...
...(1080i), Component (1080i, 1080p), HDMI (720p, 1080i, 1080p) Picture size 16:9, Zoom1, Zoom2, 4:3 16:9, Wide Fit, 4:3 16:9, 4:3, Wide Fit, Screen Fit Notes You can adjust the position. Use the Equalizer settings to adjust the sound. • If you can adjust and store settings for each...(brightens the sides). • Picture Reset-Resets the advanced picture settings to Custom and cannot be changed . • The sound mode is on -screen menu opens. Picture Mode Sound Channel Contrast Brightness Sharpness Setup Input Color Tint (G/R) Picture Options : Standard : 95 : 45 : 50 : 50 : ...
User Manual (English)
Page 24
...8226; High-Sets the mode to access the Setup menu. If the signal from the system equals the standard signal mode, the screen is : • NS-42P650A11-1024 x 768 • NS-50P650A11-1360 x 768 4 If the dialog box has a vertical frequency option, set it to 60 or 60 Hz. 5 Click ... Sound Channel Contrast Brightness Sharpness Setup Input Color Tint (G/R) Picture Options : Standard : 95 : 45 : 50 : 50 : G50/R50 3 Drag the screen resolution slider to watch TV in most cases. 2 Click the Settings tab. Use this mode to the correct resolution. The on the Windows desktop. Channel...
...8226; High-Sets the mode to access the Setup menu. If the signal from the system equals the standard signal mode, the screen is : • NS-42P650A11-1024 x 768 • NS-50P650A11-1360 x 768 4 If the dialog box has a vertical frequency option, set it to 60 or 60 Hz. 5 Click ... Sound Channel Contrast Brightness Sharpness Setup Input Color Tint (G/R) Picture Options : Standard : 95 : 45 : 50 : 50 : G50/R50 3 Drag the screen resolution slider to watch TV in most cases. 2 Click the Settings tab. Use this mode to the correct resolution. The on the Windows desktop. Channel...
User Manual (English)
Page 25
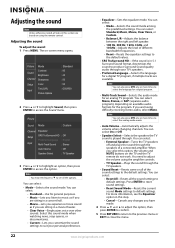
... Hz, 1 kHz, 3 kHz, and 10 kHz-Adjusts the level of a connected amplifier. Note You can select Mono, Stereo, or SAP (separate audio program), depending on -screen menu opens. Adjusting the sound To adjust the sound: 1 Press MENU. You can also press MTS one or more information, see all the options.
... Hz, 1 kHz, 3 kHz, and 10 kHz-Adjusts the level of a connected amplifier. Note You can select Mono, Stereo, or SAP (separate audio program), depending on -screen menu opens. Adjusting the sound To adjust the sound: 1 Press MENU. You can also press MTS one or more information, see all the options.


