

Warranty (English)
Page 1
... products and brand names are not returned to you. This warranty does not cover: • Customer instruction/education • Installation • Set up adjustments • Cosmetic damage • Damage due to acts of God, such as the original packaging. www.insigniaproducts.com 1 The ...your Product must pay all faults" • Consumables, including but not limited to use , including but not limited to batteries (i.e. INSIGNIA PRODUCTS MAKES NO OTHER EXPRESS WARRANTIES WITH RESPECT TO THE PRODUCT, ALL EXPRESS AND IMPLIED WARRANTIES FOR THE PRODUCT, INCLUDING, BUT NOT LIMITED...
... products and brand names are not returned to you. This warranty does not cover: • Customer instruction/education • Installation • Set up adjustments • Cosmetic damage • Damage due to acts of God, such as the original packaging. www.insigniaproducts.com 1 The ...your Product must pay all faults" • Consumables, including but not limited to use , including but not limited to batteries (i.e. INSIGNIA PRODUCTS MAKES NO OTHER EXPRESS WARRANTIES WITH RESPECT TO THE PRODUCT, ALL EXPRESS AND IMPLIED WARRANTIES FOR THE PRODUCT, INCLUDING, BUT NOT LIMITED...
Quick Setup Guide (English)
Page 1
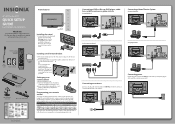
... Philips PHDVD5, PH5DSS, PMDVR8, PDVR8 RCA RCU807 One for All URC-6690 Sony RM-VL600 115 135 0464 8043 Comcast M1057 0463 Set-top box makers and models Dish Network Motorola VIP508, VIP622 DRC800 TIVO Series 3, HD 720 0463 0091 DirectTV RC23 10463 To program your ....com for the latest remote control code information. OR For a non-Insignia wall mount, attach the wall-mount bracket to the back of this ne Insignia television. Front features 42"/50" Plasma HDTV QUICK SETUP GUIDE NS-42P650A11/NS-50P650A11 Thank You for purchasing this product for years to come. We hope...
... Philips PHDVD5, PH5DSS, PMDVR8, PDVR8 RCA RCU807 One for All URC-6690 Sony RM-VL600 115 135 0464 8043 Comcast M1057 0463 Set-top box makers and models Dish Network Motorola VIP508, VIP622 DRC800 TIVO Series 3, HD 720 0463 0091 DirectTV RC23 10463 To program your ....com for the latest remote control code information. OR For a non-Insignia wall mount, attach the wall-mount bracket to the back of this ne Insignia television. Front features 42"/50" Plasma HDTV QUICK SETUP GUIDE NS-42P650A11/NS-50P650A11 Thank You for purchasing this product for years to come. We hope...
Quick Setup Guide (English)
Page 2
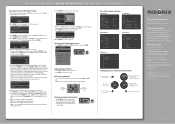
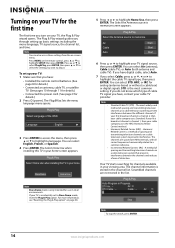
... banner displays status information, such as the channel number, type of BBY Solutions, Inc. INSIGNIA is selected automatically. 11 Press ENTER. Plug & Play Menu Language, Store Demo, Channels, and Time will be set the time using the number buttons. If you www.insigniaproducts.com For customer service, call:... The Plug & Play introduction screen opens. Plug & Play Select the Antenna source to memorize. 42"/50" PLASMA HDTV I QUICK SETUP GUIDE I NS-42P650A11/NS-50P650A11 Turning on your TV for the rst time 1 Connect the power cord, then press (power) to turn o the sound.
... banner displays status information, such as the channel number, type of BBY Solutions, Inc. INSIGNIA is selected automatically. 11 Press ENTER. Plug & Play Menu Language, Store Demo, Channels, and Time will be set the time using the number buttons. If you www.insigniaproducts.com For customer service, call:... The Plug & Play introduction screen opens. Plug & Play Select the Antenna source to memorize. 42"/50" PLASMA HDTV I QUICK SETUP GUIDE I NS-42P650A11/NS-50P650A11 Turning on your TV for the rst time 1 Connect the power cord, then press (power) to turn o the sound.
User Manual (English)
Page 2
... menus 17 Selecting a channel 18 Adjusting the volume 18 Displaying additional information 18 Adjusting the picture 18 Adjusting the TV picture 18 Adjusting advanced picture settings 19 i www.insigniaproducts.com
... menus 17 Selecting a channel 18 Adjusting the volume 18 Displaying additional information 18 Adjusting the picture 18 Adjusting the TV picture 18 Adjusting advanced picture settings 19 i www.insigniaproducts.com
User Manual (English)
Page 3
... 33 Customizing DTV closed captioning styles 33 Adjusting time settings 34 Setting the clock 34 Setting the time zone 35 Turning Daylight Saving Time on or off 36 Setting the sleep timer 36 Setting a wake-up timer 36 Adjusting menu settings 37 Selecting the menu language 37 Labeling an input...game console 20 Adjusting the computer image 21 Using Energy Saving mode 21 Adjusting the sound 22 Adjusting the sound 22 Changing channel settings 23 Automatically searching for channels 23 Removing scrambled channels from the channel list 23 Opening the channel list 24 Fine-tuning an ...
... 33 Customizing DTV closed captioning styles 33 Adjusting time settings 34 Setting the clock 34 Setting the time zone 35 Turning Daylight Saving Time on or off 36 Setting the sleep timer 36 Setting a wake-up timer 36 Adjusting menu settings 37 Selecting the menu language 37 Labeling an input...game console 20 Adjusting the computer image 21 Using Energy Saving mode 21 Adjusting the sound 22 Adjusting the sound 22 Changing channel settings 23 Automatically searching for channels 23 Removing scrambled channels from the channel list 23 Opening the channel list 24 Fine-tuning an ...
User Manual (English)
Page 7
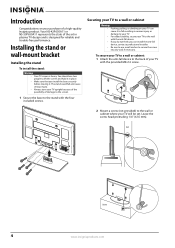
The stand could fall device to the back of a high-quality Insignia product. Wall Cabinet 4 www.insigniaproducts.com Securing your TV to a wall or cabinet Warnings • Pushing, pulling, or climbing on your purchase of your TV ..., contact a professional installer. • Be sure to use two people to the wall or cabinet where your TV will be set. Leave the screw head protruding 1/4" (6.35 mm). Your NS-42P650A11 or NS-50P650A11 represents the state of damage to the screen. 1 Secure the base to secure the screw into dry wall, if necessary.
The stand could fall device to the back of a high-quality Insignia product. Wall Cabinet 4 www.insigniaproducts.com Securing your TV to a wall or cabinet Warnings • Pushing, pulling, or climbing on your purchase of your TV ..., contact a professional installer. • Be sure to use two people to the wall or cabinet where your TV will be set. Leave the screw head protruding 1/4" (6.35 mm). Your NS-42P650A11 or NS-50P650A11 represents the state of damage to the screen. 1 Secure the base to secure the screw into dry wall, if necessary.
User Manual (English)
Page 10
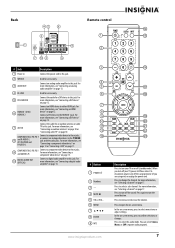
... into it. Press to turn off the surge protector (if you turn the sound back on -screen menu, press to select menu items or adjust settings. Press to the HDMI IN 1 jack. For more information, see "Connecting a component video device" on page 13 or "Connecting a VCR" on page 12. 7 ANT IN...
... into it. Press to turn off the surge protector (if you turn the sound back on -screen menu, press to select menu items or adjust settings. Press to the HDMI IN 1 jack. For more information, see "Connecting a component video device" on page 13 or "Connecting a VCR" on page 12. 7 ANT IN...
User Manual (English)
Page 11
...the video input source" on page 17. For more information, see "Automatically searching for an extended period of different types. For more information, see "Setting a wake-up timer" on page 17. For more information, see "Displaying additional information" on page 36. symbols in component video or HDMI mode.... Press to set the sleep timer. Press to the previous menu. # Button 10 RETURN 11 CCD 12 PICTURE 13 ZOOM 14 DISPLAY 15 INPUT 16 RECALL ...
...the video input source" on page 17. For more information, see "Automatically searching for an extended period of different types. For more information, see "Setting a wake-up timer" on page 17. For more information, see "Displaying additional information" on page 36. symbols in component video or HDMI mode.... Press to set the sleep timer. Press to the previous menu. # Button 10 RETURN 11 CCD 12 PICTURE 13 ZOOM 14 DISPLAY 15 INPUT 16 RECALL ...

User Manual (English)
Page 12
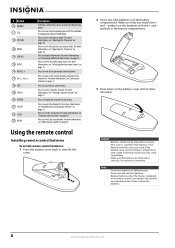
...control may need to work with your TV You can operate your Insignia TV. To program a universal remote control: 1 Find the code for details. • If your universal remote control has a "Learn" feature, you can operate both your set -top box manufacturer, or call technical support for your universal remote ... code to program your remote control to enter the TV code you use your TV. Insignia TV codes for universal remote controls (for other end to the power jack on the back of your set-top box's remote control manufacturer and model) on the charts below, then making note ...
...control may need to work with your TV You can operate your Insignia TV. To program a universal remote control: 1 Find the code for details. • If your universal remote control has a "Learn" feature, you can operate both your set -top box manufacturer, or call technical support for your universal remote ... code to program your remote control to enter the TV code you use your TV. Insignia TV codes for universal remote controls (for other end to the power jack on the back of your set-top box's remote control manufacturer and model) on the charts below, then making note ...
User Manual (English)
Page 14
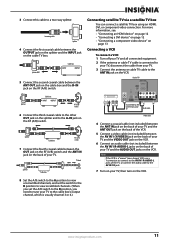
... to the AV IN 1 R jack. 7 Turn on your TV, then turn on the VCR. 8 Set the A/B switch to the A position to view unscrambled channels, and set the switch to the B position to view scrambled channels. (When you set the A/B switch to the B position, you need to tune your TV to the cable box...
... to the AV IN 1 R jack. 7 Turn on your TV, then turn on the VCR. 8 Set the A/B switch to the A position to view unscrambled channels, and set the switch to the B position to view scrambled channels. (When you set the A/B switch to the B position, you need to tune your TV to the cable box...
User Manual (English)
Page 17
...of spacing and transmitting television channels on a cable television system to a common reference. Incremental Related Carriers (IRC) - The Plug&Play Sets the menu language menu opens. Plug & Play Select the Antenna source to highlight a language. The channel information is only intended for channels... available in the list. Cable : -- If your first broadcast channel is accidentally set up basic settings including the menu language, TV signal source, the channel list, and time. DTV Air : -- The Select the Antenna source...
...of spacing and transmitting television channels on a cable television system to a common reference. Incremental Related Carriers (IRC) - The Plug&Play Sets the menu language menu opens. Plug & Play Select the Antenna source to highlight a language. The channel information is only intended for channels... available in the list. Cable : -- If your first broadcast channel is accidentally set up basic settings including the menu language, TV signal source, the channel list, and time. DTV Air : -- The Select the Antenna source...
User Manual (English)
Page 18
... Auto, press or to reset the Plug & Play option, see "Resetting the Plug & Play option" on page 38. Note If you select Auto, the Set to manually set the time using the remote control. Turning your TV on or off To turn your TV on and off: 1 Make sure that it . If... zone screen appears. Plug & Play Newfoundland Atlantic Eastern Central Mountain Pacific ▼ 13 Press ENTER. Your TV is complete, the Set the Clock Mode screen appears. If you select Manual, the Set current date and time screen appears. Your TV goes into it is turned on. 2 Press (power) to turn on the...
... Auto, press or to reset the Plug & Play option, see "Resetting the Plug & Play option" on page 38. Note If you select Auto, the Set to manually set the time using the remote control. Turning your TV on or off To turn your TV on and off: 1 Make sure that it . If... zone screen appears. Plug & Play Newfoundland Atlantic Eastern Central Mountain Pacific ▼ 13 Press ENTER. Your TV is complete, the Set the Clock Mode screen appears. If you select Manual, the Set current date and time screen appears. Your TV goes into it is turned on. 2 Press (power) to turn on the...
User Manual (English)
Page 20
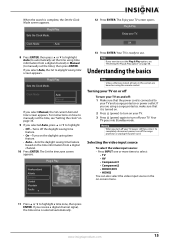
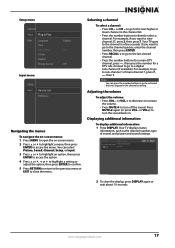
Selecting a channel To select a channel: • Press CH or CH to go to sub-channel 1 of sound, and picture and sound settings. For example, if you want to view channel 27, press 2, then press 7. or VOL + to decrease or increase the volume. • Press MUTE to the ... select Picture, Sound, Channel, Setup, or Input. 3 Press or to highlight an option, then press ENTER to access the option. 4 Press or , or to highlight a setting or adjust the option, then press ENTER to confirm. 5 Press RETURN to return to the previous menu or EXIT to a digital sub-channel (if available...
Selecting a channel To select a channel: • Press CH or CH to go to sub-channel 1 of sound, and picture and sound settings. For example, if you want to view channel 27, press 2, then press 7. or VOL + to decrease or increase the volume. • Press MUTE to the ... select Picture, Sound, Channel, Setup, or Input. 3 Press or to highlight an option, then press ENTER to access the option. 4 Press or , or to highlight a setting or adjust the option, then press ENTER to confirm. 5 Press RETURN to return to the previous menu or EXIT to a digital sub-channel (if available...
User Manual (English)
Page 21
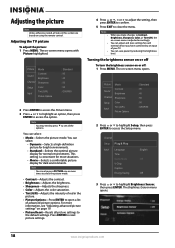
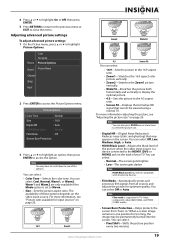
...a list of advanced picture options. Note You can also press PICTURE one or more information, see all the You can adjust and store settings for normal environments. Picture Mode Sound Channel Contrast Brightness Sharpness Setup Input Color Tint (G/R) Picture Options : Standard : 95 : 45 : ... Setup Plug & Play Input Language Time Game Mode V-Chip Caption Energy Saving : English : Off : Off 3 Press or to the default settings. For more times to select the picture mode. • Contrast-Adjusts the contrast. • Brightness-Adjusts the brightness. • Sharpness-Adjusts...
...a list of advanced picture options. Note You can also press PICTURE one or more information, see all the You can adjust and store settings for normal environments. Picture Mode Sound Channel Contrast Brightness Sharpness Setup Input Color Tint (G/R) Picture Options : Standard : 95 : 45 : ... Setup Plug & Play Input Language Time Game Mode V-Chip Caption Energy Saving : English : Off : Off 3 Press or to the default settings. For more times to select the picture mode. • Contrast-Adjusts the contrast. • Brightness-Adjusts the brightness. • Sharpness-Adjusts...
User Manual (English)
Page 22
...Off, then press ENTER. 5 Press RETURN to return to the previous menu or EXIT to highlight Picture Options. Adjusting advanced picture settings To adjust advanced picture settings: 1 On the Picture menu, press or to close the menu. Picture Color Tint (G/R) Picture Options Sound Picture Reset Channel ... Zoom2-Stretches the Zoom1 picture vertically. • Wide Fit-Stretches the picture both horizontally and vertically to display the optimal picture. • 4:3-Sets the picture to the HDMI1 (DVI) or HDMI2 jack on the back of these options depends on the screen. You can select: •...
...Off, then press ENTER. 5 Press RETURN to return to the previous menu or EXIT to highlight Picture Options. Adjusting advanced picture settings To adjust advanced picture settings: 1 On the Picture menu, press or to close the menu. Picture Color Tint (G/R) Picture Options Sound Picture Reset Channel ... Zoom2-Stretches the Zoom1 picture vertically. • Wide Fit-Stretches the picture both horizontally and vertically to display the optimal picture. • 4:3-Sets the picture to the HDMI1 (DVI) or HDMI2 jack on the back of these options depends on the screen. You can select: •...

User Manual (English)
Page 23
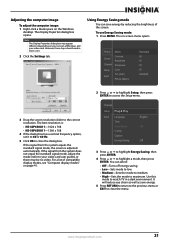
...• Side Grey-When the video source is displayed in HDMI (1080i/1080p) or Component (1080i/1080p) mode, you made need to gray. The Equalizer settings are reset to highlight Off or On, then press ENTER. Channel Setup Plug & Play Input Language Time Game Mode V-Chip Caption Energy Saving : English : ...Off : Off 3 Press or to highlight Game Mode, then press ENTER. 4 Press or to the default settings. Press or to adjust the sound. • If you can improve the image and sound from a game console by turning the Game Mode feature on...
...• Side Grey-When the video source is displayed in HDMI (1080i/1080p) or Component (1080i/1080p) mode, you made need to gray. The Equalizer settings are reset to highlight Off or On, then press ENTER. Channel Setup Plug & Play Input Language Time Game Mode V-Chip Caption Energy Saving : English : ...Off : Off 3 Press or to highlight Game Mode, then press ENTER. 4 Press or to the default settings. Press or to adjust the sound. • If you can improve the image and sound from a game console by turning the Game Mode feature on...
User Manual (English)
Page 24
... the menu. If the signal from the system equals the standard signal mode, the screen is : • NS-42P650A11-1024 x 768 • NS-50P650A11-1360 x 768 4 If the dialog box has a vertical frequency option, set it to 60 or 60 Hz. 5 Click OK to access the Setup menu. However, these steps should work...Energy Saving mode You can select: • Off-Turns off energy saving. • Low-Sets mode to low. • Medium-Sets the mode to medium. • High-Sets the mode to watch TV in most cases. 2 Click the Settings tab. For a list of Windows and your video card user guide), or there may ...
... the menu. If the signal from the system equals the standard signal mode, the screen is : • NS-42P650A11-1024 x 768 • NS-50P650A11-1360 x 768 4 If the dialog box has a vertical frequency option, set it to 60 or 60 Hz. 5 Click OK to access the Setup menu. However, these steps should work...Energy Saving mode You can select: • Off-Turns off energy saving. • Low-Sets mode to low. • Medium-Sets the mode to medium. • High-Sets the mode to watch TV in most cases. 2 Click the Settings tab. For a list of Windows and your video card user guide), or there may ...
User Manual (English)
Page 25
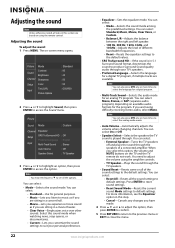
... do not work. When you are sitting in a movie theater. • Clear Voice-Emphasizes voice over other sounds. You need to press to default settings. You can select: • External Speaker-Turns the TV speakers off and plays the sound through . You can select: • Mode-Selects the ...select On or Off. • Speaker Select-Selects the speakers the TV sound is in 5.1 Surround Sound format, downmixes the sound to the default settings. If you select this option, the volume and MUTE buttons on available audio formats for an analog TV program. You can select: • ...
... do not work. When you are sitting in a movie theater. • Clear Voice-Emphasizes voice over other sounds. You need to press to default settings. You can select: • External Speaker-Turns the TV speakers off and plays the sound through . You can select: • Mode-Selects the ...select On or Off. • Speaker Select-Selects the speakers the TV sound is in 5.1 Surround Sound format, downmixes the sound to the default settings. If you select this option, the volume and MUTE buttons on available audio formats for an analog TV program. You can select: • ...
User Manual (English)
Page 26
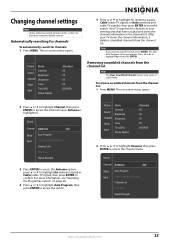
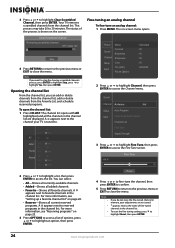
... Channel menu. message appears. To remove scrambled channels from the channel list Note The Clear Scrambled Channel feature only works in cable mode. Changing channel settings Note Unless otherwise noted, all tasks in the channel list. Antenna is highlighted. Sound Channel Antenna : Air Setup Input Auto Program Clear Scrambled Channel Channel...
... Channel menu. message appears. To remove scrambled channels from the channel list Note The Clear Scrambled Channel feature only works in cable mode. Changing channel settings Note Unless otherwise noted, all tasks in the channel list. Antenna is highlighted. Sound Channel Antenna : Air Setup Input Auto Program Clear Scrambled Channel Channel...
User Manual (English)
Page 27
Clear Scrambled Channel Removing scrambled channel. For more information, see "Setting up a favorite channel list" on page 25. 3 Press OPTIONS to access a list of options, press or to highlight Yes, then press ENTER. Picture Mode Sound ... programs" on page 26. • Reserve-Shows all current reserved programs. A appears next to reserved programs in the channel list. To reset the fine tuning setting, press to highlight Clear Scrambled Channel, then press ENTER. Opening the channel list From the channel list, you want to stop the clearing scrambled channels...
Clear Scrambled Channel Removing scrambled channel. For more information, see "Setting up a favorite channel list" on page 25. 3 Press OPTIONS to access a list of options, press or to highlight Yes, then press ENTER. Picture Mode Sound ... programs" on page 26. • Reserve-Shows all current reserved programs. A appears next to reserved programs in the channel list. To reset the fine tuning setting, press to highlight Clear Scrambled Channel, then press ENTER. Opening the channel list From the channel list, you want to stop the clearing scrambled channels...


