
Quick Setup Guide (English)
Page 1
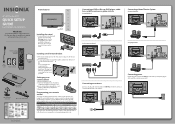
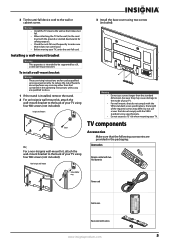
...Insignia wall mount Setting up your remote or need a di erent remote control code, visit www.insigniaproducts.com for the latest remote control code information. If you enjoy the quality and reliability of your TV, then plug the other devices in the battery compartment. 3 Replace the cover. Warning- Connecting power Plug the AC power cord into the battery compartment. Connecting a DVD or Blu-ray DVD player, cable box, satellite receiver, or game console Using HDMI (best) Connecting a Home Theater System Using analog audio Using component (good) Using digital audio Connecting...
...Insignia wall mount Setting up your remote or need a di erent remote control code, visit www.insigniaproducts.com for the latest remote control code information. If you enjoy the quality and reliability of your TV, then plug the other devices in the battery compartment. 3 Replace the cover. Warning- Connecting power Plug the AC power cord into the battery compartment. Connecting a DVD or Blu-ray DVD player, cable box, satellite receiver, or game console Using HDMI (best) Connecting a Home Theater System Using analog audio Using component (good) Using digital audio Connecting...
Quick Setup Guide (English)
Page 2
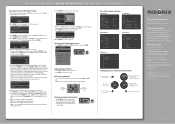
..., then press ENTER. If you select Manual, the Set current date and time screen opens. 8 If you do not know which type of their respective owners. Need additional help? We're here for analog (antenna or without a cable box) or digital signals. de R.L. All rights reserved. 42"/50" PLASMA HDTV I QUICK SETUP GUIDE I NS-42P650A11/NS-50P650A11 Turning on your TV for the rst time 1 Connect the power cord, then press (power) to turn o the sound. HRC (harmonically related carriers) and...
..., then press ENTER. If you select Manual, the Set current date and time screen opens. 8 If you do not know which type of their respective owners. Need additional help? We're here for analog (antenna or without a cable box) or digital signals. de R.L. All rights reserved. 42"/50" PLASMA HDTV I QUICK SETUP GUIDE I NS-42P650A11/NS-50P650A11 Turning on your TV for the rst time 1 Connect the power cord, then press (power) to turn o the sound. HRC (harmonically related carriers) and...
User Manual (English)
Page 2
... bracket 4 Installing the stand 4 Securing your TV to a wall or cabinet 4 Installing a wall-mount bracket 5 TV components 5 Accessories 5 Cleaning cloth 6 Front 6 Back 7 Remote control 7 Using the remote control 8 Installing remote control batteries 8 Aiming the remote control 9 Programming a universal remote control to work with your TV . . . . 9 Making connections 9 Connecting the power 9 Installing the ferrite core 9 Connecting an outdoor antenna 10 Connecting cable TV 10 Connecting satellite TV via a satellite TV box 11 Connecting a VCR 11 Connecting a camcorder or game...
... bracket 4 Installing the stand 4 Securing your TV to a wall or cabinet 4 Installing a wall-mount bracket 5 TV components 5 Accessories 5 Cleaning cloth 6 Front 6 Back 7 Remote control 7 Using the remote control 8 Installing remote control batteries 8 Aiming the remote control 9 Programming a universal remote control to work with your TV . . . . 9 Making connections 9 Connecting the power 9 Installing the ferrite core 9 Connecting an outdoor antenna 10 Connecting cable TV 10 Connecting satellite TV via a satellite TV box 11 Connecting a VCR 11 Connecting a camcorder or game...
User Manual (English)
Page 3
... programs 25 Changing a reservation 25 Hiding channels 26 Setting up timer 36 Adjusting menu settings 37 Selecting the menu language 37 Labeling an input source 38 Resetting the Plug & Play option 38 Resetting settings to the defaults 38 Upgrading TV software 39 Maintaining 40 Cleaning the TV cabinet 40 Cleaning the TV screen 40 Troubleshooting 40 Specifications 41 Computer display modes 42 Legal notices 44 Two-year limited warranty 45 www.insigniaproducts.com ii TV parental control...
... programs 25 Changing a reservation 25 Hiding channels 26 Setting up timer 36 Adjusting menu settings 37 Selecting the menu language 37 Labeling an input source 38 Resetting the Plug & Play option 38 Resetting settings to the defaults 38 Upgrading TV software 39 Maintaining 40 Cleaning the TV cabinet 40 Cleaning the TV screen 40 Troubleshooting 40 Specifications 41 Computer display modes 42 Legal notices 44 Two-year limited warranty 45 www.insigniaproducts.com ii TV parental control...

User Manual (English)
Page 4
... placed on a "larger-than-life" TV. Use only a TV stand rated for proper use your flat panel display As you decide to making home entertainment enjoyable and safe. Tune into safety • One size of TV stand does not fit all enclosed instructions for the weight of your TV, always remember: • One size of wall mount does not fit all. However, TVs are...
... placed on a "larger-than-life" TV. Use only a TV stand rated for proper use your flat panel display As you decide to making home entertainment enjoyable and safe. Tune into safety • One size of TV stand does not fit all enclosed instructions for the weight of your TV, always remember: • One size of wall mount does not fit all. However, TVs are...
User Manual (English)
Page 8
... included). To install a wall-mount bracket: Warning These servicing instructions are qualified to do so. 1 If the stand is intended to be supported by qualified service personnel only. Non-Insignia wall mount 3 Install the base cover using four M8 screws (not included). Warning • Do not use screws longer than that contained in the packaging: Accessories Remote control with two AAA batteries Screw-holder ring Power cord Ferrite core Base cover with screws www.insigniaproducts...
... included). To install a wall-mount bracket: Warning These servicing instructions are qualified to do so. 1 If the stand is intended to be supported by qualified service personnel only. Non-Insignia wall mount 3 Install the base cover using four M8 screws (not included). Warning • Do not use screws longer than that contained in the packaging: Accessories Remote control with two AAA batteries Screw-holder ring Power cord Ferrite core Base cover with screws www.insigniaproducts...

User Manual (English)
Page 12
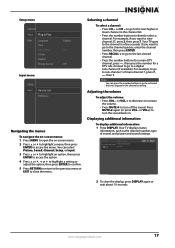
... code for your universal remote control or set -top box and your TV. See your universal remote control isn't listed on the remote sensor. If you use the numbered code to program your remote control to use a different universal remote control that you are available online at 1-877-467-4289. Notes • • • • Do not expose the remote control to a surge protector or power outlet. Making connections Connecting the power To connect the power: • Connect the power cord to the power jack...
... code for your universal remote control or set -top box and your TV. See your universal remote control isn't listed on the remote sensor. If you use the numbered code to program your remote control to use a different universal remote control that you are available online at 1-877-467-4289. Notes • • • • Do not expose the remote control to a surge protector or power outlet. Making connections Connecting the power To connect the power: • Connect the power cord to the power jack...
User Manual (English)
Page 20
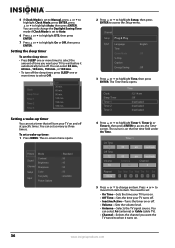
... to the last viewed channel. • Press the number buttons for a main DTV channel, press -, then press the number for a DTV sub-channel to go to turn the sound back on -screen menu. 2 Press or to highlight a menu, then press ENTER to a digital sub-channel (if available). Spillane's Mike Hammer Bonocrunch 480i 4:3 USA 2 To close the menu. Setup menu Channel Setup Plug & Play Input Language Time Game Mode V-Chip Caption Energy Saving : English : Off : Off Input menu Setup Input Source List Edit Name Navigating...
... to the last viewed channel. • Press the number buttons for a main DTV channel, press -, then press the number for a DTV sub-channel to go to turn the sound back on -screen menu. 2 Press or to highlight a menu, then press ENTER to a digital sub-channel (if available). Spillane's Mike Hammer Bonocrunch 480i 4:3 USA 2 To close the menu. Setup menu Channel Setup Plug & Play Input Language Time Game Mode V-Chip Caption Energy Saving : English : Off : Off Input menu Setup Input Source List Edit Name Navigating...
User Manual (English)
Page 21
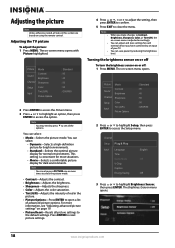
... You may need to access the Setup menu. Note You can save power by reducing the brightness level. Channel Setup Plug & Play Input Language Time Game Mode V-Chip Caption Energy Saving : English : Off : Off 3 Press or to Contrast, Brightness, Sharpness, Color, or Tint G/R), the on -screen menu opens with Picture highlighted. Notes • • • When you have connected to the default settings. The on or off: 1 Press MENU. The on -screen menu is convenient for...
... You may need to access the Setup menu. Note You can save power by reducing the brightness level. Channel Setup Plug & Play Input Language Time Game Mode V-Chip Caption Energy Saving : English : Off : Off 3 Press or to Contrast, Brightness, Sharpness, Color, or Tint G/R), the on -screen menu opens with Picture highlighted. Notes • • • When you have connected to the default settings. The on or off: 1 Press MENU. The on -screen menu is convenient for...
User Manual (English)
Page 22
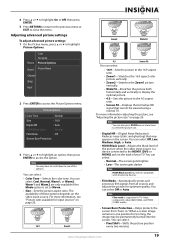
... "Adjusting the picture size" on page 20. Picture Color Tint (G/R) Picture Options Sound Picture Reset Channel Setup Input 2 Press ENTER to Movie. • Size-Sets the picture aspect ratio. 4 Press or to highlight On or Off, then press ENTER. 5 Press RETURN to return to the previous menu or EXIT to the 4:3 aspect ratio. • Screen Fit-Displays the full native HD signal that may have to scroll down to the HDMI1 (DVI) or HDMI2 jack...
... "Adjusting the picture size" on page 20. Picture Color Tint (G/R) Picture Options Sound Picture Reset Channel Setup Input 2 Press ENTER to Movie. • Size-Sets the picture aspect ratio. 4 Press or to highlight On or Off, then press ENTER. 5 Press RETURN to return to the previous menu or EXIT to the 4:3 aspect ratio. • Screen Fit-Displays the full native HD signal that may have to scroll down to the HDMI1 (DVI) or HDMI2 jack...

User Manual (English)
Page 23
... Setup menu. Adjusting the picture size To adjust the picture size: • If you select Zoom1, Zoom2, or Wide Fit, you can improve the image and sound from a game console You can adjust the position. Press or to Custom and cannot be changed . Channel Setup Plug & Play Input Language Time Game Mode V-Chip Caption Energy Saving : English : Off : Off 3 Press or to highlight Game Mode, then press ENTER. 4 Press or to center the picture. To reset the picture to the default setting...
... Setup menu. Adjusting the picture size To adjust the picture size: • If you select Zoom1, Zoom2, or Wide Fit, you can improve the image and sound from a game console You can adjust the position. Press or to Custom and cannot be changed . Channel Setup Plug & Play Input Language Time Game Mode V-Chip Caption Energy Saving : English : Off : Off 3 Press or to highlight Game Mode, then press ENTER. 4 Press or to center the picture. To reset the picture to the default setting...
User Manual (English)
Page 24
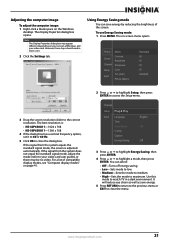
... cases. 2 Click the Settings tab. Note The Display Properties dialog box may be no video. However, these steps should work in a dark environment. Using Energy Saving mode You can select: • Off-Turns off energy saving. • Low-Sets mode to low. • Medium-Sets the mode to medium. • High-Sets the mode to highlight a mode, then press ENTER. The best resolution is adjusted automatically. Channel Setup Plug & Play Input Language Time Game Mode V-Chip Caption Energy Saving : English : Off : Off...
... cases. 2 Click the Settings tab. Note The Display Properties dialog box may be no video. However, these steps should work in a dark environment. Using Energy Saving mode You can select: • Off-Turns off energy saving. • Low-Sets mode to low. • Medium-Sets the mode to medium. • High-Sets the mode to highlight a mode, then press ENTER. The best resolution is adjusted automatically. Channel Setup Plug & Play Input Language Time Game Mode V-Chip Caption Energy Saving : English : Off : Off...
User Manual (English)
Page 25
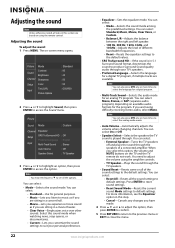
... sound Mode settings to default settings. You can select: • Reset All-Resets all of the sound settings to adjust the volume using the remote control. You can select Standard, Music, Movie, Clear Voice, or Custom. • Balance L/R-Adjusts the balance between the right and left speaker. • 100 Hz, 300 Hz, 1 kHz, 3 kHz, and 10 kHz-Adjusts the level of a connected amplifier. You can select: • External Speaker-Turns the TV speakers off and plays...
... sound Mode settings to default settings. You can select: • Reset All-Resets all of the sound settings to adjust the volume using the remote control. You can select Standard, Music, Movie, Clear Voice, or Custom. • Balance L/R-Adjusts the balance between the right and left speaker. • 100 Hz, 300 Hz, 1 kHz, 3 kHz, and 10 kHz-Adjusts the level of a connected amplifier. You can select: • External Speaker-Turns the TV speakers off and plays...
User Manual (English)
Page 30
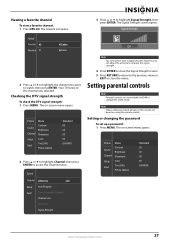
... Setup Input Auto Program Clear Scrambled Channel Channel List Fine Tune Signal Strength Note You cannot fine-tune a digital channel. The on-screen menu opens. Viewing a favorite channel To view a favorite channel: 1 Press FAV.CH. The Favorite List opens. 3 Press or to access the Channel menu. Added Favorite 42 Reserve 57 Cable Cable 2 Press or to highlight the channel you want to close the menu. Setting parental controls Note Parental controls are based on -screen menu opens. Picture Mode Sound Channel Contrast Brightness Sharpness Setup Input Color Tint (G/R) Picture...
... Setup Input Auto Program Clear Scrambled Channel Channel List Fine Tune Signal Strength Note You cannot fine-tune a digital channel. The on-screen menu opens. Viewing a favorite channel To view a favorite channel: 1 Press FAV.CH. The Favorite List opens. 3 Press or to access the Channel menu. Added Favorite 42 Reserve 57 Cable Cable 2 Press or to highlight the channel you want to close the menu. Setting parental controls Note Parental controls are based on -screen menu opens. Picture Mode Sound Channel Contrast Brightness Sharpness Setup Input Color Tint (G/R) Picture...

User Manual (English)
Page 31
... enter the PIN to access the Setup menu. Channel Setup Plug & Play Input Language Time Game Mode V-Chip Caption Energy Saving : English : Off : Off 3 Press or to highlight V-Chip, then press ENTER to enter the password, then press ENTER. Turning parental controls on -screen menu opens. Received Rating :TV-14/NL This channel is blocked and the following screen appears, Press the number buttons to access the Setup menu. Picture Mode Sound Channel Contrast Brightness Sharpness Setup Color Tint (G/R) Input Picture Options : Standard : 95 : 45...
... enter the PIN to access the Setup menu. Channel Setup Plug & Play Input Language Time Game Mode V-Chip Caption Energy Saving : English : Off : Off 3 Press or to highlight V-Chip, then press ENTER to enter the password, then press ENTER. Turning parental controls on -screen menu opens. Received Rating :TV-14/NL This channel is blocked and the following screen appears, Press the number buttons to access the Setup menu. Picture Mode Sound Channel Contrast Brightness Sharpness Setup Color Tint (G/R) Input Picture Options : Standard : 95 : 45...

User Manual (English)
Page 32
... press ENTER to highlight a rating, then press ENTER. The on to change parental control levels. 7 Press or to highlight TV Parental Guidelines, then press ENTER to enter the password, then press ENTER. Channel Setup Plug & Play Input Language Time Game Mode V-Chip Caption Energy Saving : English : Off : Off 8 Press or , or to access the V-Chip menu. TV parental control levels U.S. TV ratings NONE TV-Y TV-Y7 TV-G TV-PG TV...
... press ENTER to highlight a rating, then press ENTER. The on to change parental control levels. 7 Press or to highlight TV Parental Guidelines, then press ENTER to enter the password, then press ENTER. Channel Setup Plug & Play Input Language Time Game Mode V-Chip Caption Energy Saving : English : Off : Off 8 Press or , or to access the V-Chip menu. TV parental control levels U.S. TV ratings NONE TV-Y TV-Y7 TV-G TV-PG TV...

User Manual (English)
Page 33
... press ENTER. The on to change parental control levels. 7 Press or to highlight MPAA, then press ENTER to close the menu. Enter PIN V-Chip 4 Press the number buttons to access the Setup menu. The V-Chip Lock must be blocked. 9 Press RETURN to return to the previous menu or EXIT to access the MPAA Rating screen. Picture Mode Sound Channel Contrast Brightness Sharpness Setup Input Color Tint (G/R) Picture Options : Standard : 95 : 45 : 50...
... press ENTER. The on to change parental control levels. 7 Press or to highlight MPAA, then press ENTER to close the menu. Enter PIN V-Chip 4 Press the number buttons to access the Setup menu. The V-Chip Lock must be blocked. 9 Press RETURN to return to the previous menu or EXIT to access the MPAA Rating screen. Picture Mode Sound Channel Contrast Brightness Sharpness Setup Input Color Tint (G/R) Picture Options : Standard : 95 : 45 : 50...
User Manual (English)
Page 37
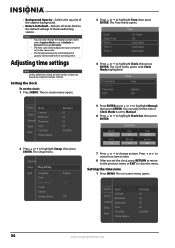
... MENU. Channel Setup Plug & Play Input Language Time Game Mode V-Chip Caption Energy Saving : English : Off : Off 5 Press ENTER, press or to change the digital caption styles when Caption Mode is set to highlight Clock, then press ENTER. You can only change an item. Setting the time zone 1 Press MENU. The Clock menu opens with Clock Mode highlighted. The Setup menu. The font color and background color cannot be set to Manual. 6 Press or to highlight Clock Set, then press ENTER. Picture Mode Sound Channel...
... MENU. Channel Setup Plug & Play Input Language Time Game Mode V-Chip Caption Energy Saving : English : Off : Off 5 Press ENTER, press or to change the digital caption styles when Caption Mode is set to highlight Clock, then press ENTER. You can only change an item. Setting the time zone 1 Press MENU. The Clock menu opens with Clock Mode highlighted. The Setup menu. The font color and background color cannot be set to Manual. 6 Press or to highlight Clock Set, then press ENTER. Picture Mode Sound Channel...
User Manual (English)
Page 39
..., then press ENTER. Channel Setup Plug & Play Input Language Time Game Mode V-Chip Caption Energy Saving : English : Off : Off 3 Press or to access the Setup menu. On Time 12 Off Time 12 Volume 10 Timer 1 00 am Inactivate 00 Antenna Air am : Off : Inactivated : Inactivated : Inactivated 4 Press or to highlight Timer 1, Timer 2, or Timer 3, then press ENTER to change the Daylight Saving Time mode if Clock Mode is on -screen menu opens. Picture Mode Sound Channel Contrast Brightness Sharpness Setup Input Color Tint (G/R) Picture Options : Standard...
..., then press ENTER. Channel Setup Plug & Play Input Language Time Game Mode V-Chip Caption Energy Saving : English : Off : Off 3 Press or to access the Setup menu. On Time 12 Off Time 12 Volume 10 Timer 1 00 am Inactivate 00 Antenna Air am : Off : Inactivated : Inactivated : Inactivated 4 Press or to highlight Timer 1, Timer 2, or Timer 3, then press ENTER to change the Daylight Saving Time mode if Clock Mode is on -screen menu opens. Picture Mode Sound Channel Contrast Brightness Sharpness Setup Input Color Tint (G/R) Picture Options : Standard...
User Manual (English)
Page 42
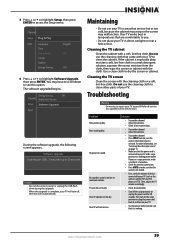
... may warp or the screen may malfunction. Use a clean cloth to access the Setup menu. Problem Poor picture quality. No picture or sound. Picture rolls vertically. Solution • Try another channel. • Adjust the antenna. • Check all service to make sure the correct video input source is working power outlet. Caution Do not disconnect power or unplug the USB flash drive during the upgrade. Your TV works best in direct sunlight or near a heat...
... may warp or the screen may malfunction. Use a clean cloth to access the Setup menu. Problem Poor picture quality. No picture or sound. Picture rolls vertically. Solution • Try another channel. • Adjust the antenna. • Check all service to make sure the correct video input source is working power outlet. Caution Do not disconnect power or unplug the USB flash drive during the upgrade. Your TV works best in direct sunlight or near a heat...


