

Warranty (English)
Page 1
...? All other than 37 inches, please take your Insignia Product during the Warranty Period. Products and parts replaced under this product or any contact including but not limited to the address listed on the receipt you received with a screen 37 inches or larger, in -home warranty service ...for Future Shop call 1-877-467-4289 www.insigniaproducts.com Distributed by static (non-moving) images applied for 2 years (730 days) from a Best Buy or Future Shop authorized dealer of Insignia brand products only that ...
...? All other than 37 inches, please take your Insignia Product during the Warranty Period. Products and parts replaced under this product or any contact including but not limited to the address listed on the receipt you received with a screen 37 inches or larger, in -home warranty service ...for Future Shop call 1-877-467-4289 www.insigniaproducts.com Distributed by static (non-moving) images applied for 2 years (730 days) from a Best Buy or Future Shop authorized dealer of Insignia brand products only that ...
Quick Setup Guide (English)
Page 1
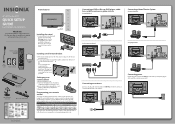
...four screws securing it to the TV and remove the stand. 2 For an Insignia wall mount, attach the wall-mount bracket to the back of your universal Insignia remote control to the screen. Programming your remote control To program an existing universal remote control to come. ... remote control code, visit www.insigniaproducts.com for years to work with other end of this ne Insignia television. Front features 42"/50" Plasma HDTV QUICK SETUP GUIDE NS-42P650A11/NS-50P650A11 Thank You for purchasing this product for the latest remote control code information. Remote control and 2...
...four screws securing it to the TV and remove the stand. 2 For an Insignia wall mount, attach the wall-mount bracket to the back of your universal Insignia remote control to the screen. Programming your remote control To program an existing universal remote control to come. ... remote control code, visit www.insigniaproducts.com for years to work with other end of this ne Insignia television. Front features 42"/50" Plasma HDTV QUICK SETUP GUIDE NS-42P650A11/NS-50P650A11 Thank You for purchasing this product for the latest remote control code information. Remote control and 2...
Quick Setup Guide (English)
Page 2
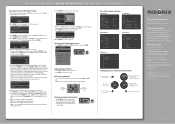
... list. We're here for helpful information from a digital channel) or Manual (to manually set the time using the number buttons. All other Insignia TV owners. Plug & Play Select Language of their respective owners. Language : English 3 Press ENTER to access the menu, then press to highlight...42"/50" PLASMA HDTV I QUICK SETUP GUIDE I NS-42P650A11/NS-50P650A11 Turning on your TV for the rst time 1 Connect the power cord, then press (power) to turn o the sound. Selecting a channel • To move the cursor on the screen or to adjust a selected item Press to select menu...
... list. We're here for helpful information from a digital channel) or Manual (to manually set the time using the number buttons. All other Insignia TV owners. Plug & Play Select Language of their respective owners. Language : English 3 Press ENTER to access the menu, then press to highlight...42"/50" PLASMA HDTV I QUICK SETUP GUIDE I NS-42P650A11/NS-50P650A11 Turning on your TV for the rst time 1 Connect the power cord, then press (power) to turn o the sound. Selecting a channel • To move the cursor on the screen or to adjust a selected item Press to select menu...
User Manual (English)
Page 2
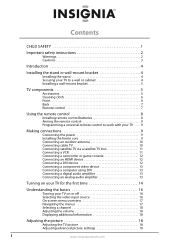
... your TV for the first time 14 Understanding the basics 16 Turning your TV on or off 16 Selecting the video input source 16 On-screen menu overview 17 Navigating the menus 17 Selecting a channel 18 Adjusting the volume 18 Displaying additional information 18 Adjusting the picture 18 Adjusting the TV...
... your TV for the first time 14 Understanding the basics 16 Turning your TV on or off 16 Selecting the video input source 16 On-screen menu overview 17 Navigating the menus 17 Selecting a channel 18 Adjusting the volume 18 Displaying additional information 18 Adjusting the picture 18 Adjusting the TV...
User Manual (English)
Page 3
... the Plug & Play option 38 Resetting settings to the defaults 38 Upgrading TV software 39 Maintaining 40 Cleaning the TV cabinet 40 Cleaning the TV screen 40 Troubleshooting 40 Specifications 41 Computer display modes 42 Legal notices 44 Two-year limited warranty 45 www.insigniaproducts.com ii Contents Improving the image...
... the Plug & Play option 38 Resetting settings to the defaults 38 Upgrading TV software 39 Maintaining 40 Cleaning the TV cabinet 40 Cleaning the TV screen 40 Troubleshooting 40 Specifications 41 Computer display modes 42 Legal notices 44 Two-year limited warranty 45 www.insigniaproducts.com ii Contents Improving the image...
User Manual (English)
Page 5
...been exposed to rain or moisture, does not operate normally, or has been dropped. 15 The wall plug is the disconnecting device. If the screen breaks, be grounded to keep from the type of electric shock is present within your TV is in any heat sources such as vases, ... When a cart is made of broken glass. If you connect the Class I apparatus which needs to be careful of glass. Handling the TV screen Your TV's screen is used, use this device, ask the service technician to perform routine safety checks to qualified service technicians. A grounding type plug has two blades...
...been exposed to rain or moisture, does not operate normally, or has been dropped. 15 The wall plug is the disconnecting device. If the screen breaks, be grounded to keep from the type of electric shock is present within your TV is in any heat sources such as vases, ... When a cart is made of broken glass. If you connect the Class I apparatus which needs to be careful of glass. Handling the TV screen Your TV's screen is used, use this device, ask the service technician to perform routine safety checks to qualified service technicians. A grounding type plug has two blades...
User Manual (English)
Page 6
... way. • When your local authorities or the Electronic Industries Alliance at heights under the following the operating instructions. Non-active pixels The TV screen contains almost 3 million thin-film transistors, which provide exceptionally sharp video quality. Heat on , or make sure that can only operate normally at ...this, let the TV stand in its normal operation. • If your TV has been dropped or damaged in damage and will form on the screen as a fixed blue, green, or red point. Occasionally, a few non-active pixels may also form during the summer if the TV is ...
... way. • When your local authorities or the Electronic Industries Alliance at heights under the following the operating instructions. Non-active pixels The TV screen contains almost 3 million thin-film transistors, which provide exceptionally sharp video quality. Heat on , or make sure that can only operate normally at ...this, let the TV stand in its normal operation. • If your TV has been dropped or damaged in damage and will form on the screen as a fixed blue, green, or red point. Occasionally, a few non-active pixels may also form during the summer if the TV is ...
User Manual (English)
Page 7
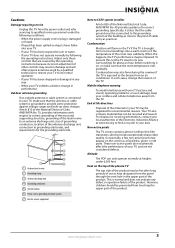
Wall Cabinet 4 www.insigniaproducts.com Your NS-42P650A11 or NS-50P650A11 represents the state of the art in serious injury or damage to your TV. • For added stability, secure your purchase of damage to the screen. 1 Secure the base to the stand with the four included screws. You should... screw. 2 Mount a screw (not provided) to the wall or cabinet where your TV upright because of the possibility of a high-quality Insignia product. Introduction Congratulations on your TV can install the anti-fall device, contact a professional installer. • Be sure to use two people ...
Wall Cabinet 4 www.insigniaproducts.com Your NS-42P650A11 or NS-50P650A11 represents the state of the art in serious injury or damage to your TV. • For added stability, secure your purchase of damage to the screen. 1 Secure the base to the stand with the four included screws. You should... screw. 2 Mount a screw (not provided) to the wall or cabinet where your TV upright because of the possibility of a high-quality Insignia product. Introduction Congratulations on your TV can install the anti-fall device, contact a professional installer. • Be sure to use two people ...
User Manual (English)
Page 9
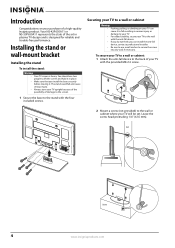
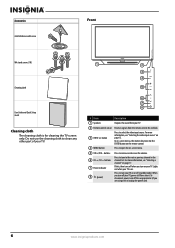
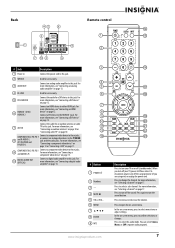
... your TV on or off the surge protector (if you turn off your TV is for cleaning the TV screen only. buttons 6 CH /CH buttons 7 Power indicator 8 (power) Press to open the on-screen menu. 5 VOL+/VOL- Blinks, then turns off when you are using one) or unplug the power cord. 6 www....insigniaproducts.com In on-screen menus, this button functions like the ENTER button on the remote control. 4 MENU button Press to increase or decrease the volume. Press to clean any ...
... your TV on or off the surge protector (if you turn off your TV is for cleaning the TV screen only. buttons 6 CH /CH buttons 7 Power indicator 8 (power) Press to open the on-screen menu. 5 VOL+/VOL- Blinks, then turns off when you are using one) or unplug the power cord. 6 www....insigniaproducts.com In on-screen menus, this button functions like the ENTER button on the remote control. 4 MENU button Press to increase or decrease the volume. Press to clean any ...
User Manual (English)
Page 10
...connect an analog video device to this jack. For more information, see "Connecting a component video device" on page 13 or "Connecting a VCR" on -screen menu. Press to open the on page 11. 9 COMPONENT IN 2 PR, PB, Y and AUDIO L/R Connect a component video device to this jack...-L Connect a component video device to these jacks. Press to increase or decrease the volume. For more information, see "Selecting a channel" on -screen menu, press to select the audio mode. Back Remote control # Jack Description 1 Power in Connect the power cord to this jack. 2 SERVICE ...
...connect an analog video device to this jack. For more information, see "Connecting a component video device" on page 13 or "Connecting a VCR" on -screen menu. Press to open the on page 11. 9 COMPONENT IN 2 PR, PB, Y and AUDIO L/R Connect a component video device to this jack...-L Connect a component video device to these jacks. Press to increase or decrease the volume. For more information, see "Selecting a channel" on -screen menu, press to select the audio mode. Back Remote control # Jack Description 1 Power in Connect the power cord to this jack. 2 SERVICE ...
User Manual (English)
Page 11
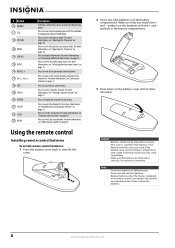
Not available in the channel list. For more information, see "Adjusting the TV picture" on -screen menu. Press to close the on page 18. Press to set the sleep timer. Press to open the channel list. For more information, see "Setting a ... batteries are disposed of correctly. If the batteries leak, clean the battery compartment with the + and - For more information, see "Adjusting the TV picture" on -screen menu, press to return to excessive heat, such as sunshine, heat registers, or fire. • Battery chemicals can cause a rash. Press to select the sound...
Not available in the channel list. For more information, see "Adjusting the TV picture" on -screen menu. Press to close the on page 18. Press to set the sleep timer. Press to open the channel list. For more information, see "Setting a ... batteries are disposed of correctly. If the batteries leak, clean the battery compartment with the + and - For more information, see "Adjusting the TV picture" on -screen menu, press to return to excessive heat, such as sunshine, heat registers, or fire. • Battery chemicals can cause a rash. Press to select the sound...
User Manual (English)
Page 17
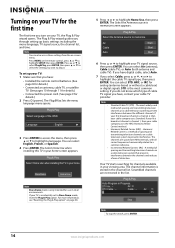
... select English, French, or Spanish. 4 Press ENTER. Language : English 3 Press ENTER to access the menu, then press or to memorize screen appears. If your first broadcast channel is channel 1, then your cable company uses the HRC (Harmonic Relate Carrier) method. You can also access... these settings from the on-screen menu. Store Demo Home Use Note Store Demo mode is accidentally set up basic settings including the menu language, TV signal source,...
... select English, French, or Spanish. 4 Press ENTER. Language : English 3 Press ENTER to access the menu, then press or to memorize screen appears. If your first broadcast channel is channel 1, then your cable company uses the HRC (Harmonic Relate Carrier) method. You can also access... these settings from the on-screen menu. Store Demo Home Use Note Store Demo mode is accidentally set up basic settings including the menu language, TV signal source,...
User Manual (English)
Page 18
... protector or unplug the power cord. Turning your TV on or off To turn off : 1 Make sure that it . Plug & Play Enjoy your TV screen opens. Plug & Play Newfoundland Atlantic Eastern Central Mountain Pacific ▼ 13 Press ENTER. OK 8 Press ENTER, then press or to highlight Auto (to turn...information from a digital channel. 10 Press ENTER. If you are based on your TV and a surge protector or power outlet. The Set the time zone screen appears. Clock Mode : Auto 12 Press ENTER. Your TV goes into it is turned on. 2 Press (power) to turn off the daylight saving ...
... protector or unplug the power cord. Turning your TV on or off To turn off : 1 Make sure that it . Plug & Play Enjoy your TV screen opens. Plug & Play Newfoundland Atlantic Eastern Central Mountain Pacific ▼ 13 Press ENTER. OK 8 Press ENTER, then press or to highlight Auto (to turn...information from a digital channel. 10 Press ENTER. If you are based on your TV and a surge protector or power outlet. The Set the time zone screen appears. Clock Mode : Auto 12 Press ENTER. Your TV goes into it is turned on. 2 Press (power) to turn off the daylight saving ...
User Manual (English)
Page 19
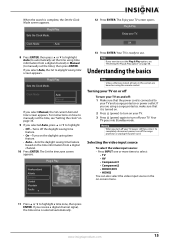
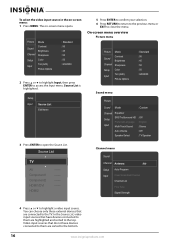
...; TV ▼ AV ---- HDMI2 - In the Source List, video input sources that do not have devices connected to them are connected to the top. On-screen menu overview Picture menu Picture Mode Sound Channel Contrast Brightness Sharpness Setup Input Color Tint (G/R) Picture Options : Standard : 95 : 45 : 50 : 50 : G50/R50 Sound... highlight Input, then press ENTER to open the Source List. Source List is highlighted. HDMI1/DVI ---- To select the video input source in the on -screen menu opens. Component2 ---- The on...
...; TV ▼ AV ---- HDMI2 - In the Source List, video input sources that do not have devices connected to them are connected to the top. On-screen menu overview Picture menu Picture Mode Sound Channel Contrast Brightness Sharpness Setup Input Color Tint (G/R) Picture Options : Standard : 95 : 45 : 50 : 50 : G50/R50 Sound... highlight Input, then press ENTER to open the Source List. Source List is highlighted. HDMI1/DVI ---- To select the video input source in the on -screen menu opens. Component2 ---- The on...
User Manual (English)
Page 20
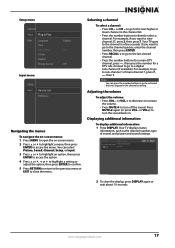
... close the display, press DISPLAY again or wait about 10 seconds. Press MUTE again (or press VOL- or VOL+) to turn the sound back on -screen menu. 2 Press or to highlight a menu, then press ENTER to the channel in the channel scanning. or VOL + to decrease or increase the volume. •... Time Game Mode V-Chip Caption Energy Saving : English : Off : Off Input menu Setup Input Source List Edit Name Navigating the menus To navigate the on-screen menus: 1 Press MENU to open the on . You can press the number buttons to go to the next higher or lower channel in the channel...
... close the display, press DISPLAY again or wait about 10 seconds. Press MUTE again (or press VOL- or VOL+) to turn the sound back on -screen menu. 2 Press or to highlight a menu, then press ENTER to the channel in the channel scanning. or VOL + to decrease or increase the volume. •... Time Game Mode V-Chip Caption Energy Saving : English : Off : Off Input menu Setup Input Source List Edit Name Navigating the menus To navigate the on-screen menus: 1 Press MENU to open the on . You can press the number buttons to go to the next higher or lower channel in the channel...
User Manual (English)
Page 21
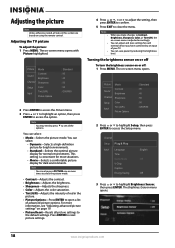
..., see all tasks in the picture. • Picture Options-Press ENTER to Contrast, Brightness, Sharpness, Color, or Tint G/R), the on -screen menu opens. You can select: • Dynamic-Selects a high-definition picture for bright environments. • Standard-Selects the optimal picture display for.... You can adjust and store settings for each external device you make changes to open a list of your TV. The on -screen menu is convenient for most situations. • Movie-Selects a comfortable picture display for normal environments. Adjusting the picture Note Unless otherwise...
..., see all tasks in the picture. • Picture Options-Press ENTER to Contrast, Brightness, Sharpness, Color, or Tint G/R), the on -screen menu opens. You can select: • Dynamic-Selects a high-definition picture for bright environments. • Standard-Selects the optimal picture display for.... You can adjust and store settings for each external device you make changes to open a list of your TV. The on -screen menu is convenient for most situations. • Movie-Selects a comfortable picture display for normal environments. Adjusting the picture Note Unless otherwise...
User Manual (English)
Page 22
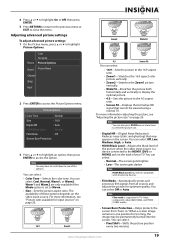
...source. www.insigniaproducts.com 19 Picture Options Color Tone : Normal Size : 16:9 Digital NR : Auto HDMI Black Level : Normal Film Mode : Off Screen Burn Protection 3 Press or to highlight an option, then press ENTER to close the menu. Note You can select Off, Low, Medium, High, or... Reduction) Reduces noise (static and ghosting) that cannot be viewed using a normal TV. For more times to the 4:3 aspect ratio. • Screen Fit-Displays the full native HD signal that may be compatible with all sources and adjusts the picture for too long, the image may appear...
...source. www.insigniaproducts.com 19 Picture Options Color Tone : Normal Size : 16:9 Digital NR : Auto HDMI Black Level : Normal Film Mode : Off Screen Burn Protection 3 Press or to highlight an option, then press ENTER to close the menu. Note You can select Off, Low, Medium, High, or... Reduction) Reduces noise (static and ghosting) that cannot be viewed using a normal TV. For more times to the 4:3 aspect ratio. • Screen Fit-Displays the full native HD signal that may be compatible with all sources and adjusts the picture for too long, the image may appear...

User Manual (English)
Page 23
...4:3 picture size, sets the sides of your TV. Picture sizes available for each external device you made need to center the picture. The on -screen menu, the menu shakes slightly. 20 www.insigniaproducts.com Press ENTER to reset picture settings. 4 Press or , or to adjust the setting, then... (720p), Air DTV (1080i), Component (1080i, 1080p), HDMI (720p, 1080i, 1080p) Picture size 16:9, Zoom1, Zoom2, 4:3 16:9, Wide Fit, 4:3 16:9, 4:3, Wide Fit, Screen Fit Notes You can improve the image and sound from a game console by turning the Game Mode feature on or off . Press or to highlight...
...4:3 picture size, sets the sides of your TV. Picture sizes available for each external device you made need to center the picture. The on -screen menu, the menu shakes slightly. 20 www.insigniaproducts.com Press ENTER to reset picture settings. 4 Press or , or to adjust the setting, then... (720p), Air DTV (1080i), Component (1080i, 1080p), HDMI (720p, 1080i, 1080p) Picture size 16:9, Zoom1, Zoom2, 4:3 16:9, Wide Fit, 4:3 16:9, 4:3, Wide Fit, Screen Fit Notes You can improve the image and sound from a game console by turning the Game Mode feature on or off . Press or to highlight...
User Manual (English)
Page 24
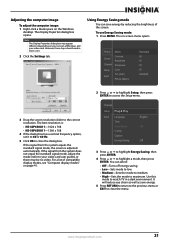
.... It will reduce eye strain as well as save energy by reducing the brightness of the screen. If the signal from the system equals the standard signal mode, the screen is : • NS-42P650A11-1024 x 768 • NS-50P650A11-1360 x 768 4 If the dialog box has a vertical frequency option, set it to 60 or 60...
.... It will reduce eye strain as well as save energy by reducing the brightness of the screen. If the signal from the system equals the standard signal mode, the screen is : • NS-42P650A11-1024 x 768 • NS-50P650A11-1360 x 768 4 If the dialog box has a vertical frequency option, set it to 60 or 60...
User Manual (English)
Page 25
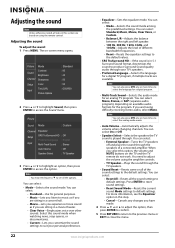
...-Lets you customize the sound settings to access the option. Adjusting the sound Note Unless otherwise noted, all tasks in this section are based on -screen menu opens. Adjusting the sound To adjust the sound: 1 Press MENU. When you select this step. • Cancel-Cancels any changes you have made. 4 Press...
...-Lets you customize the sound settings to access the option. Adjusting the sound Note Unless otherwise noted, all tasks in this section are based on -screen menu opens. Adjusting the sound To adjust the sound: 1 Press MENU. When you select this step. • Cancel-Cancels any changes you have made. 4 Press...


