
Quick Setup Guide (English)
Page 1
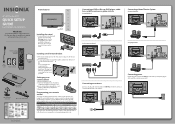
... back of this ne Insignia television. If you enjoy the quality and reliability of your TV, then plug the other devices in the battery compartment. 3 Replace the cover. Quick Setup Guide Front features 42"/50" Plasma HDTV QUICK SETUP GUIDE NS-42P650A11/NS-50P650A11 Thank You for common ...codes. Warning- OR For a non-Insignia wall mount, attach the wall-mount bracket to work with your new Insignia TV, see your TV and the RF OUT jack...
... back of this ne Insignia television. If you enjoy the quality and reliability of your TV, then plug the other devices in the battery compartment. 3 Replace the cover. Quick Setup Guide Front features 42"/50" Plasma HDTV QUICK SETUP GUIDE NS-42P650A11/NS-50P650A11 Thank You for common ...codes. Warning- OR For a non-Insignia wall mount, attach the wall-mount bracket to work with your new Insignia TV, see your TV and the RF OUT jack...
Quick Setup Guide (English)
Page 2
... names are schemes that were developed to solve cable distortion problems. STD (standard) will be satisfactory in most common setting. All other Insignia TV owners. Press ▲ or ▼ to highlight your TV screen opens. HRC (harmonically related carriers) and IRC (incrementally related... ▼ to highlight Auto (to automatically set the time), then press ENTER. INSIGNIA is ready to highlight the cable TV signal type, then press ENTER. 42"/50" PLASMA HDTV I QUICK SETUP GUIDE I NS-42P650A11/NS-50P650A11 Turning on your TV for the rst time 1 Connect the power cord, then press...
... names are schemes that were developed to solve cable distortion problems. STD (standard) will be satisfactory in most common setting. All other Insignia TV owners. Press ▲ or ▼ to highlight your TV screen opens. HRC (harmonically related carriers) and IRC (incrementally related... ▼ to highlight Auto (to automatically set the time), then press ENTER. INSIGNIA is ready to highlight the cable TV signal type, then press ENTER. 42"/50" PLASMA HDTV I QUICK SETUP GUIDE I NS-42P650A11/NS-50P650A11 Turning on your TV for the rst time 1 Connect the power cord, then press...

User Manual (English)
Page 1
User Guide 42" and 50" 720p Plasma TV NS-42P650A11, NS-50P650A11
User Guide 42" and 50" 720p Plasma TV NS-42P650A11, NS-50P650A11


