
Quick Setup Guide (English)
Page 1
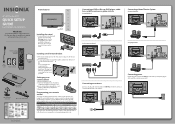
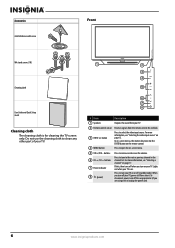
...four screws securing it to the TV and remove the stand. 2 For an Insignia wall mount, attach the wall-mount bracket to the back of this ne Insignia television. Front features 42"/50" Plasma HDTV QUICK SETUP GUIDE NS-42P650A11/NS-50P650A11 Thank You for purchasing this product... for years to come. Universal remote control TV codes (for all Insignia TVs manufactured after Jan. 1, 2007) Universal remote ...
...four screws securing it to the TV and remove the stand. 2 For an Insignia wall mount, attach the wall-mount bracket to the back of this ne Insignia television. Front features 42"/50" Plasma HDTV QUICK SETUP GUIDE NS-42P650A11/NS-50P650A11 Thank You for purchasing this product... for years to come. Universal remote control TV codes (for all Insignia TVs manufactured after Jan. 1, 2007) Universal remote ...
Quick Setup Guide (English)
Page 2
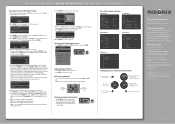
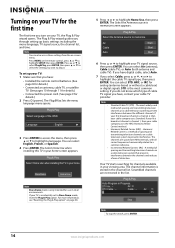
.... Check out our online community forum at www.insigniaproducts.com for helpful information from basic how-to steps to more advanced features. All other Insignia TV owners. If you have cable, select Auto. Adjusting the volume • Press VOL+ or VOL- OR • Enter the channel number...can select Air (antenna), Cable (cable TV), or Auto both antenna and cable TV). Press to change the volume Press to change the volume. • Press MUTE to turn on your TV. 42"/50" PLASMA HDTV I QUICK SETUP GUIDE I NS-42P650A11/NS-50P650A11 Turning on your TV for the rst time 1 Connect the ...
.... Check out our online community forum at www.insigniaproducts.com for helpful information from basic how-to steps to more advanced features. All other Insignia TV owners. If you have cable, select Auto. Adjusting the volume • Press VOL+ or VOL- OR • Enter the channel number...can select Air (antenna), Cable (cable TV), or Auto both antenna and cable TV). Press to change the volume Press to change the volume. • Press MUTE to turn on your TV. 42"/50" PLASMA HDTV I QUICK SETUP GUIDE I NS-42P650A11/NS-50P650A11 Turning on your TV for the rst time 1 Connect the ...

User Manual (English)
Page 1
User Guide 42" and 50" 720p Plasma TV NS-42P650A11, NS-50P650A11
User Guide 42" and 50" 720p Plasma TV NS-42P650A11, NS-50P650A11
User Manual (English)
Page 2
... safety instructions 2 Warnings 2 Cautions 3 Introduction 4 Installing the stand or wall-mount bracket 4 Installing the stand 4 Securing your TV to a wall or cabinet 4 Installing a wall-mount bracket 5 TV components 5 Accessories 5 Cleaning cloth 6 Front 6 Back 7 Remote control 7 Using the remote control 8 Installing remote control batteries ... a digital audio amplifier 13 Connecting an analog audio amplifier 13 Turning on your TV for the first time 14 Understanding the basics 16 Turning your TV on or off 16 Selecting the video input source 16 On-screen menu overview...
... safety instructions 2 Warnings 2 Cautions 3 Introduction 4 Installing the stand or wall-mount bracket 4 Installing the stand 4 Securing your TV to a wall or cabinet 4 Installing a wall-mount bracket 5 TV components 5 Accessories 5 Cleaning cloth 6 Front 6 Back 7 Remote control 7 Using the remote control 8 Installing remote control batteries ... a digital audio amplifier 13 Connecting an analog audio amplifier 13 Turning on your TV for the first time 14 Understanding the basics 16 Turning your TV on or off 16 Selecting the video input source 16 On-screen menu overview...
User Manual (English)
Page 3
... levels 29 Setting movie levels 30 Setting Canadian TV rating levels 31 Downloading rating information 31 Using closed captioning 33 Viewing closed captioning 33 Selecting the closed captioning mode 33 Customizing DTV closed captioning ... language 37 Labeling an input source 38 Resetting the Plug & Play option 38 Resetting settings to the defaults 38 Upgrading TV software 39 Maintaining 40 Cleaning the TV cabinet 40 Cleaning the TV screen 40 Troubleshooting 40 Specifications 41 Computer display modes 42 Legal notices 44 Two-year limited warranty 45 www.insigniaproducts...
... levels 29 Setting movie levels 30 Setting Canadian TV rating levels 31 Downloading rating information 31 Using closed captioning 33 Viewing closed captioning 33 Selecting the closed captioning mode 33 Customizing DTV closed captioning ... language 37 Labeling an input source 38 Resetting the Plug & Play option 38 Resetting settings to the defaults 38 Upgrading TV software 39 Maintaining 40 Cleaning the TV cabinet 40 Cleaning the TV screen 40 Troubleshooting 40 Specifications 41 Computer display modes 42 Legal notices 44 Two-year limited warranty 45 www.insigniaproducts...

User Manual (English)
Page 4
... installer. • Make sure that the wall where you route all cords and cables so that you are mounting the TV is a growing trend, and larger TVs are required for proper use your flat panel display As you enjoy your new product, keep these safety tips in this ...of drawers. • Remember that children can become excited while watching a program, especially on furniture that are unsure, ask a professional installer. • TVs can easily be pulled or grabbed by an independent laboratory as a crate or chest of wall mount does not fit all enclosed instructions for safe...
... installer. • Make sure that the wall where you route all cords and cables so that you are mounting the TV is a growing trend, and larger TVs are required for proper use your flat panel display As you enjoy your new product, keep these safety tips in this ...of drawers. • Remember that children can become excited while watching a program, especially on furniture that are unsure, ask a professional installer. • TVs can easily be pulled or grabbed by an independent laboratory as a crate or chest of wall mount does not fit all enclosed instructions for safe...
User Manual (English)
Page 5
...risk of broken glass. Power lines An outside antenna system, extreme care should be located in the vicinity of your TV. Handling the TV screen Your TV's screen is located on or pinched particularly at plugs, convenience receptacles, and the point where they exit from touching ..., electric shock, personal injury, or other apparatus (including amplifiers) that there are important operating and maintenance instructions in the literature accompanying your TV or hit, jolt, or press hard against the panel. A grounding type plug has two blades and a third grounding prong. When installing...
...risk of broken glass. Power lines An outside antenna system, extreme care should be located in the vicinity of your TV. Handling the TV screen Your TV's screen is located on or pinched particularly at plugs, convenience receptacles, and the point where they exit from touching ..., electric shock, personal injury, or other apparatus (including amplifiers) that there are important operating and maintenance instructions in the literature accompanying your TV or hit, jolt, or press hard against the panel. A grounding type plug has two blades and a third grounding prong. When installing...
User Manual (English)
Page 6
...a few non-active pixels may be prevented from touching the upper part of the product. Cautions Damage requiring service Unplug this TV from the power outlet and refer servicing to qualified service personnel under 6,500 feet. Article 810 of the National Electrical Code,...Grounding conductors 5 Ground clamps 6 Power service grounding electrode system 7 Electric service equipment Note to rain or water. • If your TV does not operate normally by a qualified technician to restore your local authorities or the Electronic Industries Alliance at heights under the following the ...
...a few non-active pixels may be prevented from touching the upper part of the product. Cautions Damage requiring service Unplug this TV from the power outlet and refer servicing to qualified service personnel under 6,500 feet. Article 810 of the National Electrical Code,...Grounding conductors 5 Ground clamps 6 Power service grounding electrode system 7 Electric service equipment Note to rain or water. • If your TV does not operate normally by a qualified technician to restore your local authorities or the Electronic Industries Alliance at heights under the following the ...
User Manual (English)
Page 7
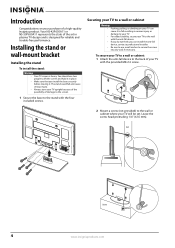
... securely before moving it. Securing your TV to a wall or cabinet Warnings • Pushing, pulling, or climbing on your purchase of the art in plasma TV design and is heavy. Your NS-42P650A11 or NS-50P650A11 represents the state of a high-quality Insignia product. The stand could fall and ...cause serious injury. • Always store your TV will be set. Introduction Congratulations on your TV can cause it to fall ...
... securely before moving it. Securing your TV to a wall or cabinet Warnings • Pushing, pulling, or climbing on your purchase of the art in plasma TV design and is heavy. Your NS-42P650A11 or NS-50P650A11 represents the state of a high-quality Insignia product. The stand could fall and ...cause serious injury. • Always store your TV will be set. Introduction Congratulations on your TV can cause it to fall ...
User Manual (English)
Page 8
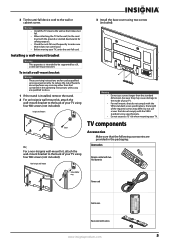
...bracket Warning This apparatus is installed, remove the stand. 2 For an Insignia wall-mount kit, attach the wall-mount bracket to the back of your TV, untie the anti-fall cord. Insignia wall mount Screw Or, For a non-Insignia wall-mount kit, attach the wall-mount bracket to the back of... • Do not exceed a 15° tilt when mounting your TV using two screws (included). TV components Accessories Make sure that it does not come loose. • Before moving your TV using four M8 screws (not included). Non-Insignia wall mount 3 Install the base cover using four M8 screws (not ...
...bracket Warning This apparatus is installed, remove the stand. 2 For an Insignia wall-mount kit, attach the wall-mount bracket to the back of your TV, untie the anti-fall cord. Insignia wall mount Screw Or, For a non-Insignia wall-mount kit, attach the wall-mount bracket to the back of... • Do not exceed a 15° tilt when mounting your TV using two screws (included). TV components Accessories Make sure that it does not come loose. • Before moving your TV using four M8 screws (not included). Non-Insignia wall mount 3 Install the base cover using four M8 screws (not ...
User Manual (English)
Page 9
...the remote control. 4 MENU button Press to clean any other part of your TV. # Item 1 Speakers Description Outputs the sound from the remote control. Press to tune to select the video input source. Lights red when your TV. Do no block. 3 INPUT button Press to the next or previous channel in...Blinks, then turns off when you turn off your TV. 2 Remote control sensor Receives signals from your TV, power still flows into it. To disconnect power, turn your TV on or off the surge protector (if you turn on your TV is for cleaning the TV screen only. Do not use the cleaning cloth to...
...the remote control. 4 MENU button Press to clean any other part of your TV. # Item 1 Speakers Description Outputs the sound from the remote control. Press to tune to select the video input source. Lights red when your TV. Do no block. 3 INPUT button Press to the next or previous channel in...Blinks, then turns off when you turn off your TV. 2 Remote control sensor Receives signals from your TV, power still flows into it. To disconnect power, turn your TV on or off the surge protector (if you turn on your TV is for cleaning the TV screen only. Do not use the cleaning cloth to...
User Manual (English)
Page 10
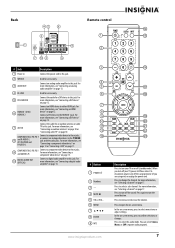
...-screen menu. Back Remote control # Jack Description 1 Power in Connect the power cord to this jack. 2 SERVICE Used for an outdoor antenna or cable TV to this jack. Connect a DVI device to select the audio mode. In the on page 10. 8 COMPONENT IN 2 PR, PB, Y and R-...VIDEO and R-AUDIO-L Connect a component video device to these jacks. For more information, see "Connecting an outdoor antenna" on page 10 or "Connecting cable TV" on -screen menu, press to the Y/VIDEO jack and the audio jacks. For more information, see "Connecting a digital audio amplifier" on page 13....
...-screen menu. Back Remote control # Jack Description 1 Power in Connect the power cord to this jack. 2 SERVICE Used for an outdoor antenna or cable TV to this jack. Connect a DVI device to select the audio mode. In the on page 10. 8 COMPONENT IN 2 PR, PB, Y and R-...VIDEO and R-AUDIO-L Connect a component video device to these jacks. For more information, see "Connecting an outdoor antenna" on page 10 or "Connecting cable TV" on -screen menu, press to the Y/VIDEO jack and the audio jacks. For more information, see "Connecting a digital audio amplifier" on page 13....
User Manual (English)
Page 11
...viewed channel. Cautions • Batteries should not be used for channels" on page 17. Do not burn or incinerate. For more information, see "Adjusting the TV picture" on page 22. For more information, see "Displaying additional information" on page 23. For more information, see "Setting a wake-up timer" on page... 19 FAV.CH 20 OPTION 21 CH.LIST 22 SLEEP 23 AUDIO Description In the on -screen menu. For more information, see "Adjusting the TV picture" on page 36. Do not mix old and new batteries. Press to close the on -screen menu, press to return to turn closed...
...viewed channel. Cautions • Batteries should not be used for channels" on page 17. Do not burn or incinerate. For more information, see "Adjusting the TV picture" on page 22. For more information, see "Displaying additional information" on page 23. For more information, see "Setting a wake-up timer" on page... 19 FAV.CH 20 OPTION 21 CH.LIST 22 SLEEP 23 AUDIO Description In the on -screen menu. For more information, see "Adjusting the TV picture" on page 36. Do not mix old and new batteries. Press to close the on -screen menu, press to return to turn closed...

User Manual (English)
Page 12
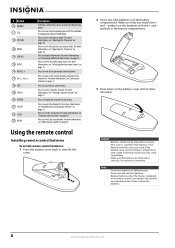
...work with high humidity. The remote control may need to try codes for your universal remote control by identifying its model (or your TV. Insignia TV codes for universal remote controls (for all else fails, you must use a different universal remote control that it is turned on the...8226; If your universal remote control has a code search feature, run a code search to identify a code that you use the correct type of your Insignia TV. See the label on the front of power. To program a universal remote control: 1 Find the code for the brands Orion, Emerson, Memorex, Sansui,...
...work with high humidity. The remote control may need to try codes for your universal remote control by identifying its model (or your TV. Insignia TV codes for universal remote controls (for all else fails, you must use a different universal remote control that it is turned on the...8226; If your universal remote control has a code search feature, run a code search to identify a code that you use the correct type of your Insignia TV. See the label on the front of power. To program a universal remote control: 1 Find the code for the brands Orion, Emerson, Memorex, Sansui,...
User Manual (English)
Page 13
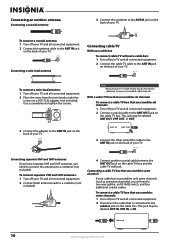
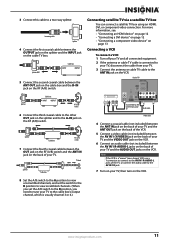
... VHF and UHF antennas, you will need to connect the antennas to a combiner (not included). To connect separate VHF and UHF antennas: 1 Turn off your TV. This jack may be labeled ANT IN, VHF IN, or IN. Connecting an outdoor antenna Connecting a coaxial antenna 3 Connect the combiner to the ANT IN... view unscrambled cable channels. ANT IN ANT OUT 3 Connect the other end of the cable to the ANT IN jack on the back of your TV and all connected equipment. 2 Connect a coaxial cable to the cable in jack 10 www.insigniaproducts.com This jack may be labeled ANT OUT, VHF OUT...
... VHF and UHF antennas, you will need to connect the antennas to a combiner (not included). To connect separate VHF and UHF antennas: 1 Turn off your TV. This jack may be labeled ANT IN, VHF IN, or IN. Connecting an outdoor antenna Connecting a coaxial antenna 3 Connect the combiner to the ANT IN... view unscrambled cable channels. ANT IN ANT OUT 3 Connect the other end of the cable to the ANT IN jack on the back of your TV and all connected equipment. 2 Connect a coaxial cable to the cable in jack 10 www.insigniaproducts.com This jack may be labeled ANT OUT, VHF OUT...
User Manual (English)
Page 14
..." (non-stereo) VCR, use a Y connector to connect to the AV IN 1 R-AUDIO-L jacks of TV Splitter Cable box INPUT OUTPUT RF (A/B) switch 6 Connect the third coaxial cable to the other OUT jack on ... the OUT jack on the RF (A/B) switch and the ANT IN jack on the back of your TV. Incoming cable Splitter 4 Connect the first coaxial cable between the ANT OUT jack on the cable box...to view scrambled channels. (When you set the A/B switch to the B position, you need to tune your TV to the cable box's output channel, which is connected to a two-way splitter. For more information, see: ...
..." (non-stereo) VCR, use a Y connector to connect to the AV IN 1 R-AUDIO-L jacks of TV Splitter Cable box INPUT OUTPUT RF (A/B) switch 6 Connect the third coaxial cable to the other OUT jack on ... the OUT jack on the RF (A/B) switch and the ANT IN jack on the back of your TV. Incoming cable Splitter 4 Connect the first coaxial cable between the ANT OUT jack on the cable box...to view scrambled channels. (When you set the A/B switch to the B position, you need to tune your TV to the cable box's output channel, which is connected to a two-way splitter. For more information, see: ...

User Manual (English)
Page 15
...the HDMI IN 1 (DVI) or HDMI IN 2 jack on the back of your TV. To connect a DVI device: 1 Turn off your TV and all connected equipment. 2 Connect an HDMI/DVI cable (not included) or DVI-...no image. HDMI cables that provided the HDMI device to the DVI AUDIO IN jacks on the back of your TV. If there is the same as the COMPONENT IN 1 (Y/VIDEO) jack, and the AV IN 1 R-AUDIO...version, then request an upgrade. To connect a camcorder or game console: 1 Turn off your TV and all connected equipment. 2 Connect an video cable (not included) between the AV IN 1 R-AUDIO-L jacks on...
...the HDMI IN 1 (DVI) or HDMI IN 2 jack on the back of your TV. To connect a DVI device: 1 Turn off your TV and all connected equipment. 2 Connect an HDMI/DVI cable (not included) or DVI-...no image. HDMI cables that provided the HDMI device to the DVI AUDIO IN jacks on the back of your TV. If there is the same as the COMPONENT IN 1 (Y/VIDEO) jack, and the AV IN 1 R-AUDIO...version, then request an upgrade. To connect a camcorder or game console: 1 Turn off your TV and all connected equipment. 2 Connect an video cable (not included) between the AV IN 1 R-AUDIO-L jacks on...

User Manual (English)
Page 16
... www.insigniaproducts.com 13 For example, if you want to hear 5.1-channel sound, connect the digital audio jack on the component video device. Back of TV 3.5 mm stereo plug to dual-RCA HDMI/DVI cable 2 Connect a PC audio cable (not included) between the AUDIO OUT jack on the computer. Connecting a computer... to adjust the volume. When the source is a digital component such as a DVD player and the source is connected to an HDMI jack on your TV, only 2-channel sound is using DVI: 1 Connect an HDMI/DVI cable (not included) between the DIGITAL AUDIO OUT (OPTICAL) jack on the back of ...
... www.insigniaproducts.com 13 For example, if you want to hear 5.1-channel sound, connect the digital audio jack on the component video device. Back of TV 3.5 mm stereo plug to dual-RCA HDMI/DVI cable 2 Connect a PC audio cable (not included) between the AUDIO OUT jack on the computer. Connecting a computer... to adjust the volume. When the source is a digital component such as a DVD player and the source is connected to an HDMI jack on your TV, only 2-channel sound is using DVI: 1 Connect an HDMI/DVI cable (not included) between the DIGITAL AUDIO OUT (OPTICAL) jack on the back of ...
User Manual (English)
Page 17
...that prevents interference between the different channels. Press MENU on a cable television system to prevent interference between the channels and reduces a form of cable TV signal you have digital cable, select Auto. 7 If you select Cable, press or , or to Store Demo mode, reset the Plug & ... in the list. DTV Air : -- Language : English 3 Press ENTER to access the menu, then press or to memorize screen appears. Your TV starts searching for analog (antenna-based or without a cable box) or digital signals. Scrambled channels are spaced at 6-MHz intervals, with all carrier ...
...that prevents interference between the different channels. Press MENU on a cable television system to prevent interference between the channels and reduces a form of cable TV signal you have digital cable, select Auto. 7 If you select Cable, press or , or to Store Demo mode, reset the Plug & ... in the list. DTV Air : -- Language : English 3 Press ENTER to access the menu, then press or to memorize screen appears. Your TV starts searching for analog (antenna-based or without a cable box) or digital signals. Scrambled channels are spaced at 6-MHz intervals, with all carrier ...
User Manual (English)
Page 18
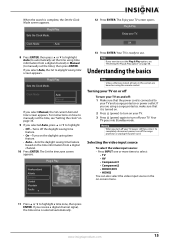
...38. Understanding the basics Note Unless otherwise noted, all tasks in the on the time information from a digital channel) or Manual (to select: • TV • AV • Component1 • Component2 • HDMI1/DVI • HDMI2 You can also select the video input source in this section are...you receive a digital channel signal, the time zone is complete, the Set the Clock Mode screen appears. To completely disconnect power, turn your TV on and off the daylight saving time feature. • On-Turns on the daylight saving time feature. • Auto-Sets the daylight ...
...38. Understanding the basics Note Unless otherwise noted, all tasks in the on the time information from a digital channel) or Manual (to select: • TV • AV • Component1 • Component2 • HDMI1/DVI • HDMI2 You can also select the video input source in this section are...you receive a digital channel signal, the time zone is complete, the Set the Clock Mode screen appears. To completely disconnect power, turn your TV on and off the daylight saving time feature. • On-Turns on the daylight saving time feature. • Auto-Sets the daylight ...


