Owners Guide
Page 1
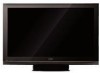
... located on the back and right side of your Plasma Television for P50A402, P50A202 and P42A202 IMPORTANT SAFETY INSTRUCTIONS 2-4 FIRST TIME USE ...5-17 THE REMOTE CONTROL 18-27 ON-SCREEN DISPLAY 28-41 USEFUL INFORMATION 42-49 LIMITED WARRANTY ...50 END USER LICENSE AGREEMENT FOR HITACHI DTV SOFTWARE 51-57 APPENDIXES ...58 INDEX ...59 READ...
... located on the back and right side of your Plasma Television for P50A402, P50A202 and P42A202 IMPORTANT SAFETY INSTRUCTIONS 2-4 FIRST TIME USE ...5-17 THE REMOTE CONTROL 18-27 ON-SCREEN DISPLAY 28-41 USEFUL INFORMATION 42-49 LIMITED WARRANTY ...50 END USER LICENSE AGREEMENT FOR HITACHI DTV SOFTWARE 51-57 APPENDIXES ...58 INDEX ...59 READ...

Owners Guide
Page 2
... injury from tip-over. 13. Only use caution when moving the cart/apparatus combination to the proper operation of Hitachi plasma televisions. Unplug this plasma television. 1. To help you operate these units. Please fill out your safety. Clean only with one wider than the...some protection against voltage surges and built up static charges. Important Safety Instructions SAFETY POINTS YOU SHOULD KNOW ABOUT YOUR HITACHI PLASMA TELEVISION Our reputation has been built on or pinched particularly at plugs, convenience receptacles, and the point where they exit ...
... injury from tip-over. 13. Only use caution when moving the cart/apparatus combination to the proper operation of Hitachi plasma televisions. Unplug this plasma television. 1. To help you operate these units. Please fill out your safety. Clean only with one wider than the...some protection against voltage surges and built up static charges. Important Safety Instructions SAFETY POINTS YOU SHOULD KNOW ABOUT YOUR HITACHI PLASMA TELEVISION Our reputation has been built on or pinched particularly at plugs, convenience receptacles, and the point where they exit ...
Owners Guide
Page 3
...and used in a residential installation. This equipment generates, uses and can be permanently imprinted onto your Plasma TV This digital television is prohibited. Operation is subject to the following measures: • Reorient or relocate the receiving antenna....Plasma Television receiver will work automatically so that are left on -demand, a cable operator's enhanced program guide and data-enhanced television services may cause undesired operation. Prevention of screen damages (Image Retention) Continuous on-screen displays such as replacement cables. Order Hitachi...
...and used in a residential installation. This equipment generates, uses and can be permanently imprinted onto your Plasma TV This digital television is prohibited. Operation is subject to the following measures: • Reorient or relocate the receiving antenna....Plasma Television receiver will work automatically so that are left on -demand, a cable operator's enhanced program guide and data-enhanced television services may cause undesired operation. Prevention of screen damages (Image Retention) Continuous on-screen displays such as replacement cables. Order Hitachi...
Owners Guide
Page 6
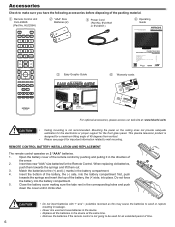
...the batteries to the (+) and (-) marks in the corresponding holes and push down the cover until it in the device at : www.hitachi.us/tv CAUTION • Ceiling mounting is not going to be used and new batteries in the device. • Replace all the batteries in....org t Easy Graphic Guide PLASMA TELEVISION Operating Guide for P50A402, P50A202 and P42A202 IMPORTANT SAFETY INSTRUCTIONS 2-4 FIRST TIME USE ...5-17 THE REMOTE CONTROL 18-27 ON-SCREEN DISPLAY 28-41 USEFUL INFORMATION 42-48 LIMITED WARRANTY ...49 END USER LICENSE AGREEMENT FOR HITACHI DTV SOFTWARE 50-56 APPENDIXES ...
...the batteries to the (+) and (-) marks in the corresponding holes and push down the cover until it in the device at : www.hitachi.us/tv CAUTION • Ceiling mounting is not going to be used and new batteries in the device. • Replace all the batteries in....org t Easy Graphic Guide PLASMA TELEVISION Operating Guide for P50A402, P50A202 and P42A202 IMPORTANT SAFETY INSTRUCTIONS 2-4 FIRST TIME USE ...5-17 THE REMOTE CONTROL 18-27 ON-SCREEN DISPLAY 28-41 USEFUL INFORMATION 42-48 LIMITED WARRANTY ...49 END USER LICENSE AGREEMENT FOR HITACHI DTV SOFTWARE 50-56 APPENDIXES ...
Owners Guide
Page 7
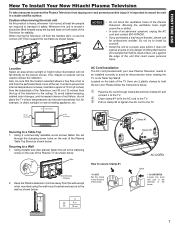
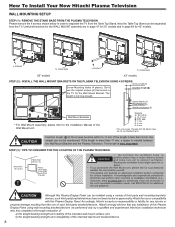
...AC cord. Also, be lifted forward using the wall mount bracket and secure to the wall as shown below . 42" 50" NOTES • Do not block the ventilation holes of the Plasma Table Top Stand as shown below . w Close clamp #1 to fix the AC cord to a Table-Top 1.... #1 and connect it to the TV. Keep the Plasma television 4 inches away from the wall except when mounted using the top and base on the rear of the Plasma Television. FIRST TIME USE How To Install Your New Hitachi Plasma Television To take measures to prevent the Plasma Television from tipping over and prevent possible ...
...AC cord. Also, be lifted forward using the wall mount bracket and secure to the wall as shown below . 42" 50" NOTES • Do not block the ventilation holes of the Plasma Table Top Stand as shown below . w Close clamp #1 to fix the AC cord to a Table-Top 1.... #1 and connect it to the TV. Keep the Plasma television 4 inches away from the wall except when mounted using the top and base on the rear of the Plasma Television. FIRST TIME USE How To Install Your New Hitachi Plasma Television To take measures to prevent the Plasma Television from tipping over and prevent possible ...
Owners Guide
Page 8
...Do not block the ventilation holes. More than 10 cm (4"). Call 800-HITACHI for 42" models. 4 SCREWS TV STAND BASE 4 SCREWS TV STAND BASE 50" models 42" models STEP (2) : INSTALL THE WALL MOUNT BRACKETS ON THE PLASMA TELEVISION USING 4 SCREWS. Don't use the original screws (A) that any injuries ... technician can be within 9~11 mm. How To Install Your New Hitachi Plasma Television WALL MOUNTING SETUP STEP (1) : REMOVE THE STAND BASE FROM THE PLASMA TELEVISION Please remove the 4 screws shown below in order to separate the TV from the use of such third party brackets/devices.
...Do not block the ventilation holes. More than 10 cm (4"). Call 800-HITACHI for 42" models. 4 SCREWS TV STAND BASE 4 SCREWS TV STAND BASE 50" models 42" models STEP (2) : INSTALL THE WALL MOUNT BRACKETS ON THE PLASMA TELEVISION USING 4 SCREWS. Don't use the original screws (A) that any injuries ... technician can be within 9~11 mm. How To Install Your New Hitachi Plasma Television WALL MOUNTING SETUP STEP (1) : REMOVE THE STAND BASE FROM THE PLASMA TELEVISION Please remove the 4 screws shown below in order to separate the TV from the use of such third party brackets/devices.
Owners Guide
Page 11
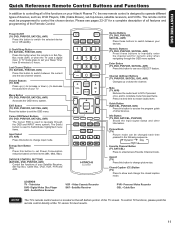
..., AVR) Press this button to enter/access Favorite Channel mode. LEGENDS TV - Personal Video Recorder CBL - Dynamic Day Night Favorite Channel Button (TV, SAT/CBL) Press to switch between your Hitachi Plasma TV, the new remote control is in the following sequence. EXIT Button (TV, DVD, PVR/VCR, SAT/CBL, AVR) Press this button to 3 hours... Box, Cable Box, DVD, VCR, PVR and AVR. The remote control must be changed each time pressed in Set-TopBox mode (SAT) or when the TV uses a digital input. Television DVD- Satellite Receiver PVR -
..., AVR) Press this button to enter/access Favorite Channel mode. LEGENDS TV - Personal Video Recorder CBL - Dynamic Day Night Favorite Channel Button (TV, SAT/CBL) Press to switch between your Hitachi Plasma TV, the new remote control is in the following sequence. EXIT Button (TV, DVD, PVR/VCR, SAT/CBL, AVR) Press this button to 3 hours... Box, Cable Box, DVD, VCR, PVR and AVR. The remote control must be changed each time pressed in Set-TopBox mode (SAT) or when the TV uses a digital input. Television DVD- Satellite Receiver PVR -
Owners Guide
Page 12
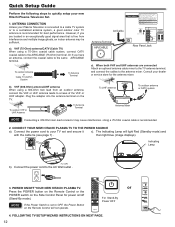
...on /off (Stand-By mode). Consult your new Hitachi Plasma Television Set. 1. CONNECT YOUR NEW HITACHI PLASMA TV TO THE POWER SOURCE a). then light blue (image displays). ANTENNA CONNECTION Unless your Plasma Television is connected to a cable TV system or to your TV set to OFF, the Power Button on the ...terminal. Connect the power cord to a centralized antenna system, a good outdoor color TV antenna is set and secure it c). The Indicating Lamp will not operate. POWER ON/OFF YOUR NEW HITACHI PLASMA TV. NOTE If the Power Switch is recommended for best performance. However, if you ...
...on /off (Stand-By mode). Consult your new Hitachi Plasma Television Set. 1. CONNECT YOUR NEW HITACHI PLASMA TV TO THE POWER SOURCE a). then light blue (image displays). ANTENNA CONNECTION Unless your Plasma Television is connected to a cable TV system or to your TV set to OFF, the Power Button on the ...terminal. Connect the power cord to a centralized antenna system, a good outdoor color TV antenna is set and secure it c). The Indicating Lamp will not operate. POWER ON/OFF YOUR NEW HITACHI PLASMA TV. NOTE If the Power Switch is recommended for best performance. However, if you ...
Owners Guide
Page 13
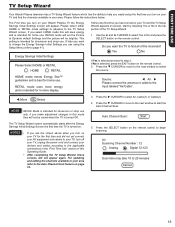
...starts after the Energy Savings Initial Settings Screen the first time the TV is selected, press the EXIT button on the remote control. 2. If No is turned on. FIRST TIME USE TV Setup Wizard Your Hitachi Plasma television has a TV Setup Wizard feature which has the ability to help you easily ...setup the first time you turn on your TV and find all of the channels? Please follow the instructions below. ...
...starts after the Energy Savings Initial Settings Screen the first time the TV is selected, press the EXIT button on the remote control. 2. If No is turned on. FIRST TIME USE TV Setup Wizard Your Hitachi Plasma television has a TV Setup Wizard feature which has the ability to help you easily ...setup the first time you turn on your TV and find all of the channels? Please follow the instructions below. ...

Owners Guide
Page 17
...as shown right below. 3. Match colors of the HDTV set -up of video contents. • HDMI is controlled by the amplifier, not by the Plasma Television. FIRST TIME USE Rear Panel Connections CONNECTING AN EQUIPMENT SOURCE WITH HDMI OR DVI CAPABILITY TO HDMI 1, HDMI 2 1. Connect the HDMI or DVI to... output device controls the HDMI interface so proper set top box or DVD player to HDMI connection cable from the AUDIO OUT jack of the Plasma TV to the Rear Panel INPUT 1 or 2 AUDIO jacks as shown on HDMI 1, 2 and 3 contains the copy protection system called High-bandwidth Digital ...
...as shown right below. 3. Match colors of the HDTV set -up of video contents. • HDMI is controlled by the amplifier, not by the Plasma Television. FIRST TIME USE Rear Panel Connections CONNECTING AN EQUIPMENT SOURCE WITH HDMI OR DVI CAPABILITY TO HDMI 1, HDMI 2 1. Connect the HDMI or DVI to... output device controls the HDMI interface so proper set top box or DVD player to HDMI connection cable from the AUDIO OUT jack of the Plasma TV to the Rear Panel INPUT 1 or 2 AUDIO jacks as shown on HDMI 1, 2 and 3 contains the copy protection system called High-bandwidth Digital ...

Owners Guide
Page 18
...addition to controlling all the functions on your Plasma TV, select TV by CHANNEL (CH) UP ( ) or...TV button on the remote control. Press it again to return to your VCR/PVR (Personal Video Recorder) press the PVR/VCR button on the remote. To operate your HITACHI Plasma TV, the new remote control is in TV... mode. Repeat the same procedure for your DVD (press the DVD button), for your device. The TV... Press this button to turn the TV set on or off when the remote... to tune. Enter 0 first for the TV to select channels. You can add any...
...addition to controlling all the functions on your Plasma TV, select TV by CHANNEL (CH) UP ( ) or...TV button on the remote control. Press it again to return to your VCR/PVR (Personal Video Recorder) press the PVR/VCR button on the remote. To operate your HITACHI Plasma TV, the new remote control is in TV... mode. Repeat the same procedure for your DVD (press the DVD button), for your device. The TV... Press this button to turn the TV set on or off when the remote... to tune. Enter 0 first for the TV to select channels. You can add any...
Owners Guide
Page 31
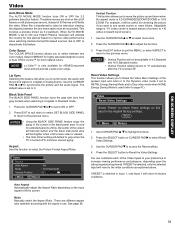
...1, only Input 1 will not be available in 4:3 Standard and 16:9 Standard modes. • Vertical Position setting returns to "0" automatically after the TV is transferred to black when watching 4:3 signals in the black panel area. Adjustable range is -10 (video center is toward top of the present ...ZOOM1/ZOOM2 or 16:9 ZOOM. NOTES • Using the BLACK SIDE PANEL feature stops the aging of the Video Inputs to your Hitachi Plasma Television will reset to highlight functions. 2. If RESET is selected, only the selected Input will activate the circuitry for more natural colors.
...1, only Input 1 will not be available in 4:3 Standard and 16:9 Standard modes. • Vertical Position setting returns to "0" automatically after the TV is transferred to black when watching 4:3 signals in the black panel area. Adjustable range is -10 (video center is toward top of the present ...ZOOM1/ZOOM2 or 16:9 ZOOM. NOTES • Using the BLACK SIDE PANEL feature stops the aging of the Video Inputs to your Hitachi Plasma Television will reset to highlight functions. 2. If RESET is selected, only the selected Input will activate the circuitry for more natural colors.
Owners Guide
Page 32
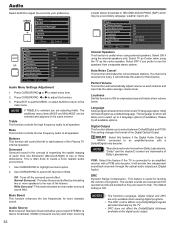
... PAD to the main menu. Auto Noise Cancel This function eliminates the noise between Dolby®Digital and PCM. Audio Source Multi-Channel Television Sound will control the left to an amplifier/receiver with a PCM only decoder; Please try all available options. Select this function to ON...quietest sounds are boosted so they are adjusting treble. This is the concept of expanding the spatial imaging of the Plasma TV internal speakers. Select ON if using the TV as a default language. Wide Surround : This mode simulates an even wider surround sound field. Press CURSOR PAD...
... PAD to the main menu. Auto Noise Cancel This function eliminates the noise between Dolby®Digital and PCM. Audio Source Multi-Channel Television Sound will control the left to an amplifier/receiver with a PCM only decoder; Please try all available options. Select this function to ON...quietest sounds are boosted so they are adjusting treble. This is the concept of expanding the spatial imaging of the Plasma TV internal speakers. Select ON if using the TV as a default language. Wide Surround : This mode simulates an even wider surround sound field. Press CURSOR PAD...
Owners Guide
Page 39
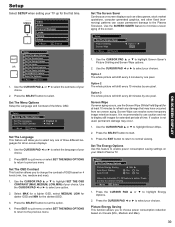
...The Energy Options Use this feature to select your Hitachi Plasma TV. Press the CURSOR PAD ◄ or ► to enable power consumption saving settings on -screen displays. 1. If caution is active. Press the CURSOR PAD ▲ or ▼ to the Plasma Television. Set The Menu Options Setup the Language and ...to select your choice. Use the CURSOR PAD ▲ or ▼ to highlight SET THE OSD CONTRAST (MAX, MEDIUM, LOW, MIN) of your TV up for the first time. Use the CURSOR PAD ◄ or ► to select. Use the CURSOR PAD ▲ or ▼ to highlight...
...The Energy Options Use this feature to select your Hitachi Plasma TV. Press the CURSOR PAD ◄ or ► to enable power consumption saving settings on -screen displays. 1. If caution is active. Press the CURSOR PAD ▲ or ▼ to the Plasma Television. Set The Menu Options Setup the Language and ...to select your choice. Use the CURSOR PAD ▲ or ▼ to highlight SET THE OSD CONTRAST (MAX, MEDIUM, LOW, MIN) of your TV up for the first time. Use the CURSOR PAD ◄ or ► to select. Use the CURSOR PAD ▲ or ▼ to highlight...
Owners Guide
Page 42
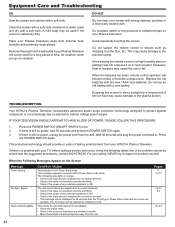
... 42 Equipment Care and Troubleshooting DO Dust the screen and cabinet with a soft cloth. Clean the screen with a soft cloth moistened in Power Save mode. Avoid placing the remote control in . Press the POWER SWITCH (ON/OFF SWITCH) once. 2. TROUBLESHOOTING Your HITACHI Plasma Television ...treated cloth. If there is extremely dirty. The TV screen can be used if the screen is still no power, wait 30 seconds and press the POWER SWITCH again. 3. Place your HITACHI Plasma Television. Remove the plug from your Plasma Television away from the unit. Exposing the screen to...
... 42 Equipment Care and Troubleshooting DO Dust the screen and cabinet with a soft cloth. Clean the screen with a soft cloth moistened in Power Save mode. Avoid placing the remote control in . Press the POWER SWITCH (ON/OFF SWITCH) once. 2. TROUBLESHOOTING Your HITACHI Plasma Television ...treated cloth. If there is extremely dirty. The TV screen can be used if the screen is still no power, wait 30 seconds and press the POWER SWITCH again. 3. Place your HITACHI Plasma Television. Remove the plug from your Plasma Television away from the unit. Exposing the screen to...
Owners Guide
Page 45
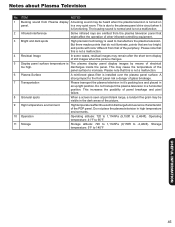
...point-blank range, a random fine grain may be visible in an upright position. Do not place the plasma television in a very quiet room. This is installed over the plasma panel surface. discharges inside the panel. in high temperature environments. 10 Operation Operating altitude: 720 to ... not a malfunction. 4 Residual Image In some cases, residual images may cause the temperature of electrical too high. Do not transport the plasma television in a horizontal position. Operating temperature: 41°F to 95°F. 11 Storage Storage altitude: 720 to 1,114hPa (9,150ft to 140&#...
...point-blank range, a random fine grain may be visible in an upright position. Do not place the plasma television in a very quiet room. This is installed over the plasma panel surface. discharges inside the panel. in high temperature environments. 10 Operation Operating altitude: 720 to ... not a malfunction. 4 Residual Image In some cases, residual images may cause the temperature of electrical too high. Do not transport the plasma television in a horizontal position. Operating temperature: 41°F to 95°F. 11 Storage Storage altitude: 720 to 1,114hPa (9,150ft to 140&#...
Owners Guide
Page 50
... from the owner's premises (must be returned with the acceptable set -up and delivery (at www.hitachi.us /tv Support and Contact/Warranty Registration IMPORTANT: A O Before using or installing your Product, please complete this V .S T form ... the U.S.A. LY CERTIFIED SERVICE CENTER N Hitachi is damaged due to operating conditions, other useful information. Product repairs (including any product whose serial number has been removed, altered, replaced, defaced or rendered illegible. P C. Any Product used for such Plasma Televisions parts. K. N. NO PERSON, AGENT,...
... from the owner's premises (must be returned with the acceptable set -up and delivery (at www.hitachi.us /tv Support and Contact/Warranty Registration IMPORTANT: A O Before using or installing your Product, please complete this V .S T form ... the U.S.A. LY CERTIFIED SERVICE CENTER N Hitachi is damaged due to operating conditions, other useful information. Product repairs (including any product whose serial number has been removed, altered, replaced, defaced or rendered illegible. P C. Any Product used for such Plasma Televisions parts. K. N. NO PERSON, AGENT,...


