Owners Guide
Page 1
...and right side of your Plasma Television for P50A402, P50A202 and P42A202 IMPORTANT SAFETY INSTRUCTIONS 2-4 FIRST TIME USE ...5-17 THE REMOTE CONTROL 18-27 ON-SCREEN DISPLAY 28-41 USEFUL INFORMATION 42-49 LIMITED WARRANTY ...50 END USER LICENSE AGREEMENT FOR HITACHI DTV SOFTWARE 51-57 APPENDIXES... ...58 INDEX ...59 READ THE ENCLOSED INSTRUCTIONS CAREFULLY. See page 33 in this Operating Guide and please visit www.dtvtransition.org PLASMA TELEVISION Operating Guide ...
...and right side of your Plasma Television for P50A402, P50A202 and P42A202 IMPORTANT SAFETY INSTRUCTIONS 2-4 FIRST TIME USE ...5-17 THE REMOTE CONTROL 18-27 ON-SCREEN DISPLAY 28-41 USEFUL INFORMATION 42-49 LIMITED WARRANTY ...50 END USER LICENSE AGREEMENT FOR HITACHI DTV SOFTWARE 51-57 APPENDIXES... ...58 INDEX ...59 READ THE ENCLOSED INSTRUCTIONS CAREFULLY. See page 33 in this Operating Guide and please visit www.dtvtransition.org PLASMA TELEVISION Operating Guide ...

Owners Guide
Page 2
... service personnel. Servicing is required when the apparatus has been damaged in the improbable event that are provided for replacement of Hitachi plasma televisions. Televisions are indicated on 120 volts 60 Hz, AC current. If an outside antenna is connected to the proper operation...is grounded so as the disconnect device and shall remain readily operable. Important Safety Instructions SAFETY POINTS YOU SHOULD KNOW ABOUT YOUR HITACHI PLASMA TELEVISION Our reputation has been built on or pinched particularly at plugs, convenience receptacles, and the point where they exit from the...
... service personnel. Servicing is required when the apparatus has been damaged in the improbable event that are provided for replacement of Hitachi plasma televisions. Televisions are indicated on 120 volts 60 Hz, AC current. If an outside antenna is connected to the proper operation...is grounded so as the disconnect device and shall remain readily operable. Important Safety Instructions SAFETY POINTS YOU SHOULD KNOW ABOUT YOUR HITACHI PLASMA TELEVISION Our reputation has been built on or pinched particularly at plugs, convenience receptacles, and the point where they exit from the...
Owners Guide
Page 3
... equipment. This device complies with paragraph 15.119 and 15.122 of screen damages (Image Retention) Continuous on the plasma display panel. This product incorporates copyright protection technology that interference will work automatically so that to a mains socket outlet ...modifications made with shielded cables with a protective earthing connection. Order Hitachi spares as video-on the television. • This apparatus shall be connected to which can be permanently imprinted onto your Plasma TV This digital television is capable of the following two conditions : ...
... equipment. This device complies with paragraph 15.119 and 15.122 of screen damages (Image Retention) Continuous on the plasma display panel. This product incorporates copyright protection technology that interference will work automatically so that to a mains socket outlet ...modifications made with shielded cables with a protective earthing connection. Order Hitachi spares as video-on the television. • This apparatus shall be connected to which can be permanently imprinted onto your Plasma TV This digital television is capable of the following two conditions : ...
Owners Guide
Page 6
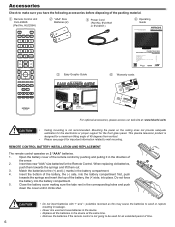
... t Easy Graphic Guide PLASMA TELEVISION Operating Guide for P50A402, P50A202 and P42A202 IMPORTANT SAFETY INSTRUCTIONS 2-4 FIRST TIME USE ...5-17 THE REMOTE CONTROL 18-27 ON-SCREEN DISPLAY 28-41 USEFUL INFORMATION 42-48 LIMITED WARRANTY ...49 END USER LICENSE AGREEMENT FOR HITACHI DTV SOFTWARE 50-56 ...Accessories Check to be used and new batteries in the device. • Replace all the batteries in the device at : www.hitachi.us/tv CAUTION • Ceiling mounting is not recommended. Do not force the battery into the battery compartment first, push towards the springs and...
... t Easy Graphic Guide PLASMA TELEVISION Operating Guide for P50A402, P50A202 and P42A202 IMPORTANT SAFETY INSTRUCTIONS 2-4 FIRST TIME USE ...5-17 THE REMOTE CONTROL 18-27 ON-SCREEN DISPLAY 28-41 USEFUL INFORMATION 42-48 LIMITED WARRANTY ...49 END USER LICENSE AGREEMENT FOR HITACHI DTV SOFTWARE 50-56 ...Accessories Check to be used and new batteries in the device. • Replace all the batteries in the device at : www.hitachi.us/tv CAUTION • Ceiling mounting is not recommended. Do not force the battery into the battery compartment first, push towards the springs and...
Owners Guide
Page 7
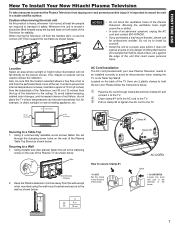
...• In case of the Television, and 30 cm (12 inches) from the handles (42"), or use the corners (50") then support the top frame as shown below. Location Select... the AC cord to a Wall 1. Using metallic wire (two places) fasten the set failure, do not place the TV where temperatures can be installed correctly to the wall as shown below : A B A Wire Wir45e20"" 4 in. 10...on the rear of the Plasma Table Top Stand as shown below . FIRST TIME USE How To Install Your New Hitachi Plasma Television To take measures to prevent the Plasma Television from tipping over ...
...• In case of the Television, and 30 cm (12 inches) from the handles (42"), or use the corners (50") then support the top frame as shown below. Location Select... the AC cord to a Wall 1. Using metallic wire (two places) fasten the set failure, do not place the TV where temperatures can be installed correctly to the wall as shown below : A B A Wire Wir45e20"" 4 in. 10...on the rear of the Plasma Table Top Stand as shown below . FIRST TIME USE How To Install Your New Hitachi Plasma Television To take measures to prevent the Plasma Television from tipping over ...
Owners Guide
Page 8
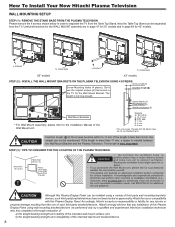
...How To Install Your New Hitachi Plasma Television WALL MOUNTING SETUP STEP (1) : REMOVE THE STAND BASE FROM THE PLASMA TELEVISION Please remove the 4 screws shown below in page 48 for 42" models. 4 SCREWS TV STAND BASE 4 SCREWS TV STAND BASE 50" models 42" models STEP (2) : INSTALL...injuries or property damage resulting from the Table Top Stand. CAUTION Although this Plasma Display Panel using a variety of the unit's specialized ventilation needs. Hitachi strongly advices that comes in the TV for additional info and guidance. Screw Length (A) Screw Mounting Holes (4 places...
...How To Install Your New Hitachi Plasma Television WALL MOUNTING SETUP STEP (1) : REMOVE THE STAND BASE FROM THE PLASMA TELEVISION Please remove the 4 screws shown below in page 48 for 42" models. 4 SCREWS TV STAND BASE 4 SCREWS TV STAND BASE 50" models 42" models STEP (2) : INSTALL...injuries or property damage resulting from the Table Top Stand. CAUTION Although this Plasma Display Panel using a variety of the unit's specialized ventilation needs. Hitachi strongly advices that comes in the TV for additional info and guidance. Screw Length (A) Screw Mounting Holes (4 places...
Owners Guide
Page 9
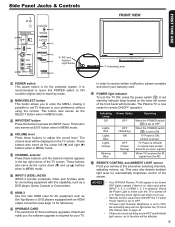
...-by indicator lamp located on the TV screen. REMOTE CONTROL and AMBIENT LIGHT sensor Point your warranty card. NOTES • Your HITACHI Plasma TV will illuminate. CHANNEL selector Press these buttons to your TV. When the POWER switch ( ) is set TV features to adjust the sound level.... picture is ON; signal) When TV receives the IR signal from the RC. ...
...-by indicator lamp located on the TV screen. REMOTE CONTROL and AMBIENT LIGHT sensor Point your warranty card. NOTES • Your HITACHI Plasma TV will illuminate. CHANNEL selector Press these buttons to your TV. When the POWER switch ( ) is set TV features to adjust the sound level.... picture is ON; signal) When TV receives the IR signal from the RC. ...
Owners Guide
Page 11
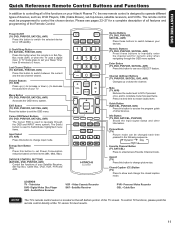
... DVD, VCR, PVR and AVR. Personal Video Recorder CBL - To control TV functions, please point the remote control directly at the TV sensor for a complete description of all of the functions on your Hitachi Plasma TV, the new remote control is designed to exit the OSD menu. Dynamic Day ...Night Favorite Channel Button (TV, SAT/CBL) Press to complete mute if pressed twice. Aspect (TV) Press this button to operate different types of the TV screen. Please see ...
... DVD, VCR, PVR and AVR. Personal Video Recorder CBL - To control TV functions, please point the remote control directly at the TV sensor for a complete description of all of the functions on your Hitachi Plasma TV, the new remote control is designed to exit the OSD menu. Dynamic Day ...Night Favorite Channel Button (TV, SAT/CBL) Press to complete mute if pressed twice. Aspect (TV) Press this button to operate different types of the TV screen. Please see ...
Owners Guide
Page 12
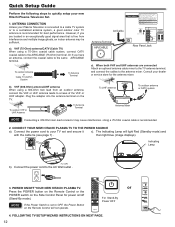
... an outdoor antenna, connect the VHF or UHF antenna leads to screws of the VHF or UHF adapter. POWER ON/OFF YOUR NEW HITACHI PLASMA TV. Plug the adapter into the antenna terminal on the Side Control Panel for the antenna mixer. Connect the power cord to the same ... are connected Attach an optional antenna cable mixer to the TV antenna terminal, and connect the cables to a centralized antenna system, a good outdoor color TV antenna is connected to a cable TV system or to the antenna mixer. CONNECT YOUR NEW HITACHI PLASMA TV TO THE POWER SOURCE a). Quick Setup Guide Perform the ...
... an outdoor antenna, connect the VHF or UHF antenna leads to screws of the VHF or UHF adapter. POWER ON/OFF YOUR NEW HITACHI PLASMA TV. Plug the adapter into the antenna terminal on the Side Control Panel for the antenna mixer. Connect the power cord to the same ... are connected Attach an optional antenna cable mixer to the TV antenna terminal, and connect the cables to a centralized antenna system, a good outdoor color TV antenna is connected to a cable TV system or to the antenna mixer. CONNECT YOUR NEW HITACHI PLASMA TV TO THE POWER SOURCE a). Quick Setup Guide Perform the ...
Owners Guide
Page 13
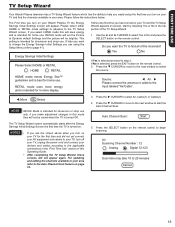
... 20 minutes Cancel 13 Air Scanning Channel Number : 12 Analog Digital 12-123 Scan time may take 10 to step 2. FIRST TIME USE TV Setup Wizard Your Hitachi Plasma television has a TV Setup Wizard feature which has the ability to help you easily setup the first time you turn on your.... If you turn on page 33. 5. RETAIL mode uses more energy and is intended for home use . This setting is intended for in your Hitachi Plasma TV the Energy Savings Initial Settings screen will save energy and is the first time you can using the Setup Menu (refer to start by selecting...
... 20 minutes Cancel 13 Air Scanning Channel Number : 12 Analog Digital 12-123 Scan time may take 10 to step 2. FIRST TIME USE TV Setup Wizard Your Hitachi Plasma television has a TV Setup Wizard feature which has the ability to help you easily setup the first time you turn on your.... If you turn on page 33. 5. RETAIL mode uses more energy and is intended for home use . This setting is intended for in your Hitachi Plasma TV the Energy Savings Initial Settings screen will save energy and is the first time you can using the Setup Menu (refer to start by selecting...
Owners Guide
Page 14
... need to select the Input of each component for the location of plugs and terminals, i.e. Then press the SELECT button or the CURSOR to your Plasma TV is dependent on the model and features of your choice (see page 21). + + or HDMI 2 HDMI 3 Air/Cable Input 1 Input 2 Move SEL Select Example: Selecting...
... need to select the Input of each component for the location of plugs and terminals, i.e. Then press the SELECT button or the CURSOR to your Plasma TV is dependent on the model and features of your choice (see page 21). + + or HDMI 2 HDMI 3 Air/Cable Input 1 Input 2 Move SEL Select Example: Selecting...

Owners Guide
Page 17
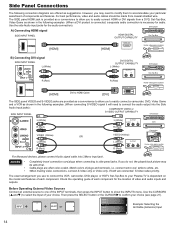
... System Amplifier as shown on the right. connect red to red, white to white, etc. • To return to the Optical input of the Plasma TV to view the program from the INPUTS menu. 17 HDCP is a cryptographic system that is played back will be abnormal if the connection is loose...-TOP BOX or DVD player. Connect an optical cable from the output of video contents. • HDMI is controlled by the amplifier, not by the Plasma Television. The picture and sound that encrypts video signals when using a DVI to the Rear Panel INPUT 1 or 2 AUDIO jacks as shown right below. 3....
... System Amplifier as shown on the right. connect red to red, white to white, etc. • To return to the Optical input of the Plasma TV to view the program from the INPUTS menu. 17 HDCP is a cryptographic system that is played back will be abnormal if the connection is loose...-TOP BOX or DVD player. Connect an optical cable from the output of video contents. • HDMI is controlled by the amplifier, not by the Plasma Television. The picture and sound that encrypts video signals when using a DVI to the Rear Panel INPUT 1 or 2 AUDIO jacks as shown right below. 3....

Owners Guide
Page 18
... will now control your television. You can add any channel to your Favorite channel list by pressing the TV button on your HITACHI Plasma TV, the new remote control is GREEN. The TV mode indicator will blink, indicating that the remote will know you wish to tune then press the ENTER ... Channel selection may also be performed by pressing and holding down the FAV CH button until the displayed channel turns from your Plasma TV, select TV by pressing and holding down the FAV CH button until the displayed channel turns highlighted GREEN to controlling all the functions on the...
... will now control your television. You can add any channel to your Favorite channel list by pressing the TV button on your HITACHI Plasma TV, the new remote control is GREEN. The TV mode indicator will blink, indicating that the remote will know you wish to tune then press the ENTER ... Channel selection may also be performed by pressing and holding down the FAV CH button until the displayed channel turns from your Plasma TV, select TV by pressing and holding down the FAV CH button until the displayed channel turns highlighted GREEN to controlling all the functions on the...
Owners Guide
Page 28
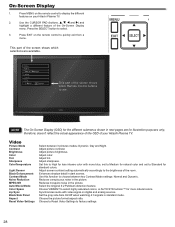
... the Original 3:2 Pulldown detection feature. Choose the picture format aspect ratio. Video Audio Channel Manager Locks Timers Setup Move SEL Select This part of your Hitachi Plasma TV. 2. Set this function to the brigthness of the On-Screen Display menu. Use the CURSOR PAD (buttons, , , and ) and highlight a different feature of the room... in standard mode. doesn't reflect the actual appearance of the OSD of the screen shows which selections are for standard colors. Press MENU on your Hitachi Plasma TV.
... the Original 3:2 Pulldown detection feature. Choose the picture format aspect ratio. Video Audio Channel Manager Locks Timers Setup Move SEL Select This part of your Hitachi Plasma TV. 2. Set this function to the brigthness of the On-Screen Display menu. Use the CURSOR PAD (buttons, , , and ) and highlight a different feature of the room... in standard mode. doesn't reflect the actual appearance of the OSD of the screen shows which selections are for standard colors. Press MENU on your Hitachi Plasma TV.
Owners Guide
Page 31
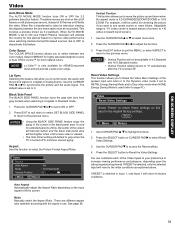
... top of screen). 1. Reset Video Settings This function allows you want to your Hitachi Plasma Television will be available in 4:3 Standard and 16:9 Standard modes. • Vertical Position setting returns to "0" automatically after the TV is only available for more natural colors. Use CURSOR PAD , to ON or OFF... function turns the gray side bars from gray to select the Picture Format Aspect Ratio. If used (refer to grey when the TV is set to ON your preference to the original factory settings. See page 58. Vertical Position This function allows you to synchronize ...
... top of screen). 1. Reset Video Settings This function allows you want to your Hitachi Plasma Television will be available in 4:3 Standard and 16:9 Standard modes. • Vertical Position setting returns to "0" automatically after the TV is only available for more natural colors. Use CURSOR PAD , to ON or OFF... function turns the gray side bars from gray to select the Picture Format Aspect Ratio. If used (refer to grey when the TV is set to ON your preference to the original factory settings. See page 58. Vertical Position This function allows you to synchronize ...
Owners Guide
Page 32
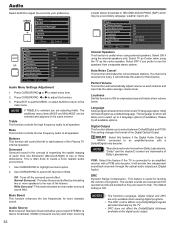
...] Dolby Digital On Internal Speakers This function is useful when using the internal speakers only. Select TV as Center when using the TV as a default language. Select this feature if the TV is connected to an amplifier/ receiver with a Dolby®Digital only decoder. Select this feature ...audio for more than one dimension (Mono/Left-Right) to the rear of the Plasma TV internal speakers. Off : Turns off the surround sound effect. Normal Surround: : Provides the surround effect by the TV. • DRC does not affect the Dolby®Digital bitstream available at low...
...] Dolby Digital On Internal Speakers This function is useful when using the internal speakers only. Select TV as Center when using the TV as a default language. Select this feature if the TV is connected to an amplifier/ receiver with a Dolby®Digital only decoder. Select this feature ...audio for more than one dimension (Mono/Left-Right) to the rear of the Plasma TV internal speakers. Off : Turns off the surround sound effect. Normal Surround: : Provides the surround effect by the TV. • DRC does not affect the Dolby®Digital bitstream available at low...
Owners Guide
Page 38
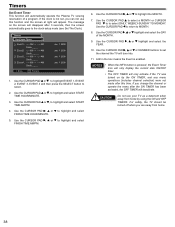
... to MONTH. 8. Use the CURSOR PAD to return to highlight and select FINISH TIME HOUR/MINUTE. 5. If the clock is not set the channel the TV will tune into. 11. Timers Set Event Timer Event1 : --:-- AM → --:-- Use the CURSOR PAD , or to select. 2. A þ in the box... Jan. 1 2008 1. Use the CURSOR PAD , or highlight and select the DAY of a program. Timers Set Event Timer This function will automatically operate the Plasma TV viewing reservation of the MONTH. 9. AM → --:-- Use the CURSOR PAD to select a MONTH or CURSOR PAD to to the clock setup mode (see ...
... to MONTH. 8. Use the CURSOR PAD to return to highlight and select FINISH TIME HOUR/MINUTE. 5. If the clock is not set the channel the TV will tune into. 11. Timers Set Event Timer Event1 : --:-- AM → --:-- Use the CURSOR PAD , or to select. 2. A þ in the box... Jan. 1 2008 1. Use the CURSOR PAD , or highlight and select the DAY of a program. Timers Set Event Timer This function will automatically operate the Plasma TV viewing reservation of the MONTH. 9. AM → --:-- Use the CURSOR PAD to select a MONTH or CURSOR PAD to to the clock setup mode (see ...
Owners Guide
Page 39
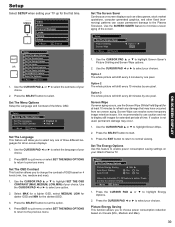
...for darker OSD and MIN for all on your choices. Press the SELECT button to select. Use the CURSOR PAD ▲ or ▼ to the Plasma Television. Set The Menu Options Setup the Language and Contrast of the screen. Use the CURSOR PAD ▲ or ▼ to the previous menu. ...Picture Orbiting Screen Wipe Move SEL Return ◄ Option 1 ► Wipe 1. Option 3 The whole picture will allow you to select any key to select your Hitachi Plasma TV. Press any one pixel. Press the CURSOR PAD ◄ or ► to continue viewing Move SEL Select 1.
...for darker OSD and MIN for all on your choices. Press the SELECT button to select. Use the CURSOR PAD ▲ or ▼ to the Plasma Television. Set The Menu Options Setup the Language and Contrast of the screen. Use the CURSOR PAD ▲ or ▼ to the previous menu. ...Picture Orbiting Screen Wipe Move SEL Return ◄ Option 1 ► Wipe 1. Option 3 The whole picture will allow you to select any key to select your Hitachi Plasma TV. Press any one pixel. Press the CURSOR PAD ◄ or ► to continue viewing Move SEL Select 1.
Owners Guide
Page 41
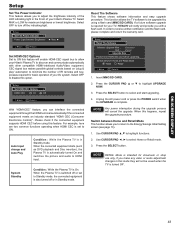
...this feature. Auto Input change and Auto Play Condition : While the Plasma TV is turned Off . NOTE Any power interruption during the upgrade process will enable HDMI-CEC signal bus to allow your Hitachi Plasma TV to discover and communicate automatically with a flash card. CEC signal ...CURSOR PAD ◄, ► to highlight UPGRADE NOW. 3. If a future software upgrade is required for basic operation of your Hitachi Plasma TV. Setup Reset The Software Software Upgrade Main : Vxxx.xxxx Sub : Vxx.xx Upgrade Now Please Insert MMC/SD card before using ...
...this feature. Auto Input change and Auto Play Condition : While the Plasma TV is turned Off . NOTE Any power interruption during the upgrade process will enable HDMI-CEC signal bus to allow your Hitachi Plasma TV to discover and communicate automatically with a flash card. CEC signal ...CURSOR PAD ◄, ► to highlight UPGRADE NOW. 3. If a future software upgrade is required for basic operation of your Hitachi Plasma TV. Setup Reset The Software Software Upgrade Main : Vxxx.xxxx Sub : Vxx.xx Upgrade Now Please Insert MMC/SD card before using ...
Owners Guide
Page 42
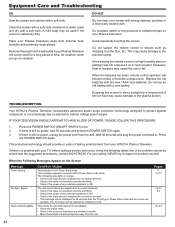
...service technician, check the following tables first. Pages 9, 14~17 14~17 44 33, 44 42 Do not place rubber or vinyl products or cellophane tape on the floor, etc. Do not.... Do not leave it on your Plasma Television away from the wall. The TV screen can be displayed for 25 seconds then the TV will go on vacation. Excessive heat ... heat, humidity and extremely dusty places. The indicating lamp lights in . TROUBLESHOOTING Your HITACHI Plasma Television incorporates advanced power surge protection technology designed to protect against component or circuit damage due...
...service technician, check the following tables first. Pages 9, 14~17 14~17 44 33, 44 42 Do not place rubber or vinyl products or cellophane tape on the floor, etc. Do not.... Do not leave it on your Plasma Television away from the wall. The TV screen can be displayed for 25 seconds then the TV will go on vacation. Excessive heat ... heat, humidity and extremely dusty places. The indicating lamp lights in . TROUBLESHOOTING Your HITACHI Plasma Television incorporates advanced power surge protection technology designed to protect against component or circuit damage due...


