
Owners Guide
Page 2
... a risk of Hitachi plasma televisions. Caution Never remove the back cover of cable entry as the disconnect device and shall remain readily operable. Adjust only those controls that the cable ground shall be located in the instructions, as close to call your product model. Please read it carefully and apply the knowledge you obtain from the apparatus. 11. Model and serial numbers are covered in...
... a risk of Hitachi plasma televisions. Caution Never remove the back cover of cable entry as the disconnect device and shall remain readily operable. Adjust only those controls that the cable ground shall be located in the instructions, as close to call your product model. Please read it carefully and apply the knowledge you obtain from the apparatus. 11. Model and serial numbers are covered in...
Owners Guide
Page 3
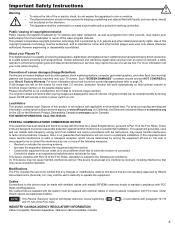
... of screen damages (Image Retention) Continuous on unit. The original contrast will display television closed captioning, ( or ), in a particular installation. For product recycling and disposal information, contact your Plasma TV This digital television is encouraged to try to correct the interference by turning power On/Off with remote control or power switch on -screen displays such as video games, stock market quotations, computer generated graphics, and other limited payper-view uses only unless...
... of screen damages (Image Retention) Continuous on unit. The original contrast will display television closed captioning, ( or ), in a particular installation. For product recycling and disposal information, contact your Plasma TV This digital television is encouraged to try to correct the interference by turning power On/Off with remote control or power switch on -screen displays such as video games, stock market quotations, computer generated graphics, and other limited payper-view uses only unless...

Owners Guide
Page 4
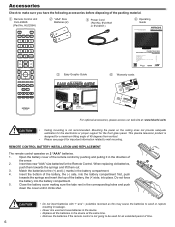
... always supported on the proper stands or installed according to the manufacturer's recommendations. • Flat Panel displays that are inappropriately situated on mind: THE ISSUE • The home theater entertainment experience is a growing trend and larger flat displays are popular purchases. WALL MOUNTING: IF YOU DECIDE TO WALL MOUNT YOUR FLAT PANEL DISPLAY, ALWAYS: • Use a mount that has been recommended by the display manufacturer and/or listed by...
... always supported on the proper stands or installed according to the manufacturer's recommendations. • Flat Panel displays that are inappropriately situated on mind: THE ISSUE • The home theater entertainment experience is a growing trend and larger flat displays are popular purchases. WALL MOUNTING: IF YOU DECIDE TO WALL MOUNT YOUR FLAT PANEL DISPLAY, ALWAYS: • Use a mount that has been recommended by the display manufacturer and/or listed by...
Owners Guide
Page 6
... '-' polarities reversed as this Operating Guide and please visit www.dtvtransition.org t Easy Graphic Guide PLASMA TELEVISION Operating Guide for P50A402, P50A202 and P42A202 IMPORTANT SAFETY INSTRUCTIONS 2-4 FIRST TIME USE ...5-17 THE REMOTE CONTROL 18-27 ON-SCREEN DISPLAY 28-41 USEFUL INFORMATION 42-48 LIMITED WARRANTY ...49 END USER LICENSE AGREEMENT FOR HITACHI DTV SOFTWARE 50-56 APPENDIXES ...57 INDEX ...58 y Warranty cards NE PAS AFFRANCHIR NNOUEIPNCFOEIMTTSSOETASDAATILGHSREEETYDATES maatRiphlrietotogadcitusohhtcneiet...
... '-' polarities reversed as this Operating Guide and please visit www.dtvtransition.org t Easy Graphic Guide PLASMA TELEVISION Operating Guide for P50A402, P50A202 and P42A202 IMPORTANT SAFETY INSTRUCTIONS 2-4 FIRST TIME USE ...5-17 THE REMOTE CONTROL 18-27 ON-SCREEN DISPLAY 28-41 USEFUL INFORMATION 42-48 LIMITED WARRANTY ...49 END USER LICENSE AGREEMENT FOR HITACHI DTV SOFTWARE 50-56 APPENDIXES ...57 INDEX ...58 y Warranty cards NE PAS AFFRANCHIR NNOUEIPNCFOEIMTTSSOETASDAATILGHSREEETYDATES maatRiphlrietotogadcitusohhtcneiet...
Owners Guide
Page 8
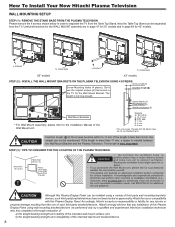
... To Install Your New Hitachi Plasma Television WALL MOUNTING SETUP STEP (1) : REMOVE THE STAND BASE FROM THE PLASMA TELEVISION Please remove the 4 screws shown below in the TV for the Wall Mount Bracket. Useful dimensions for the WALL MOUNT assembly are in page 47 for 50" models and in page 48 for additional info and guidance. Example : A = B+C+D+E A: 13~15 mm. The screw type :Theread ISO M6 (Metric type, do not use or compatibility with this Plasma Display Panel. Keep...
... To Install Your New Hitachi Plasma Television WALL MOUNTING SETUP STEP (1) : REMOVE THE STAND BASE FROM THE PLASMA TELEVISION Please remove the 4 screws shown below in the TV for the Wall Mount Bracket. Useful dimensions for the WALL MOUNT assembly are in page 47 for 50" models and in page 48 for additional info and guidance. Example : A = B+C+D+E A: 13~15 mm. The screw type :Theread ISO M6 (Metric type, do not use or compatibility with this Plasma Display Panel. Keep...
Owners Guide
Page 9
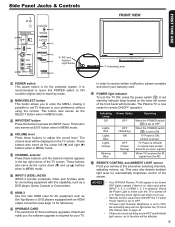
... the POWER switch ( ) is set to ON. TV Power is for remote ON/OFF operation. TV Power is selected. REMOTE CONTROL and AMBIENT LIGHT sensor Point your warranty card. This button also serves as Set-Top-Boxes or DVD players equipped with no signal input except antenna (no video input when INPUT 1, 2, 3, or HDMI 1, 2, 3 is ON with an HDMI output connection (see page 14 for automatically brightness control of the front bezel will appear to adjust the sound level. The Plasma TV...
... the POWER switch ( ) is set to ON. TV Power is for remote ON/OFF operation. TV Power is selected. REMOTE CONTROL and AMBIENT LIGHT sensor Point your warranty card. This button also serves as Set-Top-Boxes or DVD players equipped with no signal input except antenna (no video input when INPUT 1, 2, 3, or HDMI 1, 2, 3 is ON with an HDMI output connection (see page 14 for automatically brightness control of the front bezel will appear to adjust the sound level. The Plasma TV...
Owners Guide
Page 11
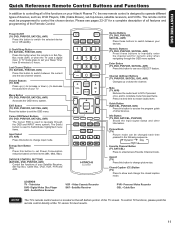
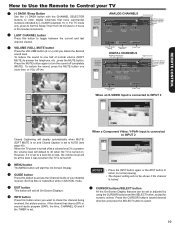
... functions on your Hitachi Plasma TV, the new remote control is designed to operate different types of devices, such as a SELECT feature. Enter Button (TV, DVD, PVR/VCR, SAT/CBL, AVR) Press this button to change the closed caption mode. Press it a third time to enter/access Favorite Channel mode. Dynamic Day Night Favorite Channel Button (TV, SAT/CBL) Press to restore audio level. Television DVD- In TV mode press to set Power Consumption reduction based on the...
... functions on your Hitachi Plasma TV, the new remote control is designed to operate different types of devices, such as a SELECT feature. Enter Button (TV, DVD, PVR/VCR, SAT/CBL, AVR) Press this button to change the closed caption mode. Press it a third time to enter/access Favorite Channel mode. Dynamic Day Night Favorite Channel Button (TV, SAT/CBL) Press to restore audio level. Television DVD- In TV mode press to set Power Consumption reduction based on the...
Owners Guide
Page 12
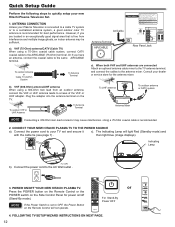
... UHF adapter. Using a 75-Ohm coaxial cable is set and secure it c). then light blue (image displays). Press the POWER button on the Remote Control or the POWER switch on the Side Control Panel for power on the TV. However, if you have an antenna, connect the coaxial cable to OFF, the Power Button on the Remote Control will light Red (Standby mode) and with the cable tie (see page 7) . Plug the adapter into the antenna terminal on /off (Stand-By mode). or For Stand-By Power...
... UHF adapter. Using a 75-Ohm coaxial cable is set and secure it c). then light blue (image displays). Press the POWER button on the Remote Control or the POWER switch on the Side Control Panel for power on the TV. However, if you have an antenna, connect the coaxial cable to OFF, the Power Button on the Remote Control will light Red (Standby mode) and with the cable tie (see page 7) . Plug the adapter into the antenna terminal on /off (Stand-By mode). or For Stand-By Power...
Owners Guide
Page 14
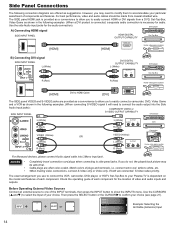
... signal SIDE INPUT PANEL L (White) R (Red) [HDMI] DVI to HDMI Cable DVI DIGITAL OUTPUT CAPABILITY L (White) OUTPUT or L R R (Red) [DVI] DIGITAL OUTPUT DVD player Set-Top Box Home video game system The SIDE panel VIDEO and S-VIDEO jacks are provided as a convenience to allow you use to connect the VCR, camcorder, DVD player, or HDTV Set-Top-Box to your particular assortment of video and audio inputs and outputs. For best performance, video and audio cables should be abnormal. • Cable plugs are often color-coded. NOTES • Completely insert connection cord...
... signal SIDE INPUT PANEL L (White) R (Red) [HDMI] DVI to HDMI Cable DVI DIGITAL OUTPUT CAPABILITY L (White) OUTPUT or L R R (Red) [DVI] DIGITAL OUTPUT DVD player Set-Top Box Home video game system The SIDE panel VIDEO and S-VIDEO jacks are provided as a convenience to allow you use to connect the VCR, camcorder, DVD player, or HDTV Set-Top-Box to your particular assortment of video and audio inputs and outputs. For best performance, video and audio cables should be abnormal. • Cable plugs are often color-coded. NOTES • Completely insert connection cord...

Owners Guide
Page 17
... a fixed output. FIRST TIME USE Rear Panel Connections CONNECTING AN EQUIPMENT SOURCE WITH HDMI OR DVI CAPABILITY TO HDMI 1, HDMI 2 1. NOTES • Completely insert the connection cord plugs when connecting to the Optical input of the Plasma TV to the last channel viewed, select CABLE or AIR from the Optical out to rear panel jacks. The Volume of plugs and terminals, i.e. Connect an optical cable from the INPUTS menu. 17 Press the INPUT button, then select HDMI 1 or 2 to a display. • The connected digital output device controls the HDMI interface so proper set-up...
... a fixed output. FIRST TIME USE Rear Panel Connections CONNECTING AN EQUIPMENT SOURCE WITH HDMI OR DVI CAPABILITY TO HDMI 1, HDMI 2 1. NOTES • Completely insert the connection cord plugs when connecting to the Optical input of the Plasma TV to the last channel viewed, select CABLE or AIR from the Optical out to rear panel jacks. The Volume of plugs and terminals, i.e. Connect an optical cable from the INPUTS menu. 17 Press the INPUT button, then select HDMI 1 or 2 to a display. • The connected digital output device controls the HDMI interface so proper set-up...

Owners Guide
Page 18
... the DVD button), for your regular tuned channels. See pages 22~27 for channels 1 to 9, or simply press the single digit channel you are grouped together in TV mode. You can also delete a channel from WHITE to highlighted GREEN. The Remote Control POWER button Press this button to turn the TV set -top-boxes, satellite receivers, DVD players, and other audio/video equipment with one touch. Press it again to return to select channels. Use the CHANNEL SELECTOR buttons...
... the DVD button), for your regular tuned channels. See pages 22~27 for channels 1 to 9, or simply press the single digit channel you are grouped together in TV mode. You can also delete a channel from WHITE to highlighted GREEN. The Remote Control POWER button Press this button to turn the TV set -top-boxes, satellite receivers, DVD players, and other audio/video equipment with one touch. Press it again to return to select channels. Use the CHANNEL SELECTOR buttons...
Owners Guide
Page 19
... Picture Format Auto STEREO 10:00 PM Program Information Program Run Time Closed Caption Setting Audio Source Selection Event Timer DIGITAL CHANNELS Digital Closed Caption (only when available) Digital Channel Show Name 3:00PM- 3:30PM REGION 5 Multi DTvCC TV-G D 1080i Air 15-1 KPBS-HD 3:17PM Main Picture Source & Channel Indication Broadcast Channel Indication Clock Audio Broadcast Alternate Broadcast Picture Format Rating Rating Program Description (Press INFO again for numeric entries. When the TV power is turned off at the level it is locked...
... Picture Format Auto STEREO 10:00 PM Program Information Program Run Time Closed Caption Setting Audio Source Selection Event Timer DIGITAL CHANNELS Digital Closed Caption (only when available) Digital Channel Show Name 3:00PM- 3:30PM REGION 5 Multi DTvCC TV-G D 1080i Air 15-1 KPBS-HD 3:17PM Main Picture Source & Channel Indication Broadcast Channel Indication Clock Audio Broadcast Alternate Broadcast Picture Format Rating Rating Program Description (Press INFO again for numeric entries. When the TV power is turned off at the level it is locked...
Owners Guide
Page 30
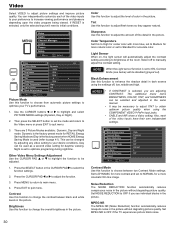
... color in the picture. Set MPEG NR to NORMAL for more cinematic film like image. Video Select VIDEO to change the contrast betwen black and white levels in the picture. Brightness Use this function to ON, Contrast Mode (see individual blocks in the picture. Sharpness Use this function to manually adjust the contrast setting. Use the CURSOR buttons or to adjust the amount of the video inputs have their own independent settings. Other Video Menu Settings Adjustment Use...
... color in the picture. Set MPEG NR to NORMAL for more cinematic film like image. Video Select VIDEO to change the contrast betwen black and white levels in the picture. Brightness Use this function to ON, Contrast Mode (see individual blocks in the picture. Sharpness Use this function to manually adjust the contrast setting. Use the CURSOR buttons or to adjust the amount of the video inputs have their own independent settings. Other Video Menu Settings Adjustment Use...
Owners Guide
Page 33
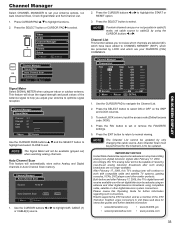
... February 17, 2009. Channel Manager Auto Channel Scan Source Air Auto Channel Scan Start Move SEL Return Reset 1. Channel Manager Channel List FAV CH# 3-1 4 5 6 7 8 9 10 No Info Skip Lock ID On Off ------ Press the SELECT button to select. After February 17, 2009, this TV's digital tuner will continue to work with compatible cable and satellite TV systems, gaming consoles, VCRs, DVD players and other digital television system connections. This feature will not be updated by LOCK and which are...
... February 17, 2009. Channel Manager Auto Channel Scan Source Air Auto Channel Scan Start Move SEL Return Reset 1. Channel Manager Channel List FAV CH# 3-1 4 5 6 7 8 9 10 No Info Skip Lock ID On Off ------ Press the SELECT button to select. After February 17, 2009, this TV's digital tuner will continue to work with compatible cable and satellite TV systems, gaming consoles, VCRs, DVD players and other digital television system connections. This feature will not be updated by LOCK and which are...
Owners Guide
Page 40
... a video input signal is displayed on screen. • Digital Captions language will automatically turn the TV on . Use the CURSOR PAD and ▼ to highlight and select the function to the previous menu. Auto TV Off Use this function. 2. Press any of digital captions. To do this feature to select between picture and user control of TV is used again. Press EXIT to quit menu or select SET THE CLOSED CAPTIONS to return to change. 2. Caption Mode: CAPTIONS is...
... a video input signal is displayed on screen. • Digital Captions language will automatically turn the TV on . Use the CURSOR PAD and ▼ to highlight and select the function to the previous menu. Auto TV Off Use this function. 2. Press any of digital captions. To do this feature to select between picture and user control of TV is used again. Press EXIT to quit menu or select SET THE CLOSED CAPTIONS to return to change. 2. Caption Mode: CAPTIONS is...
Owners Guide
Page 41
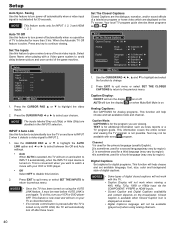
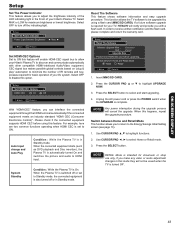
... adjust the brightness intensity of the LED indicating light in the Front of your Hitachi Plasma TV. Unplug the AC power cord or press the POWER switch when the UPGRADE is set to turn off or in Standby mode. Use CURSOR PAD ▲,▼ to highlight UPGRADE NOW. 3. Use CURSOR PAD ◄, ► to receive written notification and the flash card, please complete and return the warranty card. ON-SCREEN DISPLAY 41 Setup Set HDMI-CEC Options HDMI...
... adjust the brightness intensity of the LED indicating light in the Front of your Hitachi Plasma TV. Unplug the AC power cord or press the POWER switch when the UPGRADE is set to turn off or in Standby mode. Use CURSOR PAD ▲,▼ to highlight UPGRADE NOW. 3. Use CURSOR PAD ◄, ► to receive written notification and the flash card, please complete and return the warranty card. ON-SCREEN DISPLAY 41 Setup Set HDMI-CEC Options HDMI...
Owners Guide
Page 43
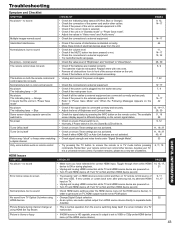
... "Standby mode" or "Power Save mode". • Adjust the values in TV mode before pressing commands. Turn TV on both the remote control and control panel do not work . Replace them while HDMI device is ON or during channel change w/ using HDMI Set Top Boxes CHECKLIST • Make sure you have selected the correct HDMI input. no sound Error notice comes to "Power Save Mode" and "When the Following Messages Appears on the Screen". • Check if the signal cable is a universal remote control. Turn TV...
... "Standby mode" or "Power Save mode". • Adjust the values in TV mode before pressing commands. Turn TV on both the remote control and control panel do not work . Replace them while HDMI device is ON or during channel change w/ using HDMI Set Top Boxes CHECKLIST • Make sure you have selected the correct HDMI input. no sound Error notice comes to "Power Save Mode" and "When the Following Messages Appears on the Screen". • Check if the signal cable is a universal remote control. Turn TV...
Owners Guide
Page 46
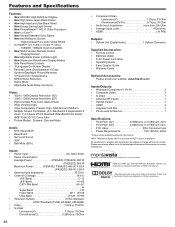
...• HDMI 19 PIN) Outputs: • Optical Out (Digital Audio 1 Optical Connector Supplied Accessories: • Remote Control • Batteries (AAA) • 6' AC Power cord cable • Operating Guide • Easy Graphic Guide • Warranty Cards Optional Accessories: Please access our website: www.hitachi.us /tv for detailed specifications and dimensions for Consumer Use • Power Requirements 108-132VAC, 60Hz 1 Screen mode availability varies by input format HDTV Televisions display HDTV only when an HDTV source is available All specifications, weights, and dimensions are...
...• HDMI 19 PIN) Outputs: • Optical Out (Digital Audio 1 Optical Connector Supplied Accessories: • Remote Control • Batteries (AAA) • 6' AC Power cord cable • Operating Guide • Easy Graphic Guide • Warranty Cards Optional Accessories: Please access our website: www.hitachi.us /tv for detailed specifications and dimensions for Consumer Use • Power Requirements 108-132VAC, 60Hz 1 Screen mode availability varies by input format HDTV Televisions display HDTV only when an HDTV source is available All specifications, weights, and dimensions are...
Owners Guide
Page 51
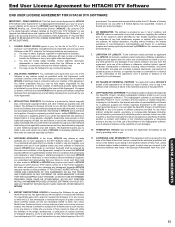
...-transferable, revocable license to repair a defect, error or bug in any way out of any person or entity who you of goods or services, which the U.S. NO FAILURE OF ESSENTIAL PURPOSE. This Agreement grants you , for HITACHI DTV Software END USER LICENSE AGREEMENT FOR HITACHI DTV SOFTWARE IMPORTANT - By using the DTV or the digital television software installed on any theory of liability...
...-transferable, revocable license to repair a defect, error or bug in any way out of any person or entity who you of goods or services, which the U.S. NO FAILURE OF ESSENTIAL PURPOSE. This Agreement grants you , for HITACHI DTV Software END USER LICENSE AGREEMENT FOR HITACHI DTV SOFTWARE IMPORTANT - By using the DTV or the digital television software installed on any theory of liability...
Owners Guide
Page 59
... Tips 2-4 Channel Manager 33 Auto Channel Scan 33 Clock 37 Closed Captions Caption Display 40 Color Temperature 30 Color 30 Color Space 31 Contrast Mode 30 E Energy Saving Features 5 Event Timer 38 External Video Sources 14-17 F Favorite Channel 18 Features 46 G Game Mode 40 H HDMI 14, 15,17 HDMI-CEC 41 I Input Setup 40 L Language Menu Language 39 Lip Sync 31 Locks Change Access Code 34 Channel Lock 34 Lock Panel Control Keys 34 Movie Ratings 34, 35 TV Ratings 34, 35 TV Ratings...
... Tips 2-4 Channel Manager 33 Auto Channel Scan 33 Clock 37 Closed Captions Caption Display 40 Color Temperature 30 Color 30 Color Space 31 Contrast Mode 30 E Energy Saving Features 5 Event Timer 38 External Video Sources 14-17 F Favorite Channel 18 Features 46 G Game Mode 40 H HDMI 14, 15,17 HDMI-CEC 41 I Input Setup 40 L Language Menu Language 39 Lip Sync 31 Locks Change Access Code 34 Channel Lock 34 Lock Panel Control Keys 34 Movie Ratings 34, 35 TV Ratings 34, 35 TV Ratings...


