
Owners Guide
Page 2
... ASPECT. NOTE: • There are no user serviceable parts inside the Projection Monitor. • Model and serial numbers are not expressly approved by ASPECT Brand Electronics could void the user's warranty. The exclamation point within the product's enclosure that any changes or modifications made to operate the equipment. Please fill out your warranty card and mail it to the proper operation of important operating and maintenance (servicing) instructions...
... ASPECT. NOTE: • There are no user serviceable parts inside the Projection Monitor. • Model and serial numbers are not expressly approved by ASPECT Brand Electronics could void the user's warranty. The exclamation point within the product's enclosure that any changes or modifications made to operate the equipment. Please fill out your warranty card and mail it to the proper operation of important operating and maintenance (servicing) instructions...
Owners Guide
Page 3
... OF SCREEN BURN This Wide Screen Projection Monitor is connected to the receiver be viewed mostly in the vicinity of the polarized or grounding-type plug. Do not defeat the safety purpose of overhead power lines or other fixed (non-moving pictures. Protect the power cord from tip-over. 13. Use only with the apparatus. An outdoor antenna should not be located in wide screen format or...
... OF SCREEN BURN This Wide Screen Projection Monitor is connected to the receiver be viewed mostly in the vicinity of the polarized or grounding-type plug. Do not defeat the safety purpose of overhead power lines or other fixed (non-moving pictures. Protect the power cord from tip-over. 13. Use only with the apparatus. An outdoor antenna should not be located in wide screen format or...

Owners Guide
Page 5
... the location selected allows a free flow of air to and from each side of the receiver cabinet and as close to the side or behind the viewing area. The best picture is no picture distortion. 5 If the Projection Monitor's audio output will be connected to the height of the set failure, do not place the Projection Monitor where temperatures can be used to 18 feet from the Projection Monitor...
... the location selected allows a free flow of air to and from each side of the receiver cabinet and as close to the side or behind the viewing area. The best picture is no picture distortion. 5 If the Projection Monitor's audio output will be connected to the height of the set failure, do not place the Projection Monitor where temperatures can be used to 18 feet from the Projection Monitor...
Owners Guide
Page 7
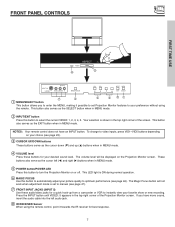
... best response. 7 This button also serves as the EXIT button when in the top right corner of the screen. Press the INPUT button until VIDEO: 5 appears in MENU mode. FRONT PANEL CONTROLS FIRST TIME USE ASPECT ̆ PULL POWER ASPECT ̆ PULL POWER ቩ ቦ INPUT 5 S-VIDEO AUDIO VIDEO L/MONO R MAGIC FOCUS VOL- This button also serves as the SELECT button when in the top right corner of the Projection Monitor screen. The volume level will not work when adjustment mode...
... best response. 7 This button also serves as the EXIT button when in the top right corner of the screen. Press the INPUT button until VIDEO: 5 appears in MENU mode. FRONT PANEL CONTROLS FIRST TIME USE ASPECT ̆ PULL POWER ASPECT ̆ PULL POWER ቩ ቦ INPUT 5 S-VIDEO AUDIO VIDEO L/MONO R MAGIC FOCUS VOL- This button also serves as the SELECT button when in the top right corner of the Projection Monitor screen. The volume level will not work when adjustment mode...
Owners Guide
Page 12
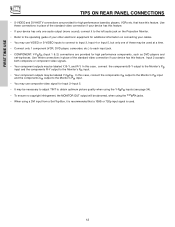
... has this case, connect the components B-Y output to the Monitor's PB input and the components R-Y output to Input 3, Input 4 or Input 5, but only one of these connections in place of the standard video connection if your cables. • You may use composite video signal for Input 2~Input 5. • It may be labeled Y-CBCR. FIRST TIME USE TIPS ON REAR PANEL CONNECTIONS • S-VIDEO and DVI-HDTV connections are provided for high performance components, such as DVD players and set-top-boxes.
... has this case, connect the components B-Y output to the Monitor's PB input and the components R-Y output to Input 3, Input 4 or Input 5, but only one of these connections in place of the standard video connection if your cables. • You may use composite video signal for Input 2~Input 5. • It may be labeled Y-CBCR. FIRST TIME USE TIPS ON REAR PANEL CONNECTIONS • S-VIDEO and DVI-HDTV connections are provided for high performance components, such as DVD players and set-top-boxes.
Owners Guide
Page 14
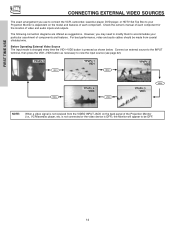
.... Check the owner's manual of video and audio inputs and outputs. However, you use to connect the VCR, camcorder, laserdisc player, DVD player, or HDTV Set Top Box to your particular assortment of the Projection Monitor (i.e., VCR/laserdisc player, etc. The following connection diagrams are offered as necessary to the INPUT terminal, then press the VID1~VID5 button as suggestions. Connect an external source to view the input source (see page 22). Before Operating External Video Source The input mode is changed...
.... Check the owner's manual of video and audio inputs and outputs. However, you use to connect the VCR, camcorder, laserdisc player, DVD player, or HDTV Set Top Box to your particular assortment of the Projection Monitor (i.e., VCR/laserdisc player, etc. The following connection diagrams are offered as necessary to the INPUT terminal, then press the VID1~VID5 button as suggestions. Connect an external source to view the input source (see page 22). Before Operating External Video Source The input mode is changed...
Owners Guide
Page 20
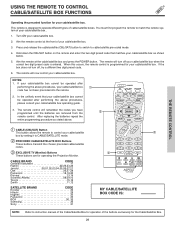
... remote at the IR Receiver sensor (see page 7) of VCRs, CBL (Cable TV) converters, satellite receivers, DVD players, and other audio/video equipment. The remote will now control your TV (Projection Monitor), VCR, DVD or cable/satellite box depending on which mode is designed to operate different types of the Projection Monitor and press the TV button. The remote will now control your DVD/VCR player (see page 29 for instruction on how to program the remote to control your ASPECT Projection Monitor, the new remote control...
... remote at the IR Receiver sensor (see page 7) of VCRs, CBL (Cable TV) converters, satellite receivers, DVD players, and other audio/video equipment. The remote will now control your TV (Projection Monitor), VCR, DVD or cable/satellite box depending on which mode is designed to operate different types of the Projection Monitor and press the TV button. The remote will now control your DVD/VCR player (see page 29 for instruction on how to program the remote to control your ASPECT Projection Monitor, the new remote control...
Owners Guide
Page 21
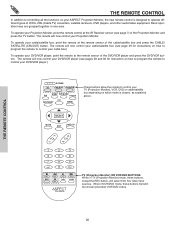
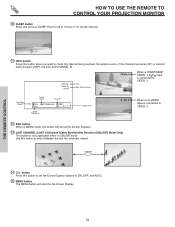
... REMOTE TO CONTROL YOUR PROJECTION MONITOR ቢ PROJECTION MONITOR POWER button ባ PICTURE-IN-PICTURE ቤ DAY/NIGHT button ብ SELECT, MENU, CURSOR buttons ቦ VOLUME, MUTE buttons POWER TV CBL/SAT DVD/VCR SWAP PIP MODE PIP FREEZE C.C. Select Night for night time viewing with less brightness and contrast for a more brightness and contrast to compete with more detailed picture (see page 33 for numeric entries. The CURSOR will highlight functions or adjust and set or adjusted by using...
... REMOTE TO CONTROL YOUR PROJECTION MONITOR ቢ PROJECTION MONITOR POWER button ባ PICTURE-IN-PICTURE ቤ DAY/NIGHT button ብ SELECT, MENU, CURSOR buttons ቦ VOLUME, MUTE buttons POWER TV CBL/SAT DVD/VCR SWAP PIP MODE PIP FREEZE C.C. Select Night for night time viewing with less brightness and contrast for a more brightness and contrast to compete with more detailed picture (see page 33 for numeric entries. The CURSOR will highlight functions or adjust and set or adjusted by using...
Owners Guide
Page 22
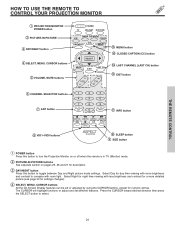
... the video input sources between the five video inputs. THE REMOTE CONTROL ▲ ▲ ▲ HOW TO USE THE REMOTE TO CONTROL YOUR PROJECTION MONITOR ቦ VOLUME, MUTE button Press the VOLUME up (̆) or down (̄) button until two dashes appear next to the channel display on and Closed Caption is set to AUTO (See page 52). ቧ CHANNEL selector buttons [Cable Box/Satellite Receiver (CBL/SAT)Mode Only] These buttons are used to turn the sound off completely (MUTE). Channel...
... the video input sources between the five video inputs. THE REMOTE CONTROL ▲ ▲ ▲ HOW TO USE THE REMOTE TO CONTROL YOUR PROJECTION MONITOR ቦ VOLUME, MUTE button Press the VOLUME up (̆) or down (̄) button until two dashes appear next to the channel display on and Closed Caption is set to AUTO (See page 52). ቧ CHANNEL selector buttons [Cable Box/Satellite Receiver (CBL/SAT)Mode Only] These buttons are used to turn the sound off completely (MUTE). Channel...
Owners Guide
Page 24
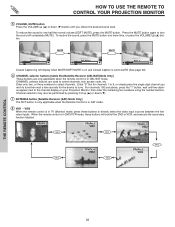
... 3 hours in MENU mode, this button to VIDEO: 1. Day/Night Mode Aspect Mode Vitual HD Day CC On 4:3 Expanded HD1080i Zzzz -:-- Use this button will start the On-Screen Display. Closed Captioning Sleep Timer S - HOW TO USE THE REMOTE TO CONTROL YOUR PROJECTION MONITOR ቫ SLEEP button Show and set the Closed Caption options to ON, OFF, and AUTO. ቱ MENU button The MENU button will exit all On-Screen Displays. ቯ LAST CHANNEL (LAST CH) button [Cable Box/Satellite Receiver (CBL/SAT) Mode Only] This button is...
... 3 hours in MENU mode, this button to VIDEO: 1. Day/Night Mode Aspect Mode Vitual HD Day CC On 4:3 Expanded HD1080i Zzzz -:-- Use this button will start the On-Screen Display. Closed Captioning Sleep Timer S - HOW TO USE THE REMOTE TO CONTROL YOUR PROJECTION MONITOR ቫ SLEEP button Show and set the Closed Caption options to ON, OFF, and AUTO. ቱ MENU button The MENU button will exit all On-Screen Displays. ቯ LAST CHANNEL (LAST CH) button [Cable Box/Satellite Receiver (CBL/SAT) Mode Only] This button is...
Owners Guide
Page 29
... buttons transmit the chosen precoded cable/satellite codes. ቤ EXCLUSIVE TV (Monitor) Buttons These buttons are removed from the remote control. POWER TV CBL/SAT DVD/VCR SWAP PIP MODE PIP FREEZE C.C. Press and release the cable/satellite (CBL/SAT) button to switch to match the remote system of your cable/satellite box. If the box does not turn off , try a different two digit preset code. 6. The remote control will now control your cable/satellite box as stated above. DAY/NIGHT MENU...
... buttons transmit the chosen precoded cable/satellite codes. ቤ EXCLUSIVE TV (Monitor) Buttons These buttons are removed from the remote control. POWER TV CBL/SAT DVD/VCR SWAP PIP MODE PIP FREEZE C.C. Press and release the cable/satellite (CBL/SAT) button to switch to match the remote system of your cable/satellite box. If the box does not turn off , try a different two digit preset code. 6. The remote control will now control your cable/satellite box as stated above. DAY/NIGHT MENU...
Owners Guide
Page 32
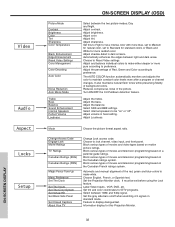
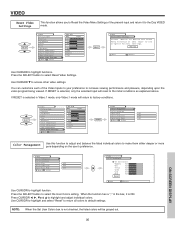
... Video Audio Aspect Locks Setup Picture Mode Contrast Brightness Color Tint Sharpness Color Temperature Black Enhancement Edge Enhancement Reset Video Settings Color Management Color Decoding Auto Color Noise Reduction Auto Movie Mode Treble Bass Balance Sound Enhancement Internal Speakers Perfect Volume Loudness ON-SCREEN DISPLAY (OSD) Select between light and dark areas. Adjust shadow detail in the picture. Choose to maintain constant color levels even after a program or channel changes. Adjust brightness. Adjust color. Reduces conspicuous noise in dark screens. Adjust...
... Video Audio Aspect Locks Setup Picture Mode Contrast Brightness Color Tint Sharpness Color Temperature Black Enhancement Edge Enhancement Reset Video Settings Color Management Color Decoding Auto Color Noise Reduction Auto Movie Mode Treble Bass Balance Sound Enhancement Internal Speakers Perfect Volume Loudness ON-SCREEN DISPLAY (OSD) Select between light and dark areas. Adjust shadow detail in the picture. Choose to maintain constant color levels even after a program or channel changes. Adjust brightness. Adjust color. Reduces conspicuous noise in dark screens. Adjust...
Owners Guide
Page 34
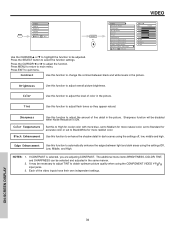
... between black and white levels in dark scenes using the settings Off, Low, Middle, and High. NOTES: 1. Each of fine detail in the same manner. 2. Use this function to adjust overall picture brightness. Sharpness function will be adjusted. If CONTRAST is ON. It may be selected and adjusted in the picture. VIDEO MENU Video Audio Aspect Locks Setup Move SEL Sel SELECT or Video Picture Mode Contrast Brightness Color Tint Sharpness Color Temperature Black Enhancement Edge Enhancement Reset Video Settings...
... between black and white levels in dark scenes using the settings Off, Low, Middle, and High. NOTES: 1. Each of fine detail in the same manner. 2. Use this function to adjust overall picture brightness. Sharpness function will be adjusted. If CONTRAST is ON. It may be selected and adjusted in the picture. VIDEO MENU Video Audio Aspect Locks Setup Move SEL Sel SELECT or Video Picture Mode Contrast Brightness Color Tint Sharpness Color Temperature Black Enhancement Edge Enhancement Reset Video Settings...
Owners Guide
Page 35
... Video Picture Mode Contrast Brightness Color Tint Sharpness Color Temperature Black Enhancement Edge Enhancement Reset Video Settings Move SEL Select Ant A/B Day 100% 50% 50% Night 50% High Middle High SELECT Video Color Management Color Decoding Auto Color Noise Reduction Auto Movie Mode Move SEL Select Off Off Off Color Management Use this function to adjust and balance the listed individual colors to make them either deeper or more pure depending on this input to factory conditions. Video Color...
... Video Picture Mode Contrast Brightness Color Tint Sharpness Color Temperature Black Enhancement Edge Enhancement Reset Video Settings Move SEL Select Ant A/B Day 100% 50% 50% Night 50% High Middle High SELECT Video Color Management Color Decoding Auto Color Noise Reduction Auto Movie Mode Move SEL Select Off Off Off Color Management Use this function to adjust and balance the listed individual colors to make them either deeper or more pure depending on this input to factory conditions. Video Color...
Owners Guide
Page 40
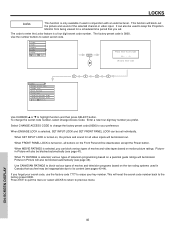
... SET FRONT PANEL LOCK can be blocked automatically (see page 42). Picture-in Canada that you forget your preference. To change the factory preset code (0000) to enter the Locks feature is selected, various types of the selected channel or video input. When TV RATINGS is a four digit secret code number. LOCKS Locks This function is 0000. Select CHANGE ACCESS CODE to change the secret code number, select Change Access Code. This function will also be set . Video Audio Aspect Locks Setup...
... SET FRONT PANEL LOCK can be blocked automatically (see page 42). Picture-in Canada that you forget your preference. To change the factory preset code (0000) to enter the Locks feature is selected, various types of the selected channel or video input. When TV RATINGS is a four digit secret code number. LOCKS Locks This function is 0000. Select CHANGE ACCESS CODE to change the secret code number, select Change Access Code. This function will also be set . Video Audio Aspect Locks Setup...
Owners Guide
Page 46
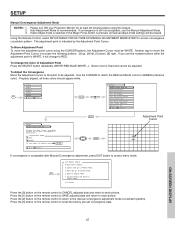
... the white lines. Over a period of alignment due to self-adjust. The outputs of the red and blue tubes can drift out of time, the picture tubes can be completed to correct for Magnetic Influences. However, the convergence correction process needs to be adjusted. MENU Video Audio Aspect Locks Setup Move SEL Sel SELECT or Setup Magic Focus Tune Up Menu Preference Set The Clock Set The Inputs Set The Color System Set Virtual HD Set Black Side Panel Set Closed Captions About Your TV...
... the white lines. Over a period of alignment due to self-adjust. The outputs of the red and blue tubes can drift out of time, the picture tubes can be completed to correct for Magnetic Influences. However, the convergence correction process needs to be adjusted. MENU Video Audio Aspect Locks Setup Move SEL Sel SELECT or Setup Magic Focus Tune Up Menu Preference Set The Clock Set The Inputs Set The Color System Set Virtual HD Set Black Side Panel Set Closed Captions About Your TV...
Owners Guide
Page 47
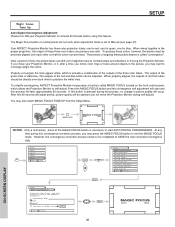
.... MENU Video Audio Aspect Locks Setup Move SEL Sel SELECT Setup Magic Focus Tune Up Menu Preference Set The Clock Set The Inputs Set The Color System Set Virtual HD Set Black Side Panel Set Closed Captions About Your TV Move SEL Select Setup Magic Focus Tune Up Aligns the Red, Green, and Blue colors to the manual convergence adjustment mode (crosshatch pattern). Press the [2] button on the remote control to CANCEL adjusted data and return to RED. Please turn ON your Projection Monitor for Magnetic Influences. Using the Remote Control, select SETUP-MAGIC FOCUS...
.... MENU Video Audio Aspect Locks Setup Move SEL Sel SELECT Setup Magic Focus Tune Up Menu Preference Set The Clock Set The Inputs Set The Color System Set Virtual HD Set Black Side Panel Set Closed Captions About Your TV Move SEL Select Setup Magic Focus Tune Up Aligns the Red, Green, and Blue colors to the manual convergence adjustment mode (crosshatch pattern). Press the [2] button on the remote control to CANCEL adjusted data and return to RED. Please turn ON your Projection Monitor for Magnetic Influences. Using the Remote Control, select SETUP-MAGIC FOCUS...

Owners Guide
Page 51
... color system. 3. ON-SCREEN DISPLAY 51 SETUP Set The Color System This function allows you to select between 1080i and 540p. Use for DTV programs. HDTV - All component color type settings will affect only color component input you are currently viewing. If Color System is cancelled at Power OFF. It is recommended to access this feature to automatically change tint and color coordinates for High Vision Signal Y-PBPR from HDTV Set-Top Box. High Definition Television...
... color system. 3. ON-SCREEN DISPLAY 51 SETUP Set The Color System This function allows you to select between 1080i and 540p. Use for DTV programs. HDTV - All component color type settings will affect only color component input you are currently viewing. If Color System is cancelled at Power OFF. It is recommended to access this feature to automatically change tint and color coordinates for High Vision Signal Y-PBPR from HDTV Set-Top Box. High Definition Television...
Owners Guide
Page 56
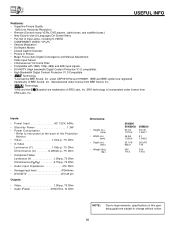
... • Audio input Impedence 47k Ohm • Average input level 470mVrms • DVI-HDTV DVI 25 pin Outputs: • Video 1.0Vp-p. 75 Ohm • Audio (Fixed 470mVrms, 1k Ohm Dimensions: • Height (in.) (mm) • Width (in.) (mm) • Depth (in Picture • Magic Focus (Auto Digital Convergence and Manual Adjustment) • Video Input Sensor • 3 Dimensional Y/C Comb Filter • Compatible with 1080i, 720p, 480p and 480i input signals. • DVI-HDTV (High bandwidth Digital Content...
... • Audio input Impedence 47k Ohm • Average input level 470mVrms • DVI-HDTV DVI 25 pin Outputs: • Video 1.0Vp-p. 75 Ohm • Audio (Fixed 470mVrms, 1k Ohm Dimensions: • Height (in.) (mm) • Width (in.) (mm) • Depth (in Picture • Magic Focus (Auto Digital Convergence and Manual Adjustment) • Video Input Sensor • 3 Dimensional Y/C Comb Filter • Compatible with 1080i, 720p, 480p and 480i input signals. • DVI-HDTV (High bandwidth Digital Content...
Owners Guide
Page 58
English), 43 TV Ratings (Canadian - French), 44 Loudness, 37 M Magic Focus Auto Convergence, 7, 46 Manual Convergence, 47 Menu Preference Language, 48 Background, 49 Monitor Out, 9 P Picture Mode, 33 Picture-in-Picture (PIP), 25 - 27 Picture-outside-Picture (POP), 25 INDEX R Remote Control Functions, 20 - 31 Programming Codes, 28 - 30 Installing Batteries, 4 S Sharpness, 34 Sound Enhancement, 38 Speakers, 37 Connecting External Speakers, 5, 13 T Time, 49 Tint, 34 Treble, 37 V Vertical Position, 39 Video Settings, 33 - 36 58 A Accessories, 4 Aspect Ratio, 23 Audio (Sound Enhancement...
English), 43 TV Ratings (Canadian - French), 44 Loudness, 37 M Magic Focus Auto Convergence, 7, 46 Manual Convergence, 47 Menu Preference Language, 48 Background, 49 Monitor Out, 9 P Picture Mode, 33 Picture-in-Picture (PIP), 25 - 27 Picture-outside-Picture (POP), 25 INDEX R Remote Control Functions, 20 - 31 Programming Codes, 28 - 30 Installing Batteries, 4 S Sharpness, 34 Sound Enhancement, 38 Speakers, 37 Connecting External Speakers, 5, 13 T Time, 49 Tint, 34 Treble, 37 V Vertical Position, 39 Video Settings, 33 - 36 58 A Accessories, 4 Aspect Ratio, 23 Audio (Sound Enhancement...


