HP Limited Warranty Statement
Page 4
... or locality where HP has a support presence for example camera docks, memory cards, or carrying cases. Any replacement product may contain remanufactured parts, components, or materials equivalent to local standards. HP's limited warranty is inconsistent with local law. B. To the extent this LWS is valid in this LWS shall be free from country to execute programming instructions. HP's limited warranty covers...
... or locality where HP has a support presence for example camera docks, memory cards, or carrying cases. Any replacement product may contain remanufactured parts, components, or materials equivalent to local standards. HP's limited warranty is inconsistent with local law. B. To the extent this LWS is valid in this LWS shall be free from country to execute programming instructions. HP's limited warranty covers...
Quick Start Guide
Page 5
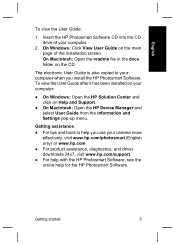
... www.hp.com/photosmart (English only) or www.hp.com. ● For product assistance, diagnostics, and driver downloads 24x7, visit www.hp.com/support. ● For help with the HP Photosmart Software, see the online help you install the HP Photosmart Software. Getting started 5 Getting assistance ● For tips and tools to your computer: ● On Windows: Open the HP Solution Center and click on your computer when you use your computer. 2. English To view the User Guide: 1. On Windows: Click View User Guide...
... www.hp.com/photosmart (English only) or www.hp.com. ● For product assistance, diagnostics, and driver downloads 24x7, visit www.hp.com/support. ● For help with the HP Photosmart Software, see the online help you install the HP Photosmart Software. Getting started 5 Getting assistance ● For tips and tools to your computer: ● On Windows: Open the HP Solution Center and click on your computer when you use your computer. 2. English To view the User Guide: 1. On Windows: Click View User Guide...
Quick Start Guide
Page 17
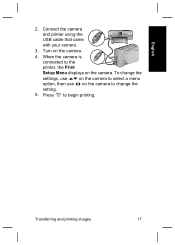
Connect the camera and printer using the USB cable that came with your camera. 3. Press to change the settings, use on the camera to select a menu option, then use on the camera to begin printing. Turn on the camera. To change the setting. 5. When the camera is connected to the printer, the Print Setup Menu displays on the camera. 4. Transferring and printing images 17 English 2.
Connect the camera and printer using the USB cable that came with your camera. 3. Press to change the settings, use on the camera to select a menu option, then use on the camera to begin printing. Turn on the camera. To change the setting. 5. When the camera is connected to the printer, the Print Setup Menu displays on the camera. 4. Transferring and printing images 17 English 2.

Quick Start Guide
Page 20
... Digital Zoom ● Date & Time ● USB Configuration ● TV Configuration ● Language ● Reset Settings Help provides descriptions ● of camera features and ● picture-taking tips. ● ● ● ● ● ● ● ● ● ● ● Top Ten Tips Camera Accessories Camera Buttons Using Shooting Modes Using Design Gallery Sharing Images Printing Images Recording Audio Clips Recording Video Clips Reviewing Images and Videos Extracting Prints from Video Deleting Images Transferring Images 20 HP Photosmart R725/R727...
... Digital Zoom ● Date & Time ● USB Configuration ● TV Configuration ● Language ● Reset Settings Help provides descriptions ● of camera features and ● picture-taking tips. ● ● ● ● ● ● ● ● ● ● ● Top Ten Tips Camera Accessories Camera Buttons Using Shooting Modes Using Design Gallery Sharing Images Printing Images Recording Audio Clips Recording Video Clips Reviewing Images and Videos Extracting Prints from Video Deleting Images Transferring Images 20 HP Photosmart R725/R727...
User Guide
Page 3
... focus 13 Using Focus Lock 13 Optimizing exposure 14 Other recommendations 14 Using the focus range settings 14 Using zoom...15 Optical zoom 15 Digital zoom...15 Setting the flash...15 Red eye...16 Using the shooting modes 16 Using Panorama mode 17 Using the Capture Menu 18 Using the Self-Timer settings 21 Using the Burst setting 21 Exposure Compensation 22 Adaptive Lighting 22 White Balance 22 ISO speed...22 3 Reviewing images and video clips 24 Using Playback...24 Deleting images 25 Saving frames from video clips 25 Viewing thumbnails 25 Magnifying images 25 HP Photosmart...
... focus 13 Using Focus Lock 13 Optimizing exposure 14 Other recommendations 14 Using the focus range settings 14 Using zoom...15 Optical zoom 15 Digital zoom...15 Setting the flash...15 Red eye...16 Using the shooting modes 16 Using Panorama mode 17 Using the Capture Menu 18 Using the Self-Timer settings 21 Using the Burst setting 21 Exposure Compensation 22 Adaptive Lighting 22 White Balance 22 ISO speed...22 3 Reviewing images and video clips 24 Using Playback...24 Deleting images 25 Saving frames from video clips 25 Viewing thumbnails 25 Magnifying images 25 HP Photosmart...
User Guide
Page 4
...34 Using a memory card reader 34 Printing images from the camera 34 Printing panoramas from the camera 35 6 Using HP Photosmart Express 36 Using the Photosmart Express Menu 36 Setting up online destinations in the camera 36 Sending individual images to online destinations 37 Selecting individual images for printing 37 Sending all images to a printer or online destinations 37 Buying prints online 38 7 Using the Setup Menu 39 8 Troubleshooting 41 Resetting the camera 41 Problems and solutions 41 9 Product support 46 Helpful websites...46 Getting assistance 46 A Managing batteries...
...34 Using a memory card reader 34 Printing images from the camera 34 Printing panoramas from the camera 35 6 Using HP Photosmart Express 36 Using the Photosmart Express Menu 36 Setting up online destinations in the camera 36 Sending individual images to online destinations 37 Selecting individual images for printing 37 Sending all images to a printer or online destinations 37 Buying prints online 38 7 Using the Setup Menu 39 8 Troubleshooting 41 Resetting the camera 41 Problems and solutions 41 9 Product support 46 Helpful websites...46 Getting assistance 46 A Managing batteries...
User Guide
Page 8
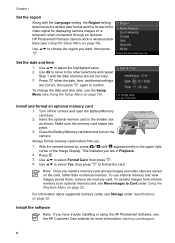
... set correctly. 3. Install and format an optional memory card 1. Always format memory cards before first use internal memory and view images stored there, remove the memory card. To use . 1. For information about supported memory cards, see Using the Setup Menu on page 39). Make sure the memory card snaps into place. 3. Press . 3. Close the Battery/Memory card door and turn on page 52. This indicates you want, then press . Note Once you have trouble installing or using the HP Photosmart Software, see the HP Customer Care website for displaying camera images...
... set correctly. 3. Install and format an optional memory card 1. Always format memory cards before first use internal memory and view images stored there, remove the memory card. To use . 1. For information about supported memory cards, see Using the Setup Menu on page 39). Make sure the memory card snaps into place. 3. Press . 3. Close the Battery/Memory card door and turn on page 52. This indicates you want, then press . Note Once you have trouble installing or using the HP Photosmart Software, see the HP Customer Care website for displaying camera images...
User Guide
Page 11
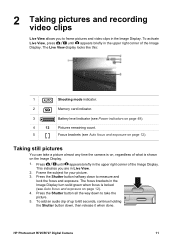
... Live View display looks like this: 1 Shooting mode indicator. 2 Memory card indicator. 3 Battery level indicator (see Power indicators on page 49). 4 12 Pictures remaining count. 5 Focus brackets (see Auto focus and exposure on page 12). 4. Press the Shutter button halfway down to take a picture almost any time the camera is on, regardless of up to 60 seconds, continue holding the Shutter button down, then release it when done. HP Photosmart R725/R727 Digital Camera 11 Frame the subject for your picture. 3. Taking still pictures...
... Live View display looks like this: 1 Shooting mode indicator. 2 Memory card indicator. 3 Battery level indicator (see Power indicators on page 49). 4 12 Pictures remaining count. 5 Focus brackets (see Auto focus and exposure on page 12). 4. Press the Shutter button halfway down to take a picture almost any time the camera is on, regardless of up to 60 seconds, continue holding the Shutter button down, then release it when done. HP Photosmart R725/R727 Digital Camera 11 Frame the subject for your picture. 3. Taking still pictures...
User Guide
Page 14
... stable surface. ● Turn on more light. Auto Macro-Use when you are crucial to correct the problem for the length of the following: ● Set the flash to Auto Flash or Flash On (see Image Advice under Using the Capture Menu on page 18 ● Exposure Compensation on page 25) to set the proper exposure. Press the Shutter button all the way down to take the picture, but it may...
... stable surface. ● Turn on more light. Auto Macro-Use when you are crucial to correct the problem for the length of the following: ● Set the flash to Auto Flash or Flash On (see Image Advice under Using the Capture Menu on page 18 ● Exposure Compensation on page 25) to set the proper exposure. Press the Shutter button all the way down to take the picture, but it may...
User Guide
Page 15
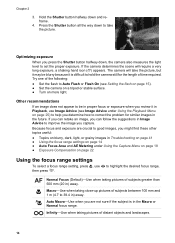
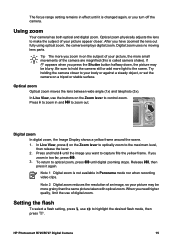
... turn off the camera. Digital zoom uses no moving lens parts. Optical zoom Optical zoom moves the lens between wide angle (1x) and telephoto (3x). Press to zoom in and to highlight the desired flash mode, then HP Photosmart R725/R727 Digital Camera 15 Note 2 Digital zoom reduces the resolution of digital zoom. The focus range setting remains in effect until it again. Be sure to control zoom. If you need higher quality, limit the use of an image...
... turn off the camera. Digital zoom uses no moving lens parts. Optical zoom Optical zoom moves the lens between wide angle (1x) and telephoto (3x). Press to zoom in and to highlight the desired flash mode, then HP Photosmart R725/R727 Digital Camera 15 Note 2 Digital zoom reduces the resolution of digital zoom. The focus range setting remains in effect until it again. Be sure to control zoom. If you need higher quality, limit the use of an image...
User Guide
Page 16
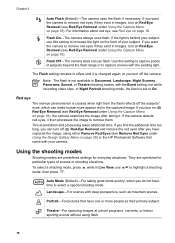
.... Using the shooting modes Shooting modes are optimized for everyday situations. to highlight a shooting Auto Mode (Default)-For taking it is not available in the captured image. Portrait-For pictures that came with the Burst setting, nor while recording video clips. For information about red eye, see Red-Eye Removal under Using the Design Gallery Menu on the front of scenes or shooting situations. Note The flash is changed again, or you turn on Red-Eye Removal (see Red eye on...
.... Using the shooting modes Shooting modes are optimized for everyday situations. to highlight a shooting Auto Mode (Default)-For taking it is not available in the captured image. Portrait-For pictures that came with the Burst setting, nor while recording video clips. For information about red eye, see Red-Eye Removal under Using the Design Gallery Menu on the front of scenes or shooting situations. Note The flash is changed again, or you turn on Red-Eye Removal (see Red eye on...
User Guide
Page 19
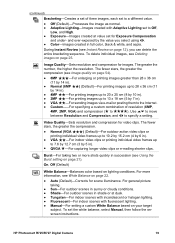
... white balance, select Manual, then follow the onscreen instructions. To delete individual images, see Using the Burst setting on your target subject. Burst-For taking . ● Sun-For outdoor scenes in sunny or cloudy conditions. ● Shade-For outdoor scenes in full color, black & white, and sepia. Video Quality-Sets resolution and compression for images. During Instant Review (see Instant Review on page 22. ● Auto (Default)-Corrects for Exposure...
... white balance, select Manual, then follow the onscreen instructions. To delete individual images, see Using the Burst setting on your target subject. Burst-For taking . ● Sun-For outdoor scenes in sunny or cloudy conditions. ● Shade-For outdoor scenes in full color, black & white, and sepia. Video Quality-Sets resolution and compression for images. During Instant Review (see Instant Review on page 22. ● Auto (Default)-Corrects for Exposure...
User Guide
Page 21
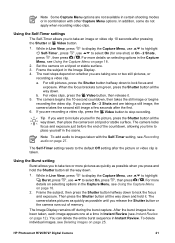
... Using the Capture Menu on page 18. 2. Note To add audio to place yourself in the scene. HP Photosmart R725/R727 Digital Camera 21 The camera locks focus and exposure just before the end of memory. For still pictures, press the Shutter button halfway down . Note Some Capture Menu options are not available in certain shooting modes or in combination with the Self-Timer setting, see Deleting images on page 25. The Self-Timer setting resets to lock focus...
... Using the Capture Menu on page 18. 2. Note To add audio to place yourself in the scene. HP Photosmart R725/R727 Digital Camera 21 The camera locks focus and exposure just before the end of memory. For still pictures, press the Shutter button halfway down . Note Some Capture Menu options are not available in certain shooting modes or in combination with the Self-Timer setting, see Deleting images on page 25. The Self-Timer setting resets to lock focus...
User Guide
Page 26
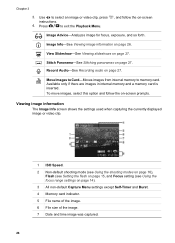
... focus, exposure, and so forth. Viewing image information The Image Info screen shows the settings used when capturing the currently displayed image or video clip. 1 ISO Speed. 2 Non-default shooting mode (see Using the shooting modes on page 16), Flash (see Setting the flash on page 15, and Focus setting (see Using the focus range settings on page 26. Image Info-See Viewing image information on page 14). 3 All non-default Capture Menu settings except Self-Timer and Burst. 4 Memory card indicator. 5 File name of the image. 6 File size of the image. 7 Date and time image...
... focus, exposure, and so forth. Viewing image information The Image Info screen shows the settings used when capturing the currently displayed image or video clip. 1 ISO Speed. 2 Non-default shooting mode (see Using the shooting modes on page 16), Flash (see Setting the flash on page 15, and Focus setting (see Using the focus range settings on page 26. Image Info-See Viewing image information on page 14). 3 All non-default Capture Menu settings except Self-Timer and Burst. 4 Memory card indicator. 5 File name of the image. 6 File size of the image. 7 Date and time image...
User Guide
Page 34
... or HP_R727 and copy the images manually. For Macintosh computers: 1. Either the HP Photosmart Software, Image Capture, or iPhoto starts automatically and guides you to copy images from video clips on the camera. - Insert your camera's memory card into the memory card reader (or into a (separately purchased) memory card reader. Using a memory card reader You can connect the camera to any PictBridge-certified printer to print still images and frames saved from a video clip (see USB Configuration under Using the Setup Menu on page...
... or HP_R727 and copy the images manually. For Macintosh computers: 1. Either the HP Photosmart Software, Image Capture, or iPhoto starts automatically and guides you to copy images from video clips on the camera. - Insert your camera's memory card into the memory card reader (or into a (separately purchased) memory card reader. Using a memory card reader You can connect the camera to any PictBridge-certified printer to print still images and frames saved from a video clip (see USB Configuration under Using the Setup Menu on page...
User Guide
Page 35
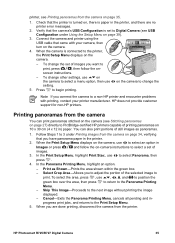
... no printer error messages. 2. Connect the camera and printer using the USB cable that the printer is paper in the printer. 2. To change other settings, use on page 35. 1. You can print panoramas stitched on the camera (see Stitching panoramas on page 27) directly to PictBridge-certified HP printers capable of printing panoramas on 10 x 30 cm (4 x 12 in Images or press and follow the on the camera. - Print as panoramas. 1. Skip This Image-Proceeds to the Print Setup Menu. 5. screen instructions. - Follow...
... no printer error messages. 2. Connect the camera and printer using the USB cable that the printer is paper in the printer. 2. To change other settings, use on page 35. 1. You can print panoramas stitched on the camera (see Stitching panoramas on page 27) directly to PictBridge-certified HP printers capable of printing panoramas on 10 x 30 cm (4 x 12 in Images or press and follow the on the camera. - Print as panoramas. 1. Skip This Image-Proceeds to the Print Setup Menu. 5. screen instructions. - Follow...
User Guide
Page 39
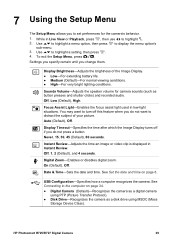
... image or video clip is displayed in low-light situations. See Set the date and time on page 34. ● Digital Camera (Default)-Recognizes the camera as a digital camera using MSDC (Mass Storage Device Class). Focus Assist Light-Enables the focus assist light used in Instant Review. Date & Time-Sets the date and time. HP Photosmart R725/R727 Digital Camera 39 7 Using the Setup Menu The Setup Menu allows you to set preferences for camera sounds (such as a disk drive using PTP (Picture Transfer Protocol). ● Disk Drive-Recognizes the camera as button presses and shutter...
... image or video clip is displayed in low-light situations. See Set the date and time on page 34. ● Digital Camera (Default)-Recognizes the camera as a digital camera using MSDC (Mass Storage Device Class). Focus Assist Light-Enables the focus assist light used in Instant Review. Date & Time-Sets the date and time. HP Photosmart R725/R727 Digital Camera 39 7 Using the Setup Menu The Setup Menu allows you to set preferences for camera sounds (such as a disk drive using PTP (Picture Transfer Protocol). ● Disk Drive-Recognizes the camera as button presses and shutter...
User Guide
Page 44
... Speed. The video is saved successfully, but the Image Display is properly connected to the camera and computer. ● Try connecting the USB cable to another USB port on the computer. ● Turn the camera off , or the camera seems stuck and won't operate. ● Press Live View/Playback to act as the camera cools. Remove the memory card and see Product support on page 25). Reformat the card (see Resetting the camera on my camera...
... Speed. The video is saved successfully, but the Image Display is properly connected to the camera and computer. ● Try connecting the USB cable to another USB port on the computer. ● Turn the camera off , or the camera seems stuck and won't operate. ● Press Live View/Playback to act as the camera cools. Remove the memory card and see Product support on page 25). Reformat the card (see Resetting the camera on my camera...
User Guide
Page 55
... Time 8, 39 Date & Time Imprint 20 deleting images 25 digital zoom 15, 39 dimensions 53 direct print 34 Display Brightness 39 Display Timeout 39 dock 6 Document mode 17 E e-mail images 36 exposure 14 Exposure Compensation 18, 19, 22 F F-number 52 flash red-eye removal 16, 18 working range 52 Flash button 5 focal length 52 focus auto focus 12 Auto Focus Area 20 brackets 12 focus lock 13 optimizing 13 settings 14, 52 Focus Assist light 39 Focus button 5 folded lens 6 format memory card 8 G getting assistance 46 H HP Photosmart Express 36, 37 HP Photosmart Express button 5 HP Photosmart Software...
... Time 8, 39 Date & Time Imprint 20 deleting images 25 digital zoom 15, 39 dimensions 53 direct print 34 Display Brightness 39 Display Timeout 39 dock 6 Document mode 17 E e-mail images 36 exposure 14 Exposure Compensation 18, 19, 22 F F-number 52 flash red-eye removal 16, 18 working range 52 Flash button 5 focal length 52 focus auto focus 12 Auto Focus Area 20 brackets 12 focus lock 13 optimizing 13 settings 14, 52 Focus Assist light 39 Focus button 5 folded lens 6 format memory card 8 G getting assistance 46 H HP Photosmart Express 36, 37 HP Photosmart Express button 5 HP Photosmart Software...
User Guide
Page 56
... Self-Timer light 6 setting 18, 21 sending individual images 37 set date and time 8 setting up destinations 36 settings reset 40 Setup Menu 39 share pictures 36 Sharpness 20 shooting mode 16 Shutter button 5, 12 shutter speed 52 slideshow 27 Snow mode 17 software install 8 solving problems 41 sounds of camera 39 Sounds Volume 39 space remaining in memory 11 specifications 52 Stitch Panorama 27 storage 53 Sunset mode 17 support process 46 T Theatre mode 16 Thumbnails 25 Thumbnails control 5 Time & Date 8, 39 transfer images 33 troubleshooting 41 turn on/off power...
... Self-Timer light 6 setting 18, 21 sending individual images 37 set date and time 8 setting up destinations 36 settings reset 40 Setup Menu 39 share pictures 36 Sharpness 20 shooting mode 16 Shutter button 5, 12 shutter speed 52 slideshow 27 Snow mode 17 software install 8 solving problems 41 sounds of camera 39 Sounds Volume 39 space remaining in memory 11 specifications 52 Stitch Panorama 27 storage 53 Sunset mode 17 support process 46 T Theatre mode 16 Thumbnails 25 Thumbnails control 5 Time & Date 8, 39 transfer images 33 troubleshooting 41 turn on/off power...


