
Quick Start Guide
Page 20
...● Digital Zoom ● Date & Time ● USB Configuration ● TV Configuration ● Language ● Reset Settings Help provides descriptions ● of camera features and ● picture-taking tips. ● ● ● ● ● ● ●...9679; ● Top Ten Tips Camera Accessories Camera Buttons Using Shooting Modes Using Design Gallery Sharing Images Printing Images Recording Audio Clips Recording Video Clips Reviewing Images and Videos Extracting Prints from Video Deleting Images Transferring Images 20 HP Photosmart R725/R727 Digital Camera
...● Digital Zoom ● Date & Time ● USB Configuration ● TV Configuration ● Language ● Reset Settings Help provides descriptions ● of camera features and ● picture-taking tips. ● ● ● ● ● ● ●...9679; ● Top Ten Tips Camera Accessories Camera Buttons Using Shooting Modes Using Design Gallery Sharing Images Printing Images Recording Audio Clips Recording Video Clips Reviewing Images and Videos Extracting Prints from Video Deleting Images Transferring Images 20 HP Photosmart R725/R727 Digital Camera
Quick Start Guide
Page 172
...; ● ) TV Configuration ● ) Language Reset Settings ● ) Top Ten Tips Camera ) Accessories ● ) Camera Buttons ● Using Shooting Modes Using Design Gallery Sharing Images Printing Images ) Help 21 HP Photosmart R725/R727
...; ● ) TV Configuration ● ) Language Reset Settings ● ) Top Ten Tips Camera ) Accessories ● ) Camera Buttons ● Using Shooting Modes Using Design Gallery Sharing Images Printing Images ) Help 21 HP Photosmart R725/R727
User Guide
Page 4
... camera 35 6 Using HP Photosmart Express 36 Using the Photosmart Express Menu 36 Setting up online destinations in the camera 36 Sending individual images to online destinations 37 Selecting individual images for printing 37 Sending all images to a printer or online destinations 37 Buying prints online 38 7 Using the Setup Menu 39 8 Troubleshooting 41 Resetting the camera...
... camera 35 6 Using HP Photosmart Express 36 Using the Photosmart Express Menu 36 Setting up online destinations in the camera 36 Sending individual images to online destinations 37 Selecting individual images for printing 37 Sending all images to a printer or online destinations 37 Buying prints online 38 7 Using the Setup Menu 39 8 Troubleshooting 41 Resetting the camera...
User Guide
Page 21
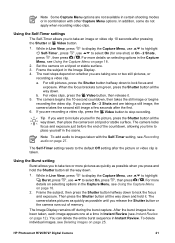
... button halfway down to include yourself in the picture, press the Shutter button all the way down . 1. The camera begins the 10-second countdown, then takes the still image or begins recording the video clip. Frame the subject, ... more details on page 18. 2. In addition, some do not apply when recording video clips. The Self-Timer setting resets to take an image or video clip 10 seconds after the first. 6. You can delete the entire burst sequence in...allows you to the default Off setting after the picture or video clip is taken. HP Photosmart R725/R727 Digital Camera 21
... button halfway down to include yourself in the picture, press the Shutter button all the way down . 1. The camera begins the 10-second countdown, then takes the still image or begins recording the video clip. Frame the subject, ... more details on page 18. 2. In addition, some do not apply when recording video clips. The Self-Timer setting resets to take an image or video clip 10 seconds after the first. 6. You can delete the entire burst sequence in...allows you to the default Off setting after the picture or video clip is taken. HP Photosmart R725/R727 Digital Camera 21

User Guide
Page 22
... relationship between bright and dark areas in scenes that whites appear white in the final image. This setting allows the camera to the default Auto setting, the camera selects the best ISO speed for flash. When ISO Speed is not recommended as a replacement for the scene. 22...see Recording audio on page 18). Exposure Compensation is changed again, or until it resets to a positive number. ISO speed This setting adjusts the sensitivity of Exposure Compensation. Such scenes could turn off the camera. Tip To see Bracketing under Using the Capture Menu on page 27. For ...
... relationship between bright and dark areas in scenes that whites appear white in the final image. This setting allows the camera to the default Auto setting, the camera selects the best ISO speed for flash. When ISO Speed is not recommended as a replacement for the scene. 22...see Recording audio on page 18). Exposure Compensation is changed again, or until it resets to a positive number. ISO speed This setting adjusts the sensitivity of Exposure Compensation. Such scenes could turn off the camera. Tip To see Bracketing under Using the Capture Menu on page 27. For ...

User Guide
Page 40
..., Argentina, and parts of the settings. ● Yes-Resets all camera settings to the factory default settings. ● Cancel-Exits the menu without resetting any of Asia. (Language)-Sets the language. Chapter 7 (continued) TV Configuration-Sets the video signal format for displaying camera images on page 7. Reset Settings-Resets camera to their defaults (except Date & Time, Language...
..., Argentina, and parts of the settings. ● Yes-Resets all camera settings to the factory default settings. ● Cancel-Exits the menu without resetting any of Asia. (Language)-Sets the language. Chapter 7 (continued) TV Configuration-Sets the video signal format for displaying camera images on page 7. Reset Settings-Resets camera to their defaults (except Date & Time, Language...
User Guide
Page 41
... page 8). HP Photosmart R725/R727 Digital Camera 41 Remove the memory card and battery. 3. Reinstall the battery and close the Battery/Memory card door. 5. Verify that the HP AC power adapter is connected to the camera (directly or through an optional dock) and is the proper type (see Storage on page 41) Resetting the camera If your camera. Ensure...
... page 8). HP Photosmart R725/R727 Digital Camera 41 Remove the memory card and battery. 3. Reinstall the battery and close the Battery/Memory card door. 5. Verify that the HP AC power adapter is connected to the camera (directly or through an optional dock) and is the proper type (see Storage on page 41) Resetting the camera If your camera. Ensure...

User Guide
Page 42
...AC power, then disconnect, then reconnect. ● Insert a battery into a different electrical outlet. The camera does not respond when I press a button. ● Turn on the camera. ● Most of an optional HP Photosmart dock does not work, replace the battery. Wait a few seconds for two months or longer, recharge ... does not turn on page 41). 42 Or replace the card with a new one. ● The camera may be full. If the Image Display does not turn on, reset the camera (see Install and format an optional memory card on page 8). The Image Display is defective. Chapter 8 ...
...AC power, then disconnect, then reconnect. ● Insert a battery into a different electrical outlet. The camera does not respond when I press a button. ● Turn on the camera. ● Most of an optional HP Photosmart dock does not work, replace the battery. Wait a few seconds for two months or longer, recharge ... does not turn on page 41). 42 Or replace the card with a new one. ● The camera may be full. If the Image Display does not turn on, reset the camera (see Install and format an optional memory card on page 8). The Image Display is defective. Chapter 8 ...
User Guide
Page 44
...to the computer. ● Ensure that does not fix the problem, reset the camera (see Resetting the camera on page 41). ● If the problem persists, contact HP Support (see Transferring images without HP Photosmart Software on page 25). However, if anything seems out of possible damage.... My camera stalls when establishing a connection to reactivate the Image Display. ● Reset the camera (see Image Advice under Using...
...to the computer. ● Ensure that does not fix the problem, reset the camera (see Resetting the camera on page 41). ● If the problem persists, contact HP Support (see Transferring images without HP Photosmart Software on page 25). However, if anything seems out of possible damage.... My camera stalls when establishing a connection to reactivate the Image Display. ● Reset the camera (see Image Advice under Using...
User Guide
Page 45
Close the HP Photosmart Transfer Software, disconnect the USB cable from the camera, and reset the camera (see Transferring images with HP Photosmart Software on page 41). HP Photosmart R725/R727 Digital Camera 45 Then, restart the image transfer process (see Resetting the camera on page 33). Use the Buy Prints Online feature on the Photosmart Express Menu (see Buying prints online on your camera packaging...
Close the HP Photosmart Transfer Software, disconnect the USB cable from the camera, and reset the camera (see Transferring images with HP Photosmart Software on page 41). HP Photosmart R725/R727 Digital Camera 45 Then, restart the image transfer process (see Resetting the camera on page 33). Use the Buy Prints Online feature on the Photosmart Express Menu (see Buying prints online on your camera packaging...
User Guide
Page 49
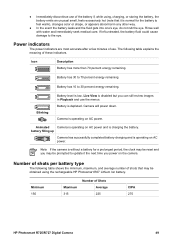
...150 Maximum 315 Number of use. Power indicators The power indicators are most accurate after a few minutes of Shots Average 225 CIPA 270 HP Photosmart R725/R727 Digital Camera 49 Camera will power down. Battery has 30 to feel warm), changes color or shape, or appears abnormal in Playback and use the menus....Battery has 10 to the eye. Live View is operating on AC power and is depleted. Note If the camera is without a battery for a prolonged period, the clock may be reset and you can still review images in any other way. ● In the event the battery leaks and the...
...150 Maximum 315 Number of use. Power indicators The power indicators are most accurate after a few minutes of Shots Average 225 CIPA 270 HP Photosmart R725/R727 Digital Camera 49 Camera will power down. Battery has 30 to feel warm), changes color or shape, or appears abnormal in Playback and use the menus....Battery has 10 to the eye. Live View is operating on AC power and is depleted. Note If the camera is without a battery for a prolonged period, the clock may be reset and you can still review images in any other way. ● In the event the battery leaks and the...
User Guide
Page 55
...door 6 install 7 shots per 49 top points about use 48 Beach mode 17 blinking lights on camera 5, 6 borders 30 Bracketing 19 Burst setting 19, 21 C camera dimensions 53 parts 5, 6 reset 41 specifications 52 turn on/off 7 weight 53 Capture Menu 18 color depth 52 color of images... lights on camera 5, 6 Lithium Ion battery 48, 50 Live View/Playback button 5 M Macro focus 13, 14 Magnify control 5 magnifying images 25 memory capacity 53 card 11 card door 6 memory card 8, 53 Menu/OK button 5 menus Capture 18 Design Gallery 29 Photosmart Express 36 Playback 25 HP Photosmart R725/R727 Digital Camera 55
...door 6 install 7 shots per 49 top points about use 48 Beach mode 17 blinking lights on camera 5, 6 borders 30 Bracketing 19 Burst setting 19, 21 C camera dimensions 53 parts 5, 6 reset 41 specifications 52 turn on/off 7 weight 53 Capture Menu 18 color depth 52 color of images... lights on camera 5, 6 Lithium Ion battery 48, 50 Live View/Playback button 5 M Macro focus 13, 14 Magnify control 5 magnifying images 25 memory capacity 53 card 11 card door 6 memory card 8, 53 Menu/OK button 5 menus Capture 18 Design Gallery 29 Photosmart Express 36 Playback 25 HP Photosmart R725/R727 Digital Camera 55
User Guide
Page 56
... 54 O on/off 7 ON/OFF button 5 online destinations 36 print buying 38 optical zoom 15 P Panorama mode 17, 27 parts of camera 5, 6 Photosmart Express button 5 Photosmart Express Menu 36, 36, 37 pictures 11, 21 Playback 24 Playback Menu 25 Portrait mode 16 power indicators 49 light 5 ON/OFF button... 27 video clips 12 red-eye removal 16, 18 redeye removal 31 Region 8 remaining pictures count 11 removing red eyes 18, 31 reset camera 41 Reset Settings 40 resolution 52 reviewing images 24 S safety precautions for batteries 48, 50 Saturation 20 selecting images for destinations 37 Self-Timer light...
... 54 O on/off 7 ON/OFF button 5 online destinations 36 print buying 38 optical zoom 15 P Panorama mode 17, 27 parts of camera 5, 6 Photosmart Express button 5 Photosmart Express Menu 36, 36, 37 pictures 11, 21 Playback 24 Playback Menu 25 Portrait mode 16 power indicators 49 light 5 ON/OFF button... 27 video clips 12 red-eye removal 16, 18 redeye removal 31 Region 8 remaining pictures count 11 removing red eyes 18, 31 reset camera 41 Reset Settings 40 resolution 52 reviewing images 24 S safety precautions for batteries 48, 50 Saturation 20 selecting images for destinations 37 Self-Timer light...


