
HP Limited Warranty Statement
Page 5
... the duration of implied warranties that might require special handling at end-of-life: • Lithium Ion rechargeable battery Disposal of this LWS from limiting the statutory rights of implied warranties 3. Customer may have additional statutory rights based...considerations. c. For disposal or recycling information, please contact your product is listed below for product assistance, diagnostics, and driver downloads. HP Photosmart R725/R727 warranty 3 Ireland Hewlett-Packard Ireland Ltd. 30 Herbert Street IRL-Dublin 2 United Kingdom Hewlett-Packard Ltd Cain Road Bracknell, GB...
... the duration of implied warranties that might require special handling at end-of-life: • Lithium Ion rechargeable battery Disposal of this LWS from limiting the statutory rights of implied warranties 3. Customer may have additional statutory rights based...considerations. c. For disposal or recycling information, please contact your product is listed below for product assistance, diagnostics, and driver downloads. HP Photosmart R725/R727 warranty 3 Ireland Hewlett-Packard Ireland Ltd. 30 Herbert Street IRL-Dublin 2 United Kingdom Hewlett-Packard Ltd Cain Road Bracknell, GB...
Quick Start Guide
Page 3
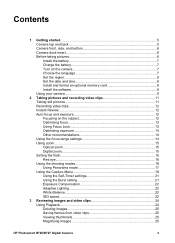
... 1 Getting started 4 Accessing the electronic User Guide 4 Camera top and back 6 Camera front and bottom 8 Camera dock insert 8 2 Setting up your camera 9 Install the battery 9 Charge the battery 9 Turn on the camera 9 Choose the language 10 Set the region 10 Set the date and time 10 Install and format an optional memory...
... 1 Getting started 4 Accessing the electronic User Guide 4 Camera top and back 6 Camera front and bottom 8 Camera dock insert 8 2 Setting up your camera 9 Install the battery 9 Charge the battery 9 Turn on the camera 9 Choose the language 10 Set the region 10 Set the date and time 10 Install and format an optional memory...

Quick Start Guide
Page 4
... features of your camera's features ● Battery information, including: - Extending battery life - English 1 Getting started This printed Quick Start Guide provides the information you to get started using your camera ● Descriptions of all the quickly camera features ● Install the ● A description of icons on the HP Photosmart Software CD. 4 HP Photosmart R725/R727 Digital Camera
... features of your camera's features ● Battery information, including: - Extending battery life - English 1 Getting started This printed Quick Start Guide provides the information you to get started using your camera ● Descriptions of all the quickly camera features ● Install the ● A description of icons on the HP Photosmart Software CD. 4 HP Photosmart R725/R727 Digital Camera
Quick Start Guide
Page 7
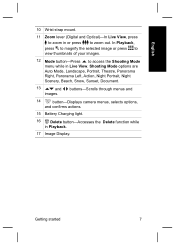
..., Night Scenery, Beach, Snow, Sunset, Document. 13 and images. buttons-Scrolls through menus and 14 button-Displays camera menus, selects options, and confirms actions. 15 Battery Charging light. 16 Delete button-Accesses the Delete function while in or press to access the Shooting Mode menu while in Live View. In Playback...
..., Night Scenery, Beach, Snow, Sunset, Document. 13 and images. buttons-Scrolls through menus and 14 button-Displays camera menus, selects options, and confirms actions. 15 Battery Charging light. 16 Delete button-Accesses the Delete function while in or press to access the Shooting Mode menu while in Live View. In Playback...
Quick Start Guide
Page 8
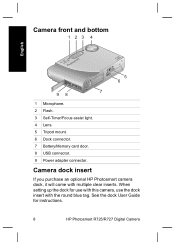
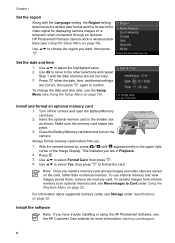
See the dock User Guide for use with this camera, use the dock insert with multiple clear inserts. Camera front and bottom 123 4 English 5 6 98 7 1 Microphone. 2 Flash. 3 Self-Timer/Focus assist light. 4 Lens. 5 Tripod mount. 6 Dock connector. 7 Battery/Memory card door. 8 USB connector. 9 Power adapter connector. When setting up the dock for instructions. 8 HP Photosmart R725/R727 Digital Camera Camera dock insert If you purchase an optional HP Photosmart camera dock, it will come with the round blue tag.
See the dock User Guide for use with this camera, use the dock insert with multiple clear inserts. Camera front and bottom 123 4 English 5 6 98 7 1 Microphone. 2 Flash. 3 Self-Timer/Focus assist light. 4 Lens. 5 Tripod mount. 6 Dock connector. 7 Battery/Memory card door. 8 USB connector. 9 Power adapter connector. When setting up the dock for instructions. 8 HP Photosmart R725/R727 Digital Camera Camera dock insert If you purchase an optional HP Photosmart camera dock, it will come with the round blue tag.
Quick Start Guide
Page 9
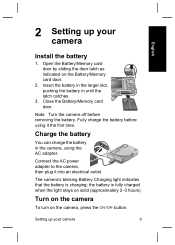
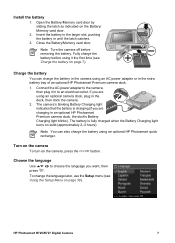
...the camera off before using the AC adapter. Turn on the camera To turn on the Battery/Memory card door. 2. 2 Setting up your camera English Install the battery 1. Close the Battery/Memory card door. Connect the AC power adapter to the camera, then plug it the ...first time. Insert the battery in the larger slot, pushing the battery in the camera, using it into an electrical outlet. Fully charge the battery before removing the battery. The camera's blinking Battery Charging light indicates that the battery is fully charged when the light stays on...
...the camera off before using the AC adapter. Turn on the camera To turn on the Battery/Memory card door. 2. 2 Setting up your camera English Install the battery 1. Close the Battery/Memory card door. Connect the AC power adapter to the camera, then plug it the ...first time. Insert the battery in the larger slot, pushing the battery in the camera, using it into an electrical outlet. Fully charge the battery before removing the battery. The camera's blinking Battery Charging light indicates that the battery is fully charged when the light stays on...
Quick Start Guide
Page 11
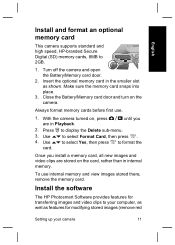
Close the Battery/Memory card door and turn on , press until you install a memory card, all new images and video clips are in internal memory. Always format memory ... speed, HP-branded Secure Digital (SD) memory cards, 8MB to display the Delete sub-menu. 3. With the camera turned on the camera. Install the software The HP Photosmart Software provides features for modifying stored images (remove red Setting up your computer, as well as shown. Turn off the camera and open the Battery/Memory...
Close the Battery/Memory card door and turn on , press until you install a memory card, all new images and video clips are in internal memory. Always format memory ... speed, HP-branded Secure Digital (SD) memory cards, 8MB to display the Delete sub-menu. 3. With the camera turned on the camera. Install the software The HP Photosmart Software provides features for modifying stored images (remove red Setting up your computer, as well as shown. Turn off the camera and open the Battery/Memory...
Quick Start Guide
Page 21
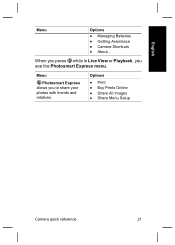
Options ● Print ● Buy Prints Online ● Share All Images ● Share Menu Setup Camera quick reference 21 Menu Photosmart Express allows you see the Photosmart Express menu. When you press while in Live View or Playback, you to share your photos with friends and relatives. English Menu Options ● Managing Batteries ● Getting Assistance ● Camera Shortcuts ● About...
Options ● Print ● Buy Prints Online ● Share All Images ● Share Menu Setup Camera quick reference 21 Menu Photosmart Express allows you see the Photosmart Express menu. When you press while in Live View or Playback, you to share your photos with friends and relatives. English Menu Options ● Managing Batteries ● Getting Assistance ● Camera Shortcuts ● About...
Quick Start Guide
Page 171
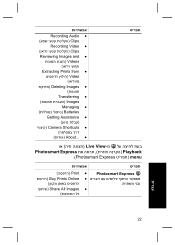
Recording Audio Clips Recording Video Clips Reviewing Images and ● Videos Extracting Prints from Video Deleting Images Transferring Images Managing Batteries Getting Assistance Camera Shortcuts About... ● Live View Photosmart Express Playback .(Photosmart Express menu Print Buy Prints Online Share All Images ● Photosmart Express 22
Recording Audio Clips Recording Video Clips Reviewing Images and ● Videos Extracting Prints from Video Deleting Images Transferring Images Managing Batteries Getting Assistance Camera Shortcuts About... ● Live View Photosmart Express Playback .(Photosmart Express menu Print Buy Prints Online Share All Images ● Photosmart Express 22
User Guide
Page 3
Contents 1 Getting started...5 Camera top and back 5 Camera front, side, and bottom 6 Camera dock insert 6 Before taking pictures 6 Install the battery 7 Charge the battery 7 Turn on the camera 7 Choose the language 7 Set the region 8 Set the date and time 8 Install and format an optional memory card 8 Install the software 8 ......22 3 Reviewing images and video clips 24 Using Playback...24 Deleting images 25 Saving frames from video clips 25 Viewing thumbnails 25 Magnifying images 25 HP Photosmart R725/R727 Digital Camera 3
Contents 1 Getting started...5 Camera top and back 5 Camera front, side, and bottom 6 Camera dock insert 6 Before taking pictures 6 Install the battery 7 Charge the battery 7 Turn on the camera 7 Choose the language 7 Set the region 8 Set the date and time 8 Install and format an optional memory card 8 Install the software 8 ......22 3 Reviewing images and video clips 24 Using Playback...24 Deleting images 25 Saving frames from video clips 25 Viewing thumbnails 25 Magnifying images 25 HP Photosmart R725/R727 Digital Camera 3
User Guide
Page 4
...borders...30 Removing red eyes 31 Cropping images 31 5 Transferring and printing images 33 Transferring images with HP Photosmart Software 33 Transferring images without HP Photosmart Software 33 Connecting to the computer 34 Using a memory card reader 34 Printing images from the ... assistance 46 A Managing batteries 48 Top points about batteries 48 Extending battery life 48 Safety precautions for using batteries 48 Power indicators...49 Number of shots per battery type 49 Recharging the Lithium Ion battery 50 Safety precautions for recharging batteries 50 B Specifications...52 ...
...borders...30 Removing red eyes 31 Cropping images 31 5 Transferring and printing images 33 Transferring images with HP Photosmart Software 33 Transferring images without HP Photosmart Software 33 Connecting to the computer 34 Using a memory card reader 34 Printing images from the ... assistance 46 A Managing batteries 48 Top points about batteries 48 Extending battery life 48 Safety precautions for using batteries 48 Power indicators...49 Number of shots per battery type 49 Recharging the Lithium Ion battery 50 Safety precautions for recharging batteries 50 B Specifications...52 ...

User Guide
Page 6
.... 2 Flash. 3 Self-Timer/Focus Assist light-See Using the Self-Timer settings on page 21. 4 Lens. 5 Tripod mount. 6 Dock connector. 7 Battery/Memory card door. 8 USB connector. 9 Power adapter connector. When setting up the optional dock for instructions. Before taking pictures Complete the following procedures before taking...See the dock User Guide for use with this camera, use the dock insert with multiple clear inserts. Chapter 1 (continued) 15 Battery Charging light. 16 Delete button-Accesses the Delete function while in Playback. 17 Image Display. Camera dock insert If you purchase a...
.... 2 Flash. 3 Self-Timer/Focus Assist light-See Using the Self-Timer settings on page 21. 4 Lens. 5 Tripod mount. 6 Dock connector. 7 Battery/Memory card door. 8 USB connector. 9 Power adapter connector. When setting up the optional dock for instructions. Before taking pictures Complete the following procedures before taking...See the dock User Guide for use with this camera, use the dock insert with multiple clear inserts. Chapter 1 (continued) 15 Battery Charging light. 16 Delete button-Accesses the Delete function while in Playback. 17 Image Display. Camera dock insert If you purchase a...
User Guide
Page 7
... Use to an electrical outlet. Install the battery 1. HP Photosmart R725/R727 Digital Camera 7 The camera's blinking Battery Charging light indicates that the battery is fully charged when the Battery Charging light turns on the Battery/ Memory card door. 2. Close the Battery/Memory card door. Charge the battery You can also charge the battery using an optional camera dock, plug in...
... Use to an electrical outlet. Install the battery 1. HP Photosmart R725/R727 Digital Camera 7 The camera's blinking Battery Charging light indicates that the battery is fully charged when the Battery Charging light turns on the Battery/ Memory card door. 2. Close the Battery/Memory card door. Charge the battery You can also charge the battery using an optional camera dock, plug in...
User Guide
Page 8
... the camera. Note Once you have trouble installing or using the HP Photosmart Software, see the HP Customer Care website for displaying camera images on a television when connected through an optional HP Photosmart Premium camera dock or wireless dock base (see Move Images to the... other selections and repeat Step 1 until appears briefly in Playback. 2. To transfer images from internal memory to an optional memory card, see Using the Setup Menu on page 39). Turn off the camera and open the Battery...
... the camera. Note Once you have trouble installing or using the HP Photosmart Software, see the HP Customer Care website for displaying camera images on a television when connected through an optional HP Photosmart Premium camera dock or wireless dock base (see Move Images to the... other selections and repeat Step 1 until appears briefly in Playback. 2. To transfer images from internal memory to an optional memory card, see Using the Setup Menu on page 39). Turn off the camera and open the Battery...
User Guide
Page 11
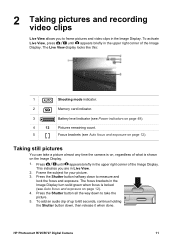
... and exposure. The Live View display looks like this: 1 Shooting mode indicator. 2 Memory card indicator. 3 Battery level indicator (see Power indicators on page 49). 4 12 Pictures remaining count. 5 Focus brackets (see Auto focus and exposure on the Image Display. 1. Taking still pictures You can take the picture. 5. HP Photosmart R725/R727 Digital Camera 11
... and exposure. The Live View display looks like this: 1 Shooting mode indicator. 2 Memory card indicator. 3 Battery level indicator (see Power indicators on page 49). 4 12 Pictures remaining count. 5 Focus brackets (see Auto focus and exposure on the Image Display. 1. Taking still pictures You can take the picture. 5. HP Photosmart R725/R727 Digital Camera 11
User Guide
Page 24
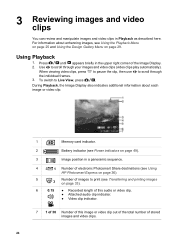
... images and video clips. 24 For information about each image or video clip. 1 Memory card indicator. 2 Battery indicator (see Power indicators on page 49). 3 Image position in a panoramic sequence. 4 1 Number of electronic Photosmart Share destinations (see Using HP Photosmart Express on page 36). 5 Number of the Image Display. 2. Use to Live View, press . Using...
... images and video clips. 24 For information about each image or video clip. 1 Memory card indicator. 2 Battery indicator (see Power indicators on page 49). 3 Image position in a panoramic sequence. 4 1 Number of electronic Photosmart Share destinations (see Using HP Photosmart Express on page 36). 5 Number of the Image Display. 2. Use to Live View, press . Using...
User Guide
Page 39
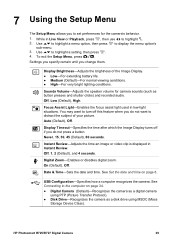
... See Connecting to the computer on page 8. Auto (Default), Off. USB Configuration-Specifies how a computer recognizes the camera. HP Photosmart R725/R727 Digital Camera 39 Display Brightness-Adjusts the brightness of your picture. Settings you specify remain until you change them. While in Live...recorded audio. Off, Low (Default), High. You may want to distract the subject of the Image Display. ● Low-For extending battery life. ● Medium (Default)-For normal viewing conditions. ● High-For very bright lighting conditions. Digital Zoom-Enables or disables ...
... See Connecting to the computer on page 8. Auto (Default), Off. USB Configuration-Specifies how a computer recognizes the camera. HP Photosmart R725/R727 Digital Camera 39 Display Brightness-Adjusts the brightness of your picture. Settings you specify remain until you change them. While in Live...recorded audio. Off, Low (Default), High. You may want to distract the subject of the Image Display. ● Low-For extending battery life. ● Medium (Default)-For normal viewing conditions. ● High-For very bright lighting conditions. Digital Zoom-Enables or disables ...
User Guide
Page 41
... replace the memory card. If so, remove the memory card and turn on page 49. HP Photosmart R725/R727 Digital Camera 41 The battery gauge goes up and down for HP Photosmart R-series cameras (L1812A/L1812B). ● Ensure that the HP AC power adapter is connected to the camera (directly or through an optional dock) and is...
... replace the memory card. If so, remove the memory card and turn on page 49. HP Photosmart R725/R727 Digital Camera 41 The battery gauge goes up and down for HP Photosmart R-series cameras (L1812A/L1812B). ● Ensure that the HP AC power adapter is connected to the camera (directly or through an optional dock) and is...

User Guide
Page 42
... disconnect, then reconnect. ● Insert a battery into a different electrical outlet. The camera does not take a picture when I press a button. ● Turn on the camera. ● Most of an optional HP Photosmart dock does not work, replace the battery. The Image Display is not working. ●...; The Image Display may be processing. Chapter 8 I have to recharge the Lithium Ion battery frequently. ● See Extending battery life on page 48. ● A battery that is new ...
... disconnect, then reconnect. ● Insert a battery into a different electrical outlet. The camera does not take a picture when I press a button. ● Turn on the camera. ● Most of an optional HP Photosmart dock does not work, replace the battery. The Image Display is not working. ●...; The Image Display may be processing. Chapter 8 I have to recharge the Lithium Ion battery frequently. ● See Extending battery life on page 48. ● A battery that is new ...
User Guide
Page 44
...recording terminates abruptly. Look for signs of the ordinary, turn off the camera, remove it is normal. Then examine the camera and the battery for cards marked High Performance, Pro, Ultra, or High Speed. If that the USB cable is properly connected to the camera and ...and won't operate. ● Press Live View/Playback to reactivate the Image Display. ● Reset the camera (see Transferring images without HP Photosmart Software on my camera. The camera responds sluggishly when trying to the touch. Reformat the card (see Image Advice under Using the Capture...
...recording terminates abruptly. Look for signs of the ordinary, turn off the camera, remove it is normal. Then examine the camera and the battery for cards marked High Performance, Pro, Ultra, or High Speed. If that the USB cable is properly connected to the camera and ...and won't operate. ● Press Live View/Playback to reactivate the Image Display. ● Reset the camera (see Transferring images without HP Photosmart Software on my camera. The camera responds sluggishly when trying to the touch. Reformat the card (see Image Advice under Using the Capture...


