Reference Guide
Page 3
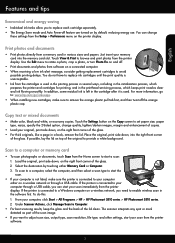
... print quality is connected to : www.hp.com/go/inkusage. •• When installing new cartridges, make sure the printer is unacceptable. •• Ink from the printer software. 3 Just insert your computer, click Start > All Programs > HP > HP Photosmart 5510 series > HP Photosmart 5510 ...series. 2. From your memory card into the right front corner of the scan image. •• If you want to set paper size, paper type, resize, specify the 2-Sided option, change these settings from...
... print quality is connected to : www.hp.com/go/inkusage. •• When installing new cartridges, make sure the printer is unacceptable. •• Ink from the printer software. 3 Just insert your computer, click Start > All Programs > HP > HP Photosmart 5510 series > HP Photosmart 5510 ...series. 2. From your memory card into the right front corner of the scan image. •• If you want to set paper size, paper type, resize, specify the 2-Sided option, change these settings from...
User Guide
Page 12
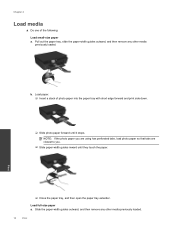
... full-size paper a. Chapter 4 Load media ▲ Do one of photo paper into the paper tray with short edge forward and print side down. ❑ Slide photo paper forward until they touch the paper. b. Pull out the paper tray, slide the paper-width guides outward, and then remove ...
... full-size paper a. Chapter 4 Load media ▲ Do one of photo paper into the paper tray with short edge forward and print side down. ❑ Slide photo paper forward until they touch the paper. b. Pull out the paper tray, slide the paper-width guides outward, and then remove ...
User Guide
Page 13
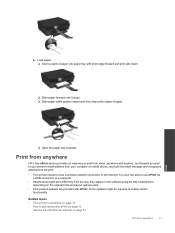
... the way they stop at the edges of paper. Print from anywhere HP's free ePrint service provides an easy way to the Internet. Load paper. ❑ Insert a stack of paper into paper tray with short edge forward and print side down. ❑ Slide paper forward until it stops. ❑ Slide paper-width guides inward...
... the way they stop at the edges of paper. Print from anywhere HP's free ePrint service provides an easy way to the Internet. Load paper. ❑ Insert a stack of paper into paper tray with short edge forward and print side down. ❑ Slide paper forward until it stops. ❑ Slide paper-width guides inward...
User Guide
Page 17
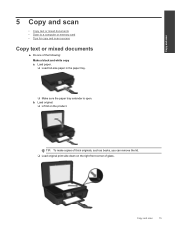
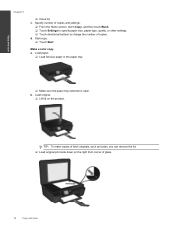
Copy and scan 5 Copy and scan • Copy text or mixed documents • Scan to a computer or memory card • Tips for copy and scan success Copy text or mixed documents ▲ Do one of glass. b. Load original. ❑ Lift lid on the right front corner of the following: Make a black and white copy a. TIP: To make copies of thick originals, such as books, you can remove the lid. ❑ Load original print side down on the product. Load paper. ❑ Load full-size paper in the paper tray. ❑ Make sure the paper tray extender is open. Copy and scan 15
Copy and scan 5 Copy and scan • Copy text or mixed documents • Scan to a computer or memory card • Tips for copy and scan success Copy text or mixed documents ▲ Do one of glass. b. Load original. ❑ Lift lid on the right front corner of the following: Make a black and white copy a. TIP: To make copies of thick originals, such as books, you can remove the lid. ❑ Load original print side down on the product. Load paper. ❑ Load full-size paper in the paper tray. ❑ Make sure the paper tray extender is open. Copy and scan 15
User Guide
Page 18
..., or other settings. ❑ Touch directional buttons to change the number of thick originals, such as books, you can remove the lid. ❑ Load original print side down on the product.
..., or other settings. ❑ Touch directional buttons to change the number of thick originals, such as books, you can remove the lid. ❑ Load original print side down on the product.

User Guide
Page 19
... cable. Under HP Photosmart 5510 series, click HP Photosmart 5510 series, click Scanner Actions, and then click Manage Scan to a computer or memory card 17 a. Before starting scan to your computer either from the printer display or from the printer display, make sure the printer is quick. Scan to Computer. Load original. Load original print side down on...
... cable. Under HP Photosmart 5510 series, click HP Photosmart 5510 series, click Scanner Actions, and then click Manage Scan to a computer or memory card 17 a. Before starting scan to your computer either from the printer display or from the printer display, make sure the printer is quick. Scan to Computer. Load original. Load original print side down on...
User Guide
Page 20
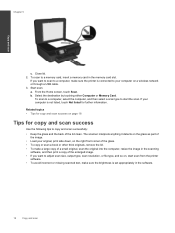
... copy and scan successfully: • Keep the glass and the back of the lid clean. Start scan. If your computer is connected to your original, print side down, on the right front corner of the glass. • To copy or scan a book or other thick originals, remove the lid. • To make... a large copy of a small original, scan the original into the computer, resize the image in the scanning software, and then print a copy of the enlarged image. • If you want to adjust scan size, output type, scan resolution, or file type, and so on page 18...
... copy and scan successfully: • Keep the glass and the back of the lid clean. Start scan. If your computer is connected to your original, print side down, on the right front corner of the glass. • To copy or scan a book or other thick originals, remove the lid. • To make... a large copy of a small original, scan the original into the computer, resize the image in the scanning software, and then print a copy of the enlarged image. • If you want to adjust scan size, output type, scan resolution, or file type, and so on page 18...
User Guide
Page 36
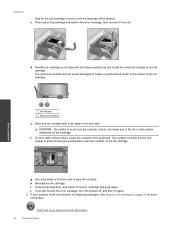
... or lint-free cloth to wipe the contacts. Click here to go online for more information. 34 Solve a problem Hold the ink cartridge by its sides with a dry swab or lint-free cloth. Wipe only the contacts with the bottom pointing up and locate the electrical contacts on again. 3. j.... g. Chapter 8 Wait for the print carriage to move to the ink label part of the ink cartridge. 1 Ink window 2 Electrical contacts e. Press tab on the bottom of the product...
... or lint-free cloth to wipe the contacts. Click here to go online for more information. 34 Solve a problem Hold the ink cartridge by its sides with a dry swab or lint-free cloth. Wipe only the contacts with the bottom pointing up and locate the electrical contacts on again. 3. j.... g. Chapter 8 Wait for the print carriage to move to the ink label part of the ink cartridge. 1 Ink window 2 Electrical contacts e. Press tab on the bottom of the product...


