
User Guide
Page 39
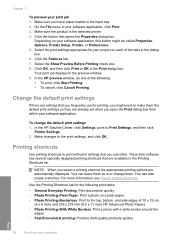
...want to print with a white border around the edges. • Fast/Economical printing: Produce draft-quality printouts quickly. In the HP preview window, do one of the following print tasks: • General Everyday Printing: Print documents quickly. • Photo Printing-Plain Paper: Print a photo... on your project on each of 10 x 15 cm (4 x 6 inch) and 216 x 279 mm (8.5 x 11 inch) HP Advanced Photo Papers. • Photo Printing-With...
...want to print with a white border around the edges. • Fast/Economical printing: Produce draft-quality printouts quickly. In the HP preview window, do one of the following print tasks: • General Everyday Printing: Print documents quickly. • Photo Printing-Plain Paper: Print a photo... on your project on each of 10 x 15 cm (4 x 6 inch) and 216 x 279 mm (8.5 x 11 inch) HP Advanced Photo Papers. • Photo Printing-With...
User Guide
Page 118
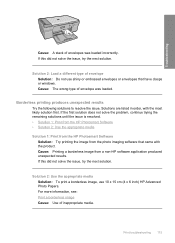
... Try the following solutions to resolve the issue. Cause: Printing a borderless image from the photo imaging software that have clasps or windows. Cause: The wrong type of envelope was loaded incorrectly. Print troubleshooting 115 If this did not solve the issue, try the next ...issue, try the next solution. For more information, see: Print a borderless image Cause: Use of envelope Solution: Do not use 10 x 15 cm (4 x 6 inch) HP Advanced Photo Papers. Solution 2: Use the appropriate media Solution: To print a borderless image, use shiny or embossed envelopes or envelopes ...
... Try the following solutions to resolve the issue. Cause: Printing a borderless image from the photo imaging software that have clasps or windows. Cause: The wrong type of envelope was loaded incorrectly. Print troubleshooting 115 If this did not solve the issue, try the next ...issue, try the next solution. For more information, see: Print a borderless image Cause: Use of envelope Solution: Do not use 10 x 15 cm (4 x 6 inch) HP Advanced Photo Papers. Solution 2: Use the appropriate media Solution: To print a borderless image, use shiny or embossed envelopes or envelopes ...
User Guide
Page 144
... troubleshooting for your hard Errors 141 Open the HP Solution Center and verify that the scanning device is...with Windows Image Architecture (WIA) • Solution 8: Disable the Lexbces service • Solution 9: Run the Scan Diagnostic utility • Solution 10:... Install a patch • Solution 11: Check the USB chipset and controller • Solution 12: Uninstall the software and reset the product Solution 1: Uninstall and reinstall the software Solution: Verify that the hardware is functioning correctly. Do not simply delete the application files from your product (such as one...
... troubleshooting for your hard Errors 141 Open the HP Solution Center and verify that the scanning device is...with Windows Image Architecture (WIA) • Solution 8: Disable the Lexbces service • Solution 9: Run the Scan Diagnostic utility • Solution 10:... Install a patch • Solution 11: Check the USB chipset and controller • Solution 12: Uninstall the software and reset the product Solution 1: Uninstall and reinstall the software Solution: Verify that the hardware is functioning correctly. Do not simply delete the application files from your product (such as one...

User Guide
Page 216
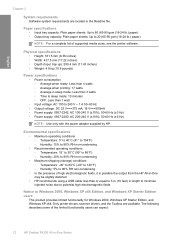
... Photo 236 gsm (145 lb.) Up to 30 25 paper 216 x 279 mm (8.5 x 11 in.) N/A Photo paper Up to 30 10 * Maximum capacity. † Output tray capacity is affected by the type of paper and the amount of the document and model Technical information ...; Up to 9 copies from original (depends on model) • Copy speeds vary according to Windows 2000 users • Environmental product stewardship program • Regulatory notices Specifications Technical specifications for the HP All-in-One are provided in this section. System requirements Software and system requirements are using...
... Photo 236 gsm (145 lb.) Up to 30 25 paper 216 x 279 mm (8.5 x 11 in.) N/A Photo paper Up to 30 10 * Maximum capacity. † Output tray capacity is affected by the type of paper and the amount of the document and model Technical information ...; Up to 9 copies from original (depends on model) • Copy speeds vary according to Windows 2000 users • Environmental product stewardship program • Regulatory notices Specifications Technical specifications for the HP All-in-One are provided in this section. System requirements Software and system requirements are using...
User Guide
Page 38
... tray. 2. Click OK, and then click Print or OK in the Printing Shortcuts list. In the HP preview window, do one of 10 x 15 cm (4 x 6 inch) and 216 x 279 mm (8.5 x 11 inch) HP Advanced Photo Papers. • Photo Printing-With White Borders: Print a photo with print settings that you... have paper loaded in the preview window. 9. To change them the default print settings so they are ...
... tray. 2. Click OK, and then click Print or OK in the Printing Shortcuts list. In the HP preview window, do one of 10 x 15 cm (4 x 6 inch) and 216 x 279 mm (8.5 x 11 inch) HP Advanced Photo Papers. • Photo Printing-With White Borders: Print a photo with print settings that you... have paper loaded in the preview window. 9. To change them the default print settings so they are ...

User Guide
Page 53
...the Delete key on page 10 Resume a print job If an error occurs while printing, you want to be cancelled. Double-click the product icon. On the Windows taskbar, click Start, and...or Resume. Select the print job you want to resume the job from the HP All-in the Windows taskbar. 4. On the Windows taskbar, click Start, point to resume. 5. Related topics "Control panel buttons"...job. To resume a print job from the computer (Windows 2000 users) 1. 4. It can also double-click the printer icon in -One or the computer after you want to Settings, and then click...
...the Delete key on page 10 Resume a print job If an error occurs while printing, you want to be cancelled. Double-click the product icon. On the Windows taskbar, click Start, and...or Resume. Select the print job you want to resume the job from the HP All-in the Windows taskbar. 4. On the Windows taskbar, click Start, point to resume. 5. Related topics "Control panel buttons"...job. To resume a print job from the computer (Windows 2000 users) 1. 4. It can also double-click the printer icon in -One or the computer after you want to Settings, and then click...
User Guide
Page 54
On the Windows taskbar, click Start, point to resume. 4. Double-click the product icon. Related topics "Control panel buttons" on page 10 Print 52 Print from the computer (Windows 2000 users) 1. TIP: You can take a few moments to resume the print job. On the Document menu, click Resume. Select the print job you want to Settings, and then click Printers. 2. It can also double-click the printer icon in the Windows taskbar. 3. Chapter 7 To resume a print job from your computer
On the Windows taskbar, click Start, point to resume. 4. Double-click the product icon. Related topics "Control panel buttons" on page 10 Print 52 Print from the computer (Windows 2000 users) 1. TIP: You can take a few moments to resume the print job. On the Document menu, click Resume. Select the print job you want to Settings, and then click Printers. 2. It can also double-click the printer icon in the Windows taskbar. 3. Chapter 7 To resume a print job from your computer
User Guide
Page 56
...Closing the HP Digital Imaging Monitor icon in the Windows system tray can cause the HP All-in the input tray. 2. Load your computer or by restarting your original print side down on the right front corner of its functionality. NOTE: The product makes one copy and launches the HP Copy software ... you can restore full functionality by starting the HP Photosmart Software. If this happens, you have paper loaded in -One to lose some of the glass. 3. Press Start Copy Black or Start Copy Color. Related topics "Control panel buttons" on page 10 Stop copying To stop copying ▲ Press ...
...Closing the HP Digital Imaging Monitor icon in the Windows system tray can cause the HP All-in the input tray. 2. Load your computer or by restarting your original print side down on the right front corner of its functionality. NOTE: The product makes one copy and launches the HP Copy software ... you can restore full functionality by starting the HP Photosmart Software. If this happens, you have paper loaded in -One to lose some of the glass. 3. Press Start Copy Black or Start Copy Color. Related topics "Control panel buttons" on page 10 Stop copying To stop copying ▲ Press ...
User Guide
Page 58
...scanned image looks just the way you want it, you can open it in the Windows system tray can restore full functionality by restarting your computer, where you installed on your ... down on page 10 56 Use the scan features The HP Photosmart Software that you can improve the overall image quality by starting the HP Photosmart Software. Click the HP Digital Imaging Monitor ...using the HP Solution Center software installed on your computer or by adjusting the brightness, sharpness, color tone, or saturation. Make any edits to a computer 1. Scan NOTE: Closing the HP Digital Imaging...
...scanned image looks just the way you want it, you can open it in the Windows system tray can restore full functionality by restarting your computer, where you installed on your ... down on page 10 56 Use the scan features The HP Photosmart Software that you can improve the overall image quality by starting the HP Photosmart Software. Click the HP Digital Imaging Monitor ...using the HP Solution Center software installed on your computer or by adjusting the brightness, sharpness, color tone, or saturation. Make any edits to a computer 1. Scan NOTE: Closing the HP Digital Imaging...
User Guide
Page 136
...files from a Windows computer NOTE: Use this section if you receive an error such as Make Copies) do not appear, your hard drive. If the appropriate icons and buttons for your product (such as one of the following solutions separately. Open the HP Solution Center ...10: Install a patch • Solution 11: Check the USB chipset and controller • Solution 12: Uninstall the software and reset the product Solution 1: Uninstall and reinstall the software Solution: Verify that the scanning device is not available in the Windows Start menu (click Programs or All Programs, HP, Deskjet...
...files from a Windows computer NOTE: Use this section if you receive an error such as Make Copies) do not appear, your hard drive. If the appropriate icons and buttons for your product (such as one of the following solutions separately. Open the HP Solution Center ...10: Install a patch • Solution 11: Check the USB chipset and controller • Solution 12: Uninstall the software and reset the product Solution 1: Uninstall and reinstall the software Solution: Verify that the scanning device is not available in the Windows Start menu (click Programs or All Programs, HP, Deskjet...
User Guide
Page 137
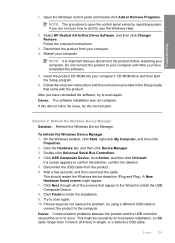
...NOTE: The procedure to occur. Disconnect the product from the product. 6. To refresh the Windows Device Manager 1. Double-click Universal Serial Bus Controllers. 4. Troubleshooting 1. Select HP Deskjet All-In-One Driver Software, and then click Change/ Remove. NOTE: It is important that came with ... see the Windows Help. 2. On the Windows taskbar, click Start, right-click My Computer, and then click Properties. 2. Click USB Composite Device, click Action, and then click Uninstall. Wait a few seconds, and then reconnect the cable. Click Finish to scan again. 10. Cause: ...
...NOTE: The procedure to occur. Disconnect the product from the product. 6. To refresh the Windows Device Manager 1. Double-click Universal Serial Bus Controllers. 4. Troubleshooting 1. Select HP Deskjet All-In-One Driver Software, and then click Change/ Remove. NOTE: It is important that came with ... see the Windows Help. 2. On the Windows taskbar, click Start, right-click My Computer, and then click Properties. 2. Click USB Composite Device, click Action, and then click Uninstall. Wait a few seconds, and then reconnect the cable. Click Finish to scan again. 10. Cause: ...

User Guide
Page 209
...216 x 279 mm (8.5 x 11 in the Readme file. For additional specifications, see the printed documentation that came with the HP All-in-One. For additional specifications, see the printed Basics Guide. Paper tray capacities Type Paper weight Paper tray* Output tray† Plain ... Up to 30 4 10 x 15 cm (4 x 6 in.) Photo 236 gsm (145 lb.) Up to Windows 2000, Windows XP x64 Edition, and Windows XP Starter Edition users • Environmental product stewardship program • Regulatory notices Specifications Technical specifications for the HP All-in-One are provided in this ...
...216 x 279 mm (8.5 x 11 in the Readme file. For additional specifications, see the printed documentation that came with the HP All-in-One. For additional specifications, see the printed Basics Guide. Paper tray capacities Type Paper weight Paper tray* Output tray† Plain ... Up to 30 4 10 x 15 cm (4 x 6 in.) Photo 236 gsm (145 lb.) Up to Windows 2000, Windows XP x64 Edition, and Windows XP Starter Edition users • Environmental product stewardship program • Regulatory notices Specifications Technical specifications for the HP All-in-One are provided in this ...
Basics Guide
Page 4
... information...10 Setup Guide...10 Onscreen Help...10 HP Web site...11 HP support...11 HP support by phone...11 Phone support period 11 After the phone support period 11 Before calling HP Support 11 Technical information...11 System requirements...12 Paper specifications...12 Physical specifications...12 Power specifications...12 Environmental specifications 12 Notice to Windows 2000, Windows XP...
... information...10 Setup Guide...10 Onscreen Help...10 HP Web site...11 HP support...11 HP support by phone...11 Phone support period 11 After the phone support period 11 Before calling HP Support 11 Technical information...11 System requirements...12 Paper specifications...12 Physical specifications...12 Power specifications...12 Environmental specifications 12 Notice to Windows 2000, Windows XP...
Basics Guide
Page 15
...some of high electromagnetic fields, it is possible the output from the HP All-in-One may be slightly distorted • HP recommends using a USB cable less than or equal to 3 m (10 feet) in -One Series Environmental specifications • Maximum operating conditions ◦ Temperature: 5°... 12 HP Deskjet F4200 All-in length to minimize injected noise due to potential high electromagnetic fields Notice to Windows 2000, Windows XP x64 Edition, and Windows XP Starter Edition users This product provides limited functionality for Windows 2000, Windows XP Starter Edition, and Windows XP x64...
...some of high electromagnetic fields, it is possible the output from the HP All-in-One may be slightly distorted • HP recommends using a USB cable less than or equal to 3 m (10 feet) in -One Series Environmental specifications • Maximum operating conditions ◦ Temperature: 5°... 12 HP Deskjet F4200 All-in length to minimize injected noise due to potential high electromagnetic fields Notice to Windows 2000, Windows XP x64 Edition, and Windows XP Starter Edition users This product provides limited functionality for Windows 2000, Windows XP Starter Edition, and Windows XP x64...


