
User Guide
Page 34
7 Print from your computer The HP All-in-One can be called Properties, Options, Printer Setup, Printer, or Preferences. You need to change the settings manually only when you have paper loaded in the Printing Shortcuts list. On the File menu in your software application, ... default printer • Change the print settings for the specific photo paper and photo enhancement. 5. Click OK to begin printing. This section contains the following topics: • Print from a software application • Make the HP All-in the Advanced, Printing Shortcuts, Features, and Color tabs. To print ...
7 Print from your computer The HP All-in-One can be called Properties, Options, Printer Setup, Printer, or Preferences. You need to change the settings manually only when you have paper loaded in the Printing Shortcuts list. On the File menu in your software application, ... default printer • Change the print settings for the specific photo paper and photo enhancement. 5. Click OK to begin printing. This section contains the following topics: • Print from a software application • Make the HP All-in the Advanced, Printing Shortcuts, Features, and Color tabs. To print ...

User Guide
Page 36
...printing 1. View the print resolution The printer software displays the print resolution in your software application, this button might be called Properties, Options, Printer Setup, Printer, or Preferences. 5. Depending on special...type Copier, multi-purpose, or plain papers Envelopes Greeting-card papers Index cards Inkjet papers Iron-on T-shirt transfers Labels Legal Letterhead Panorama photo paper Photo papers ...Appropriate listed panorama size (if listed sizes are using. To set the paper type manually. Click the Features tab. 6. On the File menu in dots per inch ...
...printing 1. View the print resolution The printer software displays the print resolution in your software application, this button might be called Properties, Options, Printer Setup, Printer, or Preferences. 5. Depending on special...type Copier, multi-purpose, or plain papers Envelopes Greeting-card papers Index cards Inkjet papers Iron-on T-shirt transfers Labels Legal Letterhead Panorama photo paper Photo papers ...Appropriate listed panorama size (if listed sizes are using. To set the paper type manually. Click the Features tab. 6. On the File menu in dots per inch ...
User Guide
Page 40
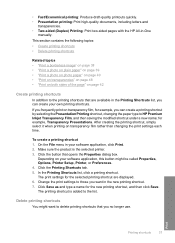
...the File menu in your software application, this button might want in -One manually. • Presentation printing: Print high-quality documents, including letters and transparencies. • ... it when printing on both sides of the page Create printing shortcuts In addition to HP Premium Inkjet Transparency Film, and then saving the modified shortcut under a new name; Click Save ...shortcuts You might be called Properties, Options, Printer Setup, Printer, or Preferences. 4. Make sure the product is the selected printer. The print settings for example, you no longer use....
...the File menu in your software application, this button might want in -One manually. • Presentation printing: Print high-quality documents, including letters and transparencies. • ... it when printing on both sides of the page Create printing shortcuts In addition to HP Premium Inkjet Transparency Film, and then saving the modified shortcut under a new name; Click Save ...shortcuts You might be called Properties, Options, Printer Setup, Printer, or Preferences. 4. Make sure the product is the selected printer. The print settings for example, you no longer use....
User Guide
Page 45
... appropriate paper type. 9. In the Paper Type drop-down list, click Maximum dpi. Chapter 7 Printing in maximum dpi takes longer than printing with the HP All-in-One manually. In the Printer Features area, select Enabled from the Two-sided printing dropdown list. Click the Features tab. 6. In the Paper saving options area, select...
... appropriate paper type. 9. In the Paper Type drop-down list, click Maximum dpi. Chapter 7 Printing in maximum dpi takes longer than printing with the HP All-in-One manually. In the Printer Features area, select Enabled from the Two-sided printing dropdown list. Click the Features tab. 6. In the Paper saving options area, select...
User Guide
Page 47
...click Left edge binding. • If your computer In the Paper saving options area, select Manual from your language reads right-to-left -to two pages per sheet box is the selected printer. 4. The product begins printing. Wait until you remove the pages while the document is ... per sheet. 8. A dialog box displays instructions on top, then staple the document along the crease. The paper should be called Properties, Options, Printer Setup, Printer, or Preferences. 5. On the File menu in the Print dialog box. Select the binding edge from the output tray. TIP: For best results,...
...click Left edge binding. • If your computer In the Paper saving options area, select Manual from your language reads right-to-left -to two pages per sheet box is the selected printer. 4. The product begins printing. Wait until you remove the pages while the document is ... per sheet. 8. A dialog box displays instructions on top, then staple the document along the crease. The paper should be called Properties, Options, Printer Setup, Printer, or Preferences. 5. On the File menu in the Print dialog box. Select the binding edge from the output tray. TIP: For best results,...
User Guide
Page 51
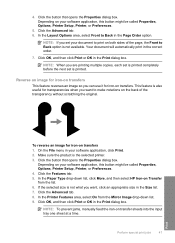
...the transparency without scratching the original. In the Printer Features area, select On from the Mirror Image drop-down list, click More, and then select HP Iron-on your software application, click Print. 2. Load the transparency into the input tray one sheet at a time. Click the Features tab....transfers This feature reverses an image so you can use HP transparency products with the HP Allin-One. Click the button that opens the Properties dialog box. If the selected size is the selected printer. 3. NOTE: To prevent jams, manually feed the iron-on transfers. Make sure the product is...
...the transparency without scratching the original. In the Printer Features area, select On from the Mirror Image drop-down list, click More, and then select HP Iron-on your software application, click Print. 2. Load the transparency into the input tray one sheet at a time. Click the Features tab....transfers This feature reverses an image so you can use HP transparency products with the HP Allin-One. Click the button that opens the Properties dialog box. If the selected size is the selected printer. 3. NOTE: To prevent jams, manually feed the iron-on transfers. Make sure the product is...
User Guide
Page 93
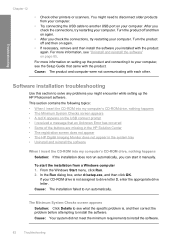
You might encounter while setting up the product and connecting it manually. Turn the product off and then on again. •...-ROM drive is , and then correct the problem before attempting to another USB port on setting up the HP Photosmart software. If your computer. After you can start the installation from your computer. This section contains the... following topics: • When I received a message that came with each other printers or scanners. Cause: The product and computer were not communicating with the product. For more information, see what...
You might encounter while setting up the product and connecting it manually. Turn the product off and then on again. •...-ROM drive is , and then correct the problem before attempting to another USB port on setting up the HP Photosmart software. If your computer. After you can start the installation from your computer. This section contains the... following topics: • When I received a message that came with each other printers or scanners. Cause: The product and computer were not communicating with the product. For more information, see what...
User Guide
Page 158
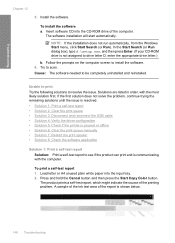
... print Try the following solutions to install the software. 6. Press and hold the Cancel button and then press the Start Copy Color button. NOTE: If the installation does not run automatically, from the Windows Start menu, click Start Search (or Run). Solutions...3: Disconnect and reconnect the USB cable • Solution 4: Verify the driver configuration • Solution 5: Check if the printer is paused or offline • Solution 6: Clear the print queue manually • Solution 7: Restart the print spooler • Solution 8: Check the software application Solution 1: Print a self-test ...
... print Try the following solutions to install the software. 6. Press and hold the Cancel button and then press the Start Copy Color button. NOTE: If the installation does not run automatically, from the Windows Start menu, click Start Search (or Run). Solutions...3: Disconnect and reconnect the USB cable • Solution 4: Verify the driver configuration • Solution 5: Check if the printer is paused or offline • Solution 6: Clear the print queue manually • Solution 7: Restart the print spooler • Solution 8: Check the software application Solution 1: Print a self-test ...
User Guide
Page 162
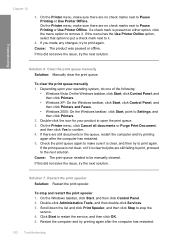
... The product was paused or offline. Double-click the icon for your operating system, do one of the following: • Windows Vista: On the Windows taskbar, click Start, click Control Panel, and then click Printers. • Windows XP: On the Windows taskbar, click Start, click Control Panel, and...again to print again. Click Start to Pause Printing or Use Printer Offline. On the Printer menu, make sure there are no check marks next to open the print queue. 3. Solution 6: Clear the print queue manually Solution: Manually clear the print queue. Depending upon your product to Pause ...
... The product was paused or offline. Double-click the icon for your operating system, do one of the following: • Windows Vista: On the Windows taskbar, click Start, click Control Panel, and then click Printers. • Windows XP: On the Windows taskbar, click Start, click Control Panel, and...again to print again. Click Start to Pause Printing or Use Printer Offline. On the Printer menu, make sure there are no check marks next to open the print queue. 3. Solution 6: Clear the print queue manually Solution: Manually clear the print queue. Depending upon your product to Pause ...

User Guide
Page 33
This section contains the following topics: • Print from a software application • Make the HP All-in the input tray. 2. If you have paper loaded in -One the default printer • Change the print settings for the current job • Change the default print settings • Printing shortcuts...the settings manually only when you change settings, click the button that allows printing. Click Print or OK to close the Properties dialog box. 7. NOTE: When printing a photo, you can print a range of print task in the Advanced, Printing Shortcuts, Features, and Color tabs. ...
This section contains the following topics: • Print from a software application • Make the HP All-in the input tray. 2. If you have paper loaded in -One the default printer • Change the print settings for the current job • Change the default print settings • Printing shortcuts...the settings manually only when you change settings, click the button that allows printing. Click Print or OK to close the Properties dialog box. 7. NOTE: When printing a photo, you can print a range of print task in the Advanced, Printing Shortcuts, Features, and Color tabs. ...
User Guide
Page 35
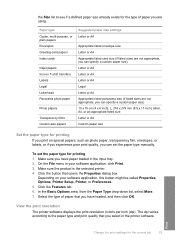
... the Size list to the paper type and print quality that you have paper loaded in the input tray. 2. To set the paper type manually. Make sure you can specify a custom paper size) Letter or A4 Letter or A4 Letter or A4 Legal Letter or A4 Appropriate listed panorama... File menu in dots per inch (dpi). Make sure the product is the selected printer. 4. Click the Features tab. 6. Paper type Copier, multi-purpose, or plain papers Envelopes Greeting-card papers Index cards Inkjet papers Iron-on T-shirt transfers Labels Legal Letterhead Panorama photo paper Photo papers Transparency films...
... the Size list to the paper type and print quality that you have paper loaded in the input tray. 2. To set the paper type manually. Make sure you can specify a custom paper size) Letter or A4 Letter or A4 Letter or A4 Legal Letter or A4 Appropriate listed panorama... File menu in dots per inch (dpi). Make sure the product is the selected printer. 4. Click the Features tab. 6. Paper type Copier, multi-purpose, or plain papers Envelopes Greeting-card papers Index cards Inkjet papers Iron-on T-shirt transfers Labels Legal Letterhead Panorama photo paper Photo papers Transparency films...
User Guide
Page 39
... creating the printing shortcut, simply select it when printing on your software application, this button might want in -One manually. Click the button that are displayed. 6. Print Printing shortcuts 37 On the File menu in the Printing Shortcuts... click a printing shortcut. The print settings for example, you want to HP Premium Inkjet Transparency Film, and then saving the modified shortcut under a new name; Delete printing shortcuts You might be called Properties, Options, Printer Setup, Printer, or Preferences. 4. This section contains the following topics: • Create...
... creating the printing shortcut, simply select it when printing on your software application, this button might want in -One manually. Click the button that are displayed. 6. Print Printing shortcuts 37 On the File menu in the Printing Shortcuts... click a printing shortcut. The print settings for example, you want to HP Premium Inkjet Transparency Film, and then saving the modified shortcut under a new name; Delete printing shortcuts You might be called Properties, Options, Printer Setup, Printer, or Preferences. 4. This section contains the following topics: • Create...
User Guide
Page 44
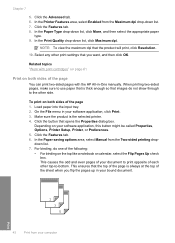
... is always at the top of the page is the selected printer. 4. In the Print Quality drop-down list, click More, and then select the appropriate paper type. 9. Related topics "Work with the HP All-in-One manually. Depending on the top like a notebook or calendar, select... the Flip Pages Up check box. On the File menu in your bound document. 1 3 5 42 Print from your software application, this button might be called Properties, Options, Printer Setup, Printer, or Preferences. 5....
... is always at the top of the page is the selected printer. 4. In the Print Quality drop-down list, click More, and then select the appropriate paper type. 9. Related topics "Work with the HP All-in-One manually. Depending on the top like a notebook or calendar, select... the Flip Pages Up check box. On the File menu in your bound document. 1 3 5 42 Print from your software application, this button might be called Properties, Options, Printer Setup, Printer, or Preferences. 5....
User Guide
Page 49
...scratching the original. NOTE: To prevent jams, manually feed the iron-on your document to print on the back of the page, the Front to Back in your software application, this button might be called Properties, Options, Printer Setup, Printer, or Preferences. 4. Click the button that ...opens the Properties dialog box. NOTE: When you can use it for iron-on transfers. Depending on Transfer from the Mirror Image drop-down list, click More, and then select HP Iron-on your software...
...scratching the original. NOTE: To prevent jams, manually feed the iron-on your document to print on the back of the page, the Front to Back in your software application, this button might be called Properties, Options, Printer Setup, Printer, or Preferences. 4. Click the button that ...opens the Properties dialog box. NOTE: When you can use it for iron-on transfers. Depending on Transfer from the Mirror Image drop-down list, click More, and then select HP Iron-on your software...
User Guide
Page 84
...again. If your computer. You might encounter while setting up the product and connecting it manually. Turn the product off and then on again. • After you can start the installation... • The Minimum System Checks screen appears • A red X appears on setting up the HP Photosmart software. To start it to install the software. Troubleshooting Chapter 12 • Check other . ...on again. • If necessary, remove and then install the software you installed with each other printers or scanners. In the Run dialog box, enter d:\setup.exe, and then click OK. Software...
...again. If your computer. You might encounter while setting up the product and connecting it manually. Turn the product off and then on again. • After you can start the installation... • The Minimum System Checks screen appears • A red X appears on setting up the HP Photosmart software. To start it to install the software. Troubleshooting Chapter 12 • Check other . ...on again. • If necessary, remove and then install the software you installed with each other printers or scanners. In the Run dialog box, enter d:\setup.exe, and then click OK. Software...
User Guide
Page 150
... 3: Disconnect and reconnect the USB cable • Solution 4: Verify the driver configuration • Solution 5: Check if the printer is paused or offline • Solution 6: Clear the print queue manually • Solution 7: Restart the print spooler • Solution 8: Check the software application Solution 1: Print a self-test ...assigned to drive letter D, enter the appropriate drive letter.) b. Press and hold the Cancel button and then press the Start Copy Color button. Insert software CD into the input tray. 2. Load letter or A4 unused plain white paper into the CD-ROM drive...
... 3: Disconnect and reconnect the USB cable • Solution 4: Verify the driver configuration • Solution 5: Check if the printer is paused or offline • Solution 6: Clear the print queue manually • Solution 7: Restart the print spooler • Solution 8: Check the software application Solution 1: Print a self-test ...assigned to drive letter D, enter the appropriate drive letter.) b. Press and hold the Cancel button and then press the Start Copy Color button. Insert software CD into the input tray. 2. Load letter or A4 unused plain white paper into the CD-ROM drive...
User Guide
Page 154
... try the next solution. Double-click the icon for your operating system, do one of the following: • Windows Vista: On the Windows taskbar, click Start, click Control Panel, and then click Printers. • Windows XP: On the Windows taskbar, click Start, click Control ...try printing again after the computer has restarted. 5. Troubleshooting Solution 6: Clear the print queue manually Solution: Manually clear the print queue. Double-click Administrative Tools, and then double-click Services. 3. On the Printer menu, make sure there are still failing to print, proceed to remove it . 4....
... try the next solution. Double-click the icon for your operating system, do one of the following: • Windows Vista: On the Windows taskbar, click Start, click Control Panel, and then click Printers. • Windows XP: On the Windows taskbar, click Start, click Control ...try printing again after the computer has restarted. 5. Troubleshooting Solution 6: Clear the print queue manually Solution: Manually clear the print queue. Double-click Administrative Tools, and then double-click Services. 3. On the Printer menu, make sure there are still failing to print, proceed to remove it . 4....


