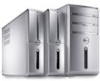
Owners Manual
Page 4
6 Front Bezel 25 Removing the Front Bezel 25 Replacing the Front Bezel 27 7 Card Retention Bracket 29 Removing the Card Retention Bracket 29 Replacing the Card Retention Bracket 31 8 PCI Express Cards 33 Removing PCI Express Cards 33 Replacing PCI Express Cards 35 Configuring Your Computer After Removing or Installing the PCI Express Card 37 9 Mini-Card 39 Removing the Mini-Card 40 Replacing the Mini-Card 41 10 Hard Drive(s 43 Removing the Hard Drive(s 43 Replacing the Hard Drive(s 48 4 Contents
6 Front Bezel 25 Removing the Front Bezel 25 Replacing the Front Bezel 27 7 Card Retention Bracket 29 Removing the Card Retention Bracket 29 Replacing the Card Retention Bracket 31 8 PCI Express Cards 33 Removing PCI Express Cards 33 Replacing PCI Express Cards 35 Configuring Your Computer After Removing or Installing the PCI Express Card 37 9 Mini-Card 39 Removing the Mini-Card 40 Replacing the Mini-Card 41 10 Hard Drive(s 43 Removing the Hard Drive(s 43 Replacing the Hard Drive(s 48 4 Contents
Owners Manual
Page 33
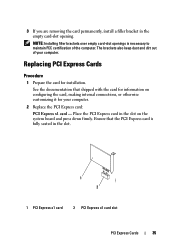
See "Removing the Card Retention Bracket" on page 9. PCI Express Cards WARNING: Before working inside your computer, read the safety information that shipped with your computer and follow the steps in "Before You Begin" on page 29. For additional safety best practices information, see the Regulatory Compliance Homepage at dell.com/regulatory_compliance. PCI Express Cards 33 Removing PCI Express Cards Prerequisites. 1 Remove the computer cover. See "Removing the Computer Cover" on page 18. 2 Remove the card retention bracket.
See "Removing the Card Retention Bracket" on page 9. PCI Express Cards WARNING: Before working inside your computer, read the safety information that shipped with your computer and follow the steps in "Before You Begin" on page 29. For additional safety best practices information, see the Regulatory Compliance Homepage at dell.com/regulatory_compliance. PCI Express Cards 33 Removing PCI Express Cards Prerequisites. 1 Remove the computer cover. See "Removing the Computer Cover" on page 18. 2 Remove the card retention bracket.
Owners Manual
Page 34
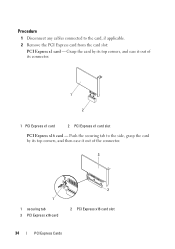
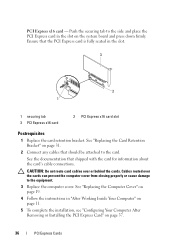
Push the securing tab to the card, if applicable. 2 Remove the PCI Express card from the card slot: PCI Express x1 card - Grasp the card by its connector. 1 2 1 PCI Express x1 card 2 PCI Express x1 card slot PCI Express x16 card - Procedure 1 Disconnect any cables connected to the side, grasp the card by its top corners, and ease it out of its top corners, and then ease it out of the connector. 3 1 1 securing tab 3 PCI Express x16 card 2 2 PCI Express x16 card slot 34 PCI Express Cards
Push the securing tab to the card, if applicable. 2 Remove the PCI Express card from the card slot: PCI Express x1 card - Grasp the card by its connector. 1 2 1 PCI Express x1 card 2 PCI Express x1 card slot PCI Express x16 card - Procedure 1 Disconnect any cables connected to the side, grasp the card by its top corners, and ease it out of its top corners, and then ease it out of the connector. 3 1 1 securing tab 3 PCI Express x16 card 2 2 PCI Express x16 card slot 34 PCI Express Cards
Owners Manual
Page 35
... is necessary to maintain FCC certification of your computer. 2 Replace the PCI Express card: PCI Express x1 card - Place the PCI Express card in the empty card-slot opening. Replacing PCI Express Cards Procedure 1 Prepare the card for your computer. 3 If you are removing the card permanently, install a filler bracket in the slot on configuring the ...information on the system board and press down firmly. NOTE: Installing filler brackets over empty card-slot openings is fully seated in the slot. 1 2 1 PCI Express x1 card 2 PCI Express x1 card slot PCI Express Cards 35
... is necessary to maintain FCC certification of your computer. 2 Replace the PCI Express card: PCI Express x1 card - Place the PCI Express card in the empty card-slot opening. Replacing PCI Express Cards Procedure 1 Prepare the card for your computer. 3 If you are removing the card permanently, install a filler bracket in the slot on configuring the ...information on the system board and press down firmly. NOTE: Installing filler brackets over empty card-slot openings is fully seated in the slot. 1 2 1 PCI Express x1 card 2 PCI Express x1 card slot PCI Express Cards 35
Owners Manual
Page 36
.... See "Replacing the Computer Cover" on page 19. 4 Follow the instructions in the slot on page 37. 36 PCI Express Cards Push the securing tab to the side and place the PCI Express card in "After Working Inside Your Computer" on page 11. 5 To complete the installation, see "Configuring Your Computer... After Removing or Installing the PCI Express Card" on the system board and press down firmly. CAUTION: Do not route card cables over the cards can prevent the computer cover ...
.... See "Replacing the Computer Cover" on page 19. 4 Follow the instructions in the slot on page 37. 36 PCI Express Cards Push the securing tab to the side and place the PCI Express card in "After Working Inside Your Computer" on page 11. 5 To complete the installation, see "Configuring Your Computer... After Removing or Installing the PCI Express Card" on the system board and press down firmly. CAUTION: Do not route card cables over the cards can prevent the computer cover ...
Owners Manual
Page 37
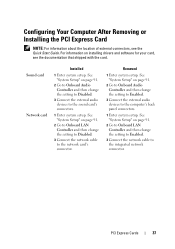
PCI Express Cards 37 See "System Setup" on page 91. 2 Go to Onboard LAN Controller and then change the setting to Enabled. 3 Connect the external audio devices ... to the network card's connector. Removed 1 Enter system setup. Sound card Network card Installed 1 Enter system setup. Configuring Your Computer After Removing or Installing the PCI Express Card NOTE: For information about the location of external connectors, see the documentation that shipped with the card.
PCI Express Cards 37 See "System Setup" on page 91. 2 Go to Onboard LAN Controller and then change the setting to Enabled. 3 Connect the external audio devices ... to the network card's connector. Removed 1 Enter system setup. Sound card Network card Installed 1 Enter system setup. Configuring Your Computer After Removing or Installing the PCI Express Card NOTE: For information about the location of external connectors, see the documentation that shipped with the card.

Owners Manual
Page 85
...4 Remove the processor fan and heat-sink assembly. System Board 85 See "Removing the Computer Cover" on page 40. 3 Remove the any PCI-Express cards, if applicable. See "Removing the Mini-Card" on page 18. 2 Remove the Mini-Card, if applicable. For additional safety best... practices information, see the Regulatory Compliance Homepage at dell.com/regulatory_compliance. Removing the System Board Prerequisites 1 Remove the computer cover. See "Removing the Processor" on page 69. 5 Remove the processor...
...4 Remove the processor fan and heat-sink assembly. System Board 85 See "Removing the Computer Cover" on page 40. 3 Remove the any PCI-Express cards, if applicable. See "Removing the Mini-Card" on page 18. 2 Remove the Mini-Card, if applicable. For additional safety best... practices information, see the Regulatory Compliance Homepage at dell.com/regulatory_compliance. Removing the System Board Prerequisites 1 Remove the computer cover. See "Removing the Processor" on page 69. 5 Remove the processor...
Owners Manual
Page 87
... board is preset at the factory. NOTE: For information on system board connectors, see "System Board Components" on page 22. 4 Replace any PCI-Express cards, if applicable. See "Replacing the Processor" on page 35. 5 Replace the Mini-Card, if applicable. 4 Compare the system board that... you disconnected from the system board. See "Replacing PCI Express Cards" on page 75. 2 Replace the processor fan and heat-sink assembly. NOTE: Jumper settings on page 19. 7 Follow the instructions in...
... board is preset at the factory. NOTE: For information on system board connectors, see "System Board Components" on page 22. 4 Replace any PCI-Express cards, if applicable. See "Replacing the Processor" on page 35. 5 Replace the Mini-Card, if applicable. 4 Compare the system board that... you disconnected from the system board. See "Replacing PCI Express Cards" on page 75. 2 Replace the processor fan and heat-sink assembly. NOTE: Jumper settings on page 19. 7 Follow the instructions in...


