
View
Page 2
... display to the port on your discrete graphics card 4 Connect the power cable and press the power button 5 Complete Windows setup 完成 Windows Windows 設定 Windows Windows Record your Windows password here NOTE: Do not use the @ symbol in your password Windows Windows Windows Windows Before You Contact Support Locate your Service Tag Record your Service Tag here
... display to the port on your discrete graphics card 4 Connect the power cable and press the power button 5 Complete Windows setup 完成 Windows Windows 設定 Windows Windows Record your Windows password here NOTE: Do not use the @ symbol in your password Windows Windows Windows Windows Before You Contact Support Locate your Service Tag Record your Service Tag here
Owners Manual
Page 2
... Dell™, the DELL logo, and Inspiron™ are trademarks of Intel Corporation in the U.S. Bluetooth® is used in trademarks and trade names other countries. and is a registered trademark owned by Dell under license; disclaims any manner whatsoever without notice. © 2012 Dell ... CAUTION indicates potential damage to change without the written permission of Dell Inc. WARNING: A WARNING indicates a potential for property damage, personal injury, or death. Microsoft®, Windows®, and the Windows start button logo are either the entities claiming the marks and ...
... Dell™, the DELL logo, and Inspiron™ are trademarks of Intel Corporation in the U.S. Bluetooth® is used in trademarks and trade names other countries. and is a registered trademark owned by Dell under license; disclaims any manner whatsoever without notice. © 2012 Dell ... CAUTION indicates potential damage to change without the written permission of Dell Inc. WARNING: A WARNING indicates a potential for property damage, personal injury, or death. Microsoft®, Windows®, and the Windows start button logo are either the entities claiming the marks and ...
Owners Manual
Page 9
...edges and avoid touching pins and contacts. NOTE: If you are using a different operating system, see the Regulatory Compliance Homepage at dell.com/regulatory_compliance. CAUTION: To avoid damaging the components and cards, handle them by their electrical outlets. 4 Disconnect all telephone cables,... all open files and exit all open programs. 2 Click Start and click Shut Down. WARNING: Before working inside your computer. Microsoft Windows shuts down instructions. 3 Disconnect your computer. 5 Press and hold the power button, while the computer is flat and clean. After ...
...edges and avoid touching pins and contacts. NOTE: If you are using a different operating system, see the Regulatory Compliance Homepage at dell.com/regulatory_compliance. CAUTION: To avoid damaging the components and cards, handle them by their electrical outlets. 4 Disconnect all telephone cables,... all open files and exit all open programs. 2 Click Start and click Shut Down. WARNING: Before working inside your computer. Microsoft Windows shuts down instructions. 3 Disconnect your computer. 5 Press and hold the power button, while the computer is flat and clean. After ...
Owners Manual
Page 91
...password, type of hard drive installed, enabling or disabling base devices, and so on (or restart) your computer. 2 During POST, when the DELL logo is displayed, watch for it is recommended that the keyboard has initialized. NOTE: The F2 prompt indicates that you must watch for future ...reference. This prompt can make your computer and try again. NOTE: Before you see the Microsoft Windows desktop. Certain changes can appear very quickly, so you note the system-setup screen information for the F2 prompt to appear and then press...
...password, type of hard drive installed, enabling or disabling base devices, and so on (or restart) your computer. 2 During POST, when the DELL logo is displayed, watch for it is recommended that the keyboard has initialized. NOTE: The F2 prompt indicates that you must watch for future ...reference. This prompt can make your computer and try again. NOTE: Before you see the Microsoft Windows desktop. Certain changes can appear very quickly, so you note the system-setup screen information for the F2 prompt to appear and then press...
Owners Manual
Page 92
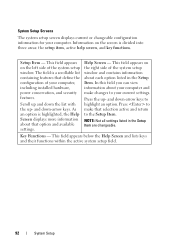
...all settings listed in the Setup Item. Press to make changes to the Setup Item. Information on the left side of the system setup window. This field appears on the right side of your computer. Help Screen - Key Functions - Setup Item - In this field you can... view information about your computer and make that define the configuration of the system setup window and contains information about that option and available settings. System Setup Screens The system setup screen displays current or changeable configuration information for ...
...all settings listed in the Setup Item. Press to make changes to the Setup Item. Information on the left side of the system setup window. This field appears on the right side of your computer. Help Screen - Key Functions - Setup Item - In this field you can... view information about your computer and make that define the configuration of the system setup window and contains information about that option and available settings. System Setup Screens The system setup screen displays current or changeable configuration information for ...
Owners Manual
Page 101
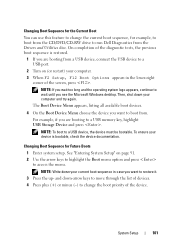
... minus (-) to a USB device, the device must be bootable. Changing Boot Sequence for example, to boot from the CD/DVD/CD-RW drive to run Dell Diagnostics from a USB device, connect the USB device to a USB port. 2 Turn on page 91. 2 Use the arrow keys to highlight the Boot menu option... of the device. The Boot Device Menu appears, listing all available boot devices. 4 On the Boot Device Menu choose the device you see the Microsoft Windows desktop. NOTE: If you wait too long and the operating system logo appears, continue to wait until you want to restore it. 3 Press the up...
... minus (-) to a USB device, the device must be bootable. Changing Boot Sequence for example, to boot from the CD/DVD/CD-RW drive to run Dell Diagnostics from a USB device, connect the USB device to a USB port. 2 Turn on page 91. 2 Use the arrow keys to highlight the Boot menu option... of the device. The Boot Device Menu appears, listing all available boot devices. 4 On the Boot Device Menu choose the device you see the Microsoft Windows desktop. NOTE: If you wait too long and the operating system logo appears, continue to wait until you want to restore it. 3 Press the up...
Owners Manual
Page 107
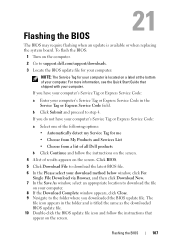
... the latest BIOS file. 6 In the Please select your download method below window, click For Single File Download via Browser, and then click Download Now. 7 In the Save As window, select an appropriate location to support.dell.com/support/downloads. 3 Locate the BIOS update file for your computer: NOTE...: The Service Tag for me • Choose from My Products and Services List • Choose from a list of all Dell products b Click Continue and ...
... the latest BIOS file. 6 In the Please select your download method below window, click For Single File Download via Browser, and then click Download Now. 7 In the Save As window, select an appropriate location to support.dell.com/support/downloads. 3 Locate the BIOS update file for your computer: NOTE...: The Service Tag for me • Choose from My Products and Services List • Choose from a list of all Dell products b Click Continue and ...


