Owners Manual
Page 4
6 Front Bezel 25 Removing the Front Bezel 25 Replacing the Front Bezel 27 7 Card Retention Bracket 29 Removing the Card Retention Bracket 29 Replacing the Card Retention Bracket 31 8 PCI Express Cards 33 Removing PCI Express Cards 33 Replacing PCI Express Cards 35 Configuring Your Computer After Removing or Installing the PCI Express Card 37 9 Mini-Card 39 Removing the Mini-Card 40 Replacing the Mini-Card 41 10 Hard Drive(s 43 Removing the Hard Drive(s 43 Replacing the Hard Drive(s 48 4 Contents
6 Front Bezel 25 Removing the Front Bezel 25 Replacing the Front Bezel 27 7 Card Retention Bracket 29 Removing the Card Retention Bracket 29 Replacing the Card Retention Bracket 31 8 PCI Express Cards 33 Removing PCI Express Cards 33 Replacing PCI Express Cards 35 Configuring Your Computer After Removing or Installing the PCI Express Card 37 9 Mini-Card 39 Removing the Mini-Card 40 Replacing the Mini-Card 41 10 Hard Drive(s 43 Removing the Hard Drive(s 43 Replacing the Hard Drive(s 48 4 Contents
Owners Manual
Page 13
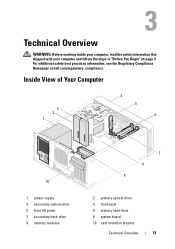
For additional safety best practices information, see the Regulatory Compliance Homepage at dell.com/regulatory_compliance. Inside View of Your Computer 3 2 1 4 5 6 10 1 power supply 3 secondary optical-drive 5 front I/O panel 7 secondary hard-drive 9 memory modules 7 8 9 2 primary optical-drive 4 front bezel 6 primary hard-drive 8 system board 10 card retention bracket Technical Overview 13 Technical Overview WARNING: Before working inside your computer, read the safety information that shipped with your computer and follow the steps in "Before You Begin" on page 9.
For additional safety best practices information, see the Regulatory Compliance Homepage at dell.com/regulatory_compliance. Inside View of Your Computer 3 2 1 4 5 6 10 1 power supply 3 secondary optical-drive 5 front I/O panel 7 secondary hard-drive 9 memory modules 7 8 9 2 primary optical-drive 4 front bezel 6 primary hard-drive 8 system board 10 card retention bracket Technical Overview 13 Technical Overview WARNING: Before working inside your computer, read the safety information that shipped with your computer and follow the steps in "Before You Begin" on page 9.
Owners Manual
Page 43
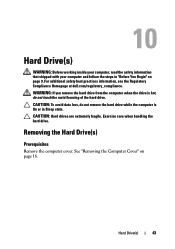
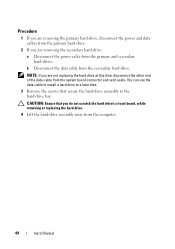
... the computer is hot, do not touch the metal housing of the hard drive. For additional safety best practices information, see the Regulatory Compliance Homepage at dell.com/regulatory_compliance. Exercise care when handling the hard drive. CAUTION: Hard drives are extremely fragile. Hard Drive(s) 43 Hard Drive(s) WARNING: Before working inside your computer, read the safety information that shipped with your...
... the computer is hot, do not touch the metal housing of the hard drive. For additional safety best practices information, see the Regulatory Compliance Homepage at dell.com/regulatory_compliance. Exercise care when handling the hard drive. CAUTION: Hard drives are extremely fragile. Hard Drive(s) 43 Hard Drive(s) WARNING: Before working inside your computer, read the safety information that shipped with your...
Owners Manual
Page 44
... hard-drive, disconnect the power and data cables from the primary hard-drive. 2 If you are not replacing the hard drive at a later time. 3 Remove the screws that you do not scratch the hard drive's circuit board, while removing or replacing the hard drive. 4 Lift the hard-drive assembly away from the computer. 44 Hard Drive(s) You can use the data cable to the hard-drive...
... hard-drive, disconnect the power and data cables from the primary hard-drive. 2 If you are not replacing the hard drive at a later time. 3 Remove the screws that you do not scratch the hard drive's circuit board, while removing or replacing the hard drive. 4 Lift the hard-drive assembly away from the computer. 44 Hard Drive(s) You can use the data cable to the hard-drive...
Owners Manual
Page 47
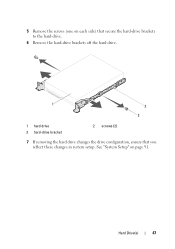
Hard Drive(s) 47 5 Remove the screws (one on page 91. See "System Setup" on each side) that secure the hard-drive brackets to the hard-drive. 6 Remove the hard-drive brackets off the hard drive. 1 3 2 1 hard drive 3 hard-drive bracket 2 screws (2) 7 If removing the hard drive changes the drive configuration, ensure that you reflect these changes in system setup.
Hard Drive(s) 47 5 Remove the screws (one on page 91. See "System Setup" on each side) that secure the hard-drive brackets to the hard-drive. 6 Remove the hard-drive brackets off the hard drive. 1 3 2 1 hard drive 3 hard-drive bracket 2 screws (2) 7 If removing the hard drive changes the drive configuration, ensure that you reflect these changes in system setup.
Owners Manual
Page 48
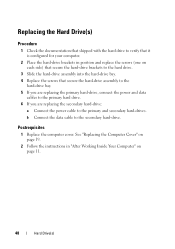
... each side) that secure the hard-drive brackets to the hard drive. 3 Slide the hard-drive assembly into the hard-drive bay. 4 Replace the screws that secure the hard-drive assembly to the hard-drive bay. 5 If you are replacing the primary hard-drive, connect the power and data cables to the primary hard drive. 6 If you are replacing the secondary hard-drive: a Connect the power cable to...
... each side) that secure the hard-drive brackets to the hard drive. 3 Slide the hard-drive assembly into the hard-drive bay. 4 Replace the screws that secure the hard-drive assembly to the hard-drive bay. 5 If you are replacing the primary hard-drive, connect the power and data cables to the primary hard drive. 6 If you are replacing the secondary hard-drive: a Connect the power cable to...
Owners Manual
Page 91
... computer. 2 During POST, when the DELL logo is displayed, watch for the F2 prompt to : • Get information about the hardware installed on your computer work incorrectly. This prompt can make your computer, such as the amount of RAM, the size of the hard drive, and so on • Change the... system configuration information • Set or change a user-selectable option, such as the user password, type of hard drive installed, enabling or disabling base devices, and so on page 9. If you wait too long and the operating system logo appears, continue to wait...
... computer. 2 During POST, when the DELL logo is displayed, watch for the F2 prompt to : • Get information about the hardware installed on your computer work incorrectly. This prompt can make your computer, such as the amount of RAM, the size of the hard drive, and so on • Change the... system configuration information • Set or change a user-selectable option, such as the user password, type of hard drive installed, enabling or disabling base devices, and so on page 9. If you wait too long and the operating system logo appears, continue to wait...
Owners Manual
Page 94
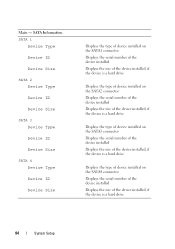
...on the SATA1 connector Displays the serial number of the device installed Displays the size of the device installed, if the device is a hard drive Displays the type of device installed on the SATA2 connector Displays the serial number of the device installed Displays the size of the device installed..., if the device is a hard drive Displays the type of device installed on the SATA3 connector Displays the serial number of the device installed Displays the size of the device installed...
...on the SATA1 connector Displays the serial number of the device installed Displays the size of the device installed, if the device is a hard drive Displays the type of device installed on the SATA2 connector Displays the serial number of the device installed Displays the size of the device installed..., if the device is a hard drive Displays the type of device installed on the SATA3 connector Displays the serial number of the device installed Displays the size of the device installed...

Owners Manual
Page 96
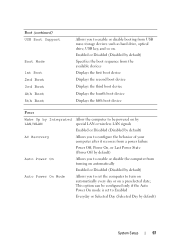
... boot your computer from a network Enabled or Disabled (Disabled by default) Boot Numlock Key Keyboard Errors Allows you to set the status of the integrated hard-drive controller ATA Mode; AHCI Mode (AHCI Mode by default) CAUTION: Changing the SATA Mode may prevent booting of your computer Enabled or Disabled (Enabled by...
... boot your computer from a network Enabled or Disabled (Disabled by default) Boot Numlock Key Keyboard Errors Allows you to set the status of the integrated hard-drive controller ATA Mode; AHCI Mode (AHCI Mode by default) CAUTION: Changing the SATA Mode may prevent booting of your computer Enabled or Disabled (Enabled by...
Owners Manual
Page 97
... or Selected Day (Selected Day by default) Auto Power On Mode Allows you to enable or disable booting from USB mass storage devices such as hard drive, optical drive, USB key, and so on. This option can be powered on by LAN/WLAN special LAN or wireless LAN signals Enabled or Disabled (Disabled...
... or Selected Day (Selected Day by default) Auto Power On Mode Allows you to enable or disable booting from USB mass storage devices such as hard drive, optical drive, USB key, and so on. This option can be powered on by LAN/WLAN special LAN or wireless LAN signals Enabled or Disabled (Disabled...

Owners Manual
Page 100
... • USB Floppy - The computer attempts to boot from the network. See "System Setup" on the floppy disk, the computer generates an error message. • Hard Drive - The computer attempts to change the boot sequence for devices. If no operating system, the computer generates an error message. • USB Storage Device - If... the screen, press . Insert the memory device into a USB port and restart the computer. Boot Sequence This feature allows you to boot from the primary hard drive.
... • USB Floppy - The computer attempts to boot from the network. See "System Setup" on the floppy disk, the computer generates an error message. • Hard Drive - The computer attempts to change the boot sequence for devices. If no operating system, the computer generates an error message. • USB Storage Device - If... the screen, press . Insert the memory device into a USB port and restart the computer. Boot Sequence This feature allows you to boot from the primary hard drive.


