Owner's Manual
Page 4
...-Battery Warning 35 Charging the Battery 35 Removing a Battery 36 Installing a Battery 36 Removing and Installing a Reserve Battery 37 Storing a Battery 38 Power Problems 38 4 Using the Module Bay About the Module Bay 41 Removing and Installing Devices While the Computer Is Turned Off. . . . . . 41 Removing and Installing Devices While the Computer Is Running 42 5 Using the Keyboard and Touch Pad Numeric Keypad 43 Keyboard Shortcuts 44 System Functions 44 Battery 44 CD or DVD Tray 44 Display Functions 44 Radios (Including Wireless Networking and Bluetooth...
...-Battery Warning 35 Charging the Battery 35 Removing a Battery 36 Installing a Battery 36 Removing and Installing a Reserve Battery 37 Storing a Battery 38 Power Problems 38 4 Using the Module Bay About the Module Bay 41 Removing and Installing Devices While the Computer Is Turned Off. . . . . . 41 Removing and Installing Devices While the Computer Is Running 42 5 Using the Keyboard and Touch Pad Numeric Keypad 43 Keyboard Shortcuts 44 System Functions 44 Battery 44 CD or DVD Tray 44 Display Functions 44 Radios (Including Wireless Networking and Bluetooth...
Owner's Manual
Page 11
... click Submit. 5 Under Select a Device, scroll to System and Configuration Utilities, and click Dell Notebook System Software. 11 Upgrade information for Dell™ 3.5-inch USB floppy drives, Intel® Pentium® M processors, optical drives, and USB devices. The website may not be as memory, the hard drive, and the operating system available in all regions. • Customer Care - Contact information, service call status and support history, service contract, online discussions with...
... click Submit. 5 Under Select a Device, scroll to System and Configuration Utilities, and click Dell Notebook System Software. 11 Upgrade information for Dell™ 3.5-inch USB floppy drives, Intel® Pentium® M processors, optical drives, and USB devices. The website may not be as memory, the hard drive, and the operating system available in all regions. • Customer Care - Contact information, service call status and support history, service contract, online discussions with...
Owner's Manual
Page 28
... the two notches. 28 Setting Up Your Computer www.dell.com | support.dell.com E-Mail Problems E N S U R E T H A T Y O U A R E C O N N E C T E D T O T H E I N T E R N E T - Setting Up a Printer NOTICE: Complete the operating system setup before you have not already done so. 2 Turn off the computer. If you purchased a printer cable at the same time you purchase a cable separately, ensure that came with either a USB cable or a parallel cable. If Work Offline has a check mark...
... the two notches. 28 Setting Up Your Computer www.dell.com | support.dell.com E-Mail Problems E N S U R E T H A T Y O U A R E C O N N E C T E D T O T H E I N T E R N E T - Setting Up a Printer NOTICE: Complete the operating system setup before you have not already done so. 2 Turn off the computer. If you purchased a printer cable at the same time you purchase a cable separately, ensure that came with either a USB cable or a parallel cable. If Work Offline has a check mark...
Owner's Manual
Page 29
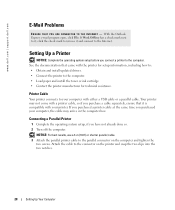
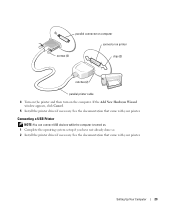
... operating system setup if you have not already done so. 2 Install the printer driver if necessary. See the documentation that came with your printer. Connecting a USB Printer NOTE: You can connect USB devices while the computer is turned on the computer. Setting Up Your Computer 29 See the documentation that came with your printer. If the Add New Hardware Wizard window appears, click Cancel. 5 Install...
... operating system setup if you have not already done so. 2 Install the printer driver if necessary. See the documentation that came with your printer. Connecting a USB Printer NOTE: You can connect USB devices while the computer is turned on the computer. Setting Up Your Computer 29 See the documentation that came with your printer. If the Add New Hardware Wizard window appears, click Cancel. 5 Install...
Owner's Manual
Page 33
...-RW drives • Using wireless communications devices, PC Cards, or USB devices • Using high-brightness display settings, 3D screen savers, or other computers with the main battery installed at all times. Using a Battery Battery Performance CAUTION: Before you begin any of the procedures in this section, follow the safety instructions in the module bay to significantly increase operating time. Operating time is low. CAUTION: Using an incompatible battery may need to purchase a new battery during...
...-RW drives • Using wireless communications devices, PC Cards, or USB devices • Using high-brightness display settings, 3D screen savers, or other computers with the main battery installed at all times. Using a Battery Battery Performance CAUTION: Before you begin any of the procedures in this section, follow the safety instructions in the module bay to significantly increase operating time. Operating time is low. CAUTION: Using an incompatible battery may need to purchase a new battery during...
Owner's Manual
Page 35
... install a second battery in the computer as long as you connect the computer to access "Power Management", see the Dell Inspiron Help file. Microsoft® Windows® Power Meter The Windows Power Meter indicates the remaining battery charge. For more information about the Power Meter tab, see page 9. Charge Gauge Before you insert a battery, press the status button on . If no lights appear, the battery has no charge. If the battery is connected to access "Power Management...
... install a second battery in the computer as long as you connect the computer to access "Power Management", see the Dell Inspiron Help file. Microsoft® Windows® Power Meter The Windows Power Meter indicates the remaining battery charge. For more information about the Power Meter tab, see page 9. Charge Gauge Before you insert a battery, press the status button on . If no lights appear, the battery has no charge. If the battery is connected to access "Power Management...
Owner's Manual
Page 43
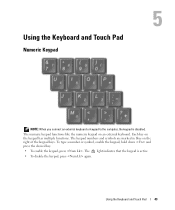
... multiple functions. To type a number or symbol, enable the keypad, hold down and press the desired key. • To enable the keypad, press . The 9 light indicates that the keypad is disabled. Each key on the right of the keypad keys. Using the Keyboard and Touch Pad 43 Using the Keyboard and Touch Pad Numeric Keypad NOTE: When you connect an external keyboard or keypad to the computer, the keypad is active. • To disable...
... multiple functions. To type a number or symbol, enable the keypad, hold down and press the desired key. • To enable the keypad, press . The 9 light indicates that the keypad is disabled. Each key on the right of the keypad keys. Using the Keyboard and Touch Pad 43 Using the Keyboard and Touch Pad Numeric Keypad NOTE: When you connect an external keyboard or keypad to the computer, the keypad is active. • To disable...
Owner's Manual
Page 70
... light is blank NOTE: If you are using the AC adapter, and turn on accessing help files, see page 9. C O N N E C T T H E C O M P U T E R D I R E C T L Y T O A N E L E C T R I C A L O U T L E T - Check the AC adapter cable connections. A D J U S T T H E P O W E R P R O P E R T I B L E . Search for instructions on . If your computer, the battery charge may be depleted. See the Dell Inspiron Help file for the keyword standby in the Windows Help and Support Center. To access the help file, see page 9. 70 Solving Problems www.dell.com | support.dell...
... light is blank NOTE: If you are using the AC adapter, and turn on accessing help files, see page 9. C O N N E C T T H E C O M P U T E R D I R E C T L Y T O A N E L E C T R I C A L O U T L E T - Check the AC adapter cable connections. A D J U S T T H E P O W E R P R O P E R T I B L E . Search for instructions on . If your computer, the battery charge may be depleted. See the Dell Inspiron Help file for the keyword standby in the Windows Help and Support Center. To access the help file, see page 9. 70 Solving Problems www.dell.com | support.dell...
Owner's Manual
Page 71
... an error message appears, see page 112). E L I M I N A T E P O S S I B L E I O N - ADJUST THE WINDOWS DISPLAY SETTINGS - 1 Click the Start button and then click Control Panel. 2 Click Appearance and Themes. 3 Click the area you want to the computer. 2 Turn on the computer and the monitor and adjust the monitor brightness and contrast controls. If the external monitor works, the computer display or video controller may be defective. Solving Problems 71 R O T A T E T H E C O M P U T E R T O F A C E A D I F F E R E N T D I R E C T I N T E R F E R E N C E - If only part of...
... an error message appears, see page 112). E L I M I N A T E P O S S I B L E I O N - ADJUST THE WINDOWS DISPLAY SETTINGS - 1 Click the Start button and then click Control Panel. 2 Click Appearance and Themes. 3 Click the area you want to the computer. 2 Turn on the computer and the monitor and adjust the monitor brightness and contrast controls. If the external monitor works, the computer display or video controller may be defective. Solving Problems 71 R O T A T E T H E C O M P U T E R T O F A C E A D I F F E R E N T D I R E C T I N T E R F E R E N C E - If only part of...
Owner's Manual
Page 77
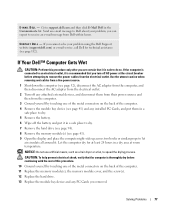
... of the computer. 11 Replace the memory module(s), the memory module cover, and the screw(s). 12 Replace the hard drive. 13 Replace the module bay device and any installed PC Cards, and put it . If the computer is safe to Dell about your problem using the Dell Support website (support.dell.com) or e-mail service, call Dell for at least 24 hours in a safe place to dry. 5 Remove the battery. 6 Wipe off AC power at room temperature. CAUTION...
... of the computer. 11 Replace the memory module(s), the memory module cover, and the screw(s). 12 Replace the hard drive. 13 Replace the module bay device and any installed PC Cards, and put it . If the computer is safe to Dell about your problem using the Dell Support website (support.dell.com) or e-mail service, call Dell for at least 24 hours in a safe place to dry. 5 Remove the battery. 6 Wipe off AC power at room temperature. CAUTION...
Owner's Manual
Page 79
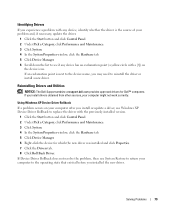
... installed the new driver. If Device Driver Rollback does not resolve the problem, then use Windows XP Device Driver Rollback to return your computer might not work correctly. If an exclamation point is the source of your problem and, if necessary, update the driver. 1 Click the Start button and click Control Panel. 2 Under Pick a Category, click Performance and Maintenance. 3 Click System. 4 In the System Properties window, click the Hardware tab. 5 Click Device Manager. 6 Scroll...
... installed the new driver. If Device Driver Rollback does not resolve the problem, then use Windows XP Device Driver Rollback to return your computer might not work correctly. If an exclamation point is the source of your problem and, if necessary, update the driver. 1 Click the Start button and click Control Panel. 2 Under Pick a Category, click Performance and Maintenance. 3 Click System. 4 In the System Properties window, click the Hardware tab. 5 Click Device Manager. 6 Scroll...
Owner's Manual
Page 80
... information on configuring the device. 80 Solving Problems Resolving Software and Hardware Incompatibilities If a device either is not detected during the operating system setup or is detected but incorrectly configured, you must first enable the infrared sensor in the Properties window reports the cards or devices that are installing the driver. 7 Click the Driver tab and click Update Driver. 8 Click Install from the Device Manager. www.dell.com | support.dell.com Manually Reinstalling Drivers NOTE: If...
... information on configuring the device. 80 Solving Problems Resolving Software and Hardware Incompatibilities If a device either is not detected during the operating system setup or is detected but incorrectly configured, you must first enable the infrared sensor in the Properties window reports the cards or devices that are installing the driver. 7 Click the Driver tab and click Update Driver. 8 Click Install from the Device Manager. www.dell.com | support.dell.com Manually Reinstalling Drivers NOTE: If...
Owner's Manual
Page 81
... not work if you purchased the computer. Dell PC Restore permanently deletes all data on the hard drive and removes any applications installed after you received the computer. Restoring the Computer to an Earlier Operating State If problems occur after you install a device driver, use System Restore. Solving Problems 81 Creating a Restore Point 1 Click the Start button and click Help and Support. 2 Click System Restore. 3 Follow the instructions on using the Hardware Troubleshooter: 1 Click the Start button and...
... not work if you purchased the computer. Dell PC Restore permanently deletes all data on the hard drive and removes any applications installed after you received the computer. Restoring the Computer to an Earlier Operating State If problems occur after you install a device driver, use System Restore. Solving Problems 81 Creating a Restore Point 1 Click the Start button and click Help and Support. 2 Click System Restore. 3 Follow the instructions on using the Hardware Troubleshooter: 1 Click the Start button and...
Owner's Manual
Page 90
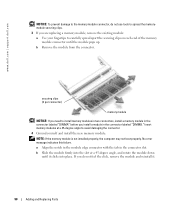
... in the connector slot. No error message indicates this failure. securing clips (2 per connector) memory module NOTICE: If you need to install memory modules in two connectors, install a memory module in the connector labeled "DIMMA" before you are replacing a memory module, remove the existing module: a Use your fingertips to carefully spread apart the securing clips on each end of the memory module connector until it . 90 Adding and Replacing Parts Insert memory modules at a 45...
... in the connector slot. No error message indicates this failure. securing clips (2 per connector) memory module NOTICE: If you need to install memory modules in two connectors, install a memory module in the connector labeled "DIMMA" before you are replacing a memory module, remove the existing module: a Use your fingertips to carefully spread apart the securing clips on each end of the memory module connector until it . 90 Adding and Replacing Parts Insert memory modules at a 45...
Owner's Manual
Page 94
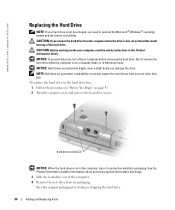
....dell.com | support.dell.com Replacing the Hard Drive NOTE: If your hard drive is not pre-imaged, you remove the hard drive from the computer when the drive is hot, do not touch the metal housing of the computer. 4 Remove the new drive from sources other than Dell. CAUTION: If you need to reinstall the Microsoft® Windows® operating system and the drivers and utilities. NOTICE: Hard drives are extremely fragile; To replace the hard drive...
....dell.com | support.dell.com Replacing the Hard Drive NOTE: If your hard drive is not pre-imaged, you remove the hard drive from the computer when the drive is hot, do not touch the metal housing of the computer. 4 Remove the new drive from sources other than Dell. CAUTION: If you need to reinstall the Microsoft® Windows® operating system and the drivers and utilities. NOTICE: Hard drives are extremely fragile; To replace the hard drive...
Owner's Manual
Page 107
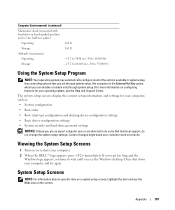
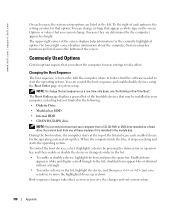
... may automatically configure most of the options available in system setup, thus overriding options that you set through system setup. (An exception is the External Hot Key option, which you can disable or enable only through system setup.) For more information on configuring features for your computer, such as: • System configuration • Boot order • Boot (start-up) configuration and docking-device configuration settings • Basic device-configuration settings • System security and hard-drive password settings NOTICE: Unless...
... may automatically configure most of the options available in system setup, thus overriding options that you set through system setup. (An exception is the External Hot Key option, which you can disable or enable only through system setup.) For more information on configuring features for your computer, such as: • System configuration • Boot order • Boot (start-up) configuration and docking-device configuration settings • Basic device-configuration settings • System security and hard-drive password settings NOTICE: Unless...
Owner's Manual
Page 108
... boot (start up -arrow key, and then enable or disable the device or change settings that appear as you save the changes and exit system setup. 108 Appendix To the right of system setup. the lower-right corner displays information about the computer. www.dell.com | support.dell.com On each screen, the system setup options are listed at the top of these modules if it stops searching and starts the operating...
... boot (start up -arrow key, and then enable or disable the device or change settings that appear as you save the changes and exit system setup. 108 Appendix To the right of system setup. the lower-right corner displays information about the computer. www.dell.com | support.dell.com On each screen, the system setup options are listed at the top of these modules if it stops searching and starts the operating...
Owner's Manual
Page 109
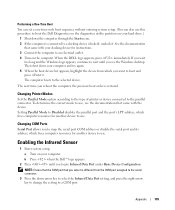
... the serial port COM address or disable the serial port and its address, which frees computer resources for another device to use . Setting Parallel Mode to Disabled disables the parallel port and the port's LPT address, which frees computer resources for instructions. 3 Connect the computer to boot and press . NOTE: Ensure that the COM port that you reboot the computer, the previous boot order is connected to a COM port. Enabling the Infrared Sensor 1 Enter system setup: a Turn on...
... the serial port COM address or disable the serial port and its address, which frees computer resources for another device to use . Setting Parallel Mode to Disabled disables the parallel port and the port's LPT address, which frees computer resources for instructions. 3 Connect the computer to boot and press . NOTE: Ensure that the COM port that you reboot the computer, the previous boot order is connected to a COM port. Enabling the Infrared Sensor 1 Enter system setup: a Turn on...
Owner's Manual
Page 114
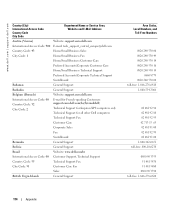
.../ Technical Support for Inspiron XPS computers only Technical Support for all other Dell computers Technical Support Fax Customer Care Corporate Sales Fax Switchboard Bermuda General Support Bolivia General Support Brazil Website: www.dell.com/br International Access Code: 00 Customer Support, Technical Support Country Code: 55 Technical Support Fax City Code: 51 Customer Care Fax Sales British Virgin Islands General Support Area Codes, Local Numbers, and Toll-Free Numbers 0820 240...
.../ Technical Support for Inspiron XPS computers only Technical Support for all other Dell computers Technical Support Fax Customer Care Corporate Sales Fax Switchboard Bermuda General Support Bolivia General Support Brazil Website: www.dell.com/br International Access Code: 00 Customer Support, Technical Support Country Code: 55 Technical Support Fax City Code: 51 Customer Care Fax Sales British Virgin Islands General Support Area Codes, Local Numbers, and Toll-Free Numbers 0820 240...
Owner's Manual
Page 131
... description, 17 system view, 17 B battery charge gauge, 35 charging, 35 checking the charge, 34 description, 23 installing, 36 performance, 33 power meter, 35 removing, 36 storing, 38 system view, 23 Bluetooth card replacing, 98 C CD, 54 using, 49 CD-RW drive fixing problems, 52 characters unexpected, 48 computer crashes, 76 restore to previous state, 81 specifications, 101 conflicts software and hardware incompatibilities, 80 copying CDs general information...
... description, 17 system view, 17 B battery charge gauge, 35 charging, 35 checking the charge, 34 description, 23 installing, 36 performance, 33 power meter, 35 removing, 36 storing, 38 system view, 23 Bluetooth card replacing, 98 C CD, 54 using, 49 CD-RW drive fixing problems, 52 characters unexpected, 48 computer crashes, 76 restore to previous state, 81 specifications, 101 conflicts software and hardware incompatibilities, 80 copying CDs general information...


