Owner's Manual
Page 3
Contents Finding Information 9 1 A Tour of Your Computer Front View 13 Left View 16 Right View 18 Back View 19 Bottom View 23 2 Setting Up Your Computer Connecting to the Internet 25 Setting Up Your Internet Connection 25 Modem and Internet Connection Problems 26 E-Mail Problems 28 Setting Up a Printer 28 Printer Cable 28 Connecting a Parallel Printer 28 Connecting a USB Printer 29 Printer Problems 30 Power Protection Devices 31 Surge Protectors 31 Line Conditioners 31 Uninterruptible Power Supplies 32 Turning Off Your Computer 32 Contents 3
Contents Finding Information 9 1 A Tour of Your Computer Front View 13 Left View 16 Right View 18 Back View 19 Bottom View 23 2 Setting Up Your Computer Connecting to the Internet 25 Setting Up Your Internet Connection 25 Modem and Internet Connection Problems 26 E-Mail Problems 28 Setting Up a Printer 28 Printer Cable 28 Connecting a Parallel Printer 28 Connecting a USB Printer 29 Printer Problems 30 Power Protection Devices 31 Surge Protectors 31 Line Conditioners 31 Uninterruptible Power Supplies 32 Turning Off Your Computer 32 Contents 3
Owner's Manual
Page 4
3 Using a Battery Battery Performance 33 Checking the Battery Charge 34 Dell™ QuickSet Battery Meter 34 Microsoft® Windows® Power Meter 35 Charge Gauge 35 Low-Battery Warning 35 Charging the Battery 35 Removing a Battery ... Battery 37 Storing a Battery 38 Power Problems 38 4 Using the Module Bay About the Module Bay 41 Removing and Installing Devices While the Computer Is Turned Off. . . . . . 41 Removing and Installing Devices While the Computer Is Running 42 5 Using the Keyboard and Touch Pad Numeric Keypad 43 Keyboard Shortcuts 44 System...
3 Using a Battery Battery Performance 33 Checking the Battery Charge 34 Dell™ QuickSet Battery Meter 34 Microsoft® Windows® Power Meter 35 Charge Gauge 35 Low-Battery Warning 35 Charging the Battery 35 Removing a Battery ... Battery 37 Storing a Battery 38 Power Problems 38 4 Using the Module Bay About the Module Bay 41 Removing and Installing Devices While the Computer Is Turned Off. . . . . . 41 Removing and Installing Devices While the Computer Is Running 42 5 Using the Keyboard and Touch Pad Numeric Keypad 43 Keyboard Shortcuts 44 System...
Owner's Manual
Page 13
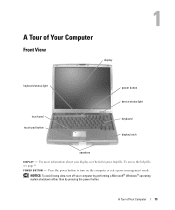
... touch pad touch pad button power button device status light keyboard display latch speakers D I S P L A Y - To access the help file, see the Dell Inspiron Help file. NOTICE: To avoid losing data, turn on the computer or exit a power management mode. A Tour of Your Computer 13 For more information about your computer by performing a Microsoft...
... touch pad touch pad button power button device status light keyboard display latch speakers D I S P L A Y - To access the help file, see the Dell Inspiron Help file. NOTICE: To avoid losing data, turn on the computer or exit a power management mode. A Tour of Your Computer 13 For more information about your computer by performing a Microsoft...

Owner's Manual
Page 14
... a power management mode. For more information, see the documentation that came with your Bluetooth wireless technology. www.dell.com | support.dell.com If the computer stops responding, press and hold the power button until the computer turns off completely (which may take several seconds). To quickly enable or disable all wireless devices, press...
... a power management mode. For more information, see the documentation that came with your Bluetooth wireless technology. www.dell.com | support.dell.com If the computer stops responding, press and hold the power button until the computer turns off completely (which may take several seconds). To quickly enable or disable all wireless devices, press...
Owner's Manual
Page 15
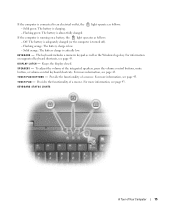
.... Flashing orange: The battery charge is almost fully charged. For information on a battery, the light operates as the Windows logo key. T O U C H P A D - If the computer is turned off). - Off: The battery is adequately charged (or the computer is connected to an electrical outlet, the - The keyboard includes a numeric keypad as well as...
.... Flashing orange: The battery charge is almost fully charged. For information on a battery, the light operates as the Windows logo key. T O U C H P A D - If the computer is turned off). - Off: The battery is adequately charged (or the computer is connected to an electrical outlet, the - The keyboard includes a numeric keypad as well as...
Owner's Manual
Page 16
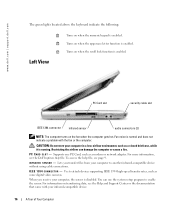
... when the scroll lock function is enabled. To access the help file, see the Dell Inspiron Help file. P C C A R D S L O T - I E E E 1 3 9 4 C O N N E C T O R - For more information, see page 9. I N F R A R E D S E N S O R - www.dell.com | support.dell.com The green lights located above the keyboard indicate the following: 9 Turns on transferring data, see the Help and Support Center or the documentation that came with...
... when the scroll lock function is enabled. To access the help file, see the Dell Inspiron Help file. P C C A R D S L O T - I E E E 1 3 9 4 C O N N E C T O R - For more information, see page 9. I N F R A R E D S E N S O R - www.dell.com | support.dell.com The green lights located above the keyboard indicate the following: 9 Turns on transferring data, see the Help and Support Center or the documentation that came with...

Owner's Manual
Page 22
www.dell.com | support.dell.com A C A D A P T E R C O N N E C T O R - CAUTION: The AC adapter works with your computer in a low-airflow environment, such as a closed briefcase, while it is normal and does not indicate a problem with the fan or the computer. Fan noise is running. NOTE: The computer turns on or off. ... adapter converts AC power to the power strip or electrical outlet may cause fire or equipment damage. CAUTION: Do not store your computer turned either on the fan when the computer gets hot. You can damage the computer or cause a fire. 22 A Tour of Your ...
www.dell.com | support.dell.com A C A D A P T E R C O N N E C T O R - CAUTION: The AC adapter works with your computer in a low-airflow environment, such as a closed briefcase, while it is normal and does not indicate a problem with the fan or the computer. Fan noise is running. NOTE: The computer turns on or off. ... adapter converts AC power to the power strip or electrical outlet may cause fire or equipment damage. CAUTION: Do not store your computer turned either on the fan when the computer gets hot. You can damage the computer or cause a fire. 22 A Tour of Your ...

Owner's Manual
Page 23
... the documentation that came with the fan or the computer. The computer uses an internal fan to a docking device. See page 35. NOTE: The computer turns on the battery charge. M I N I P C I V E - Fan noise is installed, you attach your docking device for instructions. A Tour of Your Computer 23 CAUTION: Do not store your...
... the documentation that came with the fan or the computer. The computer uses an internal fan to a docking device. See page 35. NOTE: The computer turns on the battery charge. M I N I P C I V E - Fan noise is installed, you attach your docking device for instructions. A Tour of Your Computer 23 CAUTION: Do not store your...
Owner's Manual
Page 28
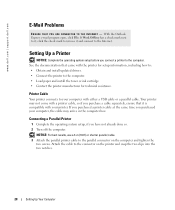
... with either a USB cable or a parallel cable. Printer Cable Your printer connects to the connector on the computer and tighten the two screws. www.dell.com | support.dell.com E-Mail Problems E N S U R E T H A T Y O U A R E C O N N E C T E D T O T H E I N T E R N E T - With the Outlook Express e-mail program open, click File. Connecting a Parallel Printer 1 Complete the operating system setup, if you purchased your... clips into the two notches. 28 Setting Up Your Computer If you purchased a printer cable at the same time you have not already done so. 2 Turn off the computer.
... with either a USB cable or a parallel cable. Printer Cable Your printer connects to the connector on the computer and tighten the two screws. www.dell.com | support.dell.com E-Mail Problems E N S U R E T H A T Y O U A R E C O N N E C T E D T O T H E I N T E R N E T - With the Outlook Express e-mail program open, click File. Connecting a Parallel Printer 1 Complete the operating system setup, if you purchased your... clips into the two notches. 28 Setting Up Your Computer If you purchased a printer cable at the same time you have not already done so. 2 Turn off the computer.
Owner's Manual
Page 29
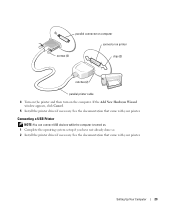
See the documentation that came with your printer. parallel connector on computer connector on printer screws (2) clips (2) notches (2) parallel printer cable 4 Turn on the printer and then turn on . 1 Complete the operating system setup if you have not already done so. 2 Install the printer driver if necessary. If the Add New Hardware ...Cancel. 5 Install the printer driver if necessary. Setting Up Your Computer 29 Connecting a USB Printer NOTE: You can connect USB devices while the computer is turned on the computer. See the documentation that came with your printer.
See the documentation that came with your printer. parallel connector on computer connector on printer screws (2) clips (2) notches (2) parallel printer cable 4 Turn on the printer and then turn on . 1 Complete the operating system setup if you have not already done so. 2 Install the printer driver if necessary. If the Add New Hardware ...Cancel. 5 Install the printer driver if necessary. Setting Up Your Computer 29 Connecting a USB Printer NOTE: You can connect USB devices while the computer is turned on the computer. See the documentation that came with your printer.
Owner's Manual
Page 32
www.dell.com | support.dell.com Uninterruptible Power Supplies NOTICE: Loss of power while data is interrupted. NOTE: To ensure maximum battery operating time, connect only your computer to enter standby or hibernate mode. 1 Save and close any open files, exit any open programs, click the Start button, and then click Turn Off Computer...
www.dell.com | support.dell.com Uninterruptible Power Supplies NOTICE: Loss of power while data is interrupted. NOTE: To ensure maximum battery operating time, connect only your computer to enter standby or hibernate mode. 1 Save and close any open files, exit any open programs, click the Start button, and then click Turn Off Computer...
Owner's Manual
Page 35
...approximately 90 percent depleted. To access the help file, see "Power Management" in approximately 1 hour with the computer turned on the battery charge gauge to access "Power Management," see the Dell Inspiron Help file. A low-battery warning occurs when the battery charge is longer with the computer... turned off. If no lights appear, the battery has no charge. If the battery runs completely out of the...
...approximately 90 percent depleted. To access the help file, see "Power Management" in approximately 1 hour with the computer turned on the battery charge gauge to access "Power Management," see the Dell Inspiron Help file. A low-battery warning occurs when the battery charge is longer with the computer... turned off. If no lights appear, the battery has no charge. If the battery runs completely out of the...
Owner's Manual
Page 36
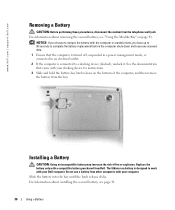
.... Slide the battery into the bay until the latch release clicks. Do not use a battery from other computers with a compatible battery purchased from Dell. The lithium-ion battery is connected to work with your docking device for instructions. 3 Slide and hold the battery-bay latch release on page ...41. For information about removing the second battery, see page 41. 36 Using a Battery See the documentation that the computer is turned off, suspended in standby mode, you have up to 30 seconds to complete the battery replacement before the computer shuts down and loses any ...
.... Slide the battery into the bay until the latch release clicks. Do not use a battery from other computers with a compatible battery purchased from Dell. The lithium-ion battery is connected to work with your docking device for instructions. 3 Slide and hold the battery-bay latch release on page ...41. For information about removing the second battery, see page 41. 36 Using a Battery See the documentation that the computer is turned off, suspended in standby mode, you have up to 30 seconds to complete the battery replacement before the computer shuts down and loses any ...
Owner's Manual
Page 38
...long storage period, recharge the battery fully before you store your computer for an extended period of time. To access the help file, see the Dell Inspiron Help file. If the power light is blinking, the computer is in standby mode-press the power button to the connector in the reserve battery... battery cover. Power Problems NOTE: For information on the computer. 38 Using a Battery When the power light is off, press the power button to turn on standby mode, see page 9. If the light is lit or blinking, the computer has power. Storing a Battery Remove the battery when you use...
...long storage period, recharge the battery fully before you store your computer for an extended period of time. To access the help file, see the Dell Inspiron Help file. If the power light is blinking, the computer is in standby mode-press the power button to the connector in the reserve battery... battery cover. Power Problems NOTE: For information on the computer. 38 Using a Battery When the power light is off, press the power button to turn on standby mode, see page 9. If the light is lit or blinking, the computer has power. Storing a Battery Remove the battery when you use...
Owner's Manual
Page 39
... B L E I C A L O U T L E T - If the battery status light flashes green and orange, the battery is working by testing it with another device, such as a lamp. See the Dell Inspiron Help file or search for the keyword standby in the Help and Support Center. C H A R G E T H E B A T T E R Y - Bypass power protection devices, power strips, and the ... electrical outlet is too hot to an electrical outlet. 3 Turn on . Turn off nearby fans, fluorescent lights, halogen lamps, or other appliances. If the computer power light turns on . Check the AC adapter cable connections. Using a...
... B L E I C A L O U T L E T - If the battery status light flashes green and orange, the battery is working by testing it with another device, such as a lamp. See the Dell Inspiron Help file or search for the keyword standby in the Help and Support Center. C H A R G E T H E B A T T E R Y - Bypass power protection devices, power strips, and the ... electrical outlet is too hot to an electrical outlet. 3 Turn on . Turn off nearby fans, fluorescent lights, halogen lamps, or other appliances. If the computer power light turns on . Check the AC adapter cable connections. Using a...

Owner's Manual
Page 41
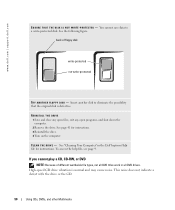
... the new device into the bay until it clicks. NOTICE: To prevent damage to a docking device (docked). Removing and Installing Devices While the Computer Is Turned Off NOTE: You can install devices such as a floppy drive, CD drive, CD-RW drive, DVD drive, CD-RW/DVD drive, DVD+RW, second battery...
... the new device into the bay until it clicks. NOTICE: To prevent damage to a docking device (docked). Removing and Installing Devices While the Computer Is Turned Off NOTE: You can install devices such as a floppy drive, CD drive, CD-RW drive, DVD drive, CD-RW/DVD drive, DVD+RW, second battery...
Owner's Manual
Page 47
TO VERIFY THAT THE PROBLEM IS WITH THE MOUSE, CHECK THE TOUCH PAD 1 Turn off the computer. 2 Disconnect the mouse. 3 Turn on the computer. 4 At the Windows desktop, use the touch pad to save the settings and close the window. See page 78. CHECK THE MOUSE ...
TO VERIFY THAT THE PROBLEM IS WITH THE MOUSE, CHECK THE TOUCH PAD 1 Turn off the computer. 2 Disconnect the mouse. 3 Turn on the computer. 4 At the Windows desktop, use the touch pad to save the settings and close the window. See page 78. CHECK THE MOUSE ...
Owner's Manual
Page 48
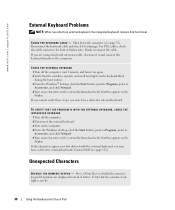
...or broken pins. TO VERIFY THAT THE PROBLEM IS WITH THE EXTERNAL KEYBOARD, CHECK THE INTEGRATED KEYBOARD 1 Turn off the computer, wait 1 minute, and turn it on again. 2 Verify that the numbers, capitals, and scroll lock lights on the keyboard blink .... Verify that the numbers lock light is not lit. 48 Using the Keyboard and Touch Pad www.dell.com | support.dell.com External Keyboard Problems NOTE: When you are displayed instead of letters. Unexpected Characters D I S A B L E T H E N U M E R I C K E Y P A D - Contact Dell (see page 32). C H E C K T H E K E Y B O A R D C A B L E - Press...
...or broken pins. TO VERIFY THAT THE PROBLEM IS WITH THE EXTERNAL KEYBOARD, CHECK THE INTEGRATED KEYBOARD 1 Turn off the computer, wait 1 minute, and turn it on again. 2 Verify that the numbers, capitals, and scroll lock lights on the keyboard blink .... Verify that the numbers lock light is not lit. 48 Using the Keyboard and Touch Pad www.dell.com | support.dell.com External Keyboard Problems NOTE: When you are displayed instead of letters. Unexpected Characters D I S A B L E T H E N U M E R I C K E Y P A D - Contact Dell (see page 32). C H E C K T H E K E Y B O A R D C A B L E - Press...
Owner's Manual
Page 50
... N T H E D R I S K - See "Cleaning Your Computer" in all DVD titles work in the Dell Inspiron Help file for instructions. 3 Reinstall the drive. 4 Turn on the computer. You cannot save data to eliminate the possibility that the original disk is normal and may cause noise.... back of different worldwide file types, not all DVD drives. www.dell.com | support.dell.com E N S U R E T H A T T H E D I S K I S N O T ...
... N T H E D R I S K - See "Cleaning Your Computer" in all DVD titles work in the Dell Inspiron Help file for instructions. 3 Reinstall the drive. 4 Turn on the computer. You cannot save data to eliminate the possibility that the original disk is normal and may cause noise.... back of different worldwide file types, not all DVD drives. www.dell.com | support.dell.com E N S U R E T H A T T H E D I S K I S N O T ...
Owner's Manual
Page 51
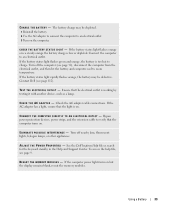
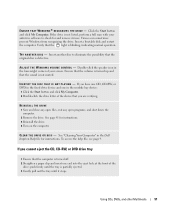
.... TR Y A N O T H E R D I N D O W S V O L U M E C O N T R O L - Insert another disc to eliminate the possibility that the sound is turned off. 2 Straighten a paper clip and insert one in the module bay device: 1 Click the Start button and click My Computer. 2 Double-click the drive letter... O W S ® R E C O G N I Z E S T H E D R I V E - Click the Start button and click My Computer. Viruses can sometimes prevent Windows from recognizing the drive. Double-click the speaker icon in the Dell Inspiron Help file for instructions. 3 Reinstall the drive. 4 Turn on the computer.
.... TR Y A N O T H E R D I N D O W S V O L U M E C O N T R O L - Insert another disc to eliminate the possibility that the sound is turned off. 2 Straighten a paper clip and insert one in the module bay device: 1 Click the Start button and click My Computer. 2 Double-click the drive letter... O W S ® R E C O G N I Z E S T H E D R I V E - Click the Start button and click My Computer. Viruses can sometimes prevent Windows from recognizing the drive. Double-click the speaker icon in the Dell Inspiron Help file for instructions. 3 Reinstall the drive. 4 Turn on the computer.


