Owner's Manual
Page 9
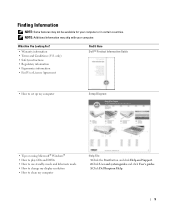
... certain countries. only) • Safety instructions • Regulatory information • Ergonomics information • End User License Agreement Find It Here Dell™ Product Information Guide • How to set up my computer Setup Diagram • Tips on using Microsoft® Windows® • How to play ...; How to clean my computer Help File 1 Click the Start button and click Help and Support. 2 Click User and system guides and click User's guides. 3 Click Dell Inspiron Help. 9 What Are You Looking For? • Warranty information • Terms and Conditions (U.S.
... certain countries. only) • Safety instructions • Regulatory information • Ergonomics information • End User License Agreement Find It Here Dell™ Product Information Guide • How to set up my computer Setup Diagram • Tips on using Microsoft® Windows® • How to play ...; How to clean my computer Help File 1 Click the Start button and click Help and Support. 2 Click User and system guides and click User's guides. 3 Click Dell Inspiron Help. 9 What Are You Looking For? • Warranty information • Terms and Conditions (U.S.
Owner's Manual
Page 21
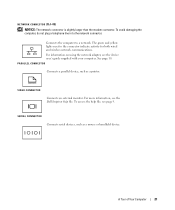
... Connects serial devices, such as a printer. For information on using the network adapter, see the Dell Inspiron Help file. PARALLEL CONNECTOR Connects a parallel device, such as a mouse or handheld device. For more information, see the device user's guide supplied with your computer. NETWORK CONNECTOR (RJ-45) NOTICE: The network connector is slightly larger...
... Connects serial devices, such as a printer. For information on using the network adapter, see the Dell Inspiron Help file. PARALLEL CONNECTOR Connects a parallel device, such as a mouse or handheld device. For more information, see the device user's guide supplied with your computer. NETWORK CONNECTOR (RJ-45) NOTICE: The network connector is slightly larger...
Owner's Manual
Page 33
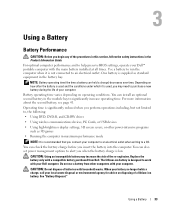
... your computer. You can install an optional second battery in the battery bay. Do not use a battery from Dell. When your battery no longer holds a charge, call your Dell™ portable computer with household waste. See "Battery Disposal." NOTE: Battery operating time (the time a battery ...run the computer when it is supplied as 3D games • Running the computer in the Product Information Guide. The lithium-ion battery is not connected to work with your Dell computer. You can hold a charge) decreases over time. Operating time is significantly reduced when you may ...
... your computer. You can install an optional second battery in the battery bay. Do not use a battery from Dell. When your battery no longer holds a charge, call your Dell™ portable computer with household waste. See "Battery Disposal." NOTE: Battery operating time (the time a battery ...run the computer when it is supplied as 3D games • Running the computer in the Product Information Guide. The lithium-ion battery is not connected to work with your Dell computer. You can hold a charge) decreases over time. Operating time is significantly reduced when you may ...

Owner's Manual
Page 41
.... Avoid pressing down on them or placing heavy objects on top of the procedures in this section, follow the safety instructions in the Product Information Guide. Using the Module Bay 41 Using the Module Bay About the Module Bay CAUTION: Before you begin any of them in a safe, dry place when...
.... Avoid pressing down on them or placing heavy objects on top of the procedures in this section, follow the safety instructions in the Product Information Guide. Using the Module Bay 41 Using the Module Bay About the Module Bay CAUTION: Before you begin any of them in a safe, dry place when...
Owner's Manual
Page 64
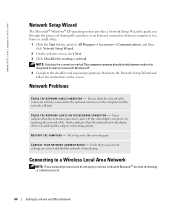
... replacing the network cable. Try to log on the computer and the network wall jack. www.dell.com | support.dell.com Network Setup Wizard The Microsoft® Windows® XP operating system provides a Network Setup Wizard to guide you through the process of sharing files, printers, or an Internet connection between computers in...
... replacing the network cable. Try to log on the computer and the network wall jack. www.dell.com | support.dell.com Network Setup Wizard The Microsoft® Windows® XP operating system provides a Network Setup Wizard to guide you through the process of sharing files, printers, or an Internet connection between computers in...
Owner's Manual
Page 65
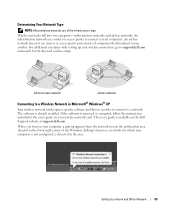
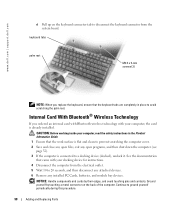
...pop-up your computer is not configured, is already installed. The user's guide is removed or corrupted, follow the instructions included in the area. When you turn on the Dell Support website at support.dell.com. Wireless networks fall into two categories-infrastructure networks and ad-hoc networks...network card. An infrastructure network uses routers or access points to connect several computers. The software is detected in the user's guide for the keyword wireless setup. For additional assistance with setting up appears from the network icon in the notification area (located ...
...pop-up your computer is not configured, is already installed. The user's guide is removed or corrupted, follow the instructions included in the area. When you turn on the Dell Support website at support.dell.com. Wireless networks fall into two categories-infrastructure networks and ad-hoc networks...network card. An infrastructure network uses routers or access points to connect several computers. The software is detected in the user's guide for the keyword wireless setup. For additional assistance with setting up appears from the network icon in the notification area (located ...

Owner's Manual
Page 84
... your computer, perform the checks in the Product Information Guide. See the documentation that you do so. See page 112. 1 Shut down the computer. The partition is located on a hidden diagnostic utility partition on page 69 and run the Dell Diagnostics before you contact Dell for instructions. 3 Connect the computer to include the...
... your computer, perform the checks in the Product Information Guide. See the documentation that you do so. See page 112. 1 Shut down the computer. The partition is located on a hidden diagnostic utility partition on page 69 and run the Dell Diagnostics before you contact Dell for instructions. 3 Connect the computer to include the...

Owner's Manual
Page 87
... from potential damage and to ensure your computer. if you begin any connector pins. Recommended Tools The procedures in the Product Information Guide. CAUTION: Before you are correctly oriented and aligned. Do not touch the components or contacts on the cable itself. NOTICE: When...component such as a processor by its edges, not by your computer. As you connect a cable, ensure that is not authorized by Dell is not covered by its metal mounting bracket. Adding and Replacing Parts Before You Begin This section provides procedures for removing and installing the...
... from potential damage and to ensure your computer. if you begin any connector pins. Recommended Tools The procedures in the Product Information Guide. CAUTION: Before you are correctly oriented and aligned. Do not touch the components or contacts on the cable itself. NOTICE: When...component such as a processor by its edges, not by your computer. As you connect a cable, ensure that is not authorized by Dell is not covered by its metal mounting bracket. Adding and Replacing Parts Before You Begin This section provides procedures for removing and installing the...
Owner's Manual
Page 89
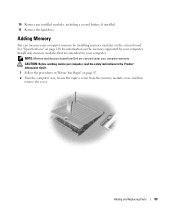
..."Specifications" on page 101 for your computer. CAUTION: Before working inside your computer, read the safety instructions in the Product Information Guide. 1 Follow the procedures in "Before You Begin" on the memory supported by installing memory modules on the system board. Adding and... increase your computer warranty. Install only memory modules that are covered under your computer memory by your computer. NOTE: Memory modules purchased from Dell are intended for information on page 87. 2 Turn the computer over, loosen the captive screw from the memory module cover, and then...
..."Specifications" on page 101 for your computer. CAUTION: Before working inside your computer, read the safety instructions in the Product Information Guide. 1 Follow the procedures in "Before You Begin" on the memory supported by installing memory modules on the system board. Adding and... increase your computer warranty. Install only memory modules that are covered under your computer memory by your computer. NOTE: Memory modules purchased from Dell are intended for information on page 87. 2 Turn the computer over, loosen the captive screw from the memory module cover, and then...
Owner's Manual
Page 92
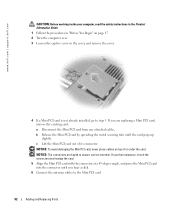
c Lift the Mini PCI card out of or under the card. www.dell.com | support.dell.com CAUTION: Before working inside your computer, read the safety instructions in the Product Information Guide. 1 Follow the procedures in the cover, and remove the cover. 4 If a Mini PCI card is not already installed, go to ensure correct...
c Lift the Mini PCI card out of or under the card. www.dell.com | support.dell.com CAUTION: Before working inside your computer, read the safety instructions in the Product Information Guide. 1 Follow the procedures in the cover, and remove the cover. 4 If a Mini PCI card is not already installed, go to ensure correct...
Owner's Manual
Page 94
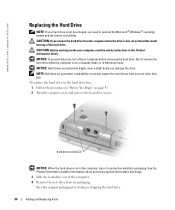
... metal housing of the computer. 4 Remove the new drive from sources other than Dell. Do not remove the hard drive while the computer is not in the computer, store it in the Product Information Guide. hard drive screws (2) NOTICE: When the hard drive is on, in standby ...You Begin" on page 87. 2 Turn the computer over, and remove the hard drive screws. See the Product Information Guide for hard drives from its packaging. NOTE: Dell does not guarantee compatibility or provide support for information about protecting against electrostatic discharge. 3 Slide the hard drive out of ...
... metal housing of the computer. 4 Remove the new drive from sources other than Dell. Do not remove the hard drive while the computer is not in the computer, store it in the Product Information Guide. hard drive screws (2) NOTICE: When the hard drive is on, in standby ...You Begin" on page 87. 2 Turn the computer over, and remove the hard drive screws. See the Product Information Guide for hard drives from its packaging. NOTE: Dell does not guarantee compatibility or provide support for information about protecting against electrostatic discharge. 3 Slide the hard drive out of ...
Owner's Manual
Page 96
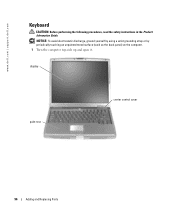
NOTICE: To avoid electrostatic discharge, ground yourself by using a wrist grounding strap or by periodically touching an unpainted metal surface (such as the back panel) on the computer. 1 Turn the computer top-side up and open it. www.dell.com | support.dell.com Keyboard CAUTION: Before performing the following procedures, read the safety instructions in the Product Information Guide. display palm rest center control cover 96 Adding and Replacing Parts
NOTICE: To avoid electrostatic discharge, ground yourself by using a wrist grounding strap or by periodically touching an unpainted metal surface (such as the back panel) on the computer. 1 Turn the computer top-side up and open it. www.dell.com | support.dell.com Keyboard CAUTION: Before performing the following procedures, read the safety instructions in the Product Information Guide. display palm rest center control cover 96 Adding and Replacing Parts
Owner's Manual
Page 98
...any installed PC Cards, batteries, and module bay devices. CAUTION: Before working inside your computer, read the safety instructions in the Product Information Guide. 1 Ensure that the keyboard tabs are completely in place to a docking device (docked), undock it. Continue to 20 seconds, and then ...palm rest. See the documentation that came with your docking device for instructions. 4 Disconnect the computer from the system board. www.dell.com | support.dell.com d Pull up on the back of the computer. Ground yourself by their edges, and avoid touching pins and contacts. NOTICE...
...any installed PC Cards, batteries, and module bay devices. CAUTION: Before working inside your computer, read the safety instructions in the Product Information Guide. 1 Ensure that the keyboard tabs are completely in place to a docking device (docked), undock it. Continue to 20 seconds, and then ...palm rest. See the documentation that came with your docking device for instructions. 4 Disconnect the computer from the system board. www.dell.com | support.dell.com d Pull up on the back of the computer. Ground yourself by their edges, and avoid touching pins and contacts. NOTICE...

Owner's Manual
Page 131
...CDs general information, 54 helpful tips, 55 how to copy a CD, 54 crashes, 76 D damaged computer testing, 78 Dell contacting, 112 support site, 11 Dell Diagnostics, 84 Dell Premier Support website, 9, 11 device latch release description, 18, 23 system view, 18, 23 device status lights, 14 description...latch description, 15 system view, 15 docking device latch description, 23 system view, 23 documentation help file, 9 online, 11 Setup Diagram, 9 System Information Guide, 9 drivers, 78 about, 78 identifying, 79 reinstalling, 79 drives fixing problems, 49, 74 See hard drive, 94 DVD, 54 using, 49 F ...
...CDs general information, 54 helpful tips, 55 how to copy a CD, 54 crashes, 76 D damaged computer testing, 78 Dell contacting, 112 support site, 11 Dell Diagnostics, 84 Dell Premier Support website, 9, 11 device latch release description, 18, 23 system view, 18, 23 device status lights, 14 description...latch description, 15 system view, 15 docking device latch description, 23 system view, 23 documentation help file, 9 online, 11 Setup Diagram, 9 System Information Guide, 9 drivers, 78 about, 78 identifying, 79 reinstalling, 79 drives fixing problems, 49, 74 See hard drive, 94 DVD, 54 using, 49 F ...


