Dell Inspiron N5110 Support Question
Dell Inspiron N5110 Support Question
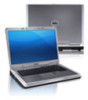
Find answers below for this question about Dell Inspiron N5110.Need a Dell Inspiron N5110 manual? We have 2 online manuals for this item!
Question posted by eerthrt on September 28th, 2014
Why Dell Replaced The Disable Battery Charging Key For Disable Touch Pad Key In
dell n5110
Current Answers
Related Dell Inspiron N5110 Manual Pages
Setup Guide - Page 5
... Your Inspiron Laptop 20 Right View Features 20 Left View Features 22 Back View Features 26
Front View Features 28 Status Lights and Indicators 30 Disabling Battery Charging 31 Computer Base and Keyboard Features 32 Touch Pad Gestures 36 Multimedia Control Keys 38 Using the Optical Drive 40 Display Features 42 Touch Screen Gestures (Optional 44 Removing and Replacing...
Setup Guide - Page 14
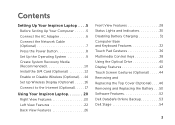
...access the Internet. Remove the battery (see "Removing and Replacing the Battery" on page 50). 3. Turn on your computer. 2. Turn off your computer. Replace the battery (see "Removing and Replacing the Battery" on page 50). 5. Installing a Subscriber Identity Module (SIM) card in your cellular service provider. Setting Up Your Inspiron Laptop
Install the SIM Card (Optional...
Setup Guide - Page 31

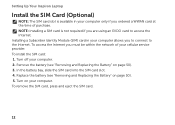
... Indicates the power states. For more information on
the battery status light, see "Enable or Disable Wireless" on when wireless is on page 30. Turns on page 30.
2
Hard drive activity light - A solid
white light indicates hard drive activity. NOTE: The battery is charging when the computer is enabled. Using Your Inspiron Laptop
1
Power indicator light -
Setup Guide - Page 32

Using Your Inspiron Laptop
Status Lights and Indicators
Battery Status Light
AC adapter Battery
Indicator light status solid white
off
solid amber off
Computer state(s)
on/standby/off/ hibernate
on/standby/off/ hibernate
on/standby
on/standby/off/ hibernate
Battery charge status charging
fully charged
low battery (
Setup Guide - Page 33
... turned on. 2. Under Power Options window, click Dell Battery Meter to disable the battery charging feature while on an airplane flight. Disabling Battery Charging
You may be disabled in the System Setup (BIOS) utility.
31
NOTE: Battery charging can also be required to open Battery Settings window. 5. Using Your Inspiron Laptop
Power Button Light/Power Indicator Light
Indicator...
Setup Guide - Page 35
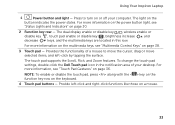
... display enable or disable key , wireless enable or
disable key , touch pad enable or disable key , brightness increase
and
decrease
keys, and the multimedia keys are located in the notification area of a mouse to turn on page 30.
2 Function key row - For more information, see
"Status Lights and Indicators" on or off your desktop. Using Your Inspiron Laptop
1
Power button and...
Setup Guide - Page 38
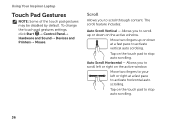
... horizontal auto scrolling. Allows you to stop auto scrolling.
36
Auto Scroll Horizontal - Using Your Inspiron Laptop
Touch Pad Gestures
NOTE: Some of the touch pad gestures may be disabled by default. Scroll
Allows you to stop auto scrolling. Tap on the touch pad to scroll through content. Move two fingers to your left or right on the active...
Setup Guide - Page 52
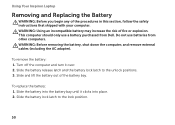
... should only use batteries from Dell.
Slide and lift the battery out of fire or explosion. Do not use a battery purchased from other computers. Slide the battery into the battery bay until it over. 2. WARNING: Using an incompatible battery may increase the risk of the battery bay. To remove the battery: 1. Using Your Inspiron Laptop
Removing and Replacing the Battery
WARNING: Before...
Setup Guide - Page 62

... it back on.
• If the problem persists, contact Dell (see "Contacting Dell" on your computer - The computer is in standby mode or the display may not be responding.
• Press a key on the keyboard, move the connected mouse or a finger on the touch pad, or press the power button to the same electrical outlet...
Setup Guide - Page 64
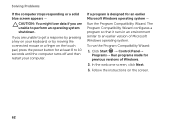
..., or by pressing a key on the screen.
62
Follow the instructions on your computer.
Click Start → Control Panel→ Programs→ Run programs made for an earlier Microsoft Windows operating system - If you are unable to get a response by moving the connected mouse or a finger on the touch pad, press the power...
Setup Guide - Page 94

...Touch Pad
X/Y position resolution (graphics table mode)
Size:
Height
240 cpi 56 mm (2.20 inches)
Width
100 mm (3.94 inches)
Battery
6-cell "smart" lithium ion:
Height
22.80 mm (0.90 inches)
Width
214 mm (8.43 inches)
92
Battery... VDC
Charge time 4 hours (when the (approximate) computer is turned off)
Operating time battery operating time varies depending on operating conditions
Coin-...
Service Manual - Page 3
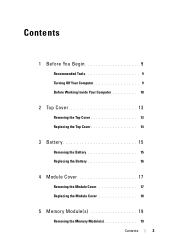
... Tools 9 Turning Off Your Computer 9 Before Working Inside Your Computer 10
2 Top Cover 13
Removing the Top Cover 13 Replacing the Top Cover 14
3 Battery 15
Removing the Battery 15 Replacing the Battery 16
4 Module Cover 17
Removing the Module Cover 17 Replacing the Module Cover 18
5 Memory Module(s 19
Removing the Memory Module(s 19
Contents
3
Service Manual - Page 16

3
2 1
1 battery release latch 3 battery lock latch
2 battery
Replacing the Battery
1 Follow the instructions in "Before You Begin" on page 9. 2 Slide the battery into the battery bay until it clicks into place. 3 Slide the battery lock latch to the lock position.
16
Battery
Service Manual - Page 18
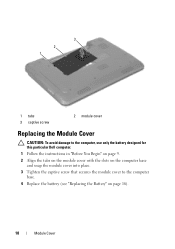
... this particular Dell computer. 1 Follow the instructions in "Before You Begin" on page 9. 2 Align the tabs on the module cover with the slots on the computer base and snap the module cover into place. 3 Tighten the captive screw that secures the module cover to the computer base. 4 Replace the battery (see "Replacing the Battery" on...
Service Manual - Page 21

...memory installed in damage to the computer. 6 Turn on the computer, replace all screws and ensure that no stray screws remain inside the computer. ...the system configuration information. Memory
21 2 1
1 tab 2 notch
4 Replace the module cover (see "Replacing the Module Cover" on page 18). 5 Replace the battery (see "Replacing the Battery" on page 16), or connect
the AC adapter to do so may ...
Service Manual - Page 24

..." on page 9. 2 Slide the optical-drive assembly into the optical-drive bay until it is fully
seated. 3 Replace the module cover (see "Replacing the Module Cover" on page 18). 4 Replace the battery (see "Replacing the Battery" on the computer, replace all screws and ensure that no stray screws remain inside the computer. CAUTION: Before turning on page...
Service Manual - Page 30

6 Replace the battery (see "Replacing the Battery" on page 16).
30
Keyboard
Service Manual - Page 34
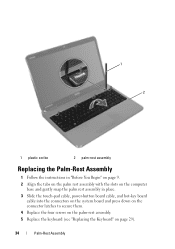
... rest assembly in place. 3 Slide the touch-pad cable, power-button board cable, and hot-key board
cable into the connectors on the system board and press down on the connector latches to secure them. 4 Replace the four screws on the palm-rest assembly. 5 Replace the keyboard (see "Replacing the Keyboard" on page 29).
34
Palm...
Service Manual - Page 40

Follow the instructions from a source other than Dell, you are installing a communication card from step 4 to step 8 in damage to do so may result in "Replacing the Palm-Rest Assembly" on page 34.
8 Replace the battery (see "Replacing the Battery" on the computer, replace all screws and ensure that no stray screws remain inside the computer. Failure to...
Service Manual - Page 44
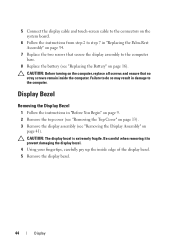
... Begin" on page 9. 2 Remove the top cover (see "Removing the Top Cover" on page 13). 3 Remove the display assembly (see "Replacing the Battery" on page 16). 5 Connect the display cable and touch-screen cable to the connectors on the system board.
6 Follow the instructions from step 2 to step 7 in damage to the computer.
Similar Questions


Dell Inspiron N5110 Disable Touch Pad When Mouse Is Plugged In
(Posted by bgzywinte 10 years ago)


Can't Disable Touch Pad
I have a new Dell Latitude E6320. The touch pad is very annoying when I'm typing. I pressed Fn + F5 ...
I have a new Dell Latitude E6320. The touch pad is very annoying when I'm typing. I pressed Fn + F5 ...
(Posted by Alexwei 11 years ago)