User Guide
Page 2
... Controls Using the Navigation System 2-1 Maps 2-6 Symbols 2-7 Navigation Menu 2-8 Destination 2-20 Colors on the Screen 2-38 Configure Menu 2-38 Global Positioning System (GPS 2-42 Vehicle Positioning 2-43 Problems with Route Guidance 2-44 If the System Needs Service 2-44 Ordering Map DVDs 2-44 Database Coverage 2-45 Navigation Audio System Playing the Radio 3-1 Finding a Station 3-2 Setting Preset Stations 3-3 Band Menu 3-3 Digital Signal Processing (DSP 3-5 XM™ Satellite Radio Service 3-6 Playing a CD 3-10 CD Messages 3-12 Playing a CD with the CD Changer...
... Controls Using the Navigation System 2-1 Maps 2-6 Symbols 2-7 Navigation Menu 2-8 Destination 2-20 Colors on the Screen 2-38 Configure Menu 2-38 Global Positioning System (GPS 2-42 Vehicle Positioning 2-43 Problems with Route Guidance 2-44 If the System Needs Service 2-44 Ordering Map DVDs 2-44 Database Coverage 2-45 Navigation Audio System Playing the Radio 3-1 Finding a Station 3-2 Setting Preset Stations 3-3 Band Menu 3-3 Digital Signal Processing (DSP 3-5 XM™ Satellite Radio Service 3-6 Playing a CD 3-10 CD Messages 3-12 Playing a CD with the CD Changer...
User Guide
Page 6
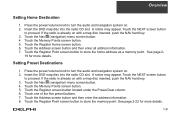
Touch the Manual Adjust screen button if you hear a beep or see the station displayed on the selected preset button. Press the power/volume knob to turn the audio and navigation system on . 2. Press the BAND hard key to further adjust the time. Setting the Time 1. Press the CONFIG hard key. 3. Touch the appropriate Time Zone screen button. 5. The radio will use the GPS satellite to turn the audio and navigation system on . 2. The vehicle needs to be in an open...
Touch the Manual Adjust screen button if you hear a beep or see the station displayed on the selected preset button. Press the power/volume knob to turn the audio and navigation system on . 2. Press the BAND hard key to further adjust the time. Setting the Time 1. Press the CONFIG hard key. 3. Touch the appropriate Time Zone screen button. 5. The radio will use the GPS satellite to turn the audio and navigation system on . 2. The vehicle needs to be in an open...
User Guide
Page 7
... the DVD map disc into the radio CD slot. 3. Touch the Change screen button. 6. Touch the appropriate Search Area numbered screen button that contains the final destination you wish to enter. Setting the Search Area 1. Touch the DEST screen button. 5. You will automatically be stopped to perform this operation. Touch the NEXT screen button to the Destination menu. Press the power/volume knob to turn the audio and navigation system on...
... the DVD map disc into the radio CD slot. 3. Touch the Change screen button. 6. Touch the appropriate Search Area numbered screen button that contains the final destination you wish to enter. Setting the Search Area 1. Touch the DEST screen button. 5. You will automatically be stopped to perform this operation. Touch the NEXT screen button to the Destination menu. Press the power/volume knob to turn the audio and navigation system on...
User Guide
Page 10
... preset buttons. 7. Press the power/volume knob to turn the audio and navigation system on . 2. A notice may appear. Touch the Memory Points screen button. 5. Touch the NEXT screen button to proceed. Touch the Nav (navigation) menu screen button. 4. Insert the DVD map disc into the radio CD slot. If the radio is already on with a map disc inserted, push the NAV hard key. 3. Touch the Address screen button and then enter all address information. 7. Setting Preset...
... preset buttons. 7. Press the power/volume knob to turn the audio and navigation system on . 2. A notice may appear. Touch the Memory Points screen button. 5. Touch the NEXT screen button to proceed. Touch the Nav (navigation) menu screen button. 4. Insert the DVD map disc into the radio CD slot. If the radio is already on with a map disc inserted, push the NAV hard key. 3. Touch the Address screen button and then enter all address information. 7. Setting Preset...
User Guide
Page 17
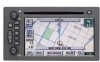
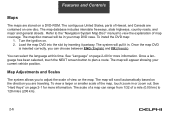
... in . The contiguous United States, parts of view on page 2-1 for more information. Once the map DVD is inserted correctly, you to 128 miles (206 km). 2-6 See "Hard Keys" on the map. Turn the ignition on a DVD-ROM. The scale of a map can select the language at this time. The system will appear showing your map DVD case. The map database...
... in . The contiguous United States, parts of view on page 2-1 for more information. Once the map DVD is inserted correctly, you to 128 miles (206 km). 2-6 See "Hard Keys" on the map. Turn the ignition on a DVD-ROM. The scale of a map can select the language at this time. The system will appear showing your map DVD case. The map database...

User Guide
Page 28
... the system following a tire change, rotation, or if your vehicle has been relocated a great distance. You may need to view the adjusted map color. The numbered settings vary the color scheme of the map display. The numbered settings vary the color scheme of the map display. Touch the Yes screen button to restore defaults, or the No screen button to view the adjusted map color. When the desired color setting has been selected, press...
... the system following a tire change, rotation, or if your vehicle has been relocated a great distance. You may need to view the adjusted map color. The numbered settings vary the color scheme of the map display. The numbered settings vary the color scheme of the map display. Touch the Yes screen button to restore defaults, or the No screen button to view the adjusted map color. When the desired color setting has been selected, press...
User Guide
Page 52
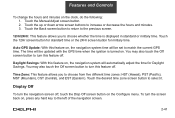
... screen button to turn this feature on, the navigation system time will be updated with the GPS time when the ignition is displayed in standard or military time. Display Off To turn the screen back on , the navigation system will be set to choose whether the time is turned on. The time will automatically adjust the time for military time. Features and Controls To change the hours and minutes on the Configure menu...
... screen button to turn this feature on, the navigation system time will be updated with the GPS time when the ignition is displayed in standard or military time. Display Off To turn the screen back on , the navigation system will be set to choose whether the time is turned on. The time will automatically adjust the time for military time. Features and Controls To change the hours and minutes on the Configure menu...
User Guide
Page 55
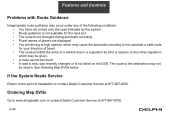
... not changed during automatic rerouting. • Plural names of places are displayed. • You are driving at high speeds, which may be given. • A route cannot be shown. Features and Controls Problems with Route Guidance Inappropriate route guidance may occur under any of the following conditions: • You have not turned onto the road indicated by time...
... not changed during automatic rerouting. • Plural names of places are displayed. • You are driving at high speeds, which may be given. • A route cannot be shown. Features and Controls Problems with Route Guidance Inappropriate route guidance may occur under any of the following conditions: • You have not turned onto the road indicated by time...
User Guide
Page 65
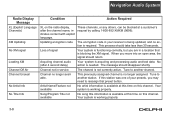
... this time on this channel. When you may need to reassign that is blocking the XM signal. Channel not in a location that preset button. Loss of your receiver is working properly. No action is working properly. 3-8 This previously assigned channel is no action is not currently active. If this station was one of signal Your system is functioning correctly, but you are in service The channel is...
... this time on this channel. When you may need to reassign that is blocking the XM signal. Channel not in a location that preset button. Loss of your receiver is working properly. No action is working properly. 3-8 This previously assigned channel is no action is not currently active. If this station was one of signal Your system is functioning correctly, but you are in service The channel is...
User Guide
Page 67
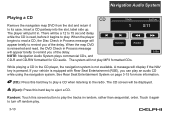
... read, the DVD Check in Process message will be displayed. (Eject): Press this screen button to remind you of the delay. See Rear Seat Entertainment System on page 3-15 for CD audio. Touch it begins to turn off random play the tracks in . When the player begins to read , before it again to play an audio CD while using the navigation system. The CD screen will pull...
... read, the DVD Check in Process message will be displayed. (Eject): Press this screen button to remind you of the delay. See Rear Seat Entertainment System on page 3-15 for CD audio. Touch it begins to turn off random play the tracks in . When the player begins to read , before it again to play an audio CD while using the navigation system. The CD screen will pull...
User Guide
Page 69
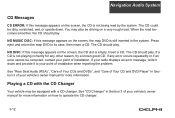
... eject and return the map DVD to your point of your vehicle's owner manual for any error occurs repeatedly or if an error cannot be dirty, scratched, wet, or upside down and provide it to its case, then insert a CD. NO DISC: If this message appears on how to operate the CD changer. 3-12 The CD should play . See "Rear Seat Audio...
... eject and return the map DVD to your point of your vehicle's owner manual for any error occurs repeatedly or if an error cannot be dirty, scratched, wet, or upside down and provide it to its case, then insert a CD. NO DISC: If this message appears on how to operate the CD changer. 3-12 The CD should play . See "Rear Seat Audio...
User Guide
Page 72
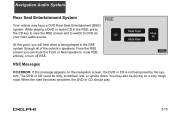
... CD ERROR: If this point, you can mute the Front or Rear speakers, mute RSE entirely, or turn off RSE. You may have a DVD Rear Seat Entertainment (RSE) system. From the RSE screen you will hear what is not being played in the RSE, press the CD key to view the RSE screen and to switch to DVD as your main audio source. While playing a DVD or audio CD in...
... CD ERROR: If this point, you can mute the Front or Rear speakers, mute RSE entirely, or turn off RSE. You may have a DVD Rear Seat Entertainment (RSE) system. From the RSE screen you will hear what is not being played in the RSE, press the CD key to view the RSE screen and to switch to DVD as your main audio source. While playing a DVD or audio CD in...
Installation Guide
Page 1
...: • Navigation Radio • GPS Antenna • Navigation DVD • Miscellaneous Installation Hardware • Owner's Manual BEFORE YOU BEGIN • Eject all responsibility for damages resulting from the factory radio. If you do, there may be radio and vehicle functions that will not work properly. TNR800 DISCLAIMER - WARNINGS Purchaser/Installer assumes all CD's from kits installed incorrectly or individuals not following these instructions correctly. READ ALL INSTRUCTIONS THROUGHLY BEFORE...
...: • Navigation Radio • GPS Antenna • Navigation DVD • Miscellaneous Installation Hardware • Owner's Manual BEFORE YOU BEGIN • Eject all responsibility for damages resulting from the factory radio. If you do, there may be radio and vehicle functions that will not work properly. TNR800 DISCLAIMER - WARNINGS Purchaser/Installer assumes all CD's from kits installed incorrectly or individuals not following these instructions correctly. READ ALL INSTRUCTIONS THROUGHLY BEFORE...
Installation Guide
Page 2
... listed on the cover of this manual, a VSS Jumper is included for holding screws Estimated Installation Time - 1 hour. Estimated Installation Time - 1.5 - 2 hours. Delphi Touch Screen Navigation Radio Installation Instructions For 2003-2006 Denali and Escalade EXT & ESV & AMP Conversion 3 - 10 Tools needed for the Installation: • Phillips Head Screwdriver • Flat Screwdriver or Prying Device • 7mm, 10mm, Extension and Drive • Pliers (needle nose and regular...
... listed on the cover of this manual, a VSS Jumper is included for holding screws Estimated Installation Time - 1 hour. Estimated Installation Time - 1.5 - 2 hours. Delphi Touch Screen Navigation Radio Installation Instructions For 2003-2006 Denali and Escalade EXT & ESV & AMP Conversion 3 - 10 Tools needed for the Installation: • Phillips Head Screwdriver • Flat Screwdriver or Prying Device • 7mm, 10mm, Extension and Drive • Pliers (needle nose and regular...

Installation Guide
Page 3
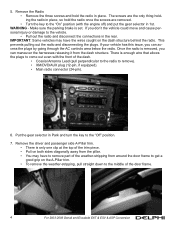
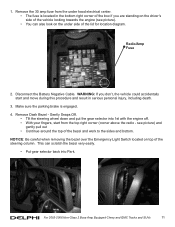
... when removing the bezel over the Emergency Light Switch located on top of the bezel and work to the sides and bottom. Disconnect the Battery Negative Cable. Gently Snaps Off. • Tilt the steering wheel down and put the gear selector into Park. This can also look on the driver's side... of the vehicle looking toward the engine (see picture) and gently pull out • Continue around the top of the steering column. Radio/Amp Fuse 2. WARNING: If you are standing on the under side of the lid for location diagram. see picture). •...
... when removing the bezel over the Emergency Light Switch located on top of the bezel and work to the sides and bottom. Disconnect the Battery Negative Cable. Gently Snaps Off. • Tilt the steering wheel down and put the gear selector into Park. This can also look on the driver's side... of the vehicle looking toward the engine (see picture) and gently pull out • Continue around the top of the steering column. Radio/Amp Fuse 2. WARNING: If you are standing on the under side of the lid for location diagram. see picture). •...
Installation Guide
Page 4
... vehicle. • Pull out the radio and disconnect the connections in the rear. Remove the Radio • Remove the three screws and hold the radio once the screws are removed. • Turn the key to the middle of the dash. • Coaxial Antenna Lead (pull perpendicular to the radio to remove). • XM/DVD/AUX plug (12-pin, if equipped). • Main radio connector (24-pin). 6. If you don't the...
... vehicle. • Pull out the radio and disconnect the connections in the rear. Remove the Radio • Remove the three screws and hold the radio once the screws are removed. • Turn the key to the middle of the dash. • Coaxial Antenna Lead (pull perpendicular to the radio to remove). • XM/DVD/AUX plug (12-pin, if equipped). • Main radio connector (24-pin). 6. If you don't the...
Installation Guide
Page 8
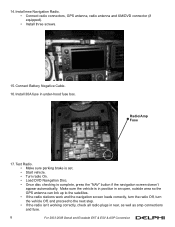
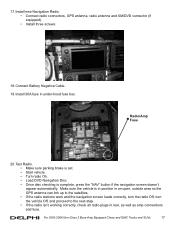
Connect Battery Negative Cable. 16. Test Radio. • Make sure parking brake is set. • Start vehicle. • Turn radio On. • Load DVD Navigation Disc. • Once disc checking is in position in an open, outside area so the GPS antenna can link up to the satellites. • If the radio stations work and the navigation screen loads correctly, turn the radio Off, turn the vehicle Off, and proceed to the next...
Connect Battery Negative Cable. 16. Test Radio. • Make sure parking brake is set. • Start vehicle. • Turn radio On. • Load DVD Navigation Disc. • Once disc checking is in position in an open, outside area so the GPS antenna can link up to the satellites. • If the radio stations work and the navigation screen loads correctly, turn the radio Off, turn the vehicle Off, and proceed to the next...
Installation Guide
Page 11
Remove Dash Bezel - NOTICE: Be careful when removing the bezel over the Emergency Light Switch located on top of the bezel and work to the sides and bottom. Remove the 30 amp fuse from the top right corner (corner above the radio - Radio/Amp Fuse 2. see picture). • You can scratch the bezel very easily. •...This can also look on the driver's side of the box if you don't, the vehicle could accidentally start from the under side of the lid for location diagram. Disconnect the Battery Negative Cable. For 2003-2006 Non-Class 2 Bose Amp Equipped Chevy and GMC Trucks and...
Remove Dash Bezel - NOTICE: Be careful when removing the bezel over the Emergency Light Switch located on top of the bezel and work to the sides and bottom. Remove the 30 amp fuse from the top right corner (corner above the radio - Radio/Amp Fuse 2. see picture). • You can scratch the bezel very easily. •...This can also look on the driver's side of the box if you don't, the vehicle could accidentally start from the under side of the lid for location diagram. Disconnect the Battery Negative Cable. For 2003-2006 Non-Class 2 Bose Amp Equipped Chevy and GMC Trucks and...
Installation Guide
Page 16
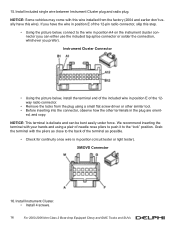
... the 12way radio connector. • Remove the locks from the factory (2004 and earlier don't usally have this step. • Using the picture below , install the terminal end of the included wire in position E of the terminal as close to the "lock" position. Grab the terminal with this wire installed from the plug using a plair of the 12-pin radio connector, skip this wire). If...
... the 12way radio connector. • Remove the locks from the factory (2004 and earlier don't usally have this step. • Using the picture below , install the terminal end of the included wire in position E of the terminal as close to the "lock" position. Grab the terminal with this wire installed from the plug using a plair of the 12-pin radio connector, skip this wire). If...
Installation Guide
Page 17
... Amp Equipped Chevy and GMC Trucks and SUVs 17 Connect Battery Negative Cable. 19. Test Radio. • Make sure parking brake is set. • Start vehicle. • Turn radio On. • Load DVD Navigation Disc. • Once disc checking is in position in an open, outside area so the GPS antenna can link up to the satellites. • If the radio stations work and the navigation screen loads correctly, turn the radio...
... Amp Equipped Chevy and GMC Trucks and SUVs 17 Connect Battery Negative Cable. 19. Test Radio. • Make sure parking brake is set. • Start vehicle. • Turn radio On. • Load DVD Navigation Disc. • Once disc checking is in position in an open, outside area so the GPS antenna can link up to the satellites. • If the radio stations work and the navigation screen loads correctly, turn the radio...


