User Guide
Page 2
... Guidance 1-10 Features and Controls Using the Navigation System 2-1 Maps 2-6 Symbols 2-7 Navigation Menu 2-8 Destination 2-20 Colors on the Screen 2-38 Configure Menu 2-38 Global Positioning System (GPS 2-42 Vehicle Positioning 2-43 Problems with Route Guidance 2-44 If the System Needs Service 2-44 Ordering Map DVDs 2-44 Database Coverage 2-45 Navigation Audio System Playing the Radio 3-1 Finding a Station...
... Guidance 1-10 Features and Controls Using the Navigation System 2-1 Maps 2-6 Symbols 2-7 Navigation Menu 2-8 Destination 2-20 Colors on the Screen 2-38 Configure Menu 2-38 Global Positioning System (GPS 2-42 Vehicle Positioning 2-43 Problems with Route Guidance 2-44 If the System Needs Service 2-44 Ordering Map DVDs 2-44 Database Coverage 2-45 Navigation Audio System Playing the Radio 3-1 Finding a Station...
User Guide
Page 5
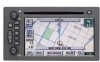
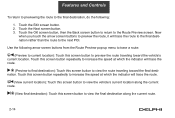
CAUTION: The information in the system may set the navigation system to your preference using various methods and choices. It is important to consider whether you may not always be complete. When getting started, you ...Reference the following : • Plan a route with provided turn-by the system for further information: 1-4 The navigation system allows you begin to operate the navigation system, read this manual thoroughly to become familiar with voice prompts. • Select a destination using various options. Road conditions and regulations such as prohibited turns, detours, and...
CAUTION: The information in the system may set the navigation system to your preference using various methods and choices. It is important to consider whether you may not always be complete. When getting started, you ...Reference the following : • Plan a route with provided turn-by the system for further information: 1-4 The navigation system allows you begin to operate the navigation system, read this manual thoroughly to become familiar with voice prompts. • Select a destination using various options. Road conditions and regulations such as prohibited turns, detours, and...
User Guide
Page 6
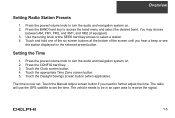
Press the power/volume knob to turn the audio and navigation system on. 2. Touch the Clock screen button. 4. The time is now set the time. Overview Setting Radio Station Presets 1. Setting the Time 1. Use the tuning knob or the SEEK hard key arrows to further adjust the time. Touch ...hear a beep or see the station displayed on . 2. Touch the appropriate Time Zone screen button. 5. The radio will use the GPS satellite to turn the audio and navigation system on the selected preset button. Press the BAND hard key to receive the signal. 1-5 The vehicle needs to be in ...
Press the power/volume knob to turn the audio and navigation system on. 2. Touch the Clock screen button. 4. The time is now set the time. Overview Setting Radio Station Presets 1. Setting the Time 1. Use the tuning knob or the SEEK hard key arrows to further adjust the time. Touch ...hear a beep or see the station displayed on . 2. Touch the appropriate Time Zone screen button. 5. The radio will use the GPS satellite to turn the audio and navigation system on the selected preset button. Press the BAND hard key to receive the signal. 1-5 The vehicle needs to be in ...
User Guide
Page 8
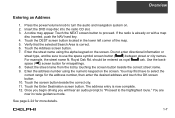
Touch the NEXT screen button to the highlighted route." Touch the DEST screen button located in route guidance mode. should be sure to use the space symbol screen button ( ) between street or city names. Select the street name from the list by touching the screen button beside the ... for more details. 1-7 Overview Entering an Address 1. A notice may first have to turn the audio and navigation system on the screen. Touch the screen button beside the correct city. 11. Insert the DVD map disc into the radio CD slot. 3. If the radio is already on the screen. You are now...
Touch the NEXT screen button to the highlighted route." Touch the DEST screen button located in route guidance mode. should be sure to use the space symbol screen button ( ) between street or city names. Select the street name from the list by touching the screen button beside the ... for more details. 1-7 Overview Entering an Address 1. A notice may first have to turn the audio and navigation system on the screen. Touch the screen button beside the correct city. 11. Insert the DVD map disc into the radio CD slot. 3. If the radio is already on the screen. You are now...
User Guide
Page 9
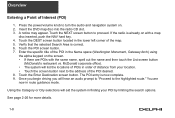
..., Gateway Arch) using the alpha keypad on the screen. • If there are now in route guidance mode. A notice may appear. Verify that the selected Search Area is now complete. 9. Touch the Enter Destination screen button. Touch the NEXT screen button to turn the audio and navigation system on with the ... of the map. 5. See page 2-26 for more details. 1-8 Once you begin driving you will aid the system in order of distance from your POI by limiting the search options. Insert the DVD map disc into the radio CD slot. 3. Touch the POI screen button. 7. You are POIs with a map...
..., Gateway Arch) using the alpha keypad on the screen. • If there are now in route guidance mode. A notice may appear. Verify that the selected Search Area is now complete. 9. Touch the Enter Destination screen button. Touch the NEXT screen button to turn the audio and navigation system on with the ... of the map. 5. See page 2-26 for more details. 1-8 Once you begin driving you will aid the system in order of distance from your POI by limiting the search options. Insert the DVD map disc into the radio CD slot. 3. Touch the POI screen button. 7. You are POIs with a map...
User Guide
Page 11
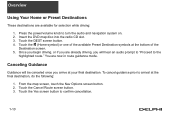
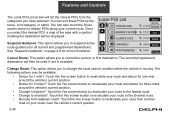
... the Yes screen button to turn the audio and navigation system on. 2. Once you begin driving, or if you arrive at your final destination. To cancel guidance prior to the highlighted route." Insert the DVD map disc into the radio CD slot. 3. Overview Using Your Home or Preset Destinations These destinations are available...
... the Yes screen button to turn the audio and navigation system on. 2. Once you begin driving, or if you arrive at your final destination. To cancel guidance prior to the highlighted route." Insert the DVD map disc into the radio CD slot. 3. Overview Using Your Home or Preset Destinations These destinations are available...
User Guide
Page 12
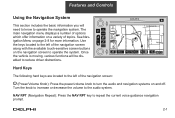
... offer information on the navigation screen to operate the system. Once the vehicle is moving, various functions will need to know to reduce driver distractions. Use the keys located to turn the audio and navigation systems on page 2-8 for more information. NAV RPT (Navigation Repeat): Press the NAV... RPT key to the audio system. Turn the knob to increase or decrease the volume ...
... offer information on the navigation screen to operate the system. Once the vehicle is moving, various functions will need to know to reduce driver distractions. Use the keys located to turn the audio and navigation systems on page 2-8 for more information. NAV RPT (Navigation Repeat): Press the NAV... RPT key to the audio system. Turn the knob to increase or decrease the volume ...

User Guide
Page 19
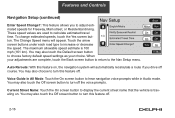
...Guidance screen button to choose from the following items on the main navigation menu: Suspend Guidance Selecting the Suspend Guidance screen button from a list of the map screen to make system adjustments and plan routes. You will be viewed by pressing the ...navigation menu allows you to choose from the Nav Menu allows you can still be able to resume the current route. 2-8 Features and Controls Navigation Menu Nav (Navigation Menu): Touch the navigation menu symbol screen button at the bottom of options and to use the available touch screen buttons to access the main navigation...
...Guidance screen button to choose from the following items on the main navigation menu: Suspend Guidance Selecting the Suspend Guidance screen button from a list of the map screen to make system adjustments and plan routes. You will be viewed by pressing the ...navigation menu allows you to choose from the Nav Menu allows you can still be able to resume the current route. 2-8 Features and Controls Navigation Menu Nav (Navigation Menu): Touch the navigation menu symbol screen button at the bottom of options and to use the available touch screen buttons to access the main navigation...

User Guide
Page 23
Destination: This feature allows you to add, modify, or delete road preference settings. Route Overview: Touch this screen button to use or avoid. Features and Controls Edit Route Selecting the Edit Route screen button allows you to recalculate a route based on page 2-20. 2-12 See "Route ...
Destination: This feature allows you to add, modify, or delete road preference settings. Route Overview: Touch this screen button to use or avoid. Features and Controls Edit Route Selecting the Edit Route screen button allows you to recalculate a route based on page 2-20. 2-12 See "Route ...
User Guide
Page 25
... the route to view the route traveling toward the vehicle's current location. Touch this screen button to the next POI. Touch the Next screen button. 3. Use the following : 1. Touch this screen button repeatedly to increase the speed at which the indicator will trace the route. (View current location): Touch this screen...
... the route to view the route traveling toward the vehicle's current location. Touch this screen button to the next POI. Touch the Next screen button. 3. Use the following : 1. Touch this screen button repeatedly to increase the speed at which the indicator will trace the route. (View current location): Touch this screen...
User Guide
Page 27
... . Touch the arrow screen buttons under each road type to the Nav Setup menu. When your adjustments are used to choose factory default speed settings as your choice. Features and Controls Navigation Setup (continued) Enter Speed Change?: This feature allows you drive off course. Auto Reroute: With this feature ... or decrease the speed. To change estimated speeds, touch the Yes screen button. The maximum allowable speed estimate is traveling on , the navigation system will appear. You may also touch the Default screen button to calculate estimated travel time.
... . Touch the arrow screen buttons under each road type to the Nav Setup menu. When your adjustments are used to choose factory default speed settings as your choice. Features and Controls Navigation Setup (continued) Enter Speed Change?: This feature allows you drive off course. Auto Reroute: With this feature ... or decrease the speed. To change estimated speeds, touch the Yes screen button. The maximum allowable speed estimate is traveling on , the navigation system will appear. You may also touch the Default screen button to calculate estimated travel time.
User Guide
Page 32
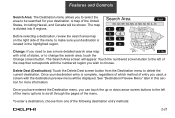
... search area map on the right side of the menu to make sure your destination entry is complete, regardless of which method of entry you used, a screen with a list of states, or to change the search area, touch the Change screen button. Touch the numbered screen button to the left of...
... search area map on the right side of the menu to make sure your destination entry is complete, regardless of which method of entry you used, a screen with a list of states, or to change the search area, touch the Change screen button. Touch the numbered screen button to the left of...
User Guide
Page 35
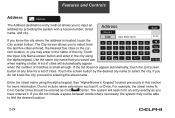
... the desired city name to select the city. Touch the Input City Name screen button and enter in the city using the alpha keypad. Touch the screen button by providing the system with a house number, street name, and city. Civic Center Drive should be able to entering the street name. If the... you do not know the city where the address is small enough. or Drive. The system will automatically appear when the number of cities. See "Alpha-Numeric Keypad" located previously in the name of the city. Use the same city name that you may not be entered as you did not include...
... the desired city name to select the city. Touch the Input City Name screen button and enter in the city using the alpha keypad. Touch the screen button by providing the system with a house number, street name, and city. Civic Center Drive should be able to entering the street name. If the... you do not know the city where the address is small enough. or Drive. The system will automatically appear when the number of cities. See "Alpha-Numeric Keypad" located previously in the name of the city. Use the same city name that you may not be entered as you did not include...
User Guide
Page 36
...street name has been selected, enter the house number using the numeric keypad. When you have finished entering the house number, touch the OK screen button. If the address number exists on more than one street that is entered, the system will automatically search for available names, and the ...field will contain the number of items in the city name for the address, a list of matching street names will become available. The system will list the house number range that shares the same name, a list of cities that contain the address will be displayed. If you have ...
...street name has been selected, enter the house number using the numeric keypad. When you have finished entering the house number, touch the OK screen button. If the address number exists on more than one street that is entered, the system will automatically search for available names, and the ...field will contain the number of items in the city name for the address, a list of matching street names will become available. The system will list the house number range that shares the same name, a list of cities that contain the address will be displayed. If you have ...
User Guide
Page 37
...button from the POI list. While inputting a POI or city name, the List screen button will contain the number of items in a name, the system will supply. If the list of available POIs for the category selected is still too long, you may search for the POI. • Touch the... the Destination menu brings up the POI entry menu. You may need to further reduce the list of available items. • Select a POI by name using a combination of the Name entry field will become available. Select the desired POI. The POIs in a POI by choosing the Category option. Select ...
...button from the POI list. While inputting a POI or city name, the List screen button will contain the number of items in a name, the system will supply. If the list of available POIs for the category selected is still too long, you may search for the POI. • Touch the... the Destination menu brings up the POI entry menu. You may need to further reduce the list of available items. • Select a POI by name using a combination of the Name entry field will become available. Select the desired POI. The POIs in a POI by choosing the Category option. Select ...
User Guide
Page 38
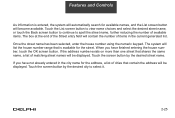
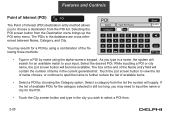
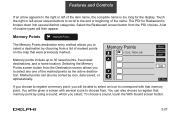
... able to select an icon to correspond with several distinct categories. Memory Points The Memory Points destination entry method allows you to select a destination by using a sound, which you select. If you choose to register a memory point, you to select any one of the marked points as the active destination. You...
... able to select an icon to correspond with several distinct categories. Memory Points The Memory Points destination entry method allows you to select a destination by using a sound, which you select. If you choose to register a memory point, you to select any one of the marked points as the active destination. You...
User Guide
Page 41
... numbers for an entry exactly as you did not include a space between words where necessary, the system may not be entered to . To enter a destination using this method, enter the name of interest (POI) destination by inputting the intersecting roads you wish to... travel to locate a destination. The destination location will search for POIs included in the DVD database can be able to find the desired location. 2-30 For example, the street name N. The system...
... numbers for an entry exactly as you did not include a space between words where necessary, the system may not be entered to . To enter a destination using this method, enter the name of interest (POI) destination by inputting the intersecting roads you wish to... travel to locate a destination. The destination location will search for POIs included in the DVD database can be able to find the desired location. 2-30 For example, the street name N. The system...
User Guide
Page 42
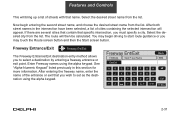
... specific intersection, you must specify a city. Freeway Entrance/Exit The Freeway Entrance/Exit destination entry method allows you wish to set as the destination using the alpha keypad. After entering the freeway name, enter the name of the entrance or exit that you to start route guidance or you may... the list. Select the desired city from the list. You may touch the Route screen button and then the Start screen button. Enter Freeway names using the alpha keypad. 2-31
... specific intersection, you must specify a city. Freeway Entrance/Exit The Freeway Entrance/Exit destination entry method allows you wish to set as the destination using the alpha keypad. After entering the freeway name, enter the name of the entrance or exit that you to start route guidance or you may... the list. Select the desired city from the list. You may touch the Route screen button and then the Start screen button. Enter Freeway names using the alpha keypad. 2-31
User Guide
Page 47
... screen button to recalculate your route from the categories you select the desired POI, a map of the area with a symbol marking the destination will be used if one mile around the vehicle's current position. • Change to fastest?: Touch the Yes screen button to recalculate your route to the fastest route...
... screen button to recalculate your route from the categories you select the desired POI, a map of the area with a symbol marking the destination will be used if one mile around the vehicle's current position. • Change to fastest?: Touch the Yes screen button to recalculate your route to the fastest route...
User Guide
Page 49
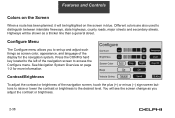
... been planned, it will be shown as a thicker line than a general street. See Navigation System Overview on the screen in blue. Contrast/Brightness To adjust the contrast or brightness of the navigation screen to the desired level. Configure Menu The Configure menu allows you... to distinguish between interstate freeways, state highways, county roads, major streets and secondary streets. Different colors are also used to set up and adjust such things as you adjust the contrast or brightness. 2-38 Highways will be highlighted on page 1-2 for the navigation system.
... been planned, it will be shown as a thicker line than a general street. See Navigation System Overview on the screen in blue. Contrast/Brightness To adjust the contrast or brightness of the navigation screen to the desired level. Configure Menu The Configure menu allows you... to distinguish between interstate freeways, state highways, county roads, major streets and secondary streets. Different colors are also used to set up and adjust such things as you adjust the contrast or brightness. 2-38 Highways will be highlighted on page 1-2 for the navigation system.