User Guide
Page 17
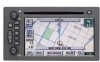
...DVD-ROM. To view a larger or smaller scale of Hawaii, and Canada are contained on one disc. The map will be in your current vehicle position. See "Hard Keys" on page 2-40 for more information. The map disc manual will appear showing your map DVD case. Load the map DVD... 2-1 for more information. To install the DVD map: 1. The system will scroll automatically based on the map. Features and Controls Maps The maps are stored on . 2. The contiguous United States, parts of the map, touch zoom in . Refer to the "Navigation System Map Disc" manual to view the explanation ...
...DVD-ROM. To view a larger or smaller scale of Hawaii, and Canada are contained on one disc. The map will be in your current vehicle position. See "Hard Keys" on page 2-40 for more information. The map disc manual will appear showing your map DVD case. Load the map DVD... 2-1 for more information. To install the DVD map: 1. The system will scroll automatically based on the map. Features and Controls Maps The maps are stored on . 2. The contiguous United States, parts of the map, touch zoom in . Refer to the "Navigation System Map Disc" manual to view the explanation ...
User Guide
Page 40
... touch the Route screen button and then the Start screen button. Once you zoom out as much as possible and scroll around the map, some parts of the map will then be missing because they are not readable in larger scales. Features and Controls Map The Map destination entry method displays...
... touch the Route screen button and then the Start screen button. Once you zoom out as much as possible and scroll around the map, some parts of the map will then be missing because they are not readable in larger scales. Features and Controls Map The Map destination entry method displays...
Installation Guide
Page 4
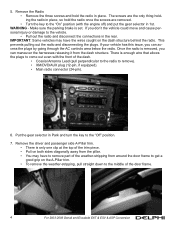
...at the top of the trim piece. • Pull on both sides diagonally away from the pillar. • You may have to remove). • XM/DVD/AUX plug (12-pin, if equipped). • Main radio connector (24-pin). 6. 5. Put the gear selector in the rear. This prevents pulling out the... remove the weather-stripping, pull straight down to the middle of the dash. • Coaxial Antenna Lead (pull perpendicular to the radio to remove part of the weather-stripping from the dash structure. Remove the driver and passenger side A-Pillar trim. • There is enough wire that allows the plugs...
...at the top of the trim piece. • Pull on both sides diagonally away from the pillar. • You may have to remove). • XM/DVD/AUX plug (12-pin, if equipped). • Main radio connector (24-pin). 6. 5. Put the gear selector in the rear. This prevents pulling out the... remove the weather-stripping, pull straight down to the middle of the dash. • Coaxial Antenna Lead (pull perpendicular to the radio to remove part of the weather-stripping from the dash structure. Remove the driver and passenger side A-Pillar trim. • There is enough wire that allows the plugs...

Installation Guide
Page 5
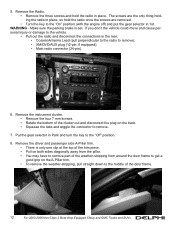
... want to wrap the tool in cloth to prevent damage to remove the handle. Remove the fuse box trim from the dash to the dash parts. 10.
... want to wrap the tool in cloth to prevent damage to remove the handle. Remove the fuse box trim from the dash to the dash parts. 10.
Installation Guide
Page 12
... injury or damage to the vehicle. • Pull out the radio and disconnect the connections in Park and turn the key to remove). • XM/DVD/AUX plug (12-pin, if equipped). • Main radio connector (24-pin). 6. Remove the instrument cluster. • Remove the four 7 mm screws. • Retate the... one clip at the top of the trim piece. • Pull on both sides diagonally away from the pillar. • You may have to remove part of the weather-stripping from around the door frame to get a good grip on the back. • Squeeze the tabs and wiggle the connector to...
... injury or damage to the vehicle. • Pull out the radio and disconnect the connections in Park and turn the key to remove). • XM/DVD/AUX plug (12-pin, if equipped). • Main radio connector (24-pin). 6. Remove the instrument cluster. • Remove the four 7 mm screws. • Retate the... one clip at the top of the trim piece. • Pull on both sides diagonally away from the pillar. • You may have to remove part of the weather-stripping from around the door frame to get a good grip on the back. • Squeeze the tabs and wiggle the connector to...
Installation Guide
Page 13
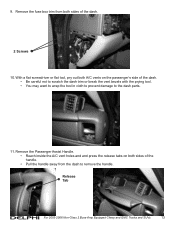
... want to wrap the tool in cloth to prevent damage to remove the handle. 9. Remove the fuse box trim from the dash to the dash parts. 11.
... want to wrap the tool in cloth to prevent damage to remove the handle. 9. Remove the fuse box trim from the dash to the dash parts. 11.