User Guide
Page 2
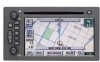
... 1-10 Features and Controls Using the Navigation System 2-1 Maps 2-6 Symbols 2-7 Navigation Menu 2-8 Destination 2-20 Colors on the Screen 2-38 Configure Menu 2-38 Global Positioning System (GPS 2-42 Vehicle Positioning 2-43 Problems with Route Guidance 2-44 If the System Needs Service 2-44 Ordering Map DVDs 2-44 Database Coverage 2-45 Navigation Audio System Playing the Radio 3-1 Finding a Station 3-2 Setting...
... 1-10 Features and Controls Using the Navigation System 2-1 Maps 2-6 Symbols 2-7 Navigation Menu 2-8 Destination 2-20 Colors on the Screen 2-38 Configure Menu 2-38 Global Positioning System (GPS 2-42 Vehicle Positioning 2-43 Problems with Route Guidance 2-44 If the System Needs Service 2-44 Ordering Map DVDs 2-44 Database Coverage 2-45 Navigation Audio System Playing the Radio 3-1 Finding a Station 3-2 Setting...
User Guide
Page 6
Setting the Time 1. Press the power/volume knob to turn the audio and navigation system on . 2. Press the CONFIG hard key. 3. Touch the appropriate Time Zone screen button. 5. The time is now set the time. ...hold one of the six screen buttons at the bottom of the screen until you need to set . The radio will use the GPS satellite to further adjust the time. Touch the Manual Adjust screen button if you hear a beep or see the station displayed on...hard key to receive the signal. 1-5 Use the tuning knob or the SEEK hard key arrows to turn the audio and navigation system on . 2.
Setting the Time 1. Press the power/volume knob to turn the audio and navigation system on . 2. Press the CONFIG hard key. 3. Touch the appropriate Time Zone screen button. 5. The time is now set the time. ...hold one of the six screen buttons at the bottom of the screen until you need to set . The radio will use the GPS satellite to further adjust the time. Touch the Manual Adjust screen button if you hear a beep or see the station displayed on...hard key to receive the signal. 1-5 Use the tuning knob or the SEEK hard key arrows to turn the audio and navigation system on . 2.
User Guide
Page 52
... To change the hours and minutes on , the navigation system time will automatically adjust the time for military time. Touch the Manual Adjust screen button. 2. Display Off To turn the screen back on the Configure menu. To turn the navigation screen off . Touch the Back screen button to .... 2-41 You may also touch the Off screen button to choose whether the time is turned on , the navigation system will be updated with the GPS time when the ignition is displayed in standard or military time. Time Zone: This feature allows you to turn this feature off. The ...
... To change the hours and minutes on , the navigation system time will automatically adjust the time for military time. Touch the Manual Adjust screen button. 2. Display Off To turn the screen back on the Configure menu. To turn the navigation screen off . Touch the Back screen button to .... 2-41 You may also touch the Off screen button to choose whether the time is turned on , the navigation system will be updated with the GPS time when the ignition is displayed in standard or military time. Time Zone: This feature allows you to turn this feature off. The ...
User Guide
Page 53
...metallic objects will interfere with the system's ability to receive GPS signals and may occur if any of the following are true: • Signals are obstructed by the United States Department of Defense GPS satellites. The Global Positioning System (GPS) locates the current position of ... windshield or place metallic objects on the vehicle's dashboard. While your vehicle is when GPS will not appear on the map screen. Features and Controls Global Positioning System (GPS) The navigation system determines the position of your vehicle by using signals sent by tall buildings, large trucks...
...metallic objects will interfere with the system's ability to receive GPS signals and may occur if any of the following are true: • Signals are obstructed by the United States Department of Defense GPS satellites. The Global Positioning System (GPS) locates the current position of ... windshield or place metallic objects on the vehicle's dashboard. While your vehicle is when GPS will not appear on the map screen. Features and Controls Global Positioning System (GPS) The navigation system determines the position of your vehicle by using signals sent by tall buildings, large trucks...
User Guide
Page 74
Navigation Audio System Index N A Audio System 3-1 C Colors on the Screen 2-38 D Database Coverage Explanations ........2-45 Destination 2-20 DVD Rear Seat Entertainment System ......3-15 G Navigation 1-2, 1-4 Menu 2-8 Using the System 2-1 O Ordering Map DVDs 2-44 P Problems with Route Guidance 2-44 R Radio 3-1 Rear Seat Entertainment System .........3-15 Getting Started, Navigation 1-4 S Global Positioning System (GPS) ........2-42 Symbols 2-7 M System Overview, Navigation System 1-2 Maps 2-6 System Needs Service, If 2-44 Menu Navigation 2-8 V Vehicle Positioning...
Navigation Audio System Index N A Audio System 3-1 C Colors on the Screen 2-38 D Database Coverage Explanations ........2-45 Destination 2-20 DVD Rear Seat Entertainment System ......3-15 G Navigation 1-2, 1-4 Menu 2-8 Using the System 2-1 O Ordering Map DVDs 2-44 P Problems with Route Guidance 2-44 R Radio 3-1 Rear Seat Entertainment System .........3-15 Getting Started, Navigation 1-4 S Global Positioning System (GPS) ........2-42 Symbols 2-7 M System Overview, Navigation System 1-2 Maps 2-6 System Needs Service, If 2-44 Menu Navigation 2-8 V Vehicle Positioning...
Installation Guide
Page 1
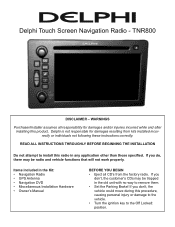
... BEFORE BEGINNING THE INSTALLATION Do not attempt to the Off Locked: position. Delphi Touch Screen Navigation Radio - If you don't, the customer's CDs may be trapped in the Kit: • Navigation Radio • GPS Antenna • Navigation DVD • Miscellaneous Installation Hardware • Owner's Manual BEFORE YOU BEGIN &#... will not work properly. Items included in the old unit with no way to remove them. • Set the Parking Brake! TNR800 DISCLAIMER - If you don't, the vehicle could move during this procedure, causing personal injury or damage to the vehicle. • ...
... BEFORE BEGINNING THE INSTALLATION Do not attempt to the Off Locked: position. Delphi Touch Screen Navigation Radio - If you don't, the customer's CDs may be trapped in the Kit: • Navigation Radio • GPS Antenna • Navigation DVD • Miscellaneous Installation Hardware • Owner's Manual BEFORE YOU BEGIN &#... will not work properly. Items included in the old unit with no way to remove them. • Set the Parking Brake! TNR800 DISCLAIMER - If you don't, the vehicle could move during this procedure, causing personal injury or damage to the vehicle. • ...
Installation Guide
Page 7
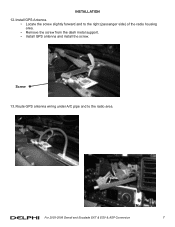
Route GPS antenna wiring under A/C pipe and to the right (passenger side) of the radio housing area. • Remove the screw from the dash metal support. • Install GPS antenna and install the screw. Install GPS Antenna. • Locate the screw slightly forward and to the radio area. Screw 13. For 2003-2006 Denali and Escalade EXT & ESV & ASP Conversion 7 INSTALLATION 12.
Route GPS antenna wiring under A/C pipe and to the right (passenger side) of the radio housing area. • Remove the screw from the dash metal support. • Install GPS antenna and install the screw. Install GPS Antenna. • Locate the screw slightly forward and to the radio area. Screw 13. For 2003-2006 Denali and Escalade EXT & ESV & ASP Conversion 7 INSTALLATION 12.
Installation Guide
Page 8
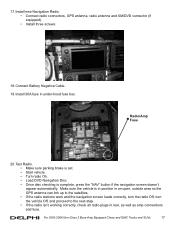
Install new Navigation Radio. • Connect radio connectors, GPS antenna, radio antenna and XM/DVD connector (if equipped). • Install three screws. 15. Install 30A fuse in rear, as well as amp connections and fuse. 8 For 2003-2006 Denali and .... 16. 14. Test Radio. • Make sure parking brake is set. • Start vehicle. • Turn radio On. • Load DVD Navigation Disc. • Once disc checking is in position in an open, outside area so the GPS antenna can link up to the satellites. • If the radio stations work and the...
Install new Navigation Radio. • Connect radio connectors, GPS antenna, radio antenna and XM/DVD connector (if equipped). • Install three screws. 15. Install 30A fuse in rear, as well as amp connections and fuse. 8 For 2003-2006 Denali and .... 16. 14. Test Radio. • Make sure parking brake is set. • Start vehicle. • Turn radio On. • Load DVD Navigation Disc. • Once disc checking is in position in an open, outside area so the GPS antenna can link up to the satellites. • If the radio stations work and the...

Installation Guide
Page 15
Screw 14. Route GPS antenna wiring under A/C pipe and to the right (passenger side) of the radio housing area. • Remove the screw from the dash metal support. • Install GPS antenna and install the screw. INSTALLATION 13. Install GPS Antenna. • Locate the screw slightly forward and to the radio area. For 2003-2006 Non-Class 2 Bose Amp Equipped Chevy and GMC Trucks and SUVs 15
Screw 14. Route GPS antenna wiring under A/C pipe and to the right (passenger side) of the radio housing area. • Remove the screw from the dash metal support. • Install GPS antenna and install the screw. INSTALLATION 13. Install GPS Antenna. • Locate the screw slightly forward and to the radio area. For 2003-2006 Non-Class 2 Bose Amp Equipped Chevy and GMC Trucks and SUVs 15
Installation Guide
Page 17
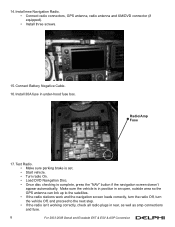
... 17 Test Radio. • Make sure parking brake is set. • Start vehicle. • Turn radio On. • Load DVD Navigation Disc. • Once disc checking is in position in an open, outside area so the GPS antenna can link up to the satellites. • If the radio stations work and the... step. • If the radio isn't working correctly, check all radio plugs in under-hood fuse box. Connect Battery Negative Cable. 19. Install new Navigation Radio. • Connect radio connectors, GPS antenna, radio antenna and XM/DVD connector (if equipped). • Install three screws. 18.
... 17 Test Radio. • Make sure parking brake is set. • Start vehicle. • Turn radio On. • Load DVD Navigation Disc. • Once disc checking is in position in an open, outside area so the GPS antenna can link up to the satellites. • If the radio stations work and the... step. • If the radio isn't working correctly, check all radio plugs in under-hood fuse box. Connect Battery Negative Cable. 19. Install new Navigation Radio. • Connect radio connectors, GPS antenna, radio antenna and XM/DVD connector (if equipped). • Install three screws. 18.